How To Set Up Dual Monitors Easily Windows 11/10: Complete Guide
Working with one screen can feel limiting. You switch between apps constantly. Your workflow slows down. A dual monitor setup changes everything. It gives you more space to work. You can see multiple things at once.
This guide shows you how to set up dual monitors easily on Windows systems support.
Windows 11 and Windows 10 make dual monitors simple. The process takes just a few minutes. You don’t need technical skills. This article covers everything you need. You’ll learn the reasons, methods, and solutions to problems. By the end, you’ll have a smooth dual monitor experience.
Part 1: Reasons to Set Up Multiple Monitors in Windows
Adding a second screen brings many benefits. Here’s why you should set up multiple monitors in Windows today.
- Boost Your Productivity: You can work on two tasks at once. Write a document while checking emails. Research on one screen while taking notes on another. Your work gets done faster.
- Better Multitasking: Switch between apps without clicking. Keep your main work on one screen. Use the second for reference materials. No more constant tab switching.
- Improved Gaming Experience: Extend your game view across screens. Use one screen for the game. Keep guides or chat on the other. Your gaming becomes more immersive.
- Professional Video Editing: View your timeline on one screen. Preview your video on the other. This setup is standard in creative work. Editors need this extra space.
- Enhanced Data Analysis: Compare spreadsheets side by side. View charts while working on data. Financial analysts love this setup. It makes number crunching easier.
- Better Online Learning: Follow your class on one screen. Take notes on the other. Students find this setup helpful. Learning becomes more organized.
- Streamlined Coding: Write code on your main screen. View the documentation on the second. Debug on one while testing on another. Developers work much faster this way.
- Efficient Communication: Keep email or chat open on one screen. Do your actual work on the other. You never miss important messages. Your team stays connected.
Part 2: Top Ways to Set Up Multiple Monitors in Windows 11/10
There are several methods to configure your screens. Each one is simple and effective. Choose the method that works best for you. This section covers the easiest approaches.
Method 1: Using Windows Display Settings
Windows Display Settings is the most common method. It gives you full control over your screens. Most users prefer this approach. It works on both Windows 11 and Windows 10.
This method lets you arrange your monitors. You can choose how they work together. The interface is user-friendly. Even beginners can set up dual monitors easily. Windows provides these tools built in.
Precautions to Take
- Check Cable Connections: Make sure both monitors connect firmly. Loose cables cause display problems. Use the right cable for each monitor.
- Update Graphics Drivers: Old drivers create issues. Download the latest drivers first. Visit your graphics card manufacturer’s website.
- Verify Monitor Compatibility: Check if your monitors support your desired resolution. Mixing very different monitors can look odd. Try to match sizes when possible.
Steps
Step 1. Right-click on your desktop and select Display settings. Scroll to the top of the Display settings window to confirm both monitors are detected and numbered (e.g., 1 and 2).

Step 2. Under Multiple displays, choose how you want the screens to behave:
- Extend: Use both monitors as one large workspace.
- Duplicate: Show the same content on both screens.
Drag and arrange the monitor icons to match their physical layout on your desk. Click Apply to save your setup.
Method 2: Using the Graphics Control Panel
Graphics card software offers advanced options. NVIDIA and AMD have their own panels. These tools provide extra features. They give you more control over display settings.
This method works well for gamers and designers. You get options not available in Windows settings. The control panel lets you fine-tune everything. It’s perfect for users who want precise control.
Precautions to Take
- Install Correct Software: Download software matching your graphics card. NVIDIA users need GeForce Experience. AMD users need Radeon Software.
- Don’t Change Unknown Settings: Stick to display options you understand. Wrong settings can cause screen problems. You might need to reset everything.
- Save Your Configuration: Create a profile before making changes. This lets you restore settings if needed. It’s a safety backup.
Steps
Step 1. Right-click your desktop and open your graphics control panel. For NVIDIA, choose “NVIDIA Control Panel.” For AMD, select “AMD Radeon Software.”
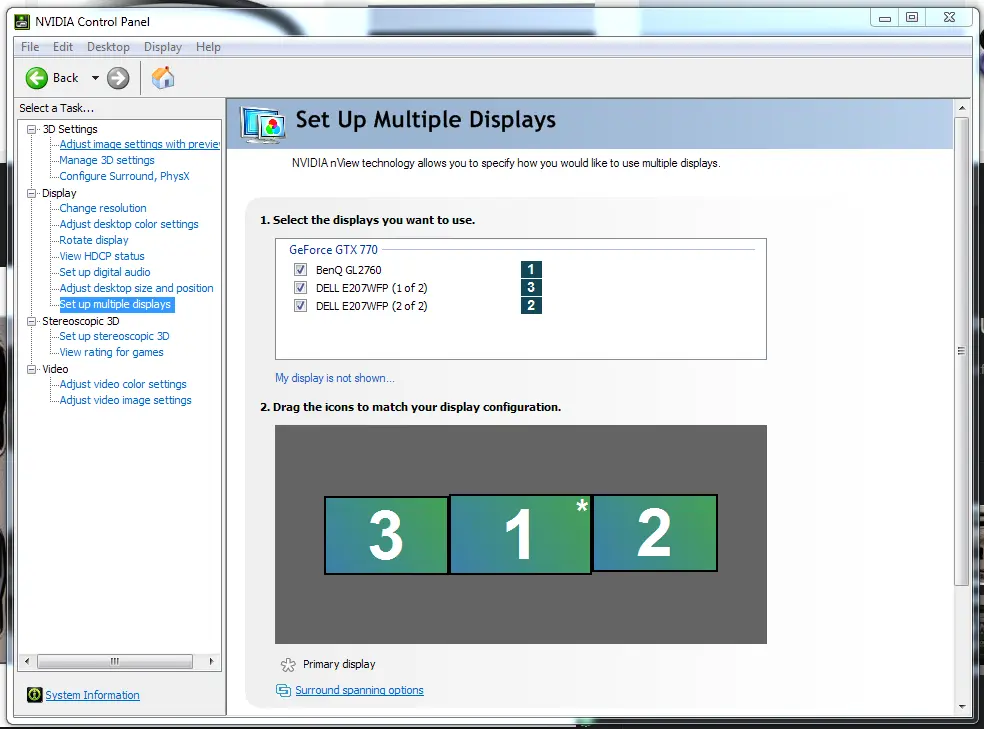
Step 2. Find the display or desktop section. Look for multi-monitor or multiple display options. Configure your screens to extend or duplicate. Apply the settings and test them.
Method 3: Using Keyboard Shortcuts
Windows offers quick shortcuts for displays. These save time once configured. You can switch modes instantly. It’s the fastest method for frequent changes.
This approach works great for presentations. You can quickly switch between modes. No need to dig through settings. Just press a few keys.
Precautions to Take
- Learn the Shortcuts First: Practice before important work. Wrong shortcuts can disconnect displays. Know how to undo changes quickly.
- Test Before Presentations: Always test shortcuts beforehand. Don’t experiment during live demos. Have a backup plan ready.
- Remember Default Keys: Windows Key + P is the main shortcut. Memorize what each option does. This prevents confusion during use.
Steps
Step 1. Press Windows Key + P on your keyboard. A sidebar appears with display options. You’ll see PC screen only, Duplicate, Extend, and Second screen only.
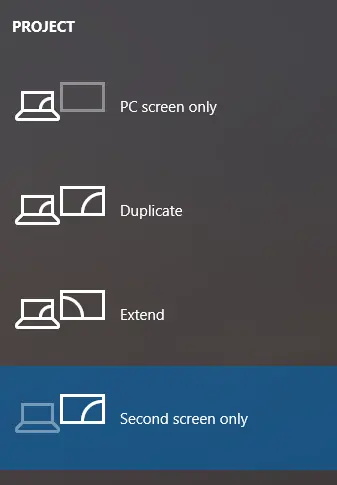
Step 2. Click “Extend” to set up dual monitors easily Windows makes this process quick. Your desktop now spans both screens. Move windows between monitors freely.
Method 4: Using Device Manager
Device Manager helps when Windows doesn’t detect monitors automatically. It lets you manage display hardware directly. This method fixes detection issues quickly. It’s perfect for troubleshooting display problems.
This approach works when other methods fail. You can refresh monitor drivers here. The tool gives you direct hardware access. It’s a powerful troubleshooting option for persistent issues.
Precautions to Take
- Create System Restore Point: Make a backup before changing drivers. This protects your system from problems. You can undo changes if something breaks.
- Don’t Disable Unknown Devices: Only work with display adapters you recognize. Disabling the wrong devices causes bigger problems. Leave other hardware alone.
- Note Current Settings: Write down current configurations before changes. Take screenshots of working settings. This helps restore things if needed.
Steps
Step 1. Press Windows Key + X and select Device Manager. Find “Display adapters” and expand the section. Your graphics card appears in the list.
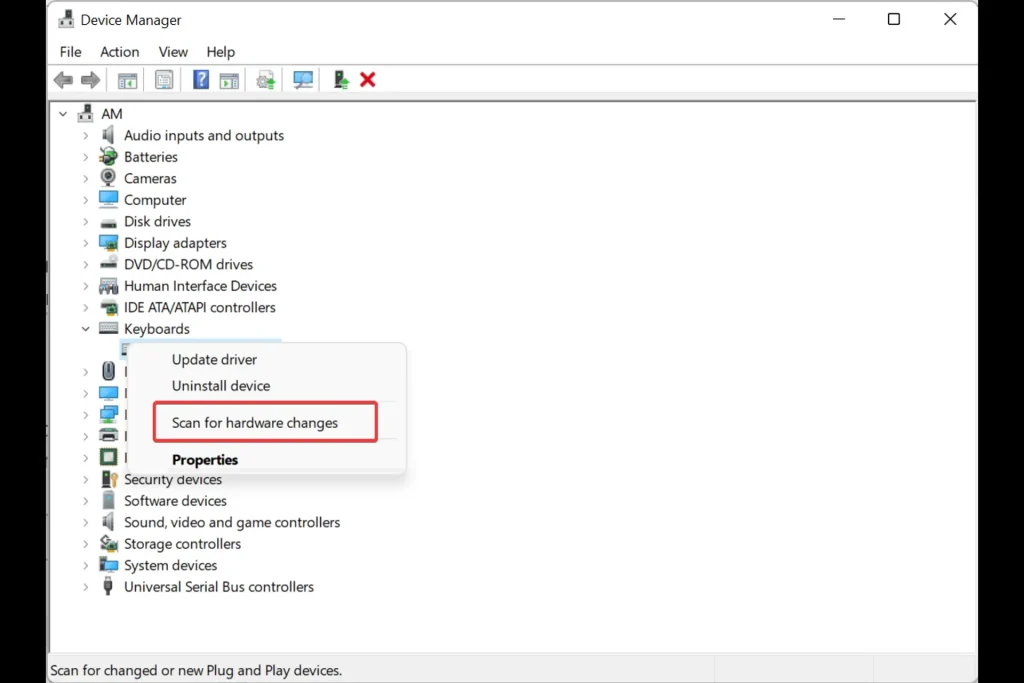
Step 2. Right-click your graphics adapter and choose “Scan for hardware changes.” Windows searches for connected monitors. Your second display should appear now. Restart if needed.
Method 5: Using Command Prompt
Command Prompt offers a technical approach to display settings. It works when GUI methods fail completely. Advanced users prefer this direct method. It bypasses common software conflicts effectively.
This method gives you system-level control over displays. You can force Windows to recognize monitors. It’s useful for stubborn detection problems. The commands work even when the settings won’t open.
Precautions to Take
- Run as Administrator: Always use administrator privileges for these commands. Right-click Command Prompt and choose “Run as administrator.” Regular access won’t work properly.
- Type Commands Carefully: One wrong character breaks the command completely. Copy commands exactly as written. Double-check before pressing Enter.
- Keep Commands Handy: Save working commands in a text file. You might need them again later. This saves time during future troubleshooting.
Steps
Step 1. Press Windows Key + X and select “Command Prompt (Admin)” or “Windows Terminal (Admin).” Type this command: displayswitch /extend and press Enter.
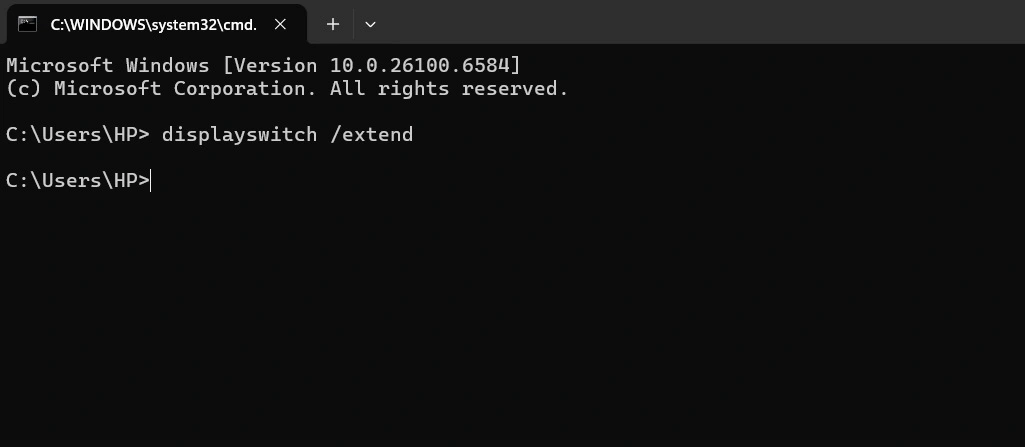
Step 2. The command activates extended display mode immediately. Your monitors should now work together. If not, try displayswitch /clone to test duplication mode first.
Part 3: Challenges You May Face While Setting Up Dual Monitors
Even simple setups can have problems. Knowing these helps you prepare. Most issues have quick fixes. Don’t worry if you encounter these common challenges.
- Second Monitor Not Detected: Windows doesn’t see your second screen. The display remains blank. This is very common.
Fix: Check all cable connections first. Try a different cable or port. Restart your computer with both monitors connected. Update your graphics drivers. Use Windows Key + P and select “Detect” if available.
- Different Resolutions Look Odd: Monitors show different sizes or quality. Text appears fuzzy on one screen. Colors don’t match between displays.
Fix: Open Display Settings for each monitor. Set the recommended resolution for both. Adjust scaling to match text size. Calibrate colors using Windows color management tools.
- Wrong Monitor Order: The mouse moves in the wrong direction. Monitors don’t match physical placement. Dragging windows feels backward.
Fix: Go to Display Settings in Windows. Drag the numbered monitor boxes to match reality. Place them left-to-right as they sit on your desk. Click Apply to confirm changes.
- Displays Keep Disconnecting: Screens go black randomly. Monitors keep losing signal. The connection isn’t stable.
Fix: Replace faulty cables with quality ones. Check if ports are loose or damaged. Disable power-saving features for displays. Update or reinstall graphics drivers completely.
- Taskbar on Wrong Screen: The taskbar appears on the secondary monitor. You can’t find your Start button. Icons are in the wrong place.
Fix: Right-click the taskbar and lock it first. Go to Display Settings and set your preferred monitor as the main. The taskbar moves to your primary display. Unlock and customize as needed.
- Performance Issues or Lag: The Computer runs more slowly with two monitors. Games have lower frame rates. Applications feel sluggish overall.
Fix: Close unnecessary background programs first. Reduce the resolution on the secondary monitor. Check if your graphics card supports dual monitors well. Upgrade hardware if needed.
Advanced Tips By the Author
Take your dual monitor setup further with these tips. I’ve learned these through years of experience. They’ll make your workflow even better. These tricks solve problems you didn’t know you had.
- Use Virtual Desktops: Windows 11/10 supports multiple desktops. Create separate workspaces for different tasks. Switch between them with Windows Key + Tab. This multiplies your screen real estate effectively.
- Master Window Snapping: Drag windows to screen edges to snap them. Windows Key + Arrow keys snap windows precisely. This organizes your workspace instantly. You’ll arrange windows much faster.
- Adjust Individual Monitor Settings: Each monitor can have different brightness and color. Match them through monitor buttons and Windows calibration. Consistent colors across screens reduce eye strain. Your work looks professional.
- Create Display Profiles: Use graphics card software for profiles. Save different setups for work and gaming. Switch between configurations with one click. This saves setup time daily.
- Optimize Refresh Rates: Set the highest refresh rate your monitors support. Go to Advanced Display Settings in Windows. Higher rates make movement smoother. Your eyes will thank you.
- Use Monitor-Specific Wallpapers: Right-click your desktop background in Settings. Choose different wallpapers for each screen. This helps you identify monitors quickly. It also looks more interesting.
- Install Monitor Management Software: Try DisplayFusion or similar tools for extra features. These apps offer advanced window management. You get better control than Windows provides. They’re worth trying for power users.
Conclusion
Setting up dual monitors transforms how you work. The process is simpler than most people think. Windows makes it easy with built-in tools. You now know multiple methods to set up multiple monitors in Windows successfully.
Take your time during initial setup. Make sure everything works smoothly before starting work. Adjust settings to match your preferences exactly. Soon you’ll wonder how you ever worked with just one screen. Enjoy your new expanded workspace and improved workflow.
FAQs:
Q1. Can I use two different monitor brands together?
Yes, you can mix different monitor brands without issues. Windows doesn’t care about brand names at all. The monitors just need compatible connections to your computer. However, matching brands often looks better visually. Different brands may have slight color differences between screens. You might notice different brightness levels or color temperatures.
Q2. Do I need a special graphics card for dual monitors?
Most modern graphics cards support dual monitors automatically. Even basic integrated graphics usually handle two screens fine. Check your graphics card for multiple video output ports. You need at least two ports like HDMI, DisplayPort, or DVI. Very old computers might need a graphics card upgrade. Gaming or professional work may require better graphics cards anyway. The card needs enough power to drive both screens at your desired resolution.
Q3. Can I have different resolutions on each monitor?
Windows allows different resolutions on each monitor without problems. You can mix a 4K monitor with a 1080p monitor easily. Each screen runs at its own best resolution independently. Go to Display Settings and configure each monitor separately. Choose the recommended resolution for each one individually. Windows adjust automatically when you move things between screens. Text size might look different when moving windows across monitors.
Author Bio:
Dinesh Lakhwani 

Dinesh Lakhwani, the entrepreneurial brain behind “TechCommuters,” achieved big things in the tech world. He started the company to make smart and user-friendly tech solutions. Thanks to his sharp thinking, focus on quality and the motto of never giving up, TechCommuters became a top player in the industry. His commitment to excellence has propelled the company to a leading position in the industry.
Popular Post


Recent Post

How To Check Installed RAM and RAM Slots [Complete Guide]
RAM plays an important role in how smoothly a computer runs. Short for Random Access Memory, it stores the data and instructions that Windows and active applications need at any given moment. From opening multiple browser tabs to running games and productivity software, RAM helps keep everything responsive. A system with limited memory may experience […]

What is Microsoft Autopilot Everything You Need To Know
Technology has changed the way companies manage computers. Well, yes! Employees now work from offices, homes, and remote locations. Setting up devices manually for every worker takes time and effort. It can also create mistakes that slow down productivity. This is where Microsoft Autopilot becomes useful. It helps businesses prepare and deploy Windows devices with […]

Enable Automatic Device Locking Feature Windows: Complete Guide
Introduction: Your computer stores important information such as emails, documents, passwords, and personal photos. Leaving it unlocked can put that data at risk. Thankfully, Windows includes built-in features that can automatically lock your device when you are away. Setting up automatic device locking is quick and does not require any extra software. In this guide, […]

How to Update Wireless Network Driver in Windows 11 and 10
Your Wi-Fi keeps dropping. Pages load slowly. The connection feels unstable? Well, you are not alone. Most of the time, the problem is not with your internet plan. It is with your wireless network driver. A driver is a small piece of software that helps your computer talk to its hardware. When it gets outdated, […]

Common Windows 11 Problems and Solutions (2026 Version)
Windows 11 has become more polished over the years, but it is still not completely free from problems. Even after regular updates from Microsoft, many users continue to face issues like lagging performance, failed updates, audio troubles, random crashes, and network errors. Some problems appear after installing new features, while others develop gradually as the […]

Fortect Driver Updater Review: Features, Steps, Pros, and Cons.
A new PC usually feels quick and responsive. Applications open instantly, games run smoothly, and everything works as expected. As time passes, however, you may notice slower performance, system crashes, hardware glitches, or devices that stop working properly. While many people assume malware or low storage space is to blame, outdated drivers are often the […]

New Features Coming in Windows 11 This Year [2026]
Microsoft is always working to make Windows better. This year is no exception. The company has announced and rolled out several exciting updates for its users. These updates touch almost every part of the operating system. From the Start menu to system settings, changes are arriving fast. If you use Windows daily, you will want […]

Top 14 Duplicate Photo Finder and Remover For Windows [2026]
Introduction: Photos pile up fast. Well, yes! You take ten shots of the same moment. You download the same image twice. You back up your folder and forget you already did it. Before you know it, your storage is packed with copies. A good duplicate photo finder helps you take back that space without losing […]

Advanced System Settings on Windows 11: Complete Guide
Windows 11 is a powerful operating system. It comes with many features that most users never explore. One of the most useful areas is the System Properties panel. This is where you can control how your computer performs, starts up, and handles memory. Many users only change basic settings like wallpaper or display options. But […]

21 Advanced Windows Security Settings: Latest Updates
Introduction: Your computer holds a lot of important data. From personal photos to work files, everything sits on your Windows system. That is why protecting it properly matters more than ever. Windows security settings have come a long way. Microsoft keeps adding stronger layers of protection with every update. Most users never go beyond the […]

