


Every computer collects junk over time. Right? Well, yes! Photos often get copied twice. Documents get saved in two folders by mistake. Old downloads pile up and never get deleted. This slowly eats up your storage space, and most people do not even notice until their drive is almost full. That is where a duplicate […]
Programs And Features Settings in Windows 11 – Open/Enable/Disable
Have you ever had issues managing the apps installed on your Windows 11? Do you become confused about how to properly handle which apps are installed, running, or off on your computer? If you are, then you’re not alone. Many users have been overwhelmed by the barrage of various settings and options that exist in Windows 11, most specifically where managing programs and features is concerned.
Well, the Programs and Features Settings in Windows 11—a power tool at your fingertips is here to take real control of your computer’s software ecosystem.
From managing applications you no longer need to enable new features that will enhance the user experience, to turn off programs that might be impacting system performance, it is very important to learn about these settings.
In this detailed guide, we will cover everything from opening and enabling to disabling and optimizing Programs And Features Settings in Windows 11.
Overview of Programs and Features Settings in Windows 11

Programs And Features Settings in Windows 11 is a central hub for managing the software installed on your computer. It provides a user-friendly interface to view, install, uninstall, and modify programs, as well as control Windows features.
This powerful tool is an evolution of the “Add or Remove Programs” feature from earlier Windows versions, offering more functionality and control over your system’s software landscape.
Key aspects of Programs And Features Settings in Windows 11 include:
- List of the programs installed
- Uninstall/change the already installed software
- Allow/Disallow Windows features
- Size of the programs installed
- Install date of each program
- Publisher for a better identification of sources of the software
- Filter and sort options
- All settings for the system related to the installation and removal of programs are now available in one place
- Integration with Windows Update for a single feature management experience.
Understanding and effectively using Programs And Features Settings can significantly improve your Windows 11 experience, helping you maintain a clean, efficient, and personalized system.
How to Open Programs and Features Settings in Windows 11: 5 Methods.
Windows 11 offers multiple methods to access the Programs And Features Settings, catering to different user preferences and scenarios.
Let’s explore the various ways to open this essential tool.
Method 1: Using the Start Menu
Step 1: Open the Windows search bar and type “Apps and Features”.

Step 2: Click on the “Installed Apps” option that appears in the search results.
This method is quick and straightforward, especially if you’re comfortable with typing and searching.
Method 2: Through Settings
Step 1: Press the Windows key + I to open the Settings app. Click on “Apps” in the left sidebar.

Step 2: Select “Installed apps” from the options on the right.
While this method doesn’t directly open the classic Programs And Features interface, it provides a modern alternative with similar functionality.
Method 3: Via Power Menu
Step 1: Right-click on the Start button or press Windows key + X.

Step 2: Select “Installed Apps” from the menu that appears.
This method opens the traditional Programs And Features interface, which some users may find more familiar.
Method 4: Using Run Command
Step 1: Press the Windows key + R to open the Run dialog.

Step 2: Type “appwiz.cpl” and press Enter.
This method is the fastest for users who are comfortable with command shortcuts.
Method 5: Through File Explorer
Step 1: Open File Explorer. Navigate to this folder location:
Control Panel\All Control Panel Items\Programs and Features.

Step 2: Double-click on “Programs and Features.”
This method can be useful if you’re already working in File Explorer.
By familiarizing yourself with these various methods, you can quickly access Programs And Features Settings in Windows 11 regardless of your current task or preference.
How to Enable Programs and Features Settings in Windows 11
Enabling Programs And Features Settings in Windows 11 is typically not necessary, as it’s a built-in
tool that’s always available. However, there are related settings and features you might want to enable to enhance your control over programs and features.
Here’s how to Enable Programs And Features Settings in Windows 11:
Enable installation of apps from any source:
By default, Windows 11 only allows you to install apps from the Microsoft Store to keep your computer safe.
To enable installation from other sources:
Step 1: Open Settings (Windows key + I). Go to “Apps” > “Advanced App Settings”.

Step 2: Select the dropdown next to the”Choose where to get apps“. Pick “Anywhere”.
Enable Windows features:
Some advanced Windows features are not enabled by default. To turn them on:
Step 1: Open the Control Panel. Click on “Programs and Features” > “Turn Windows features on or off”.

Step 2: Check the boxes next to the features you want to enable.

Allow apps to run in the background:
To ensure all your apps function properly:
Step 1: Open Settings. Go to “System” > “Power & battery”.

Step 2: Click on “Battery usage”. Here you can check the individual app settings.
Enable notifications for app installations and removals:
To stay informed about changes to your installed programs:
Step 1: Open Settings. Go to “System” > “Notifications“. Scroll down to “Additional settings”.

Step 2: Turn on the “Show me the Windows welcome experience after updates and when Signed in” option.
By enabling these settings, you can enhance your control over Programs And Features Settings in Windows 11 and customize your system to better suit your needs.
Disable Programs and Features Settings in Windows 11
While you can’t entirely disable Programs And Features Settings in Windows 11 (as it’s an integral part of the operating system), there are related settings you might want to disable for various reasons, such as security, performance, or personal preference. Here’s how to turn off or disable certain aspects:
Disable automatic app updates:
To prevent apps from updating automatically:
Step 1: Open Microsoft Store. Click on your profile icon and select “Settings“.

Step 2: Toggle off the “App Updates” option.
Disable Windows features:
To turn off certain Windows features:
Step 1: Open the Control Panel. Click on “Programs and Features” > “Turn Windows features on or off”. Uncheck the boxes next to the features you want to disable.

Step 2: Click “OK” and restart your computer if prompted.
Disable automatic driver updates:
To prevent Windows from automatically updating device drivers:
Step 1: Open Settings. Go to “System” > “About”. Click on “Advanced system settings”.
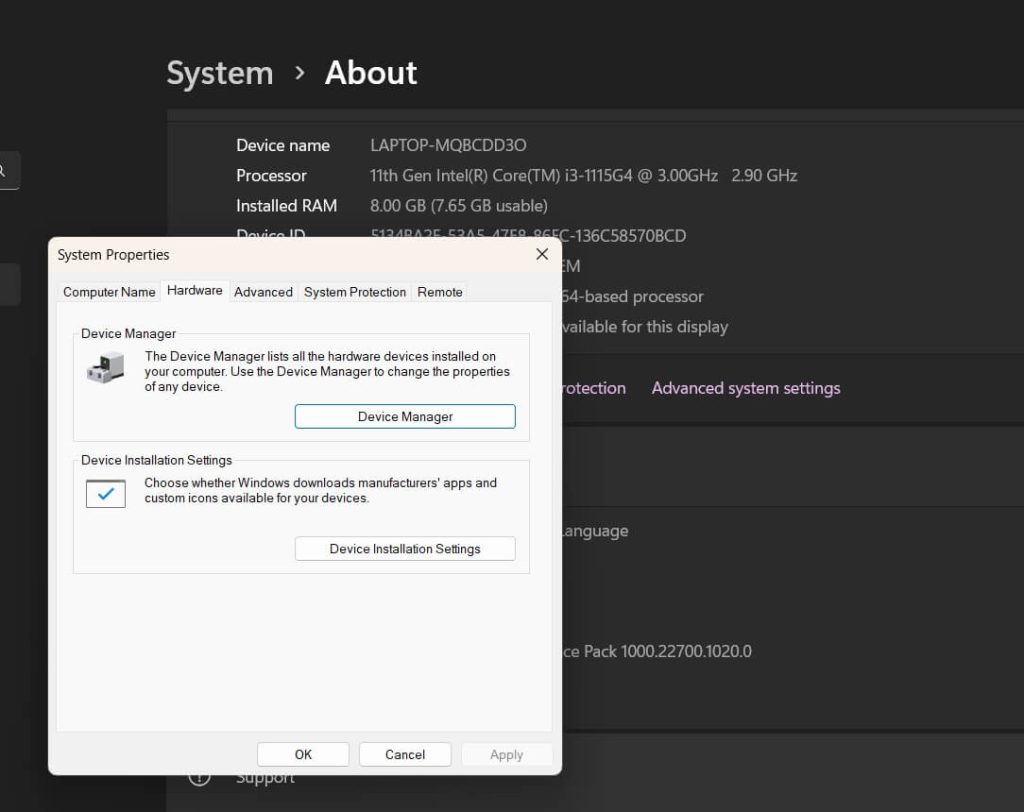
Step 2: In the “Hardware” tab, click on “Device Installation Settings“. Select “No (your device might not work as expected)” and click “Save Changes”.

Disable Windows Insider Program:
If you’re enrolled in the Windows Insider Program and want to disable it:
Step 1: Open Settings. Go to “Windows Update” > “Windows Insider Program”.

Step 2: Click on “Stop getting preview builds”.
By disabling these settings, you can customize your Windows 11 experience and potentially improve system performance or security, depending on your specific needs and preferences.
Tips to Make the Most of Programs and Features Settings in Windows 11
To optimize your experience with Programs And Features Settings in Windows 11, consider the following tips and best practices:
- Use the sorting and filtering options: Take advantage of the sorting and filtering capabilities in Programs And Features Settings. You can sort by name, size, or install date to quickly find the programs you’re looking for.
- Research before uninstalling: Before you uninstall a program, and especially if you’re not sure what it does, do a quick search online to make sure this isn’t some really important system component that isn’t obvious.
- Create a system restore point: Do this before you make major changes to programs that are installed, or to Windows features. That way you can go back in case of a problem.
- When available, use the “Repair” option: Some programs, when found problematic or not functioning correctly, can be accessed from Programs And Features Settings with the option “Repair”.
- Keep your programs up to date: Keep often-installed programs current with the newest features and security patches installed. Most programs have the option to turn on automatic updates for convenience.
- Use Windows Features: Go into Windows Features to toggle on more functionality that may be needed for workflow, such as Hyper-V for virtualization or Windows Subsystem for Linux for development.
- Be cautious with third-party uninstallers: While third-party uninstaller tools can be helpful, be cautious when using them. Stick to reputable options and always back up your system before using such tools.
- Use PowerShell for advanced management: For power users, PowerShell offers advanced capabilities for managing installed programs and features. Learn basic PowerShell commands to streamline your program management tasks.
- Group similar programs: If you have multiple versions or related programs installed, consider grouping them together for easier management. You can do this mentally or by using folder structures in your Start menu.
By implementing these tips, you can maintain a cleaner, more efficient Windows 11 system and make the most of the Programs And Features Settings.
Conclusion
Learning the Programs and Features Settings in Windows 11 is a must for any user who wants to keep his or her computer system in good order, organized, effective, and at one’s will. By this guide, you have learned how to open it, navigate this extremely powerful tool, enable or disable features, and now have complete control over the Windows 11 experience.
Regular maintenance, making informed decisions of uses for your programs and features, and the capability to consider all the options Windows 11 has in store for you are the keys to keeping them well.
With all this information and these various trips up your sleeve, you will definitely be able to utilize the full potential of the Programs And Features Settings under Windows 11 and be assured of a smoother, much more personalized computing experience.
FAQs:
Q: How often should I review my installed programs in Windows 11?
It’s a good practice to review your installed programs every 3-6 months, or more frequently if you install new software often. Regular reviews help maintain system performance and free up storage space.
Q: Can I recover a program if I accidentally uninstall it through Programs And Features Settings?
If you’ve accidentally uninstalled a program, you can try restoring your system to a previous point if you created a restore point. Otherwise, you’ll need to reinstall the program. Always be cautious when uninstalling software.
Q: Are there any risks in disabling Windows features?
Disabling certain Windows features can impact functionality or security. Before disabling any feature, research its purpose and potential consequences. If unsure, it’s best to leave features enabled, especially those related to security.
Q: How can I determine which programs are safe to uninstall?
Generally, it’s safe to uninstall programs you’ve installed yourself and no longer need. Be cautious with pre-installed programs or those with unfamiliar names. Research any program you’re unsure about before uninstalling, and avoid removing anything in the Windows folder.
Author Bio:
Dinesh Lakhwani 

Dinesh Lakhwani, the entrepreneurial brain behind “TechCommuters,” achieved big things in the tech world. He started the company to make smart and user-friendly tech solutions. Thanks to his sharp thinking, focus on quality and the motto of never giving up, TechCommuters became a top player in the industry. His commitment to excellence has propelled the company to a leading position in the industry.
Popular Post
Recent Post

Duplicate File Finder Pro: A Complete Review, Everything You Should Know
Computers collect thousands of files over time. Well, yes! Many of them end up being duplicates created by backups, downloads, or accidental copies. These extra files take up valuable storage space and make it harder to keep everything organized. Finding and removing them manually can take hours. Right? Duplicate File Finder Pro is a tool […]

Monitor Screen Calibration Guide: Everything You Should Know
Your monitor shows colors every single day. But are those colors actually correct? Most people never stop to check this. They just use the screen as it comes out of the box. This habit can lead to wrong colors in photos, videos, and work files. Colors may look too warm or too cold without you […]

How To Check Installed RAM and RAM Slots [Complete Guide]
RAM plays an important role in how smoothly a computer runs. Short for Random Access Memory, it stores the data and instructions that Windows and active applications need at any given moment. From opening multiple browser tabs to running games and productivity software, RAM helps keep everything responsive. A system with limited memory may experience […]

What is Microsoft Autopilot Everything You Need To Know
Technology has changed the way companies manage computers. Well, yes! Employees now work from offices, homes, and remote locations. Setting up devices manually for every worker takes time and effort. It can also create mistakes that slow down productivity. This is where Microsoft Autopilot becomes useful. It helps businesses prepare and deploy Windows devices with […]

Enable Automatic Device Locking Feature Windows: Complete Guide
Introduction: Your computer stores important information such as emails, documents, passwords, and personal photos. Leaving it unlocked can put that data at risk. Thankfully, Windows includes built-in features that can automatically lock your device when you are away. Setting up automatic device locking is quick and does not require any extra software. In this guide, […]

How to Update Wireless Network Driver in Windows 11 and 10
Your Wi-Fi keeps dropping. Pages load slowly. The connection feels unstable? Well, you are not alone. Most of the time, the problem is not with your internet plan. It is with your wireless network driver. A driver is a small piece of software that helps your computer talk to its hardware. When it gets outdated, […]

Common Windows 11 Problems and Solutions (2026 Version)
Windows 11 has become more polished over the years, but it is still not completely free from problems. Even after regular updates from Microsoft, many users continue to face issues like lagging performance, failed updates, audio troubles, random crashes, and network errors. Some problems appear after installing new features, while others develop gradually as the […]

Fortect Driver Updater Review: Features, Steps, Pros, and Cons.
A new PC usually feels quick and responsive. Applications open instantly, games run smoothly, and everything works as expected. As time passes, however, you may notice slower performance, system crashes, hardware glitches, or devices that stop working properly. While many people assume malware or low storage space is to blame, outdated drivers are often the […]

New Features Coming in Windows 11 This Year [2026]
Microsoft is always working to make Windows better. This year is no exception. The company has announced and rolled out several exciting updates for its users. These updates touch almost every part of the operating system. From the Start menu to system settings, changes are arriving fast. If you use Windows daily, you will want […]

