


A slow computer makes it hard to focus. Programs take too long to open. Free space keeps shrinking until the disk is almost full. This happens to most PC owners at some point. Even new machines can slow down after a while. That is the exact problem cleanup tools are built to solve. They comb […]
How To Scan a Document on iPhone or iPad
Introduction:
Gone are the days of bulky scanners and laborious document digitization processes. Right? Now, with just a few taps on your smartphone or tablet, you can effortlessly transform physical documents into digital files.
Say goodbye to the time-consuming and cumbersome methods of the past. In this guide, we will walk you through the step-by-step process of how to scan a document on iPhone or iPad. From capturing crisp images using a built-in camera to selecting the perfect scanning app, we’ll explore the best techniques and share invaluable tips to ensure your digital scans are of the highest quality.
How to Scan a Document on Your iPhone or iPad
iOS and iPadOS offer you two built-in apps including Notes and Files that you can use for scanning documents effortlessly. Read on to know more:
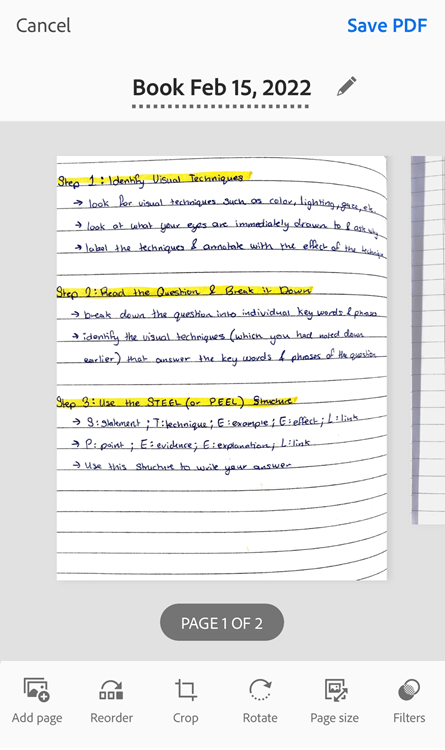
#1 Use the Notes App
Scanning a document on your iPhone or iPad has never been easier. With the powerful built-in features of iOS, you can quickly digitize your physical documents and store them in a digital format. Say goodbye to bulky scanners and hello to the convenience of mobile scanning.
In this guide, we’ll walk you through the simple steps on how to scan a document on iPhone or iPad using the Notes app.
Step 1: Open the Notes App
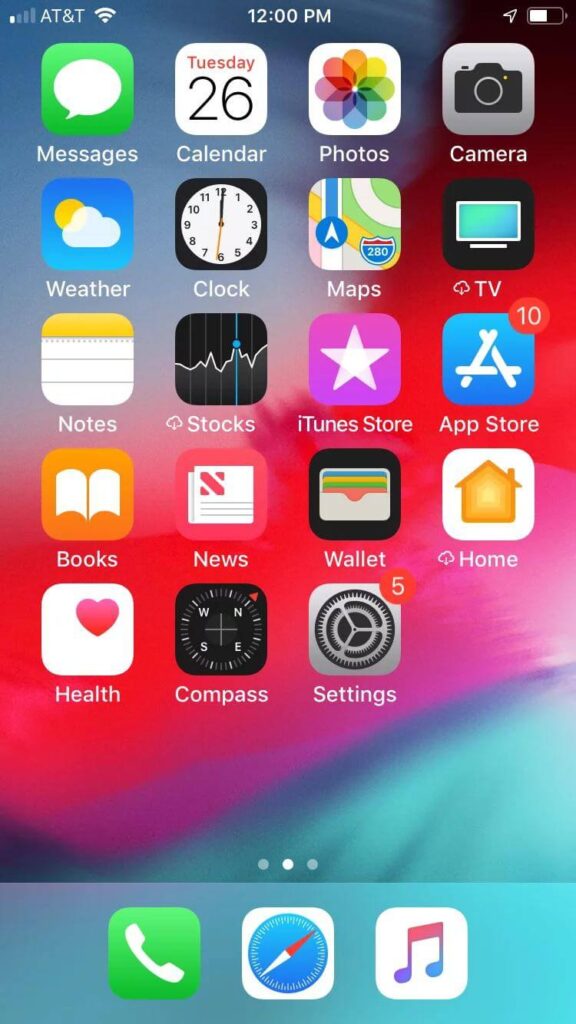
Look for the Notes app on your iPhone or iPad. It comes pre-installed on iOS devices, so you should be able to find it on the home screen itself.
Step 2: Create a New Note
Now, create a new note by tapping on the “+” (plus) button. If you already have an existing note, you can use that as well.
Step 3: Access the Document Scanner
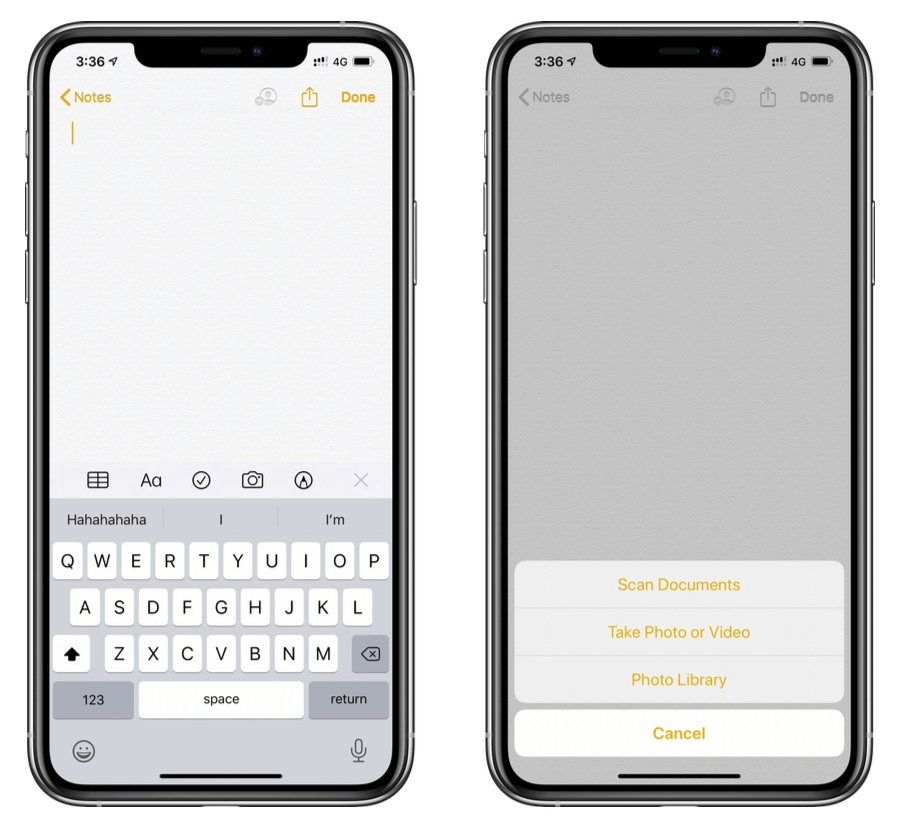
Within the newly created note, tap on the camera icon placed at the bottom. From the options that appear, select “Scan Documents.” The camera will activate, ready to scan your document.
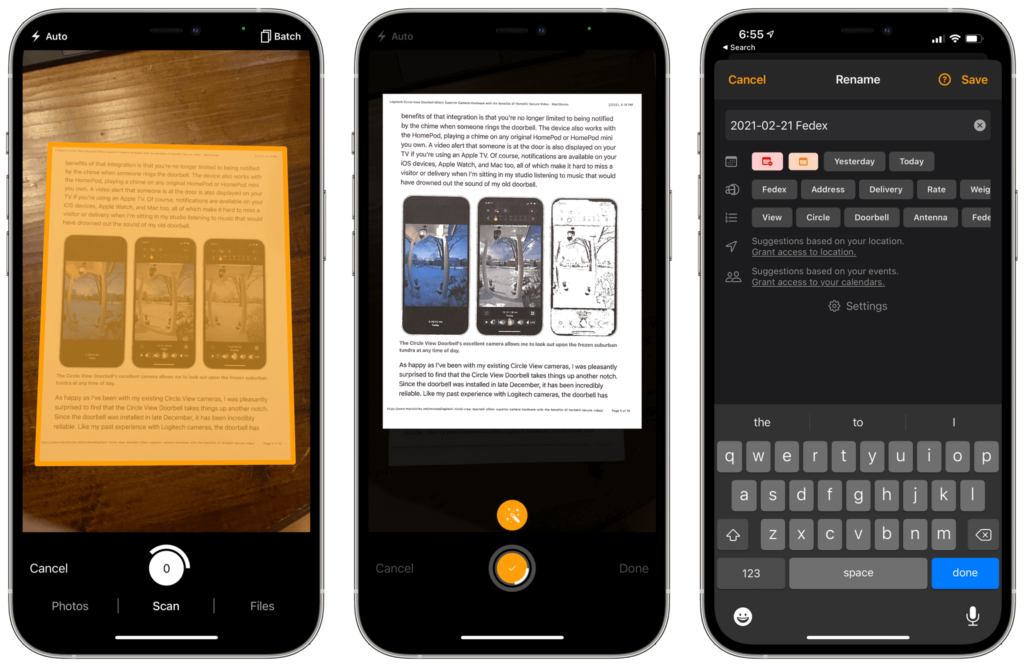
Step 4: Capture the Document
Hold your iPhone or iPad over the document you want to scan. Ensure that the entire document is within the frame, and the edges are aligned properly. The scanner will automatically detect the document and capture the image.
Step 5: Adjust and Enhance the Scan

Once the document is captured, you have the option to adjust the corners and edges if needed. Drag the white dots to refine the document’s boundaries. You can also use the filters provided to enhance the scan’s readability.
Step 6: Add More Pages or Save
If you have multiple pages to scan, tap on the “+” (plus) button to capture additional pages. Once you’re done, tap on “Save” to finalize the scanned document.
Step 7: Organize and Share
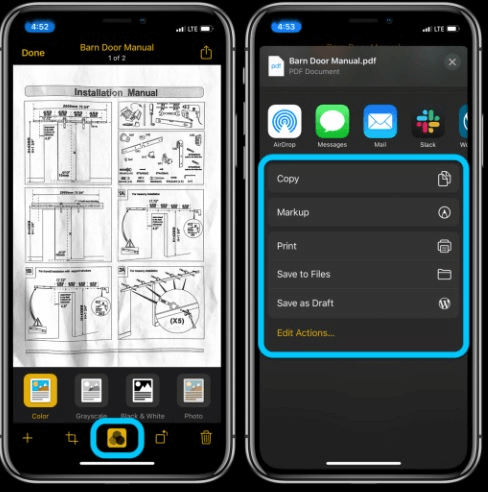
Your scanned document is now saved within the note. You can organize it by adding a title, tags, or even moving it to a specific folder. To share the scanned document, tap on the share icon (the square with an arrow pointing upward). Choose your preferred sharing method, such as email, messaging apps, or cloud storage.
That’s it! You’ve successfully scanned a document using your iPhone or iPad. With this simple process, you can now easily scan documents on the go.
#2 Use the Files App
Scanning a document on your iPhone or iPad using the Files app is a convenient way to digitize your paperwork. Here’s a step-by-step guide on how to scan a document on iPhone or iPad using the Files app:
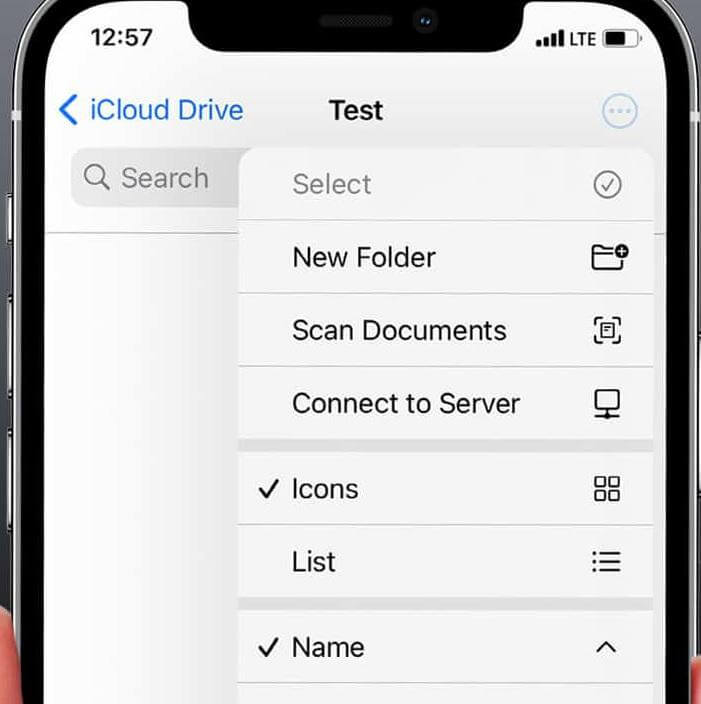
- Open the Files app on your iPhone.
- Now, select a folder or create a new one.
- Tap on the three-dot ellipsis icon placed in the top-right corner and choose the “Scan Documents” option.
- Now, align the document within the frame and capture the image from your iPhone or iPad.
- Adjust the corners and make the necessary edits if necessary to enhance the scan.
- Save the scanned document on your device.
- Organize or rename the file if needed.
- Share the document using the share icon.
And it’s done! Enjoy the convenience of digitizing your paperwork with just a few simple steps.
Best Document Scanner Apps for iOS To Use
Looking for the best document scanner apps for iOS? You’ve come to the right place. Look no further. We have got you covered. Give them a try and unlock the power of mobile document scanning on your iOS device!
1. CamScanner
CamScanner stands out from the crowd thanks to its comprehensive scanning experience. Its reliable document capture, advanced OCR capabilities, and cloud storage integration make it a game-changer for users of iOS devices. CamScanner is also packed with additional features, going the extra mile with collaboration tools, enabling you to share and work on scanned documents with others.
Plus, it offers annotations and signatures, making it perfect for both personal and professional use. With all these benefits in one package, CamScanner makes it easy to transition your device into an efficient document-scanning solution.

Features:
- Multiple document scanning modes.
- Comes with an in-built PDF converter.
- Protects your confidential scans by putting a lock on the folder.
- Auto-cropping and enhancement tools.
- Export scanned documents in various formats including JPG, PDF, and more.
Pros:
- Handy document scanner and file manager.
- OCR functionality.
- Easy-to-use.
Cons:
- Limited features are available with the free version.
- The free version adds a watermark to scanned documents.
Price: Free, offers in-app purchases.
2. Adobe Scan
Adobe Scan is an exceptional document-scanning app for iOS that stands out for its extensive features and seamless integration with Adobe’s ecosystem. With Adobe Scan, you can easily capture high-quality scans of documents, receipts, whiteboards, and more using your iOS device’s camera. The app offers automatic edge detection, smart cropping, and image enhancement to ensure your scans are clear and professional-looking.
One of the standout features of Adobe Scan is its built-in OCR (Optical Character Recognition) technology. This allows you to convert scanned documents into searchable and editable text, making it effortless to find and extract information from your scanned files.
Features:
- Creates high-quality scans.
- Automatically finds documents and receipts in your photo library and turns them into PDF scans.
- Automatic text recognition.
- Advanced editing options.
Pros:
- Powerful scanning capabilities.
- Integration with other Adobe tools.
- Allows you to adjust the brightness and contrast of scanned images in just a few taps.
Cons:
- Reliance of Adobe ecosystem.
- Integration services require an Internet connection to work.
Price: Free, offers in-app purchases.
3. Genius Scan
Genius Scan gives you the power to quickly capture various types of documents using your device’s camera. Automated cropping and alignment guarantee optimal results, whilst an array of image enhancements ensure clarity and legibility.
It also provides efficient tools for organizing your scans, including custom folders, tags, and OCR text extraction for easy searchability. To top it off, Genius Scan offers seamless integration with popular cloud storage services so you can access your scans from anywhere.
Features:
- Captures high-quality scans of various documents, receipts, and whiteboards.
- On-device document processing.
- PDF password encryption to protect your files.
- Document detection and background removal.
- Secures your scanned documents with a password or biometric authentication.
Pros:
- User-friendly interface.
- Cloud integration.
- Document organization.
Cons:
- Limited editing features.
- Some advanced functionalities may require a paid upgrade.
Price: Free, offers in-app purchases.
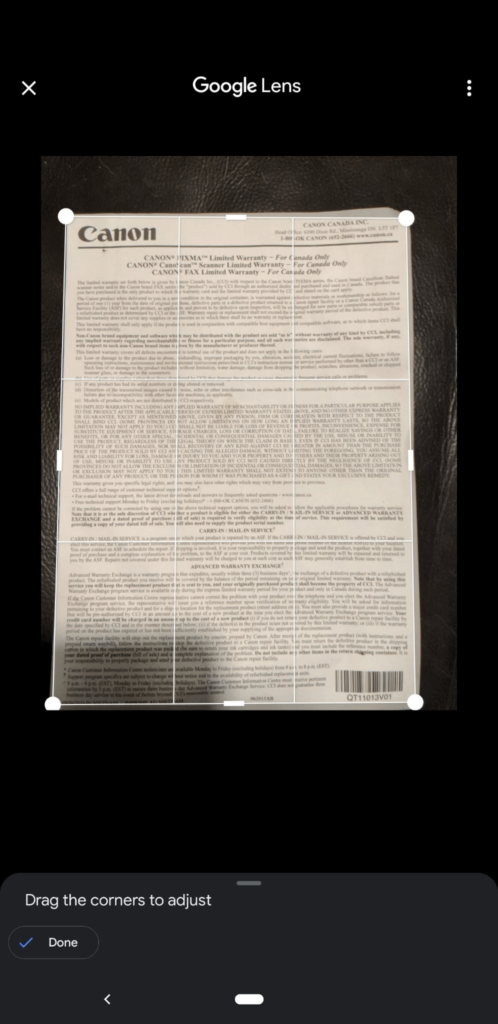
4. Google Lens
Google Lens is a powerful tool for iOS devices that provides visual search, as well as the capability to do document scans. It detects boundaries and optimizes picture quality so that text is easier to read.
Additionally, Optical Character Recognition (OCR) technology allows users to quickly find particular words and phrases from scanned receipts, invoices, notes, and more.
Features:
- Extract text from images and translate it into different languages.
- Find online shopping results and prices by scanning product images.
- Seamlessly integrates with other Google apps like Google Photos and Google Assistant.
Pros:
- Easy accessibility.
- A versatile and secure document scanning application.
Cons:
- Accuracy limitations.
- Limited offline functionality.
Price: Free.
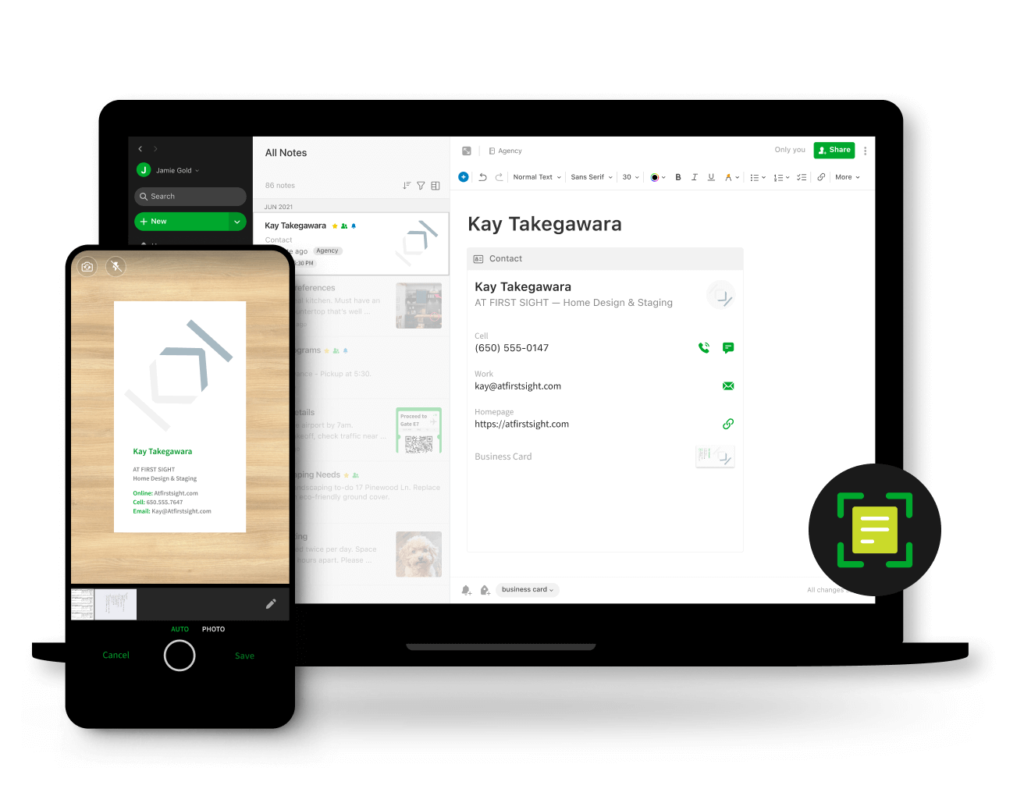
5. Evernote Scannable
Evernote Scannable, an iOS app, is a popular choice for document scanning. With its intuitive interface and comprehensive features, it makes capturing and managing scanned documents incredibly easy. From receipts to business cards to contracts – the device’s camera will detect the document and deliver a sharp scan. Rest assured that your image will be easy to read and understand.
Features:
- Automatically detects document boundaries and enhances scan quality.
- Extracts text from scanned documents for searching and editing within Evernote.
- Capture and organize contact information from business cards.
- Save scanned documents directly to Evernote for easy organization and access.
Pros:
- Offers a streamlined scanning experience.
- Integration with Evernote.
Cons:
- Fewer editing options compared to other document scanning apps.
- Limited export options.
Price: Free.
Conclusion
On this note, we wrap our guide on how to scan a document on an iPhone or iPad. With the power of your iPhone or iPad, you can now easily transform your physical documents into digital files in just a few clicks, making document scanning a seamless and efficient process. Take advantage of the built-in methods or explore the vast array of third-party apps available on the App Store to find the perfect solution that suits your specific needs.
Author Bio:
Dinesh Lakhwani 

Dinesh Lakhwani, the entrepreneurial brain behind “TechCommuters,” achieved big things in the tech world. He started the company to make smart and user-friendly tech solutions. Thanks to his sharp thinking, focus on quality and the motto of never giving up, TechCommuters became a top player in the industry. His commitment to excellence has propelled the company to a leading position in the industry.
Popular Post
Recent Post

Fortect Software Review: The Ultimate PC & Mobile Cleaning, Optimization & Security Tool
Slow computers are a common problem for almost every Windows user. Well, yes! Over time, your PC picks up junk files. These files sit quietly in the background. They take up space and slow things down. Programs open slower. Windows takes longer to boot. Even simple tasks like opening a folder can feel sluggish. There […]

CCleaner PC Optimizer Review: A Complete Guide for Windows Users
If your computer has started to feel slow, you are not alone. Most Windows PCs slow down over time. Junk files pile up. The registry gets messy. Too many apps open when you start your PC. All this adds up and makes even a good machine feel tired. This is where a PC cleaner tool […]

Auslogics Duplicate File Finder: Full Review and User Guide
A computer quietly gathers clutter over time. This includes duplicate photos, repeated downloads, and forgotten backups hiding in random folders. This buildup slowly eats away at storage and can make even a fast PC feel sluggish. Manually finding and deleting duplicates is tedious. It means checking every folder, comparing file names, and guessing which copies […]

CCleaner Duplicate File Finder: Key Features, Pricing, Step-by-Step Guide and More
Every computer collects junk over time. Right? Well, yes! Photos often get copied twice. Documents get saved in two folders by mistake. Old downloads pile up and never get deleted. This slowly eats up your storage space, and most people do not even notice until their drive is almost full. That is where a duplicate […]

Duplicate File Finder Pro: A Complete Review, Everything You Should Know
Computers collect thousands of files over time. Well, yes! Many of them end up being duplicates created by backups, downloads, or accidental copies. These extra files take up valuable storage space and make it harder to keep everything organized. Finding and removing them manually can take hours. Right? Duplicate File Finder Pro is a tool […]
Top 3 Duplicate File Finder for Windows 11 & Windows 10
If your PC storage keeps filling up even after you delete big files, duplicate files could be the real reason. Most of us save the same photo twice, download a document more than once, or copy a whole folder by mistake. Over months and years, these duplicate files pile up quietly. You do not even […]

Monitor Screen Calibration Guide: Everything You Should Know
Your monitor shows colors every single day. But are those colors actually correct? Most people never stop to check this. They just use the screen as it comes out of the box. This habit can lead to wrong colors in photos, videos, and work files. Colors may look too warm or too cold without you […]

How To Check Installed RAM and RAM Slots [Complete Guide]
RAM plays an important role in how smoothly a computer runs. Short for Random Access Memory, it stores the data and instructions that Windows and active applications need at any given moment. From opening multiple browser tabs to running games and productivity software, RAM helps keep everything responsive. A system with limited memory may experience […]

What is Microsoft Autopilot Everything You Need To Know
Technology has changed the way companies manage computers. Well, yes! Employees now work from offices, homes, and remote locations. Setting up devices manually for every worker takes time and effort. It can also create mistakes that slow down productivity. This is where Microsoft Autopilot becomes useful. It helps businesses prepare and deploy Windows devices with […]

