How can you save voicemail on iPhone: Best ways for beginners
Often when you receive any voicemail, your first concern is to store the backup copy of the same file on your iPhone. This way, you can access the voice or textual file of the voicemail anytime without worrying about the same being deleted from your mobile. But since iOS doesn’t save the backup copy automatically once you are done heating the voicemail, you should learn the manual ways to do so.
In this below article, we have introduced top ways to save voicemail on your iPhone easily. This way, your file won’t be lost anywhere.
Top ways to save voicemail on your iPhone
Method 1: Saving voicemails on iPhone as a voice memo
You might need to access the voicemail note on the iPhone after two weeks or months. In this case, converting the voicemail into a voice memo and storing it in the iPhone sounds feasible. Below is a brief description of the steps to make the process a no-brainer.
- Navigate to your iPhone’s phone application and click the Voicemail option.
- A complete list of voicemails will be shown on the screen.
- Here, you must choose the voicemails you want to save on the iPhone.
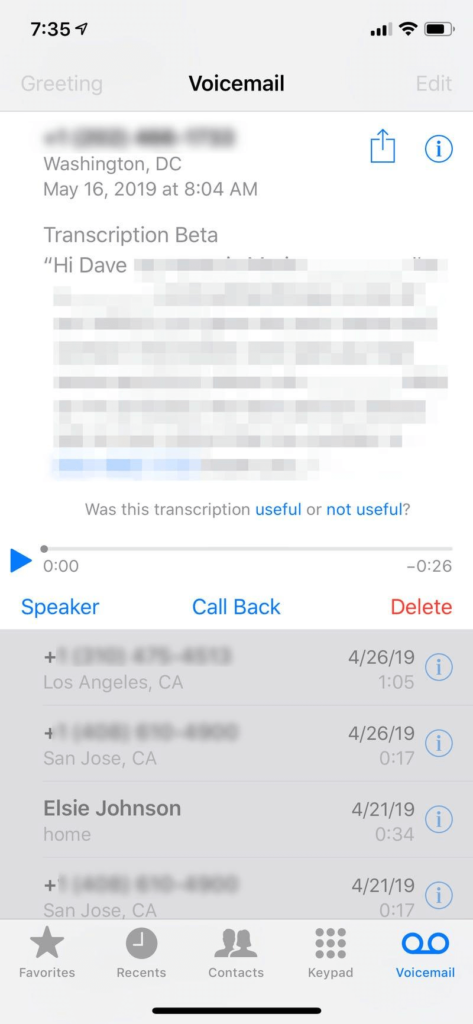
- Now, click on the Share button that you can find in the top-right corner of the screen.
- A list of options will be displayed on the screen, including Mail, Messages, AirDrop, etc.

- Click any methods from the list, and your voicemail will be saved in the MP4A format.
Method 2: Keeping a voicemail copy with a screen recorder
If your iPhone has iOS 16 or higher versions, you can easily make a copy of the voicemail using the screen recorder. Find here the steps to do so.
- Open Settings and navigate further to Control Center.
- A list of Included Controls will be shown on the screen.
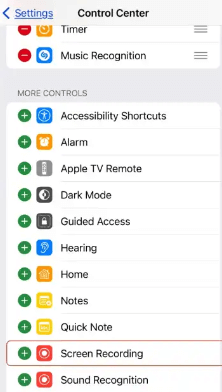
3. Ensure the list contains the Screen Recording feature.
4. Sometimes, the option might not be there. In that case, click the (+) button and add the required field.
5. Once done, launch the Phone application on the device and open the Voicemail option.
6. Swipe the screen, and it will open the Control Center. Here, you need to click the Screen Recording button.
7. A 3-second countdown timer will start.
8. Now, play the desired voicemail you would like to save. Ensure to put it on the loudspeaker.
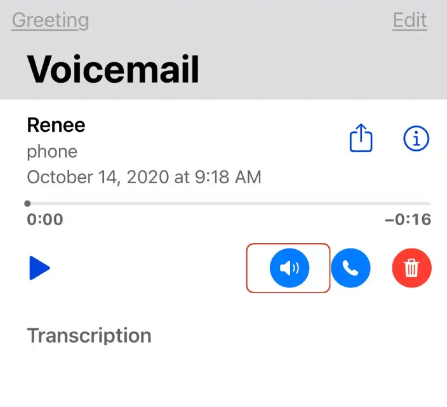
9. Once the voicemail plays, the Screen Recording feature will begin recording the media.
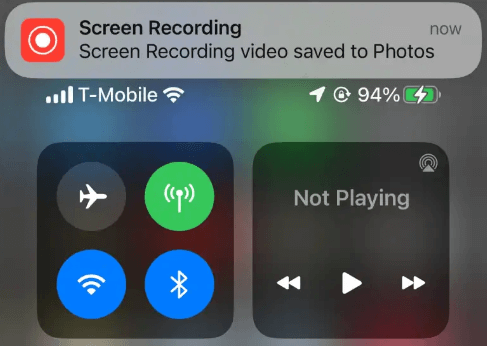
10. After the voicemail is over, launch the Control Center once again and stop screen recording. Then, save the file to the Photos app for future use.
Method 3: Backing up the voicemail with the Notes application
Another great way to store the backup copy of your voicemail on iOS is through the Notes application.
- Open the Phone app and select the voicemail option.
- From here, select the desired voicemail button from the bottom right corner. You can select the voicemail file you want to save from here.
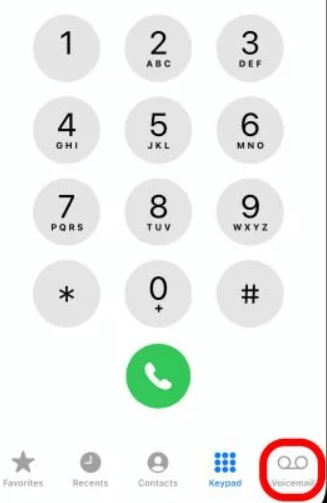
3. Now, click the share button and select the Notes application.
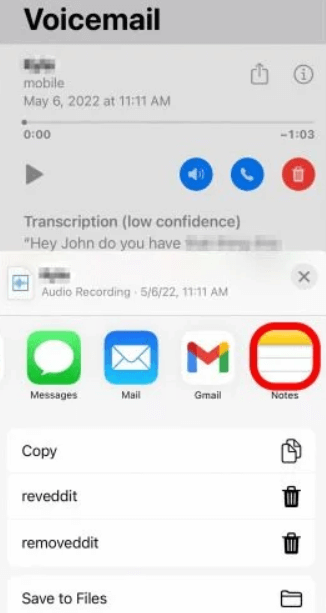
4. After this, click the Save To button and choose if you want to save the voicemail to a new or existing note.
5. If you choose a new note, give a proper name and hit the Save button on the top right corner.
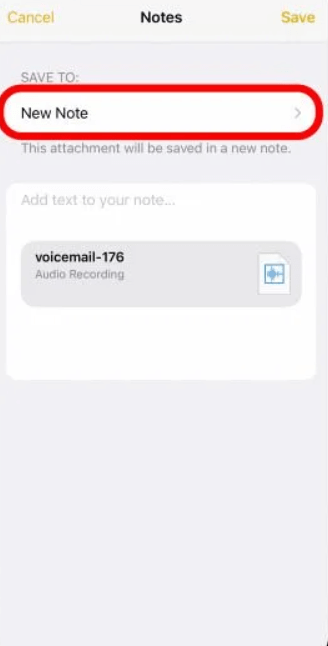
6. Once the file is saved in MP4A format, you can easily access the voicemail anytime.
Method 4: Saving voicemail transcripts on iPhone
You can also transcribe the voicemail and save the textual note on the iPhone. Here are the steps to do so.
- Launch the Phone app on your iPhone and click the voicemail button.
- Now choose the voicemail file you want to save.
- Once done, tap and hold the transcription text being played below. This will select the entire transcribed text.
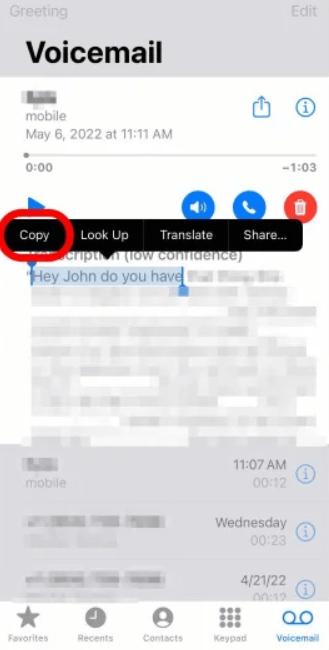
4. Click on the Copy button to get the selected portion of the transcript copied.
5. Launch the Notes app and click on the Compose button.
6. There will be a Paste button. Press and hold it to paste the text.

7. Now, save the notes file with a new name to access the transcription later.
Conclusion
With the top ways to save voicemail on iPhone discussed here, you must decide which one will be best for you. Then, go through the steps and choose the one that sounds most convenient.
Apart from this, you should consider saving the voicemail file in audio or textual format. Based on that, your steps will change. So, now, you won’t have to worry about not having the voicemail to listen to later.
Popular Post
Recent Post
Top 9 Browsers With Built-In VPN – VPN Browser
Online browsing is no longer private by default. Every website collects data in some form. This includes location details, device information, and browsing habits. Over time, this data builds a clear picture of user behavior. Many people are now uncomfortable with this level of tracking. A VPN browser helps reduce this exposure. It adds a […]
AI In Cyber Security: Who is Winning, Hackers or Security Companies
Cybersecurity once followed clear rules. Companies built firewalls. Users created passwords. Antivirus tools scanned files and removed known threats. When an attack happened, security teams studied it and added new rules. This method worked for many years. It created a sense of control and stability. That sense is gone today. Artificial intelligence has changed how […]
The Biggest AI-Run Cyber Attacks Of All Time
Artificial intelligence is now part of everyday technology. It helps people search faster. It improves medical research. It supports businesses in making better choices. But AI is not used only for good purposes. Cyber criminals have also learned how to use it. This has changed the nature of cyber attacks across the world. In the […]
Switch To a Dark Background Theme on Windows: Enable Dark Mode
People often like a screen that feels gentle on the eyes. A darker style softens bright areas and makes long computer sessions easier to handle. It also gives the desktop a cleaner and more modern feel. When you switch to a dark background theme in Windows, the colors shift to deeper shades that reduce glare […]
Complete Guide on Managing Audio Input Devices [Latest In 2026]
People use microphones for meetings, games, classes, recordings, and voice chats, so any problem with the device can interrupt their work. Even a small system error can make the voice weak or stop it fully. This is why knowing the basics of managing audio input devices is helpful for new and experienced users. Windows includes […]
Resetting Audio Settings on Windows 11: Complete Guide
Sound problems can disrupt work, study, or entertainment. Many users face issues where the audio becomes too low, too loud, unclear, or does not play at all. A common way to solve these problems is by resetting audio settings to their original state. This helps Windows rebuild its sound setup from the beginning. Windows 11 […]
Troubleshooting Headphone Detection: Headphones Not Detected/Working
A lot of users run into sound problems at some point. A common one is when the computer does not pick up the headphones. You plug them in, but the speakers keep playing. This can break your focus during work, movies, music, or calls. It also causes confusion because the reason is not always clear […]
How To Re-Pair Bluetooth Earbuds For Stereo Sound on Windows
Wireless earbuds are often paired with computers for rich stereo sound, but things don’t always go smoothly. Sometimes, the system defaults to mono audio or fails to activate the correct playback mode. This can disrupt music, calls, or gaming, making the sound feel flat and lifeless. These glitches usually stem from improper setup. Windows might […]
How To Manage Camera Permissions for App On Windows: Complete Guide [2026]
Many users run into issues when trying to join video calls or online meetings—their camera simply won’t turn on. This can happen for a few reasons: Windows might be blocking access, or the app may not have the correct permissions. These hiccups often lead to confusion and frustration. Fortunately, Windows provides straightforward tools to help […]
Help With Color Management In Windows: Complete Guide [2026]
Color often decides how we experience a picture, a video, a website, or even a simple chart. Many users feel confused when colors look different on each screen. A monitor may show a softer shade while a laptop shows a sharper one. This creates doubt and slows down work. It can also lead to mistakes […]







![Complete Guide on Managing Audio Input Devices [Latest In 2026]](https://www.techcommuters.com/wp-content/uploads/2025/12/Complete-Guide-on-Managing-Audio-Input-Devices.webp)




![Help With Color Management In Windows Complete Guide [2026]](https://www.techcommuters.com/wp-content/uploads/2025/12/Help-With-Color-Management-In-Windows-Complete-Guide.webp)

