How to Fix Cannot Verify Server Identity on iPhone or iPad?
Introduction
While carrying out any work, like sending/receiving emails, errors like the “Cannot Verify Server Identity” one in iOS devices are possible. This happens when the device cannot verify the legitimacy of the mail server’s certificate. Due to an incorrect signature, expired certificate, or mismatch of server and given domain name, the verification process deems it as inauthentic and shows the error.
With this error, users cannot exchange their emails through the account, so a quick resolution is necessary. At this time, you can use Norton’s LifeLock to protect your email account and other ID details.
How to Rectify the Cannot Verify Server Identity Issue?
To remove the error- Cannot Verify Server Identity, iPhone and iPad users take several steps on their devices. Which one will suit your needs depends on the main cause of the error on your iPhone or iPad. The following are the most common solutions to the problem.
Solution 1: Reboot the iPhone/iPad Device
One of the easiest solutions for the Cannot Verify Server Identity error is to restart the device directly. This simple troubleshooting technique will interfere with the server connection and renew the connection when it reboots again. To note, doing this step is suitable if you are unaware of the exact cause for the error and is a minor failsafe process. If the reason is more complex, the error message will appear later.
Hold the Up-volume button and the side button to switch off the iPhone/iPad device. Press and hold until the “Slide to power off” option appears. Move the given slider icon to the end: that will switch the device off. Then, press the side button and hold until the device restarts.
Solution 2: Kill the Mail app
Some iOS users keep the Mail app continuously active, and that can cause it to start lagging or show errors. So, it would help if you swipe up the iPhone screen to open the app carousel. Keep swiping right until you reach the Mail app and swipe on it up. Deactivate the app and switch it on again later.
Solution 3: Disconnect/Reconnect the Internet Connection
Some users notice the Cannot Verify Server Identity iPhone or iPad error even if the mail server and device are not affected. This can occur if the local network connection they are using is facing some error.
If your connection to an ISP is causing the problem, disconnect and reconnect with a few minutes of a gap in between. Additionally, you can turn the modem and router off if you are using them. Restart again after a minute of waiting.
Solution 4: Recheck the iOS Update
In iPhone/iPad devices, the Mail app is one of the in-built applications. So, updating the iOS or iPadOS system to a new version can change the Mail app if such software upgrades are available in the bundled iOS update. If you are using the device with an older OS and see the Cannot Verify Server Identity error, you should do an IOS update.
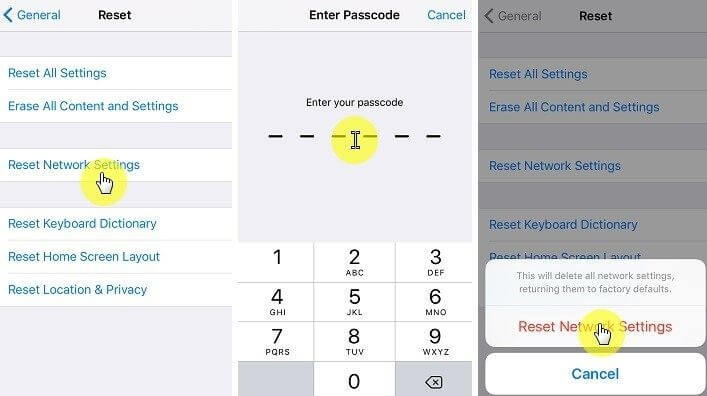
Solution 5: Reset the Network Settings
While you can disconnect and reconnect your internet connection like in Solution 3, resetting the network settings is better if the problem persists. When users reset the network settings, the process deletes all recent settings, like customizations one made. It will return to default settings and remove the issues causing the verification issue.
How to do this?
Step 1: Open your iPad or iPhone device and go to the Settings application.
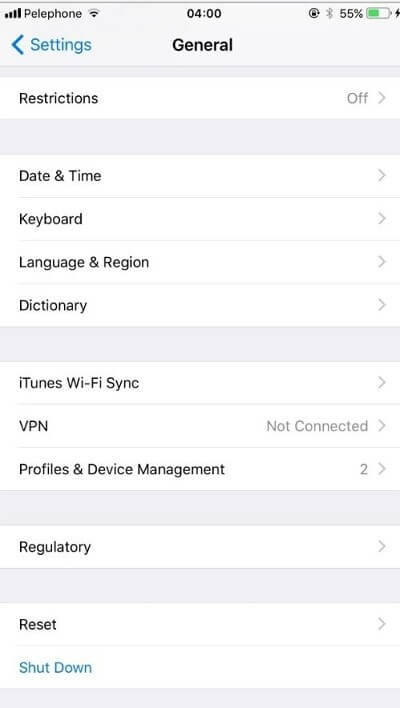
Step 2: Click on General > Reset.
Step 3: Under the next options, choose the “Reset Network Settings” option.
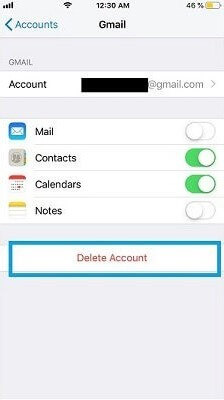
Solution 6: Delete the Mail Account and Open it Again
When you notice the Cannot Verify Server Identity problem on your device, you can delete your account completely from the app. That will remove the issue, and you can reactivate your account afterward. With software like Norton LifeLock, you can back up your account data and restore them when you re-add your mail account.
How to do this?
Step 1: Open the Settings app through your iPad or iPhone device.
Step 2: In the list, choose the “Passwords & Accounts” selection. If you are using older iOS version models, press the “Mail, Contacts, Calendars” or “Mail” option > Accounts.

Step 3: Select the email account to remove. Press the Delete Account button.
Step 4: A confirmation prompt will appear. Hit the “Delete from My iPhone/iPad” or “Delete Account” button, as per your device’s OS version.
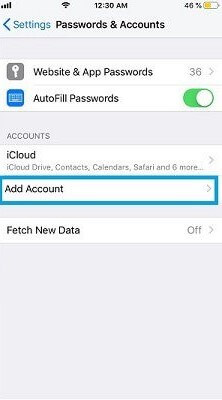
Step 5: Return to the Accounts & Passwords/Accounts page after deleting the account.
Step 6: Choose the “Add Account” selection. Tap on the preferred email service provider and insert all details as instructed to finish the email setup.
Solution 7: Disable the SSL
Another common fix to handle the Cannot Verify Server Identity issue is deactivating the active SSL certificates. These can sometimes block the verification process while trying to include a new account. So, disabling SSL might remove the problem.
How to do this?
Step 1: On your iPad or iPhone, go to Settings.
Step 2: Open the Passwords & Accounts menu.
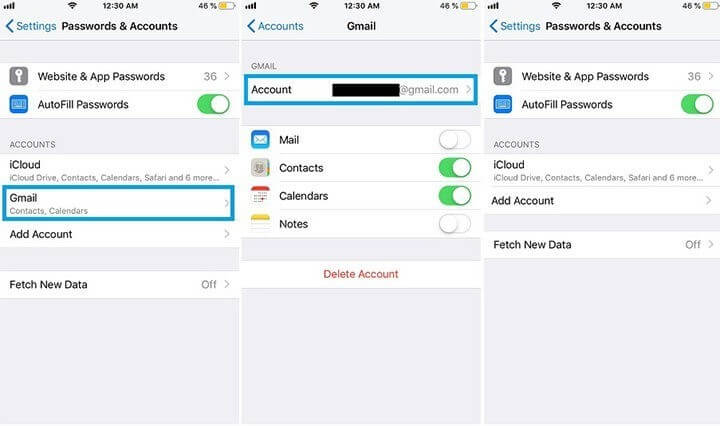
Step 3: Scroll down to find the Mail app and click on it.
Step 4: Tap on the registered account > Advanced.
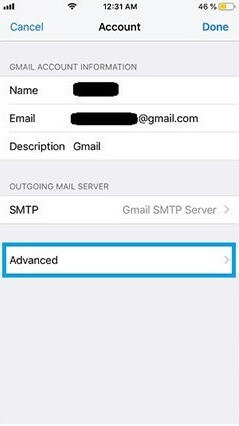
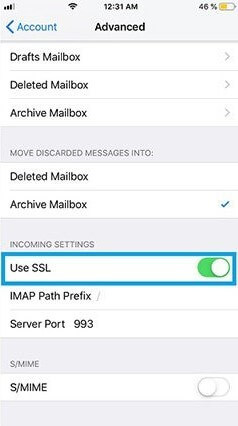
Step 5: Find the SSL choice and toggle the slider beside it to disable the SSL.
Solution 8: Change the Time and Date
If you have the wrong date and time input within your iPhone device, that can cause the Cannot Verify Server Identity prompt. You should check that your smartphone’s date/time settings are the right ones per your exact time zone. If not, change it to resolve the problem.
How to do this?
Step 1: Open your iPhone and access Settings.
Step 2: Click on General > Date & Time.
Step 3: In the next screen, toggle the slider beside the “Set Automatically” feature to enable it. Then, check if the email sending and receiving function has resumed and understand if the process worked.
Solution 9: Update the Settings for your iOS carrier
If an iPhone is working with an outdated carrier setting, the verification problem is interrupted due to incompatibility. Plus, the out-of-date iOS carrier settings will affect accurate connectivity with your accounts. You should update these settings to eliminate the error.
How to do this?
Step 1: Open your iPad or iPhone device and access Settings.
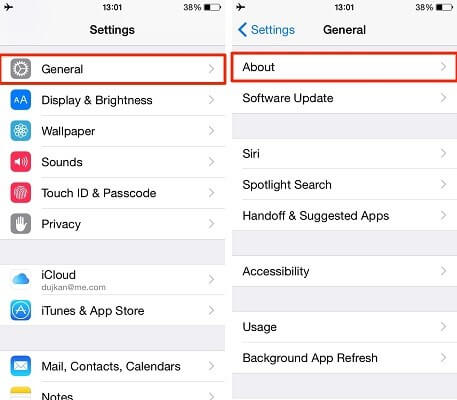
Step 2: In the Settings menu, click on the General option.
Step 3: Press About and see the information about the carrier update available. Follow all the given instructions for installing the latest update.
Solution 10: Troubleshoot the minor issues
Multiple other situations can cause the Cannot Verify Server Identity iPhone or iPad-based error prompt. For example, if the server and domain names are not aligning, the verification process will analyze the certificate as incorrect or fake. You can carry out small troubleshooting steps to rectify the domain and server name-related inconsistencies.
- Users operating with a Shared Hosting connection can remove the problem when they adjust the mail server configurations on their iPhones.
- Changing the server name for the email as per the certificate name will work for hosting customers utilizing VPS accounts.
- The VPS users working with a self-signed certificate may see this issue since that is not considered liable. You should prepare a liable certificate from a registered source.
Conclusion
Depending on the main reason for the error, you can use different techniques like restarting the app/device, resetting connections, or deleting and adding the account. Check if the steady mail process is working again after trying out these techniques. Also, use the reliable Norton LifeLock software to protect your account data while trying out these solutions.
If you found this guide helpful, check out our other detailed posts.
Author Bio:
Dinesh Lakhwani 

Dinesh Lakhwani, the entrepreneurial brain behind “TechCommuters,” achieved big things in the tech world. He started the company to make smart and user-friendly tech solutions. Thanks to his sharp thinking, focus on quality and the motto of never giving up, TechCommuters became a top player in the industry. His commitment to excellence has propelled the company to a leading position in the industry.
Popular Post


Recent Post

What is Microsoft Autopilot Everything You Need To Know
Technology has changed the way companies manage computers. Well, yes! Employees now work from offices, homes, and remote locations. Setting up devices manually for every worker takes time and effort. It can also create mistakes that slow down productivity. This is where Microsoft Autopilot becomes useful. It helps businesses prepare and deploy Windows devices with […]

Enable Automatic Device Locking Feature Windows: Complete Guide
Introduction: Your computer stores important information such as emails, documents, passwords, and personal photos. Leaving it unlocked can put that data at risk. Thankfully, Windows includes built-in features that can automatically lock your device when you are away. Setting up automatic device locking is quick and does not require any extra software. In this guide, […]

How to Update Wireless Network Driver in Windows 11 and 10
Your Wi-Fi keeps dropping. Pages load slowly. The connection feels unstable? Well, you are not alone. Most of the time, the problem is not with your internet plan. It is with your wireless network driver. A driver is a small piece of software that helps your computer talk to its hardware. When it gets outdated, […]

Common Windows 11 Problems and Solutions (2026 Version)
Windows 11 has become more polished over the years, but it is still not completely free from problems. Even after regular updates from Microsoft, many users continue to face issues like lagging performance, failed updates, audio troubles, random crashes, and network errors. Some problems appear after installing new features, while others develop gradually as the […]

Fortect Driver Updater Review: Features, Steps, Pros, and Cons.
A new PC usually feels quick and responsive. Applications open instantly, games run smoothly, and everything works as expected. As time passes, however, you may notice slower performance, system crashes, hardware glitches, or devices that stop working properly. While many people assume malware or low storage space is to blame, outdated drivers are often the […]

New Features Coming in Windows 11 This Year [2026]
Microsoft is always working to make Windows better. This year is no exception. The company has announced and rolled out several exciting updates for its users. These updates touch almost every part of the operating system. From the Start menu to system settings, changes are arriving fast. If you use Windows daily, you will want […]

Top 14 Duplicate Photo Finder and Remover For Windows [2026]
Introduction: Photos pile up fast. Well, yes! You take ten shots of the same moment. You download the same image twice. You back up your folder and forget you already did it. Before you know it, your storage is packed with copies. A good duplicate photo finder helps you take back that space without losing […]

Advanced System Settings on Windows 11: Complete Guide
Windows 11 is a powerful operating system. It comes with many features that most users never explore. One of the most useful areas is the System Properties panel. This is where you can control how your computer performs, starts up, and handles memory. Many users only change basic settings like wallpaper or display options. But […]

21 Advanced Windows Security Settings: Latest Updates
Introduction: Your computer holds a lot of important data. From personal photos to work files, everything sits on your Windows system. That is why protecting it properly matters more than ever. Windows security settings have come a long way. Microsoft keeps adding stronger layers of protection with every update. Most users never go beyond the […]

Security Upgrades of Microsoft Windows in This Decade [Complete Guide]
Introduction Microsoft has been working hard to make Windows safer every year. Cyberattacks are growing fast. Hackers are smarter now. They target millions of Windows users every single day. That is why Microsoft has added many powerful new security upgrades of Microsoft Windows since 2020. These upgrades protect your data, your identity, and your device […]

