How to Watch Netflix 4K Videos on Mac?

Last updated on January 22nd, 2025 at 9:19 am
Netflix is one of the biggest streaming services currently, with almost 214 million subscribers. Users can easily Watch Netflix 4K content on their laptops or PC, but this is only available for Windows.
Mac aims to offer the MacOS Big Sur with Safari 14 updates for users to stream the content on Netflix in HDR 4K definition. However, the software would work on specific laptop and desktop versions of Mac that can support compatible hardware.
How to Watch Netflix Videos in 4K on Mac
There are particular methods available for Mac users to stream their Netflix content on Mac devices. We tried out different options to see the most suitable and easy processes for current versions. Prerequisites include a Netflix Premium account, Mac device with Kaby Lake or newer Intel processor type, HDCP 2.2-supported 4K TV, and a Windows 10 copy.
Here are the top methods available.
Method 1: Install Windows 10 and Parallels Desktop on Mac
One manner of watching Mac Netflix 4K content is using a virtual machine, such as Parallels Desktop on your device. With this, you can operate Windows 10 through your Mac computer or laptop. Users who do not want to boot their system in specific manners prefer this method since they can easily switch between Windows and macOS.
This method is suitable for systems with a dual-monitor setup alternatively but can run on single-monitor systems.
How to do this?
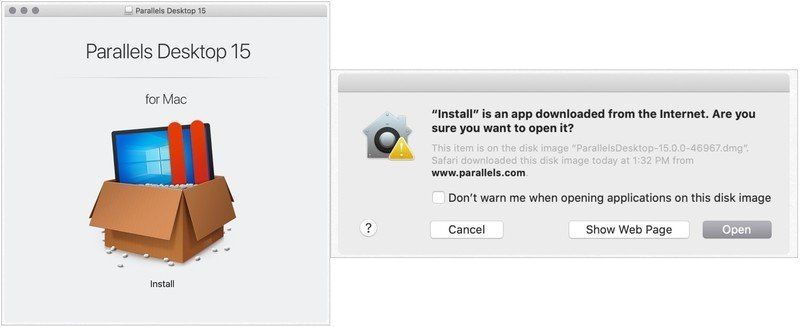
Step 1: It is important to open the Parallels Desktop 15 site and download the software with a free trial or full plan.
Step 2: Open the Finder app from your system search bar after the download completes. Look for the file ParallelsDesktop.dmg here and double-click your cursor on it.
On the other hand, you can directly search for the file through Spotlight.
Step 3: The Parallels Dekstop window would come up. Double-click your cursor on top of the “Install” button.
Step 4: The software would show a confirmation prompt. Click on “Open” to begin the installation.
Step 5: Click Yes on the License Agreement prompt.
Step 6: On the next window, add the Administrator Name and then the Password in the correct fields.

Step 7: After it installs, the software will automatically open the page for Windows 10 download on your Mac device.
Click on the “Install Windows” button to start the installation or “Skip” if you have a Windows 10 copy.
Step 8: Next, users are re-directed to the page for the Parallels Desktop account. Create a new one if you do not have an account or Sign-in to your available one.
Step 9: A new window would appear with a simulated Windows interface. Stream Mac Netflix 4K content through there.
Method 2: Use Bootcamp to Install Windows 10 on Mac
Another method to Watch Netflix 4K content on Mac is to use the Bootcamp software. Users can expect a native Windows-centric experience here. The Bootcamp partitions the SSD or HDD of the Mac into a section where one can install the Windows 10 version. Here, you can select the Windows partition to steam Mac Netflix 4K videos and then use the Mac partition later.
How to do this?
The following is a three-part breakdown of the setup of Windows 10 OS on Mac via Bootcamp for easy Mac Netflix 4K streaming.
Sequence 1: Install Windows 10 using BootCamp
First, you must download the Windows 10 version on the Mac device. Then, use the next steps for further installation.
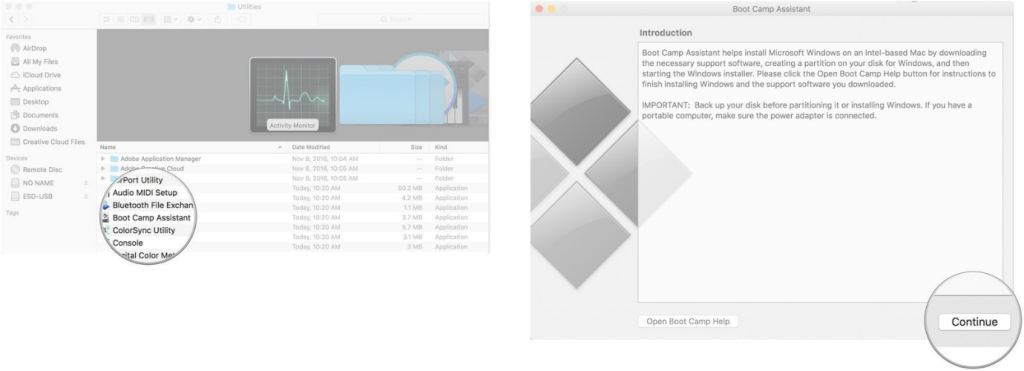
Step 1: Open Applications > Utilities. Find the “Boot Camp Assistant” option and launch the application.
Step 2: Click on the Continue button. The BootCamp software would automatically search for the Windows 10 ISO file you downloaded.
Step 3: Under the Partition section, click on the slider and drag it to the side. This would set the default 458 GB storage. Users have the choice to adjust their storage requirements depending on the space limits inside the drive.
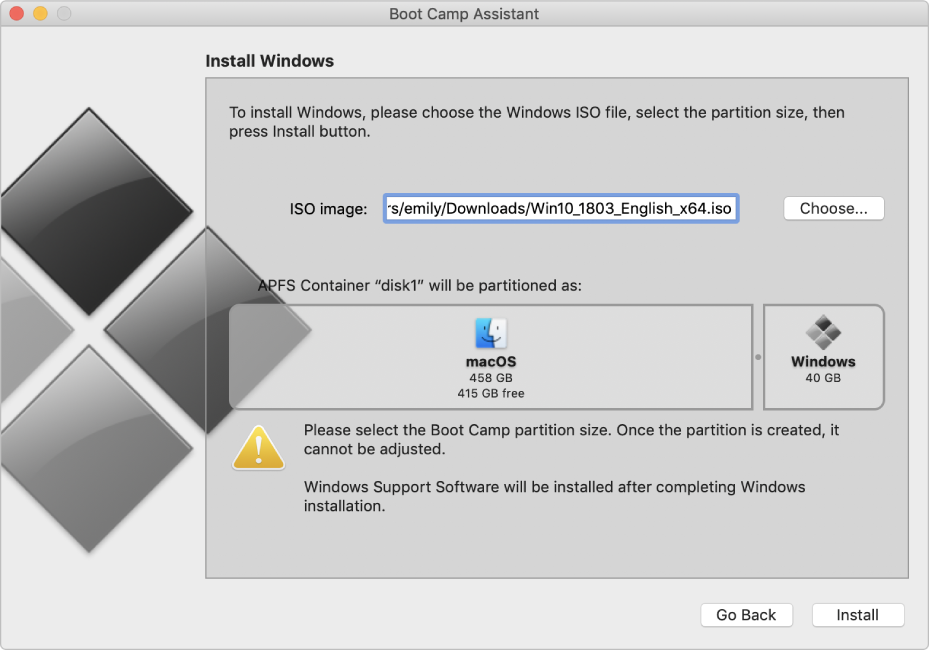
Step 4: Click on the “Install” button. This would download the Windows support.

Step 5: Add your set password in the available field.
Step 6: Click on the OK button. This would restart the Mac device, and the Windows 10 setup window would appear next.
Step 7: Select the preferred language out of the list.
Step 8: Click on the “Install Now” button.
Step 9: Either add your product key code or click the cursor on the “I don’t have a key” option. This step is possible after the installation as well.
Step 10: Choose the Windows 10 Pro option > Next.
Step 11: Click the cursor on the “Custom: Install Windows Only” option on the next window.
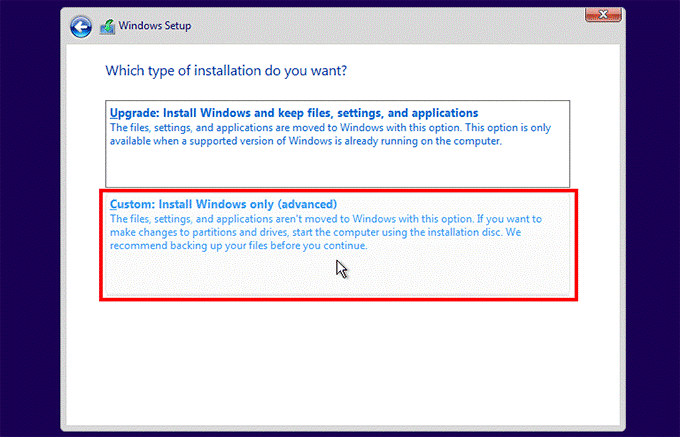
Step 12: Click on top of the “Drive 0 Partition X: BOOTCAMP” option only and then choose Next. This will begin Windows 10 installation.
The Mac device you are using would restart multiple times.
Step 13: On the next setup window, click on the “Customize your installation” or “Use Express Settings” option
Step 14: If you choose the latter, type the username and password of your choice. Then, click the “Next” button.
Step 15: You can select Cortana use or avoid it. The Windows 10 software would boot up completely after this.
Sequence 2: Install the BootCamp on Windows 10 Partition
After the Windows 10 OS loads up on the Mac device, this would activate the BootCamp software installer. The step is important since particular software and drivers enter into the device during the BootCamp installation process. The window for it would crop up on the screen.
Step 1: Click on the “Install” option.
Step 2: Then, choose to agree on the license agreement prompt.
Step 3: Then, click your cursor on the Install option.
Step 4: After the installation is fully done, click on the “Finish” button.
Step 5: Access the Netflix account and Watch Netflix 4K on Mac.
Sequence 3: Return Your Device to macOS Partition
After using the Windows partition screen, it is possible to easily switch the device OS back to macOS.
Step 1: Open the Windows 10 taskbar. Then, click your cursor on the “Show Hidden Icons” option.
Step 2: Click on the Boot Camp option.
Step 3: Then, choose the “Restart in OS X” option.

This would bring the macOS interface again. Alternatively, you can restart the Mac device and press on top of the “Options” key. This would open the boot menu, and you can select your preferred OS for the usage period.
Conclusion
Upon following the different steps correctly, users can Watch Netflix 4K content on their macOS devices. First, check for compatibility to understand which method would work best for your Mac laptop or PC.
If this proved helpful for you, read through our posts for similar guides.
Author Bio:
Dinesh Lakhwani 

Dinesh Lakhwani, the entrepreneurial brain behind “TechCommuters,” achieved big things in the tech world. He started the company to make smart and user-friendly tech solutions. Thanks to his sharp thinking, focus on quality and the motto of never giving up, TechCommuters became a top player in the industry. His commitment to excellence has propelled the company to a leading position in the industry.
Popular Post


Recent Post

21 Advanced Windows Security Settings: Latest Updates
Introduction: Your computer holds a lot of important data. From personal photos to work files, everything sits on your Windows system. That is why protecting it properly matters more than ever. Windows security settings have come a long way. Microsoft keeps adding stronger layers of protection with every update. Most users never go beyond the […]

Security Upgrades of Microsoft Windows in This Decade [Complete Guide]
Introduction Microsoft has been working hard to make Windows safer every year. Cyberattacks are growing fast. Hackers are smarter now. They target millions of Windows users every single day. That is why Microsoft has added many powerful new security upgrades of Microsoft Windows since 2020. These upgrades protect your data, your identity, and your device […]

How To Link a Microsoft Account to a Digital License on Windows [2026]
Most people never think about Windows activation until it suddenly stops working. Something as simple as replacing hardware or reinstalling Windows can cause the system to lose its activated status. Linking your Microsoft account to your digital license beforehand helps prevent unnecessary trouble and makes activation recovery much easier later on. Many people using Windows […]

Monthly Round Up: All Big Incidents Happened for Windows Users in The Month of April 2026
Windows users had a turbulent April 2026. On April 14, Microsoft rolled out its scheduled Patch Tuesday security updates, a routine release meant to close vulnerabilities and resolve known issues. What followed was anything but routine. Rather than strengthening systems, the updates triggered a cascade of fresh problems across Windows 10, Windows 11, and Windows […]
How To Add Or Remove Programs On Windows 11: 4 Quick Methods to Try.
Introduction: Managing software on your computer is something every Windows user should know. Whether you want to install a useful new app or remove programs you no longer need, understanding how to add remove programs can help your PC stay clean, organized, and fast. It also helps free up storage space, reduce clutter, and improve […]

Monthly Round-up: All big cybersecurity incidents happened in the Month of April 2026
April 2026 was one of the most eventful months in recent cybersecurity history. Well, yes. Attackers did not just target one industry or one country. They went after hospitals, government bodies, travel platforms, water utilities, education companies, and healthcare technology firms. The scale and variety of these attacks made it clear that no organization is […]
How To Change Your Default Web Browser Windows 11 And 10 [Complete Guide]
Your web browser is the gateway to everything you do online. It opens your emails, plays your videos, and loads your favorite websites. But what if the browser that opens every time is not the one you like? That is a small problem with a very easy fix. You can change your default web browser […]
Change Time Format On Windows: Complete Guide
Windows show time in different ways. Some people prefer the 12-hour clock with AM and PM. Others like the 24-hour format, also called military time. Knowing how to change time format on your Windows PC is a simple but useful skill. It helps you stay comfortable with your display and avoid confusion. Many users never […]
How To Get Help With Paint In Windows [2026]
Microsoft Paint has been around for decades. It comes with every version of Windows and is one of the easiest tools to use. But even simple tools can cause trouble. If you have ever felt stuck while drawing or editing an image, you are not alone. Many people look for help with Paint in Windows […]
How To Toggle Bluetooth Settings Easily on Windows [2026]
Bluetooth is a key feature on any Windows computer. It allows you to connect devices like headphones, keyboards, mice, and speakers without using wires. Many users rely on it daily, so it helps to know how to switch Bluetooth on or off quickly whenever needed. Sometimes you just want to turn Bluetooth on or off […]

