


Slow computers are a common problem for almost every Windows user. Well, yes! Over time, your PC picks up junk files. These files sit quietly in the background. They take up space and slow things down. Programs open slower. Windows takes longer to boot. Even simple tasks like opening a folder can feel sluggish. There […]
How to Remove Watermark from Photo
A watermark is a symbol or signature that is imprinted on an image. These are often translucent and do not hinder the viewers from enjoying the photo. Watermarking photographs can help safeguard the owner’s copyright by preventing others from using the image without consent.
If you are looking for the appropriate approach for how to remove the watermark, you are at the correct place. We are here to help you with the best possible ways to remove watermarks from any images easily.
Need of Removing Watermarks from Photos
Putting a watermark on the photos can help to decrease thieving. However, many creative photographers and photographers are opposed to this technique. Watermarking your photographs has several drawbacks that you should think about before imprinting all of your excellent shots.
So, before moving on to how to remove watermarks from images, let’s dive into some factors stating of removing watermarks.
- Increases Social Sharing
Social networking platforms aid in the flow of information and content. However, highly watermarked photos can hinder social sharing and lack much consideration. People desire to share photographs that they find attractive and compelling, and a web-sized photo with a noticeable watermark can restrict them from doing so.
Thus, removing the watermark from an image increases the volume of image sharing on social media.
- Makes your picture More appealing
One of the most common concerns from photographers is the disturbance that a watermark may cause in an image. Sometimes photographers and businesses apply a huge watermark over the center of the image, confirming copyright but covering the topic.
If the watermark is excessively black or huge, it is the only object the viewer can properly concentrate on, leaving a bad impression. Therefore, removing the watermark from the image can make it more attractive and appealing.
Now that you know how removing the watermarks can help, let’s discuss the procedures for how to remove watermarks from photographs.
Why Should You Select a Tool for Removing a Watermark from Photos?
There are several laborious techniques to erase watermarks. Else, you can easily crop away that portion of the photos. Selecting the best tool or app will make your work easier. Following are the key benefits of using an appropriate tool for removing the watermark.
- The tools and applications offer a 100 percent guarantee of protecting your file and images.
- Such technologies may remove many watermarks at once. These are more efficient when it comes to batch file processing.
- The majority of programs erase the watermark from their website. As a result, there is no possibility of viruses on the computer.
Know the Methods to Remove Watermark from a Photograph
Some several tools and applications support you in removing a watermark from images. We are going to discuss the best tools along with stepwise solutions. So, without any delays, let’s begin with the method to remove the watermark.
Method 1: Use the Original Program for Removing the Watermark
If you generated your watermarked picture with a program like Microsoft Word, or PowerPoint, use the same approach for removing the watermark.

Based on the approach used to create the watermark, removing it may need additional steps. Following are the steps to remove any watermark from a photograph.
Step 1: First, you need to launch the original software to make the watermarked image.
Step 2: Then, you will have to open the file containing the watermarked image.
Step 3: After that, you need to locate the photo with the watermark.
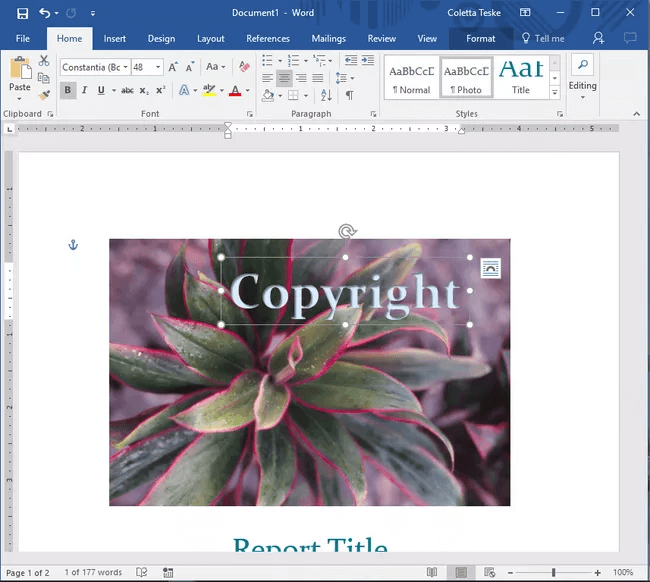
Step 4: Afterwards, you should click on the watermark text or picture and select the delete option.
Step 5: Lastly, you will have to right-click on the same image and choose Save as Picture.
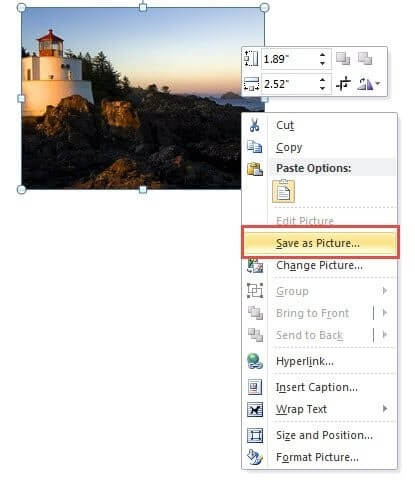
Step 6: Assign the photo its name, select the file type you want to save it and finally click on the save option.
Method 2: Utilize Watermark Remover Available Online
Multiple online solutions help you to know how to eliminate a watermark from any image. Here is a general stepwise procedure to remove a watermark:
Step 1: First of all, you will have to navigate to the homepage of any online watermark remover tool.
Step 2: You need to choose the Upload Image option and then pick. After that, you have to select the photo containing the watermark from the location it is saved.

Step 3: Next, you need to select the Marker Tool. It will help you to mark the watermark portion in the image.

Step 4: After that, you will use the marker tool to draw a line across the watermark. There will be a translucent color appearance on the spot you select.
Step 5: Select the Erase option, located in the upper-middle part, as shown in the image below.
Step 6: Lastly, to download the image with a watermark, you must choose the Download option to save the image to your PC.
Method 3: Use Cropping the Photo to Remove the Watermark
Another option to get the answer of how to remove the watermark is cropping the watermark section from the image. Cropping off watermarks from photographs is the simplest way to remove them.
The Crop tool is available in all photo editors, from the basic and simple versions to advanced photo editors. Bigger watermarks will not work with this method, but the watermarks in corners should be acceptable with it.
You can select any photo editor tool to crop the watermark section for removing the watermark. However, the basic steps that will help you to crop the watermark portion from the images are as follows:
Step 1: First of all, open any photo editor software or application you want to remove your watermark.
Step 2: Next, you need to upload the watermark image. Navigate to the file location where you have saved the image. Pick the image and continue.
Step 3: Now, look for the crop icon in your selected tool and click on it.
Step 5: You need to drag the grips to pick the image segment you wish to save.

Step 6: Lastly, you need to Save or Finish the adjustments by hitting the Save, Finish or Done option.
Final Thoughts
There are several excellent applications available for removing watermarks from photographs. Keep a duplicate of the source photo if you need to try erasing the watermark with a distinct software or application. These techniques differ in difficulty from difficult to simple, and the program used for the process can be both free and quite pricey.
So, choose a watermark remover according to your skill level, goals, and money. Look for a program with a good combination of capability, pricing, and ease of use to remove watermarks from images.
Author Bio:
Dinesh Lakhwani 

Dinesh Lakhwani, the entrepreneurial brain behind “TechCommuters,” achieved big things in the tech world. He started the company to make smart and user-friendly tech solutions. Thanks to his sharp thinking, focus on quality and the motto of never giving up, TechCommuters became a top player in the industry. His commitment to excellence has propelled the company to a leading position in the industry.
Popular Post
Recent Post

CCleaner PC Optimizer Review: A Complete Guide for Windows Users
If your computer has started to feel slow, you are not alone. Most Windows PCs slow down over time. Junk files pile up. The registry gets messy. Too many apps open when you start your PC. All this adds up and makes even a good machine feel tired. This is where a PC cleaner tool […]

Auslogics Duplicate File Finder: Full Review and User Guide
A computer quietly gathers clutter over time. This includes duplicate photos, repeated downloads, and forgotten backups hiding in random folders. This buildup slowly eats away at storage and can make even a fast PC feel sluggish. Manually finding and deleting duplicates is tedious. It means checking every folder, comparing file names, and guessing which copies […]

CCleaner Duplicate File Finder: Key Features, Pricing, Step-by-Step Guide and More
Every computer collects junk over time. Right? Well, yes! Photos often get copied twice. Documents get saved in two folders by mistake. Old downloads pile up and never get deleted. This slowly eats up your storage space, and most people do not even notice until their drive is almost full. That is where a duplicate […]

Duplicate File Finder Pro: A Complete Review, Everything You Should Know
Computers collect thousands of files over time. Well, yes! Many of them end up being duplicates created by backups, downloads, or accidental copies. These extra files take up valuable storage space and make it harder to keep everything organized. Finding and removing them manually can take hours. Right? Duplicate File Finder Pro is a tool […]

Top 3 Duplicate File Finder for Windows 11 & Windows 10
If your PC storage keeps filling up even after you delete big files, duplicate files could be the real reason. Most of us save the same photo twice, download a document more than once, or copy a whole folder by mistake. Over months and years, these duplicate files pile up quietly. You do not even […]

Monitor Screen Calibration Guide: Everything You Should Know
Your monitor shows colors every single day. But are those colors actually correct? Most people never stop to check this. They just use the screen as it comes out of the box. This habit can lead to wrong colors in photos, videos, and work files. Colors may look too warm or too cold without you […]

How To Check Installed RAM and RAM Slots [Complete Guide]
RAM plays an important role in how smoothly a computer runs. Short for Random Access Memory, it stores the data and instructions that Windows and active applications need at any given moment. From opening multiple browser tabs to running games and productivity software, RAM helps keep everything responsive. A system with limited memory may experience […]

What is Microsoft Autopilot Everything You Need To Know
Technology has changed the way companies manage computers. Well, yes! Employees now work from offices, homes, and remote locations. Setting up devices manually for every worker takes time and effort. It can also create mistakes that slow down productivity. This is where Microsoft Autopilot becomes useful. It helps businesses prepare and deploy Windows devices with […]

Enable Automatic Device Locking Feature Windows: Complete Guide
Introduction: Your computer stores important information such as emails, documents, passwords, and personal photos. Leaving it unlocked can put that data at risk. Thankfully, Windows includes built-in features that can automatically lock your device when you are away. Setting up automatic device locking is quick and does not require any extra software. In this guide, […]

