How to Show, Hide, or Restore Windows 10 Desktop Icons
Last updated on February 14th, 2026 at 5:18 am
We normally create a lot of desktop icons to use as a shortcut for the most frequently used programs and files. At the same time, there are people who keep their desktop wallpaper absolutely clean and hide icons for better visibility. If you don’t know how to hide icons or how to show desktop icons or how to create one on the desktop wallpaper, we are going to explore these very basic hacks to show / hide / restore Windows 10 desktop icons.
______________________________________________________________________
Things to Check Before Changing Desktop Icon Settings
Before showing, hiding, or restoring desktop icons, a few simple checks help avoid confusion. Desktop icon issues are often caused by display settings, user profiles, or accidental changes. Knowing what affects icon visibility saves time and prevents repeated adjustments. These precautions ensure the changes work as expected.
- Check screen resolution settings
Incorrect resolution can misalign icons or push them off-screen. - Confirm you are on the correct user account
Icon settings are user-specific in Windows 10. - Right-click the desktop carefully
Small misclicks can trigger unwanted layout changes. - Disable tablet mode
Tablet mode hides desktop elements by default. - Verify view options
Icons may be hidden if “Show desktop icons” is unchecked. - Restart File Explorer
Explorer glitches can hide icons temporarily. - Check display scaling
High scaling settings may cause icons to disappear. - Save open work before changes
Explorer restarts can briefly refresh the desktop.
How to Show, Hide, or Restore Desktop Icons on Windows 10
Activate ‘Show Desktop Icons’ Option
![]()
![]()
Step 1. ‘Right Click’ anywhere on the clear space of the desktop wallpaper.
Step 2. Click on ‘View’ option Go to ‘Show Desktop Icons’ and put a check to enable viewing desktop icons.
Note: You should be able to get all your desktop icons back on the screen.
Deactivate ‘Show Desktop Icons’ Option
Step 1. ‘Right Click’ anywhere on the clear space of the desktop wallpaper.
Step 2. Click on ‘View’ option Go to ‘Show Desktop Icons’ and remove the check mark to disable viewing desktop icons.
Didn’t work? Try the next solution!
Turn Off ‘Start Full Screen’ Mode

While using windows in ‘Full-Screen Mode’ somehow hide the Desktop icons. Here are the steps to turn off the Start Menu Full-screen mode.
Step 1. Right-click on the Start button and click on ‘Settings’ Select ‘Personalization’ from the list click on ‘Start’ tab on the left hand side list toggle off ‘Use Start Full Screen’.
You may also ‘Right Click’ on on clear area of desktop wallpaper and click on ‘Personalization’ go to ‘Start’ tab on the left-hand side toggle off ‘Use Start Full Screen’.
Also Read: Common Windows 10 Problems & Solutions
Restore Default Windows 10 Desktop Icons
![]()
![]()
If you’ve previously added or removed some of the ‘Special Icons’ like This PC, Network, User, Computer OR Control Panel to the desktop, OR if you want to know how to add computer icons on Windows 10 desktop background, you may follow these steps to do it.
Step 1. ‘Right Click’ on the clear area of the desktop wallpaper Click on ‘Personalize’ option.
Step 2. Go to ‘Themes’ tab on the left-hand side panel Under ‘Related Settings’ on the right-hand side of the window, Click on ‘Desktop Icon Settings’.
Step 3. Check to Add or Uncheck to Remove the Windows Desktop Icons from the list and Click on ‘Apply’ & ‘Ok’.
Also Read: How To Speed Up Windows 10 Boot Time
Toggle ‘Tablet Mode’ Off

Step 1. Right-click on ‘Start’ button to go to ‘Settings’ option click on ‘System’ and choose ‘Tablet Mode’ from the left-hand side panel.
Step 2. Scroll through ‘Make Windows More Touch-Friendly When Using Your Device As A Tablet’ and turn it Off.
Step 3. Select ‘Use Desktop mode’ under ‘When I Sign In’ drop-down list.
You should be able to see your desktop icons now. Try turning on and off ‘Tablet Mode’ a few times. If that doesn’t work. Still No Go? Try the steps below!
Disable Any Secondary Monitor
One should also check if the secondary monitor is Enabled OR Disabled.
Step 1. ‘Right Click’ on the clear area of the desktop wallpaper Click on ‘Display Settings’ option.
Step 2. Under ‘Multiple Display’ select ‘Display 1’ as your primary display.
Restart ‘Explorer.exe’ Service
At times, restarting ‘Windows Explorer’ also gets the default settings back on the system. To perform the following, try out these steps.
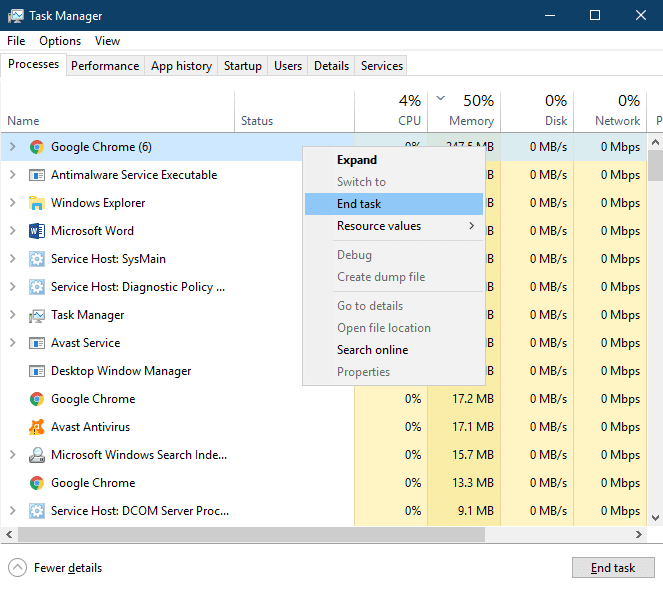
Step 1. Press Ctrl + Alt + Delete key together and select ‘Task Manager’. You can also right-click on ‘Task Bar’ and click on ‘Task manager’. Or press ‘Win + R’ and type ‘taskmgr’ to open ‘Task Manager’.
Step 2. Go to ‘Processes’ tab and look for ‘explorer.exe’ or ‘Windows Explorer’.
Step 3. Select the process and click on ‘End Task’ / ‘Restart’ button at the bottom right corner of the window. You may also do the same by right-clicking on the process and clicking on ‘End Task’.
Step 4. Go to the ‘File Menu’ of Task Manager and click on ‘New Task’. In the command run box, type ‘explorer.exe’ and hit enter. A New ‘Windows Explorer’ window should open on your screen.
Note: Once the service is restarted, you should get your desktop icons back on the screen. If not, you may restart the system and check if it comes up. Still not lucky? Try another solution!
Registry Edit To Show/Hide Desktop Items
![]()
![]()
Note: Registry Editor is a very critical section of Windows, and you need to be very accurate while tweaking it. Below steps are based on Windows 10 OS and needs to be followed with accuracy.
Step 1. Press ‘Win + R’ keys together to open the Run Dialogue Box.
Step 2. Open ‘Registry Editor’ by typing ‘regedit’ and clicking on ‘Ok’. You may also type the same in the Search Bar and press Enter to open.
Step 3. From the left-hand side panel, go to the following path and create a new 32-bit DWORD value with the NoDesktop name and press enter. You may also copy-paste the address below in the registry address bar. Computer\HKEY_LOCAL_MACHINE\SOFTWARE\Microsoft\Windows\CurrentVersion\Policies\Explorer
Note: Regardless you are using 64-bit Windows, you will need to use a 32-bit DWORD as the value type.
Step 4. Set the ‘Value Data’ to 1 to hide and 0 to show the desktop icons.
Note: A logout and login will be required for changes to take effect. To apply the same option for all users, you need to ensure that you are logged in using an Administrator account.
Then, go to the following Registry key:
HKEY_LOCAL_MACHINE\Software\Microsoft\Windows\CurrentVersion\Policies\Explorer
Create and configure the same value here, NoDesktop, as described above.
Using ‘Group Policy’ To Show / Hide All Desktop Icons in Windows 10
Group policy is one of the important and sensitive steps to show / hide all desktop icons in Windows 10.
Step 1. Press ‘Win + R’ key together to open Run Dialogue Box.
Step 2. Type ‘gpedit.msc’ and click on ‘Ok’ to open ‘Group Policy Editor’. You may type the same in the search box and press enter.
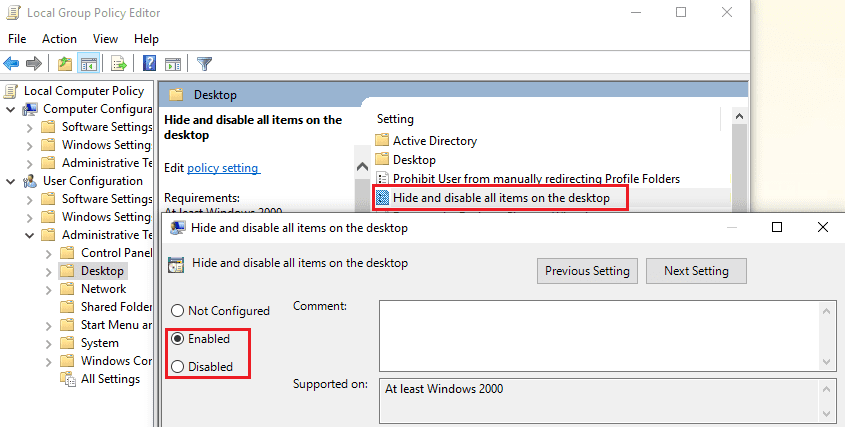
Step 3. Go to User Configuration\Administrative Templates\Desktop.
Step 4. Look for ‘Hide and disable all items on the desktop’ and enable the policy option to hide icons and disable the show icons. Click on ‘Apply’ and ‘Ok’.
Advanced Tips for Managing Windows 10 Desktop Icons
Once the basic steps are done, advanced adjustments help maintain a clean desktop. These tips improve visibility, stability, and organization. They are helpful when icons keep disappearing or resetting.
- Reset icon cache
A corrupted cache prevents icons from loading properly. - Use the desktop icon settings panel
System icons like This PC can be restored here. - Disable third-party themes
Custom themes sometimes override icon settings. - Check group policy settings
Some policies hide desktop icons on shared systems. - Scan for malware
Malware can alter Explorer behavior. - Update graphics drivers
Display driver issues can affect desktop rendering. - Turn off auto-arrange if needed
This allows manual icon placement. - Create a restore point
Restore points help revert unwanted layout changes.
Conclusion
Desktop icons in Windows 10 are simple but essential. They offer quick access to files, folders, and system tools. When icons disappear, it often feels like data is lost. In most cases, the cause is minor. A hidden view setting, tablet mode, or Explorer glitch is usually responsible. Basic checks restore icons quickly without advanced fixes.
Keeping icon settings stable requires small habits. Avoid frequent theme changes. Keep display drivers updated. Restart Explorer when icons behave oddly. Advanced steps like resetting the icon cache prevent repeated issues. With the right approach, desktop icons stay visible, organized, and easy to manage.
FAQs
Why did my desktop icons suddenly disappear in Windows 10?
This usually happens when the “Show desktop icons” option is disabled. Tablet mode can also hide icons automatically. Display scaling or resolution changes may push icons off-screen. File Explorer may fail to refresh. Restarting Explorer or checking view settings usually restores them.
How do I restore default Windows 10 system icons?
Open Desktop Icon Settings from the Personalization menu. Enable system icons like This PC and Recycle Bin. Apply the changes and refresh the desktop. If icons still do not appear, restart File Explorer. System icons return without affecting personal files.
Can desktop icons reset after a Windows update?
Yes, updates can reset layout or display preferences. Icons may move or disappear after major updates. This happens due to the driver or the setting refresh. Re-enabling desktop icon options fixes the issue. Updates rarely delete actual files, only icon visibility changes.
Author Bio:
Dinesh Lakhwani 

Dinesh Lakhwani, the entrepreneurial brain behind “TechCommuters,” achieved big things in the tech world. He started the company to make smart and user-friendly tech solutions. Thanks to his sharp thinking, focus on quality and the motto of never giving up, TechCommuters became a top player in the industry. His commitment to excellence has propelled the company to a leading position in the industry.
Popular Post


Recent Post

How To Adjust The Mouse Pointer Speed: Complete Guide
Using a computer every day means you use the mouse a lot. The mouse pointer moves on the screen and helps you click, scroll, and select items. Many people never think about the speed of the mouse pointer. They have used the default setting for years. This can cause small problems over time. A slow […]

How to Change Mouse Scrolling Settings In Windows
A mouse is one of the most used computer tools. People use it every day. They scroll through emails. They scroll through documents. They scroll through websites and images. The movement becomes automatic. Most users do not notice it. That is why problems often go unnoticed. Scrolling problems show up slowly. At first, it feels […]

Keyboard Light Settings: Keyboard Lighting Control [Complete Guide]
Keyboards are no longer simple typing tools. Well, yes! Over time, they have evolved to include features that improve comfort, visibility, and overall experience. One of the most useful features today is keyboard lighting. It helps users work comfortably in low-light conditions. It also reduces strain when typing for long hours. Many users first notice […]

Customizing Pointer Appearance: Complete Guide
The way your mouse pointer looks on your computer may seem like a small detail. But customizing pointer appearance can make using your PC more comfortable and visually appealing. Many users do not realize that they can change the pointer size, color, and style to fit their needs. Whether you want a bigger pointer for […]

How To Choose a Computer Monitor: Monitor Buying Guide
Buying a monitor looks easy. Many people think all screens are the same. That belief causes regret later. A monitor is not just a display. It is a daily tool. You read on it. You work on it. You relax with it. Small problems become big over time. Poor brightness hurts eyes. Bad size causes […]

How To Get Help With File Explorer in Windows 11 [Complete Guide]
File Explorer is one of the most important tools in Windows 11. It is used to open folders, view files, and manage stored data. Almost every action on a Windows computer depends on it in some way. When users open documents, save downloads, or organize photos, File Explorer is always involved. Because it is used […]

How To Fix A Frozen Computer: Complete Guide [Windows 11/10]
A frozen computer is one of the most common problems Windows users face. The screen stops responding. The mouse pointer does not move. Keyboard inputs do nothing. You may hear the fan running loudly. Sometimes the system looks alive, but nothing works. This situation often happens when you are busy or working on something important. […]

How to Upgrade Computer RAM: Complete Guide
Upgrading RAM is one of the simplest ways to improve a computer. It helps the system feel faster and smoother. Apps open quicker. Browsers handle more tabs. Games and tools run with less delay. Many users search for how to upgrade computer RAM because it gives real results without high cost. You do not need […]

How To Clean Your Computer Keyboard: Complete Guide
A computer keyboard is touched more than almost any other device you own. It is used during work, study, gaming, and casual browsing. Fingers carry natural oils, sweat, and dirt. Small food crumbs fall between keys without notice. Dust settles each day slowly. Over time, this creates a hidden layer of grime. Many users do […]
Computer Mouse Buying Guide for Beginners and Advanced Users
Buying a mouse looks easy at first. Many people think all mouse work the same way. Well, that idea often leads to regret later. A mouse affects comfort, speed, and daily work. It matters for office tasks, gaming, design, and study. The right choice reduces strain and improves control. The wrong one feels annoying every […]

