Make The Most Out Of Skype – Use Skype Like A Pro
Since 2003, Skype has become a regular mode of communication. Skype is one of the best Text and Video chat platforms for personal and professional users. You can connect to anyone on Skype across the world on a Voice or Video call. All you need to go for a Skype download on your device and create a Microsoft Skype Account and go for a Skype login to connect the world.
Though you must be using Skype Account since long however there are still ways that you might not be aware of. There is always a scope of improvement in the experience using tips and tricks to do small tweaking and enhance the quality or do more.
We have explored a few most useful and unknown tricks of Skype in this article.
Setup A Skype Caller ID
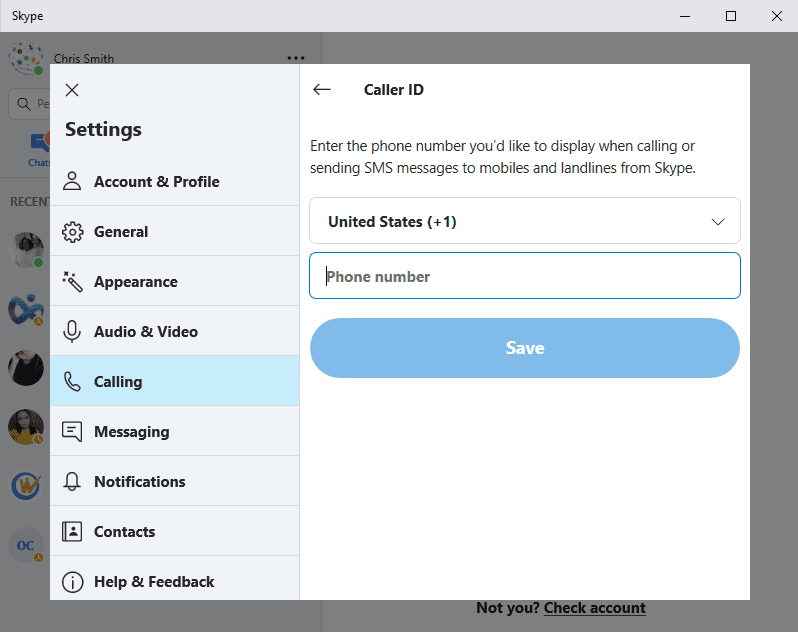
Setting up a Skype Caller ID is very important while calling mobile numbers or landline numbers.
Step 1. Click on three dots to open the menu on the top and click on ‘Settings’.
Step 2. Click on ‘Calling’ option from the left-hand side panel.
Step 3. Click on the ‘Caller ID’ option and enter a phone number to display whenever you make a call.
Remove All Skype Ads
Skype Ads are annoying as they popup while using Skype for communicating. You can block all the Skype Ads using this simple trick on your PC.
Step 1. Get into ‘Control Panel’ and go to ‘Network and Internet’.
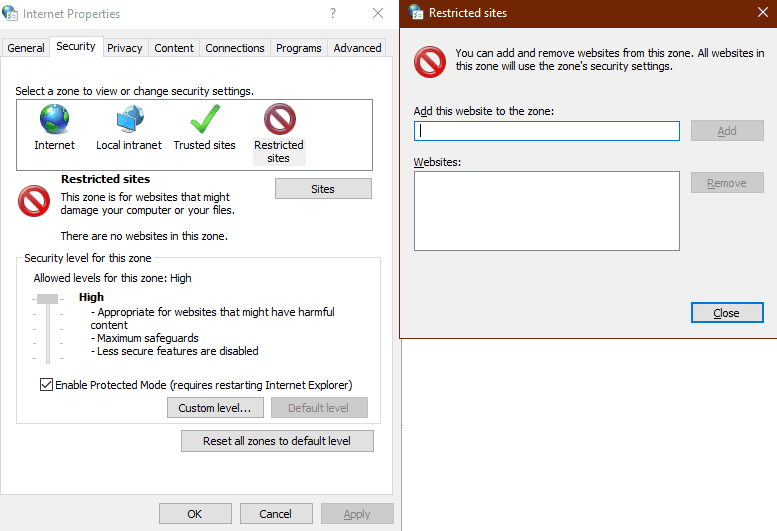
Step 2. Click on Internet Options and a new window will open up. You may also try (Win + R) top open Run command window and type in ‘inetcpl.cpl’ and press Enter.
Step 3. Go to the ‘Security’ tab and select ‘Restricted Sites’. The ‘Site’ button will become accessible, click on it.
Step 4. On the next page enter this: ‘https://apps.Skype.com/’, and click on Add button.
Note: You will need to restart your PC and open Skype to get the changes in effect and all Ads will not be visible.
Skype Call Forwarding
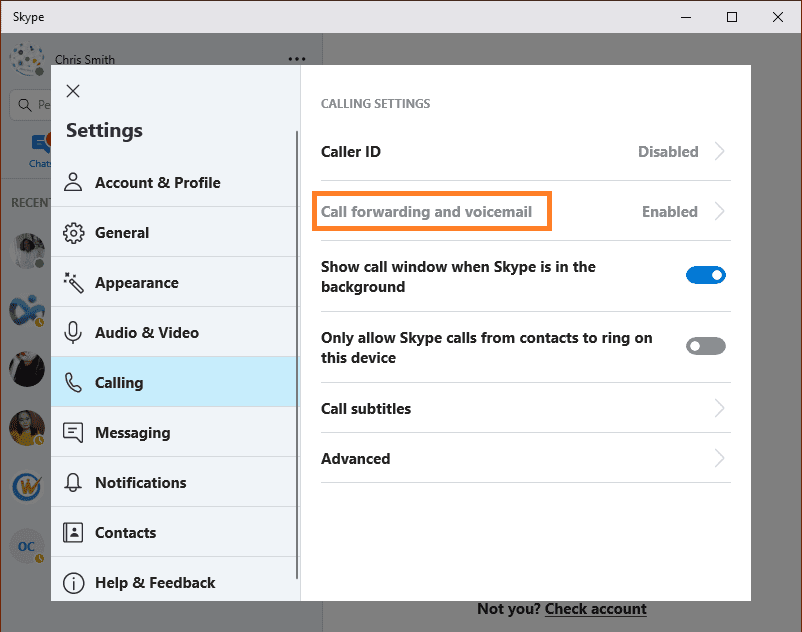
To set up Skype call forwarding, follow these steps:
Step 1. Click on three dots to open the menu on the top and click on ‘Settings’.
Step 2. Click on ‘Calling’ option from the left-hand side panel.
Step 3. Click on the ‘Call Forwarding and Voicemail’ option. Enter a Phone number to forward any call and enable the radio button.
Create a Skype Meeting Using Outlook
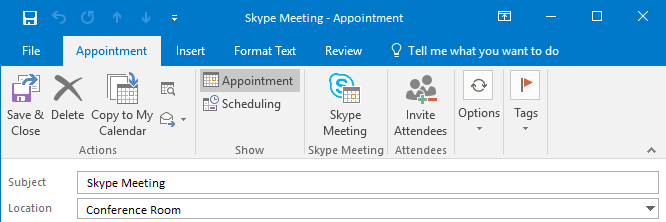
Microsoft Outlook can be used to setup a Skype Meeting without wasting time to schedule meetings on other tools. Chances of errors are higher on other tools. Someone might forget to join on time while others don’t have appropriate browser plugins installed or some other issue. Avoid all this hassle by simply using a Skype for Business account.
Step 1. While creating an appointment on Outlook, Go to ‘Skype Meeting’ on the Appointment tab.
Step 2. This will send an Email invitation with an embed link in the description. People can click on the link to join the meeting or setup a reminder to click and Join Meeting whenever it pops up.
Step 3. Skype for Business will automatically launch to join the meeting.
Note: If you are unable to see the ‘Skype Meeting’ option on your Outlook, Go to File menu ‘Options’ ‘Add-ins’. Go to ‘Manage’ dropdown option click on ‘COM Add-ins’ and click on ‘Go’. Put a check in front of ‘Skype Meeting Add-in for Microsoft Office’ and click on ‘Ok’.
Use Skype Shortcuts
If you know a few basic simple keyboard shortcuts, life becomes easy during a meeting or a call to manage or take control over the meeting.
| Pause/Resume Video | Win + F5 |
| Place a Call on Hold | Ctrl + Shift + H |
| End a Call | Alt + Q |
| Stop Sharing Your Screen | Ctrl + Alt + S |
| Regain Control of a Shared Screen | Ctrl + Alt + Spacebar |
| Accept an Incoming Invitation | Win + Shift + O |
| Decline an Incoming Invitation | Win + Esc |
| Mute/Unmute Audio | Win + F4 |
There are hundreds of keyboard shortcuts for Skype. We have listed a few basic shortcuts and rest can be accessed on Support.Microsoft.com.
Record A Call OR Meeting
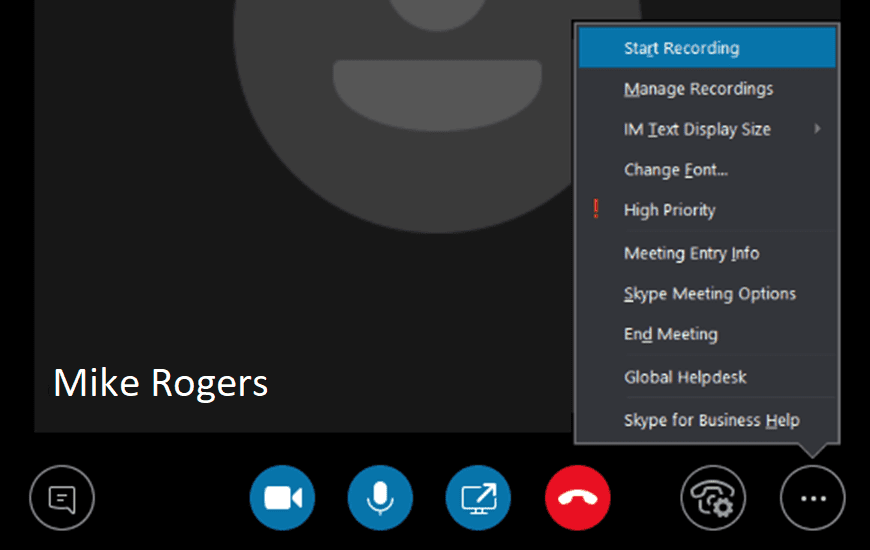
There are people who get complete blank once the meeting is over or after the call ends. To overcome this, you can record all your Skype meetings. Skype latest version not only records a call, but also records call activity, audio, video, screen share, and instant messages. You can do the same by following these steps:
Step 1. When a Skype meeting or Conference is initiated, click on Meeting options (…) and then click on ‘Start Recording’.
Note: Everyone connected to the meeting will be notified that you’re recording the session. A red circle symbol will appear at the top of the call throughout the session. The meeting can be paused or stopped as per the need. As soon as the meeting finishes, the recording will end and will be automatically saved in MP4 format.
Where to Look for A Recorded Session?
To find the recorded session, open the main screen of Skype for Business and go to ‘Settings’ dropdown list. Click on ‘Tools’ ‘Recording Manager’. Here you can find metadata of your recordings, like file name, date and length. You can also browse the files on your PC and play the recordings or share it with someone.
Change Privacy Relationship for Contacts
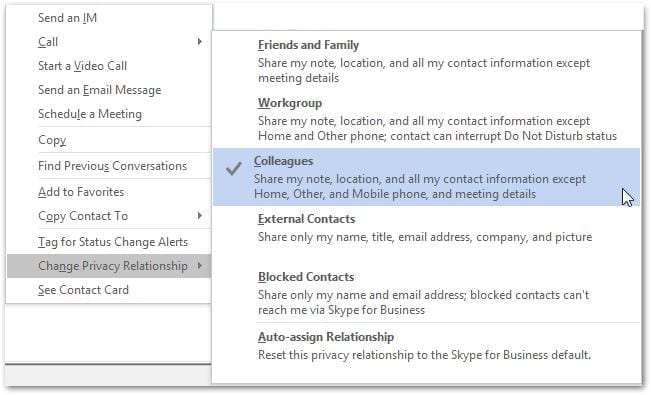
You can customize contact categories out of Five Relationship Levels in your Skype contact category. Every individual contact can be assigned within one of these categories. Each relationship level is assigned with different permissions. For example, Friends and Family can’t see your meeting details and Workgroup can interrupt your ‘Do Not Disturb’ status.
Right-click on their name and select ‘Change Privacy Relationship’. You can review the current category and change according to your preference. You can also select multiple contacts to change the relationship category but pressing Ctrl key and clicking on multiple contacts one by one. If you want to revert the changes of relationship categories, you may click on Auto-assign Relationship at the bottom.
Initiate A Whiteboard, Poll OR Q&A In Skype
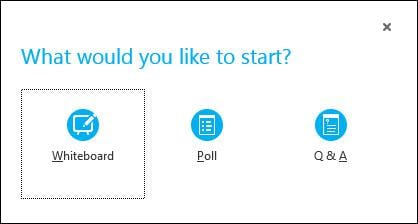
This is a very interesting feature of Skype meeting. Add more fun and creativity to your meetings by adding these small features to it. To add any of these, click on ‘Present Content Button’ click on ‘More’, and then choose any of the above three options (Whiteboard, Poll, or Q&A). These options will be displayed on everyone’s screen once selected.
Selecting Whiteboard will open a white drawing area with tools to draw or highlight something just like MS Paint. The whiteboard will minimize if you switch to other presenting options, but the content will remain intact for further use.
If you go for a Poll option, it will open a window to vote out options. You can gather choices of other participants by using a Poll option. You can select ‘Poll Actions’ to adjust the settings, like hiding the votes from attendees, saving the results, or closing the poll.
If you go with Q&A, it will switch the standard chat window into a Question and Answer module. If any attendee asks a question, you’ll receive a notification to type a response and press Enter. This will display the question and answer to everyone in the meeting. You can also save the recorded Q&A session for further references.
Open a PowerPoint Presentation in Skype
If you want to share a PowerPoint Presentation, the integration with PowerPoint allows you to do so.
Step 1. Open the presentation in PowerPoint.
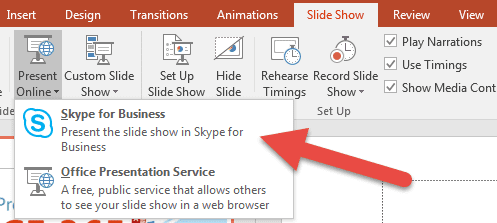
Step 2. Click on the ‘Slide Show’ tab and click on ‘Present Online’ and select ‘Skype for Business’.
This will start sharing the presentation with a current meeting or you can initiate a new meeting with PowerPoint Presentation. You can do the same with other Office applications. Simply go to the ‘File’ menu and click on ‘Share’ and click on ‘Present Online’. Select ‘Skype for Business’ from the dropdown to start presenting any file.
Backup Skype Chat History
To backup Skype chat history, press (Win + R) to open ‘Run’ command and type %appdata%\Skype and click on ‘Ok’.
Windows Explorer will open up the folder with your ‘Skype ID’ as a name. Here we are searching for a file called ‘main.db’, this file contains all your Skype chat history. You can copy and paste the file to a different location to create a secured backup on your PC.
Wrapping Up
If you have Skype latest version or you have tried Skype update, you would be able to gain access to all these Skype tips and tricks. All you need to do is use your Microsoft Account to go for Skype login on App or use Skype web and configure these settings.
You can also go for Skype download on your smartphone and use the Skype App. Use these simple tips and tricks while using Skype and leave your best impression on your connections.
For more such tips, tricks and tech related updates subscribe to this Blog and if you are more into tech-related videos do watch and subscribe to our YouTube channel. You could also reach us on Facebook and Pinterest.
For any suggestions and queries, you may drop a comment and we shall revert soon.
Popular Post
Recent Post
Best Y2mate Alternatives- A Comprehensive List In 2024
Videos are one of the most popular media types among consumers currently, for posting promotional or informative content. This is why YouTube has one of the biggest user-bases currently, and people search for tools to easily download these files. However, YouTube features a strong algorithm and legal guidelines that stop people from downloading or using […]
Availability of ONLYOFFICE Docs v.7.0- Latest Version Comes with More Modifications
ONLYOFFICE delivers the newest Docs v.7.0 with additional features, new upgrades, and a host of revisions for professional collaboration uses. Having a high-quality feature-rich office suite invigorates the productivity rate of companies, professionals, and even homeowners. ONLYOFFICE developers have therefore come up with the latest version of the DOCS online office suite. The version boasts […]
Review: Status Saver For WhatsApp 2024 [Free]
Ever since WhatsApp launched its own Status feature, people are loving it. As we can add interesting images and videos to our WhatsApp Status to show it to others and also watch others’ status. But the problem often faced by the users is that WhatsApp does not have a Status saver option. So what do […]
5 Cybersecurity Tips To Manage Your Remote Personnel Challenges
Did you know that your company’s information can unintentionally be put at risk by you and your employees when working remotely? This could possibly lead to fraud, data breaches, and a plethora of other unwanted consequences. Although remote working offers many benefits, it also comes with some risks. Continue reading if you want to learn […]
What is FileRepMalware & How to Remove It?
For the continued safety of the digital system and files, many people download a third-party antivirus program into their device. These keep the system safe from security issues after an intricate scanning process. Windows devices can install options like Norton, Avast, or AVG for quick and efficient malware/virus detection. In many cases, the tag FileRepMalware […]
SaaS Growth in 2022: Growth, Challenges, and Strategies
Software-as-a-Service (SaaS) is expanding very quickly in the entire IT business. SaaS models are the first preferences of many enterprises because of their flexibility, cost-effectiveness and subscription-based model. In the pandemic, companies required the cloud network; thus, SaaS has only got growth and will be growing. Gartner and BMC have given highly optimized reports, according […]
M1 Pro vs. M1 Max: Which Is The Better Mac Chip
In 2020, Apple’s M1 chip debuted and blew us all away with how much it improved performance and efficiency in the MacBook Air M1, Mac Mini M1, and MacBook Pro M1. Mac users were still on the M1 performance hangover when Apple launched M1 Pro and M1 Max with better performance promise. Both chips are […]
Apple Pay Not Working! Here’s How to Fix It (10 Fixes)
Today, people are more and more relying upon digital payments because they are safe and fast. But sometimes, when you have to make an urgent payment, and your Apple Pay is not working, there is nothing more frustrating than it. Apple Pay might have military-grade level security, but it is still prone to errors. However, […]
How to Fix WiFi Disappeared in Windows 11?
Users have complained that the WiFi symbol has disappeared from their taskbar after upgrading their PC to Windows 11. A network icon is present on the taskbar that displays network access. When your device doesn’t have the essential drivers installed, you will see an absent WiFi icon. Furthermore, if your computer’s WiFi adapter is deactivated […]
How to Fix Windows Update Service Not Running
The majority of Windows upgrades address security concerns. It is the most serious issue, as viruses or hackers might take advantage of them. Other flaws and concerns in Windows 10 can be resolved through updates. They may impact the sustainability of your OS, even if they are not accountable for security breaches. When you check […]

