How To Screen Record in Windows 11 Laptop/PC [Complete Guide]
Screen recording has become a common need today. People use it to share tutorials, record gameplay, or save online meetings. With a few clicks, you can capture everything on your display. This makes it easier to explain ideas, create lessons, or keep a copy of something important.
If you have ever asked how to record your screen on Windows or how to record your computer screen, you are not alone.
Many people look for simple ways to do this. Windows 11 gives you built-in tools. You can also use apps that add more features. Screen recording in a laptop or PC is easy once you learn the basic steps.
Precautions to Take: Recording Screen on Windows
Before you begin, it is smart to take some precautions. These steps will help you record smoothly and keep your system safe.
- Close personal or private files you do not want to appear.
- Check if your PC or laptop has enough free disk space.
- Adjust the microphone and camera settings before recording.
- Turn off notifications to avoid sudden pop-ups.
- Keep your laptop charged or connect to power.
- Test audio quality if you plan to record voice or system sound.
- Use a stable internet connection for online meetings.
- Save all your ongoing work before starting the recording.
How to Record Your Screen on Windows PC
If you wonder how to screen record on laptop or how to screen record on a PC, there are many ways. You can use built-in Windows tools or install other apps. Here are the three most trusted methods.
Method 1: Use Xbox Game Bar
The Xbox Game Bar is a built-in tool in Windows 11. Many people use it to record games, but it works for any app or program on your PC. It does not need extra downloads, which makes it very quick and easy. This is a good option if you want to know how to record your computer screen without installing software.
The tool lets you record in high quality and also capture system audio or your microphone. You can even take screenshots while recording. Files are saved directly to your computer, so you can access them right away. For most people asking how to record your screen on Windows, this is the fastest way.
Step 1. Press Windows Key + G to open the Xbox Game Bar.
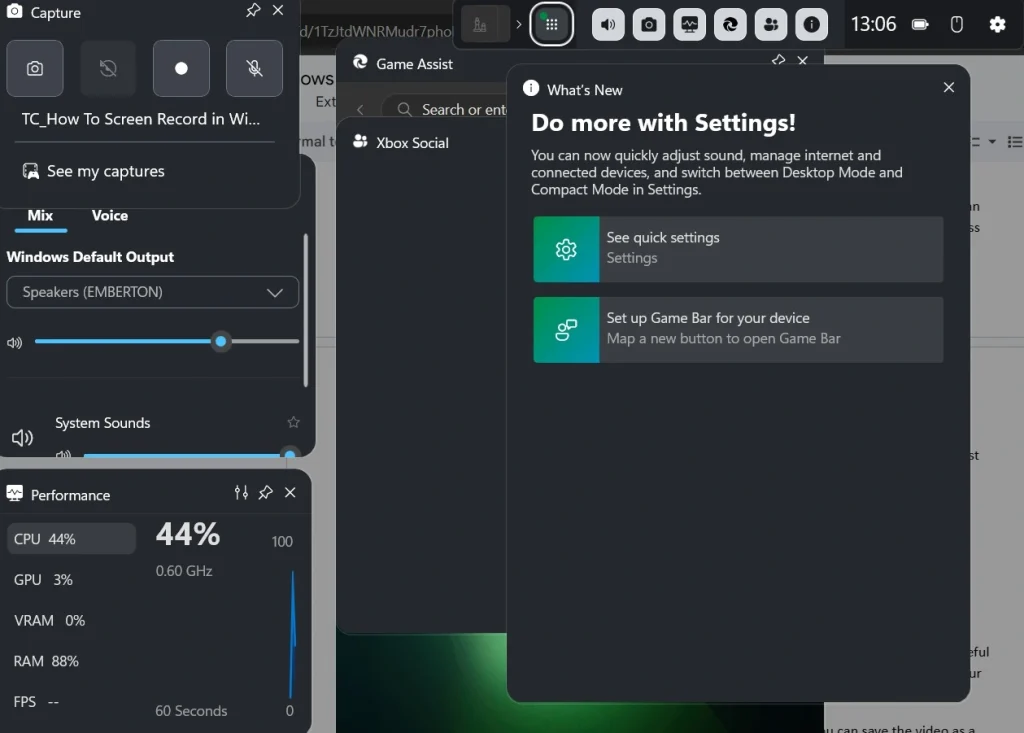
Step 2. Click the white record button, or press Windows Key + Alt + R to start.
Method 2: Use Microsoft PowerPoint
PowerPoint has a screen recording feature that many people do not know about. It is a hidden but useful tool for teachers, trainers, and anyone making presentations. With this option, you can record your computer screen and then place the video right inside your slide.
It is simple to use and works well for short recordings. After recording, you can save the video as a separate file. This makes it useful when you want to share or upload it outside of PowerPoint. For users searching how to record your screen on Windows for work or study, this method is very effective.
Step 1. Open PowerPoint and go to Insert > Screen Recording.
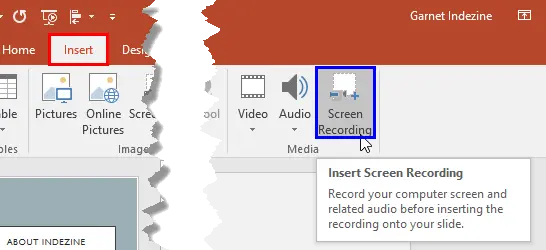
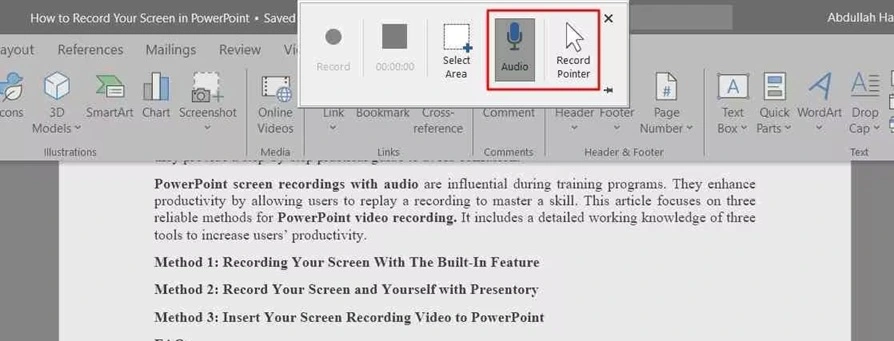
Step 2. Select the part of the screen you want to capture, then click record.
Method 3: Use Third-Party Software
Sometimes you need more control than built-in tools provide. This is when third-party software helps. Apps like OBS Studio, Bandicam, or Camtasia give more options, such as editing, screen overlays, and flexible file formats. These tools are popular with gamers, YouTubers, and professionals.
They are also good for long recordings because they do not stop after a set time. You can record with multiple audio sources and choose different screen areas. If you want advanced features, this is the best answer for how to screen record on Windows or how to record on PC.
Step 1. Download and install a trusted app like OBS Studio.
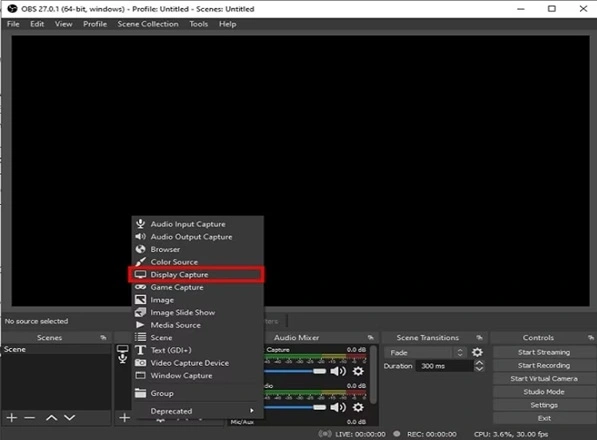
Step 2. Choose the screen area, audio, and video settings, then click record.
Method 4: Use Snipping Tool
Windows 11 has updated the Snipping Tool. It is not only for screenshots anymore. The latest version also allows you to record your computer screen. This feature is simple and built into the system, so you do not need to install anything new.
It works well for quick recordings and short clips. You can choose part of your screen and record without opening heavy apps. If you often ask how to screen record on a laptop without extra tools, this method is perfect.
Step 1. Open Snipping Tool from the Start menu.
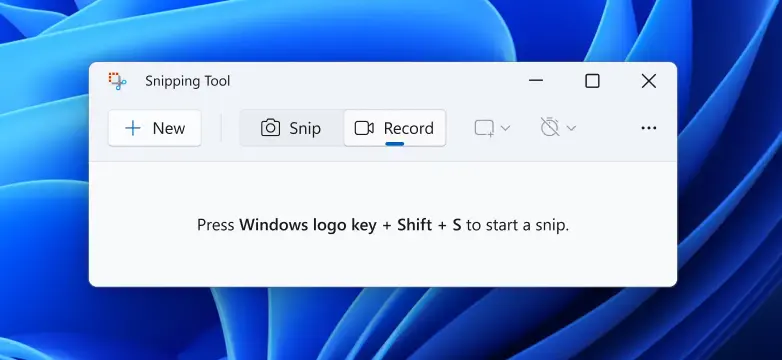
Step 2. Click on the record button, select your area, and press start.
Author’s Tip
When you record your screen, keep recordings short. A ten-minute video is easier to manage than an hour-long one. Short clips are also easier to share online.
Pay attention to the audio. Viewers can forgive poor video quality, but unclear sound is harder to follow. If your microphone is weak, add subtitles. This keeps your recording useful.
Organize your files. Rename each saved recording with a clear title and date. This makes it simple to find them later, especially if you make many screen recordings on Windows.
Common Problems When Recording Screen on Windows
When learning how to record your screen on Windows, you may face a few small issues. These are normal and easy to fix.
- No Sound Recorded – Check your microphone or system audio settings. Make sure the correct device is selected.
- Low Video Quality – Adjust the settings in Xbox Game Bar or the app you use. Higher quality gives better results but needs more storage.
- Recording Stops Suddenly – This can happen if your PC runs out of space or memory. Close other apps before recording.
- App Not Recording – Some apps, like certain system windows, cannot be recorded with Xbox Game Bar. In such cases, try PowerPoint or third-party software.
- Video Not Saving – Always stop the recording properly. If files are missing, check the Captures folder or your chosen save location.
These problems are common but not hard to solve. Once fixed, you can record smoothly.
Best Uses of Screen Recording in Laptop or PC
Screen recording in laptop or PC is more than just capturing games. It can help in many parts of daily life.
- Online Classes – Students and teachers can record lessons to watch later.
- Work Meetings – Record meetings on your PC to keep notes and details.
- Tutorials – Show others how to do something by recording your computer screen.
- Gaming – Share your gameplay with friends or upload it online.
- Tech Support – Record a problem on your screen to show it to support staff.
If you often ask how to record your computer screen, think of these uses. It saves time and makes sharing information easier.
Conclusion
Learning how to record your screen on Windows does not take much time. Once you know the methods, you can do it in minutes. Xbox Game Bar, PowerPoint, and third-party apps all work well.
If you are searching how to screen record on Windows or how to record on PC, these options will guide you. Each method fits a different need, from simple capture to advanced editing.
Screen recording on a laptop or PC is no longer difficult. With these tools, you can create tutorials, record meetings, or share gameplay with ease. Start with one method today and see how simple it feels.
FAQs
Q1. Can I record my full screen in Windows 11?
Yes, you can record the full screen. Xbox Game Bar lets you record games or apps in full view. PowerPoint allows you to capture the whole display as well. Third-party apps like OBS Studio give even more control. These are the best choices when you want the complete screen recorded without missing any part.
Q2. Why is my screen recording not saving?
Sometimes the recording does not save because of low storage or app errors. Xbox Game Bar saves files in the Captures folder, but if your disk is full, the video will not appear. Another issue is closing the app too soon. Always stop the recording properly and wait for it to save. Check your folders before recording again to avoid losing your work.
Q3. Can I record with sound in Windows 11?
Yes, you can record with sound. Xbox Game Bar has settings for the microphone and system sound. PowerPoint also records with audio if enabled. Third-party apps let you select both the microphone and the system input at the same time. This is very useful for tutorials, meetings, and gameplay. Always check sound levels before you start.
Author Bio:
Dinesh Lakhwani 

Dinesh Lakhwani, the entrepreneurial brain behind “TechCommuters,” achieved big things in the tech world. He started the company to make smart and user-friendly tech solutions. Thanks to his sharp thinking, focus on quality and the motto of never giving up, TechCommuters became a top player in the industry. His commitment to excellence has propelled the company to a leading position in the industry.
Popular Post


Recent Post
How to Switch From Local To Microsoft Account On Windows
Many users begin with a local account when they set up a new Windows computer. A local account works only on that single device. It stores settings, files, and preferences locally. It does not connect to online Microsoft services. For basic offline use, it works well. However, as digital needs grow, many users want better […]

How to Switch Windows 10 to a Local Account: Complete Guide
Windows 10 allows users to sign in with either a Microsoft account or a local account. When you set up a new computer, the system often suggests using a Microsoft account. This account connects your device to Microsoft services such as Outlook, OneDrive, and the Microsoft Store. It also syncs settings, themes, and passwords across […]

How To Change Default Apps For File Types In Windows
Windows is designed to make using your computer easy. One way it does this is by assigning default apps to different file types. This means when you open a file, Windows automatically opens it with a specific program. For example, photos may open with Photos, music with Groove Music, and PDFs with Edge. These default […]

How To Adjust The Mouse Pointer Speed: Complete Guide
Using a computer every day means you use the mouse a lot. The mouse pointer moves on the screen and helps you click, scroll, and select items. Many people never think about the speed of the mouse pointer. They have used the default setting for years. This can cause small problems over time. A slow […]

How to Change Mouse Scrolling Settings In Windows
A mouse is one of the most used computer tools. People use it every day. They scroll through emails. They scroll through documents. They scroll through websites and images. The movement becomes automatic. Most users do not notice it. That is why problems often go unnoticed. Scrolling problems show up slowly. At first, it feels […]

Keyboard Light Settings: Keyboard Lighting Control [Complete Guide]
Keyboards are no longer simple typing tools. Well, yes! Over time, they have evolved to include features that improve comfort, visibility, and overall experience. One of the most useful features today is keyboard lighting. It helps users work comfortably in low-light conditions. It also reduces strain when typing for long hours. Many users first notice […]

Customizing Pointer Appearance: Complete Guide
The way your mouse pointer looks on your computer may seem like a small detail. But customizing pointer appearance can make using your PC more comfortable and visually appealing. Many users do not realize that they can change the pointer size, color, and style to fit their needs. Whether you want a bigger pointer for […]

How To Choose a Computer Monitor: Monitor Buying Guide
Buying a monitor looks easy. Many people think all screens are the same. That belief causes regret later. A monitor is not just a display. It is a daily tool. You read on it. You work on it. You relax with it. Small problems become big over time. Poor brightness hurts eyes. Bad size causes […]

How To Get Help With File Explorer in Windows 11 [Complete Guide]
File Explorer is one of the most important tools in Windows 11. It is used to open folders, view files, and manage stored data. Almost every action on a Windows computer depends on it in some way. When users open documents, save downloads, or organize photos, File Explorer is always involved. Because it is used […]

How To Fix A Frozen Computer: Complete Guide [Windows 11/10]
A frozen computer is one of the most common problems Windows users face. The screen stops responding. The mouse pointer does not move. Keyboard inputs do nothing. You may hear the fan running loudly. Sometimes the system looks alive, but nothing works. This situation often happens when you are busy or working on something important. […]

