How to Enable or Disable USB Port in Windows 7
Last updated on March 16th, 2024 at 10:24 am
There are numerous different easy methods available to enable or disable the USB port in your Windows-based laptop or computer. So, let’s protect your vital files and information by adopting any of the following methods.
Methods to Enable or Disable USB Ports in Windows 7
Enabling and disabling the USB port feature in your system means that nobody can insert a USB drive into your device and save data in it. This feature can be enabled and disabled pretty quickly.
Method 1: Use of Device Manager
Okay, so you can block or unblock USB port insertion from your Windows computer very smoothly with the assistance of Device Manager. You have to follow these steps to implement this method;
Step 1: Just right-click anywhere on your My Computer icon present on your desktop, then click on the Manage option.
Step 2: Then a new similar-looking pop-up menu will appear on your screen and now on the left side the option Device Manager should be selected.
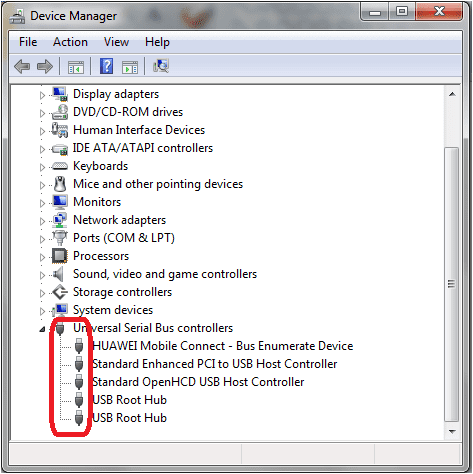
Step 3: Here, you have to search for the Universal Serial Bus Controllers option.
Step 4: Under Universal Serial Bus Controllers, you should select all the devices and press right-click again to either disable or enable the feature. Test to check whether the feature is working or not.
Special Note – If the port feature isn’t working yet, then restart your system. You have to manually enable that Device later even if you reboot your computer still it won’t automatically enable USB ports.
Also Read: How to Recover Permanently Deleted Files in Windows 10/8/7
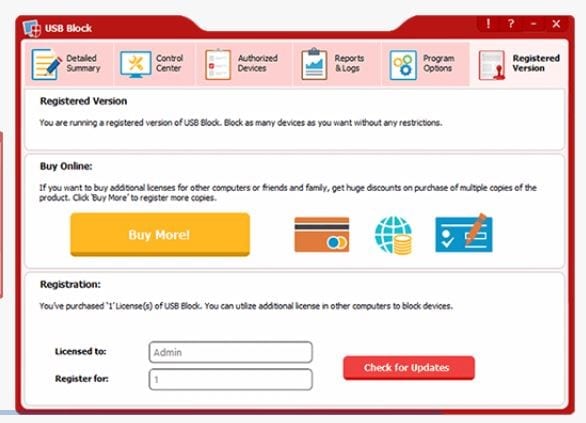
Method 2: Use Third-Party Software
If you want to disable the USB ports on your computer and you are not satisfied with the internal methods, then you can use the third-party software on your computer. The third-party software will easily block the USB port feature from your system with this downloaded software. The software can be downloaded from the different sources available online. This software will make your enabling and disabling process super simple.
Method 3: Use Mass Storage Drivers with the Registry
This method has been popularly used by Windows users as the process of enabling and disabling USB ports is very fast. It is an effective method as compared to the other methods. If you are a smart user, then the register setting will save up your lots of time for you. Follow the lead to start the process;
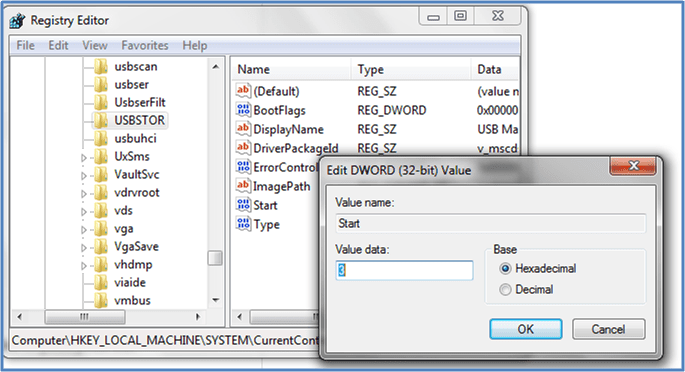
Step 1: You have to go to your desktop and press “Win Button + R”. There, you have to type the command “Regedit” and press the OK Button.
Step 2: Here, you have to prompt a Window, for this you have to follow this written command;
HIKEY_LOCAL_MACHINE -> SYSTEM -> CURRENT CONTROL SET -> SERVICES -> USBSTOR
Step 3: Now, you have to go to the START work area. In this section, to enable or disable the USB port, you just have to change the Value data with 4 Next Time if you want to enable the port, then change the Value to 3, but remember after every change the value will close your Registry Editor.
Method 4: Uninstall your USB Mass Storage Drive
In administrative organizations like schools or colleges, the best solution to disable the USB ports is to uninstall each and every USB driver installed in the system. This method is an extreme step that should be only taken by the user who never wants to transfer data via USB ports. So, use this step as your last resort. However, if you ever want to reinstall drivers, then Windows will automatically search for USB port drivers and you can again transfer data using USB.

Method 5: Use BuduLock
This is free software available online that can lock any defined folder and block unauthorized access to the USB ports. Basically, the software blocks USB ports and lock folders with alphanumeric passwords. It is a very useful tool that you can operate as;
Step 1: Obviously, first you have to download BuduLock on your Windows computer and install it properly.
Step 2: Now, you should insert a USB drive on your Windows computer.
Step 3: You need to click on the Flash Drive Lock that is located behind the Folder Lock Option.
Step 4: Here, by pressing on the Disable Flash Drive, you can block your USB ports. Similarly, if you want to enable the feature, then you have to press Enable Flash Drive and insert your password.
Also Read: Best Disk Cloning Software for Windows
Method 6: Disable USB Ports
This is again an adverse solution as it’s not possible to disable all of your USB ports from the motherboard. But, you can easily remove the one port which is located on the front of your CPU. However, if you want to disconnect the USB port from the top and front of the computer, then you can plug out the cable from the USB header. You can effortlessly remove the USB header to protect your vital data from getting misused.
Method 7: Try Microsoft Support
If you are in real trouble and your USB ports aren’t working even after changing the previous settings as we have discussed above, then here you probably have one option – contact Windows Service Support which is Microsoft Fix it 50061. You just need to apply the setup, and it will fix your problems subsequently.
So, readers, these are some direct and indirect methods to enable or disable USB ports in your Windows 7 or above OS. We have explained every method in brief, but still, if you require any assistance, then just ask in the comments.
Author Bio:
Dinesh Lakhwani 

Dinesh Lakhwani, the entrepreneurial brain behind “TechCommuters,” achieved big things in the tech world. He started the company to make smart and user-friendly tech solutions. Thanks to his sharp thinking, focus on quality and the motto of never giving up, TechCommuters became a top player in the industry. His commitment to excellence has propelled the company to a leading position in the industry.
Popular Post


Recent Post

Top 5 Borderless Payments Apps In 2024
Discover the leading top borderless payment apps reshaping global transactions in 2024. Explore seamless cross-border transfers and innovative features through these apps.

Movavi Video Splitter Online: A Comprehensive Review
Explore Movavi online Video Splitter for free with our detailed review. Learn how to easily split and customize your videos. Discover its features and usability for all your editing needs.
How to Stop PS5 from Turning on With TV [2024]
The PlayStation 5 (PS5) is a powerful gaming console that offers an immersive gaming experience. However, one common issue that many users face is the console turning on automatically when they turn on their TV. This can be frustrating, especially if you’re not planning to use your PS5 at that moment. Here, we will explore […]
How to Clear the Delivery Optimization Cache in Windows
Delivery Optimization in Windows is a feature that helps users save bandwidth and improve download speeds by downloading updates and apps from other Windows devices on the same network or even from the internet. While this feature is beneficial, it can accumulate a significant amount of cache over time, impacting system performance. Here, we will […]

How to Add Multiple Monitors To Your Windows 10/11 Laptop [2024]
Multitasking and productivity are key factors for many individuals. Adding multiple monitors to your Windows 10 or Windows 11 laptop can greatly enhance your workflow, improving your overall efficiency. If you are wondering how to connect 2 or more monitors to your Windows 10 laptop, you are in the right place. Here, we will discuss different […]

How to Get Help in Windows 11: Complete Guide
Learn the best ways to get help in Windows 11 PC. Using these ways you can find help to solve issues in Windows 11.
How to Check SSD or HDD in Laptop [Windows 11/10]
Solid State Drives (SSD) and Hard Disk Drives (HDD) are the two main hard drive types that rule the laptop storage industry. Although they both store data, they are very different in terms of durability, speed, and performance. Knowing whether the SSD or HDD in your laptop is important since it may help you better […]

How to Stop Your Phone from Turning Off By Itself
Having your phone unexpectedly turned off can be frustrating and inconvenient, especially when it happens frequently. Whether you’re in the middle of an important call, playing a game, or simply browsing the internet, an unexpected shutdown can disrupt your productivity and disrupt your day. Here, we will explore some effective methods to help you if […]
Reboot and Select Proper Boot Device Windows 11: 7 Ways to Fix
Are you facing the “reboot and select proper boot device” on your Windows 11 PC? if yes, then find the best ways to fix this error.

Top 10 LiveLeak Alternatives In 2024
Since LiveLeak’s shutdown, many users have been searching for alternatives to the platform. There are plenty of LiveLeak alternatives in 2024. Therefore, if you are looking for a LiveLeak alternative, you are in the right place. Here, we will discuss some of the best LiveLeak alternatives in 2024. LiveLeak and its Evolution LiveLeak, established in 2006, […]

