How to Create a Windows 10 Bootable USB Drive (3 Methods)

Last updated on February 15th, 2026 at 10:21 am
Alone the word “Windows 10 bootable USB” sounds daunting. Creating a Windows 10 installation media with lots of steps and terminal commands seems like a complicated thing.
But, let’s break a myth – it is not hard to create a Windows 10 bootable flash drive. In fact, it takes up a few simple steps to install a Windows 10 package on an external drive for easy access.
Our team has laid down the quickest and easiest methods to create a Windows 10 bootable USB drive for your convenience. So, let’s get moving.
Why Create a Windows 10 Installation Media?
A Windows 10 bootable USB drive means copying your Windows 10 environment to a portable flash drive. This will enable Windows 10 users to:
- Clean install Windows 10 operating system to the new or old computer if your system corrupts.
- If you want to upgrade from older Windows versions or downgrade from Windows 11, having a portable Windows 10 in your pocket can be extremely helpful.
- Mac users can leverage bootable Windows 10 USB to create a Windows environment on MacOS.
- Having a bootable workstation can eliminate the need to carry a laptop everywhere.
Precautions Before Creating a Windows 10 Bootable USB:
Creating a bootable USB is simple, but small mistakes can cause failure or data loss. The process formats the USB drive and writes system files to it. Taking basic precautions ensures the installer works correctly and avoids unnecessary problems later. These checks help the process stay smooth and reliable.
- Backup USB data first
The USB drive will be erased completely during creation. - Use a USB drive with enough space
At least 8 GB is required for Windows 10 installation files. - Choose a good-quality USB drive
Cheap or old drives may fail during the process. - Ensure a stable internet connection
Downloads can corrupt if the connection drops. - Use official tools or trusted software
This reduces the risk of errors or malware. - Plug the USB directly into the PC
Avoid USB hubs during the creation process. - Check system architecture
Confirm whether you need 32-bit or 64-bit Windows. - Disable antivirus temporarily if needed
Some security tools interrupt boot file creation.
How to Easily Create a Windows 10 Bootable USB
Windows users have multiple options to create a Windows 10 installation media today. But the three prominent ones are:
Method 1. Create a Windows 10 Bootable USB with Media Creation Tool
Media Creation Tool is a free and easy solution for Windows 10 users to create a bootable USB drive. To follow this method, all you need is an 8 GB USB and these steps:
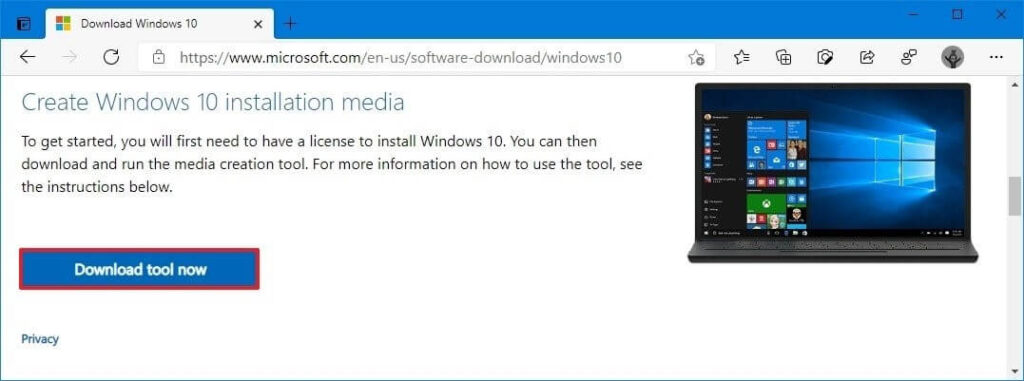
Step 1. Connect a USB drive to your Windows 10 computer. Ensure the drive is formatted to Windows compatible file format.
Step 2. Go to Microsoft’s official website to install the Media Creation Tool. Click on the Download tool now and follow the installation wizard steps.
Step 3. Double-click to launch the MediaCreationToolxxxx.exe file.
Step 4. Click on the Accept in the popup window.
Step 5. Choose the Create installation media option and click on the Next.
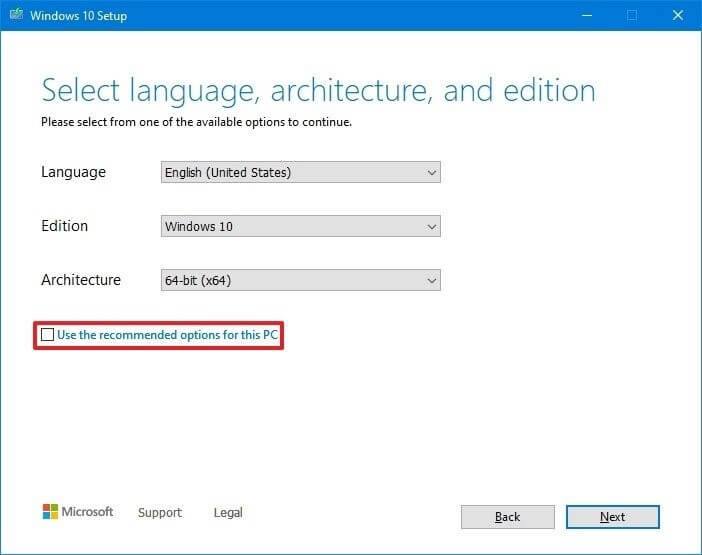
Step 6. Now, you have to define the language, edition, and architecture that you prefer to create a bootable USB. Or, you can select the option “Use the recommended options for this PC.”
Step 7. After that, select the USB flash drive and click Next to continue. If you have more than one removable drive connected to your computer, disconnect all other drives that you don’t need for the process.
Step 8. Finally, click on the Finish and wait for the process to complete. It might take a few minutes.
Method 2. Create a Windows 10 Bootable USB with Rufus
If you don’t want to use the Media Creation Tool to create a Windows 10 installation media drive, you can use Rufus. It is also a free and open-source application for Windows that can help you format and create bootable USB or Live USBs.
If you want to create a bootable media with an existing Windows 10 ISO file, follow these steps with Rufus:
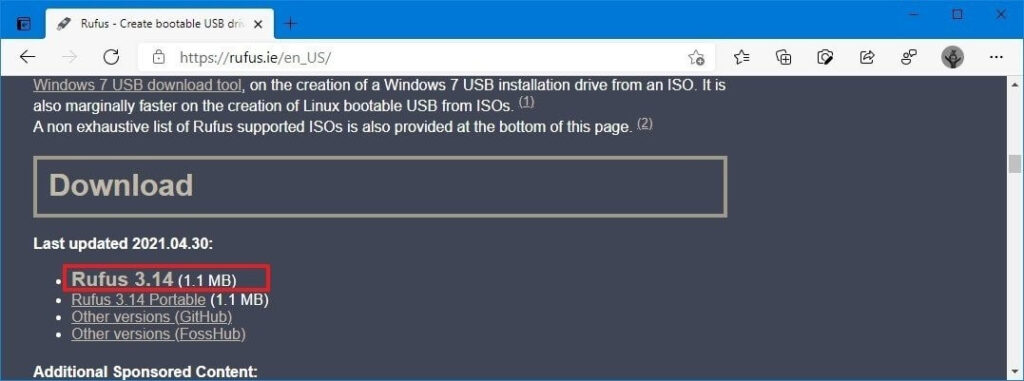
Step 1. Go to the Rufus website, and under the download section, click on the latest release to download Rufus on your computer.
Step 2. Launch the Rufus-x.xx.exe file using double-clicking.
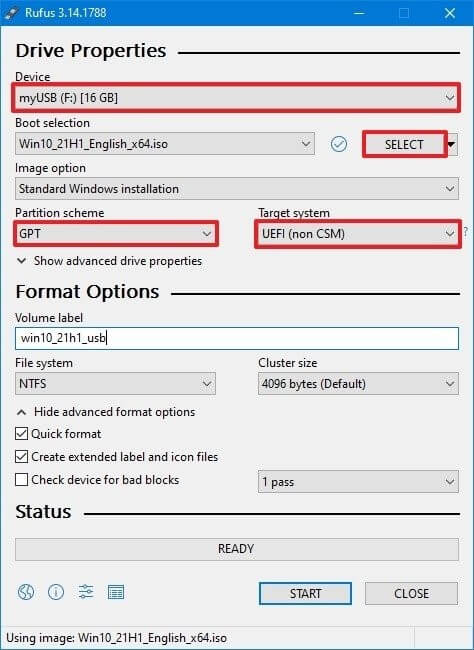
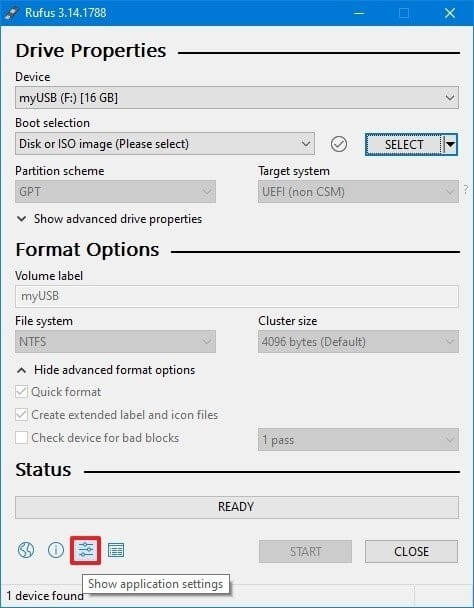
Step 4. Select the USB flash drive from under the Device tab.
Step 5. From the Bootable section, click on the Select button.
Step 6. Choose the Windows 10 ISO file and click on the Open button.
Step 7. Select the Standard Windows installation option from the Image option drop-down menu.
Step 8. After that, use the Partition scheme drop-down menu to select the GPT option.
Step 9. Then, select the UEFI option to use the Target system.
Step 10. Keep the default settings under the Show Advanced drive properties section unless you know what you are doing.
Step 11. Under the Volume label field, confirm the name of your drive.
Step 12. Also, don’t change the default settings for the File system and Cluster size options.
Step 13. Now, click on the Show advanced format options button to check the Quick format and Create extended label and icon files options.
Step 14. Click on the Start, OK, and finally, on the Close button to create a bootable USB drive from Windows 10 ISO.
Using the Rufus, you can also download the Windows 10 ISO file and then create a bootable drive. For that, steps will be slightly different, such as:
Step 1. Download the latest Rufus version on your computer and open the Rufus-x.xx.exe file.
Step 2. Go to Settings button > Click on the Check for updates drop-down menu > Select the Daily option > Close.
Step 3. Reopen the Rufus-x.xx.exe file.
Step 4. Go to the Device section > Select the USB drive.
Step 5. Under the Boot selection,> Click on the arrow next to the Select option > Select the Download option > Download button.
Step 6. Under the Version drop-down menu, select the Windows 10 option > Continue button.
Step 7. Choose the 21H1 (Build 19043.xxx – xxxx.xx) option to download the latest Windows updates.
Step 8. Select the “Language” drop-down menu and select your installation language.
Step 9. Select the 32-bit or 64-bit option under the Architecture drop-down menu > Click on the Download button.
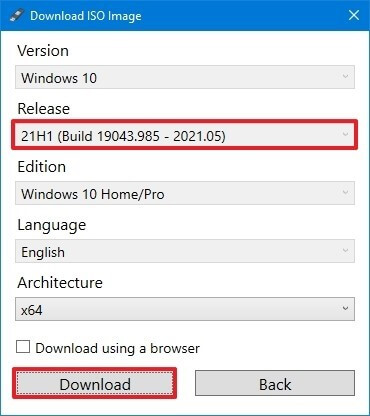
Step 10. Select a folder to save the Windows ISO file > Save.
Step 11. Now, simply follow Step 7 to Step 14 as per above.
Method 3. Create a Windows 10 Bootable USB with EaseUS Partition Master
Rufus might be a great app, but it requires high technical skills to use this program. Thus, if you want to create a Windows 10 installation media within only 3 steps and with no technical hassle, EaseUS Partition Master is the best tool.
This tool can help you create a bootable USB drive, migrate Windows 11 to a new SSD, convert MBR to GPT disk, rescue data, and more. In addition, it is a free tool with an intuitive interface, perfect for novice users.
Here’s how to create a Windows 10 bootable USB using EaseUS Partition Master:
Step 1. Go to the EaseUS website to download the Partition Master on your computer using the automatic wizard. Also, prepare a USB drive.
Step 2. Open EaseUS Partition Master > Click on the WinPE Creator.
Step 3. Select your USB drive and install Windows 10 on it by clicking on the Proceed button.
Sum Up
There you have it, people! You have learned the three simple solutions to create a bootable USB. All the steps are discussed in full detail, so you will not face any problem using these methods.
But anyhow, if you get stuck somewhere, write it down in the comments, and we will surely help you. Also, if you find this post useful, please share it and follow us on social networks for more interesting guides.
FAQs
Will creating a bootable USB delete my files?
Yes, all data on the USB drive will be erased. The process formats the drive before copying Windows files. Always back up important files first. Once created, the USB works only as an installer. Normal storage use requires reformatting again.
Can I create a Windows 10 bootable USB without internet?
Yes, but you must already have the Windows 10 ISO file. Tools like Rufus can work offline using the ISO. Without the ISO, internet access is required to download installation files. Offline creation still needs a working PC.
Why is my PC not booting from the USB drive?
This usually happens due to an incorrect boot order. BIOS or UEFI may not be set to boot from USB. Secure Boot settings can also block it. Try changing boot priority or recreating the USB. Using a different USB port may also help.
Author Bio:
Dinesh Lakhwani 

Dinesh Lakhwani, the entrepreneurial brain behind “TechCommuters,” achieved big things in the tech world. He started the company to make smart and user-friendly tech solutions. Thanks to his sharp thinking, focus on quality and the motto of never giving up, TechCommuters became a top player in the industry. His commitment to excellence has propelled the company to a leading position in the industry.
Popular Post


Recent Post
How to Switch From Local To Microsoft Account On Windows
Many users begin with a local account when they set up a new Windows computer. A local account works only on that single device. It stores settings, files, and preferences locally. It does not connect to online Microsoft services. For basic offline use, it works well. However, as digital needs grow, many users want better […]

How to Switch Windows 10 to a Local Account: Complete Guide
Windows 10 allows users to sign in with either a Microsoft account or a local account. When you set up a new computer, the system often suggests using a Microsoft account. This account connects your device to Microsoft services such as Outlook, OneDrive, and the Microsoft Store. It also syncs settings, themes, and passwords across […]

How To Change Default Apps For File Types In Windows
Windows is designed to make using your computer easy. One way it does this is by assigning default apps to different file types. This means when you open a file, Windows automatically opens it with a specific program. For example, photos may open with Photos, music with Groove Music, and PDFs with Edge. These default […]

How To Adjust The Mouse Pointer Speed: Complete Guide
Using a computer every day means you use the mouse a lot. The mouse pointer moves on the screen and helps you click, scroll, and select items. Many people never think about the speed of the mouse pointer. They have used the default setting for years. This can cause small problems over time. A slow […]

How to Change Mouse Scrolling Settings In Windows
A mouse is one of the most used computer tools. People use it every day. They scroll through emails. They scroll through documents. They scroll through websites and images. The movement becomes automatic. Most users do not notice it. That is why problems often go unnoticed. Scrolling problems show up slowly. At first, it feels […]

Keyboard Light Settings: Keyboard Lighting Control [Complete Guide]
Keyboards are no longer simple typing tools. Well, yes! Over time, they have evolved to include features that improve comfort, visibility, and overall experience. One of the most useful features today is keyboard lighting. It helps users work comfortably in low-light conditions. It also reduces strain when typing for long hours. Many users first notice […]

Customizing Pointer Appearance: Complete Guide
The way your mouse pointer looks on your computer may seem like a small detail. But customizing pointer appearance can make using your PC more comfortable and visually appealing. Many users do not realize that they can change the pointer size, color, and style to fit their needs. Whether you want a bigger pointer for […]

How To Choose a Computer Monitor: Monitor Buying Guide
Buying a monitor looks easy. Many people think all screens are the same. That belief causes regret later. A monitor is not just a display. It is a daily tool. You read on it. You work on it. You relax with it. Small problems become big over time. Poor brightness hurts eyes. Bad size causes […]

How To Get Help With File Explorer in Windows 11 [Complete Guide]
File Explorer is one of the most important tools in Windows 11. It is used to open folders, view files, and manage stored data. Almost every action on a Windows computer depends on it in some way. When users open documents, save downloads, or organize photos, File Explorer is always involved. Because it is used […]

How To Fix A Frozen Computer: Complete Guide [Windows 11/10]
A frozen computer is one of the most common problems Windows users face. The screen stops responding. The mouse pointer does not move. Keyboard inputs do nothing. You may hear the fan running loudly. Sometimes the system looks alive, but nothing works. This situation often happens when you are busy or working on something important. […]

