How To Backup & Sync Device Contacts With Google Accounts
Last updated on August 11th, 2025 at 3:49 pm
It’s hard to manage multiple Android devices or if you’re planning to go for a new smartphone in the near future, Do you know that all your contacts can be synced with Google contacts? You can find all your Google contacts on any Android device you associate with your Google account? But what about isolated contacts which are left on your phone’s local storage?
Since those aren’t stored in your Google account, you won’t be able to access them on other devices. If you are wondering how to get them all in one place, we have got the solution for you.
It’s Easy! You can backup & sync device contacts with Google account and keep all your contacts at one place. We’ll show you how to do that in a few easy steps. We assume that you have a smartphone device that is configured with a Google account, and it contains all your contacts on the local storage.
EXPORT OR BACK UP CONTACTS
Android Device
Step 1. Open the ‘Contacts App’ on your Android smartphone or tablet.
Step 2. Tap the app’s Overflow menu (Three horizontal lines in the upper left corner). Tap ‘Menu’ and then ‘Settings’ and then ‘Export’.
Step 3. Select one or more accounts from where you want to export contacts.
Step 4. Tap ‘Export to .VCF file’.
Turn Automatic Backup Off or On
When you set up your Google Account for the first time on your device, it asks you if you want to back up your data. You can turn ON automatic updates or you can change this setting at any time.
Step 1. Open your device’s ‘Settings’ App.
Step 2. Tap ‘System’ and then tap ‘Backup’.
Step 3. Turn On or Off ‘Back up to Google Drive’ as per your preference.
Computer Settings
If you want to add your contacts to another email account, you need to first download them as a ‘.CSV’ or ‘vCard’ file on your PC.
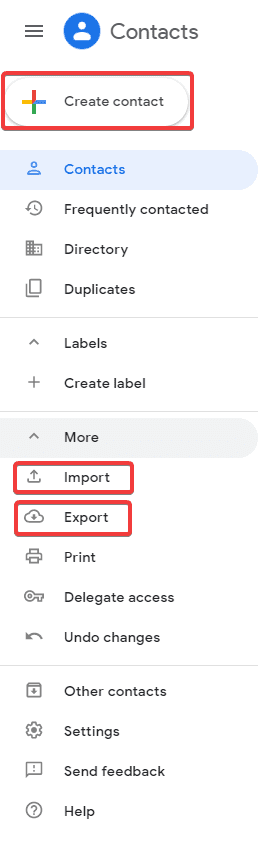
Step 1. Go to Google Contacts.
Step 2. Put a check on the boxes that appear next to their names to select contacts.
Step 3. Click More and then Export.
Step 4. To back up your contacts, select Google CSV.
Step 5. To save your file, click Export.
Backup Android Phone’s Contacts to Gmail Account
You must be delighted to know that it is invariably possible to backup or sync Android contacts to your Gmail account using your computer or a laptop. Simply follow these instructions properly and you should be able to back up your contacts to Gmail at the end of this guide.
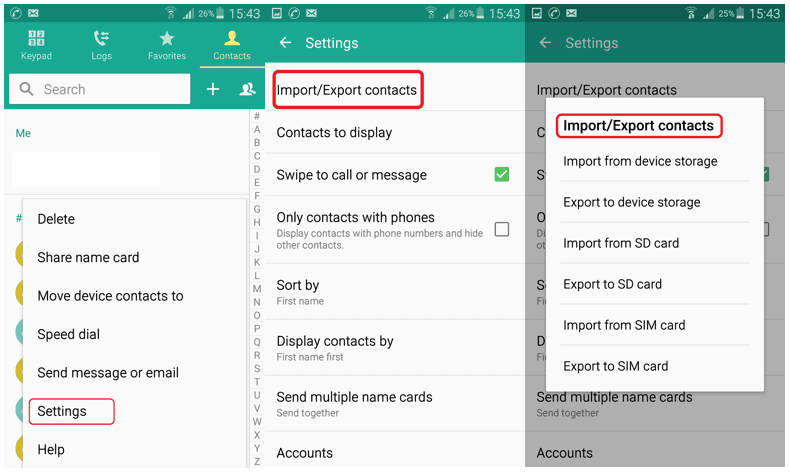
Firstly, you need to open contacts application on your Android phone then tap on the menu button and click on ‘Import/Export’. Tap on ‘Export to Storage’ and save all the contacts to your phone’s storage device or memory card. Next, connect your phone to PC and copy the ‘.VCF’ file on your computer. Or, you may keep the phone connected and use the following steps.
Step 1. Go to Gmail.com and login with your email ID and password.
Step 2. From the top left corner that says ‘Gmail’, click on the drop-down icon.
Step 3. Click on ‘Contacts’ followed by ‘More’ and then click on ‘Import Contacts’ from the drop-down options.
Step 4. Browse and select the ‘.VCF’ file which is saved on your phone storage or PC and click on ‘Open’ to initiate the process. (If the file is saved on your phone then choose the file from your phone storage path or email it to yourself and download the file on the system before following this step.)
Step 5. Now check for all your Android contacts on your Gmail contacts folder and they should be there on your Gmail account.
Also Read: Duplicate Contacts Remover Apps For iPhone
Backup and Sync on iPhone
You can backup and sync all your Google Contacts on your phone, tablet, and computer simultaneously. If you edit a contact on one device, the contact details are changed and saved on all the devices.
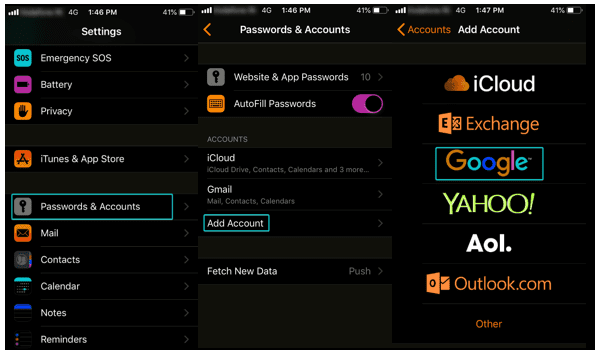
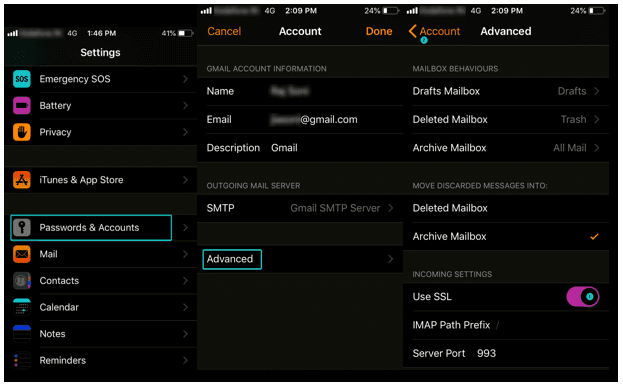
Step 1. Open ‘Settings App’ on your iPhone or iPad.
Step 2. Go to ‘Passwords & Accounts’ and then under ‘Add Accounts’, Select ‘Google’.
Step 3. Enter your credentials (Email ID & Password), Complete 2-Step verification if prompted.
Step 4. When you go next, enable ‘Contacts’ sync and Tap on ‘Save’.
Note: To start syncing, you will need to open your iPhone or iPad’s ‘Contacts App’.
Windows 10 Computer
Configuring a Google account to Sync contacts is absolutely easy on your Windows computer.
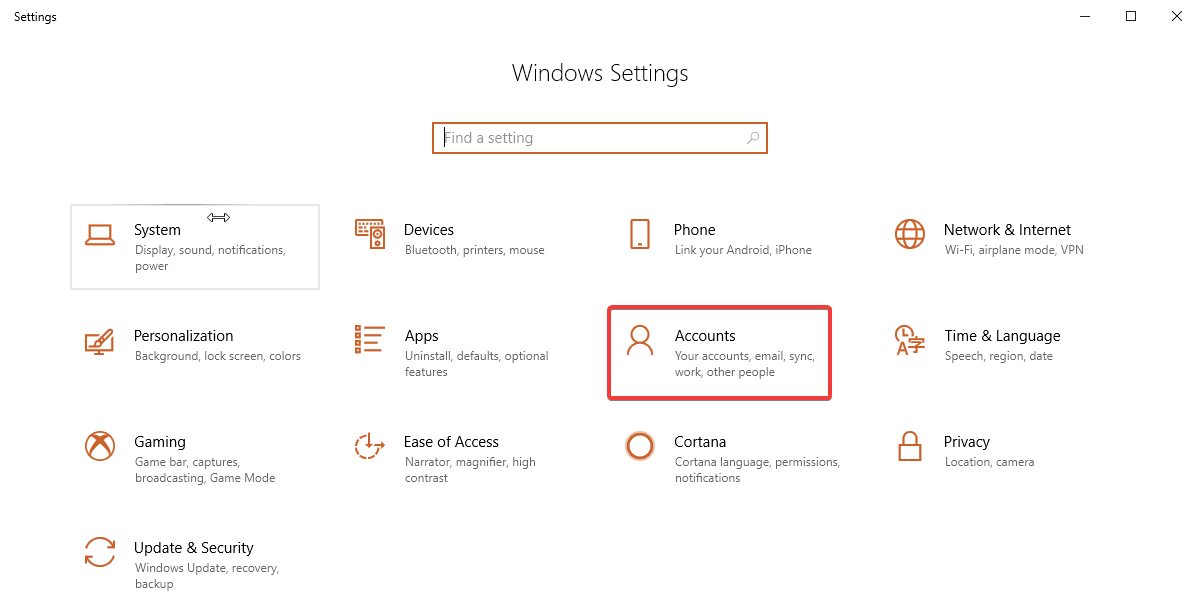
Step 1. Click on ‘Start Button’ and go to ‘Settings’.
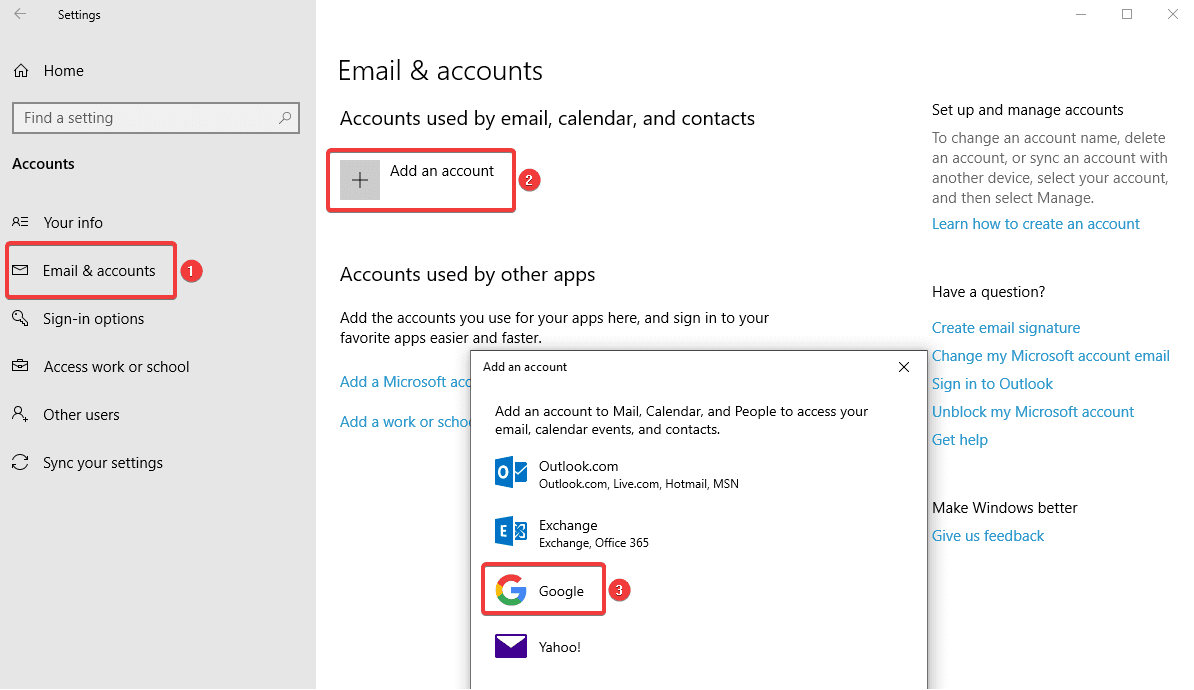
Step 2. Under ‘Windows Settings’ box, Click on ‘Accounts’ click on ‘Email & Accounts’ on the left-hand side panel Click on (+ sign to ‘Add an Account’). Select ‘Google’.
Step 3. Enter your credentials (Email Address & password) and click on ‘Next’.
Step 4. Review permissions and then click on ‘Allow’ and ‘Done’.
RESTORE CONTACTS FROM BACKUPS
Step 1. Open your device’s Settings App.
Step 2. Tap Google.
Step 3. Under ‘Services’ tap ‘Restore Contacts’.
Step 4. If you have multiple ‘Google Accounts’ to choose from which account’s contacts you want to restore, tap ‘From Account’.
Step 5. Tap the device with the contacts to copy.
Step 6. If you don’t wish to copy or sync contacts from your SIM card or device storage, you can turn off sync with SIM card or Device storage.
Step 7. Tap Restore, and wait until you see ‘Contacts restored’.
Step 8. To avoid duplicate contacts, your device only restores contacts that don’t exist. Your restored contacts automatically get synced with Google Account and all other devices.
Unable to Sync Contacts?
You need to ensure that your Google Account is configured on your iPhone or iPad using (SSL), It is recommended and secure connection for additional security.
Step 1. Open ‘Settings App’ on your iPhone or iPad.
Step 2. Go to ‘Contacts’ ‘Default Account’
Step 3. Tap on your Google Account.
Step 4. Put a tick on selected accounts and switch ‘Contacts’ ON.
Step 5. Tap ‘Password & Account’ ‘Advanced’ switch ‘Use SSL’ ON Tap ‘Account’ again Tap ‘Done’.
Note: You can try adding your account after configuring these settings and it should be done.
Import Contacts
Step 1. Open the Contacts app.
Step 2. Tap the app’s Overflow menu.
Step 3. Tap ‘Settings’ Tap ‘Import’ Tap ‘Google’.
Step 4. Select Import ‘vCard’ file.
Step 5. Locate and select the ‘vCard’ file which you want to import.
Step 6. Allow the import process to complete.
Step 7. By default, all the contacts on your device will be automatically synced with your Google account, so there is no further action required.
Conclusion
We have collated steps on how to sync Google contacts with Android / iPhone / Computers and other devices, now you can ensure that all your contacts are synced and backed up at one place. You can view/edit any contact on any device and all devices will have the updated details.
You can add a contact on any device and all the devices will have that contact added in the contacts list. So now stay assured about keeping all your contacts in one place and backup & sync device contacts with Google account so that you never miss out on any of your contacts on any of your devices.
If you know more such interesting ways to backup & sync device contacts with Google Accounts, then feel free to share in the comments below.
Author Bio:
Dinesh Lakhwani 

Dinesh Lakhwani, the entrepreneurial brain behind “TechCommuters,” achieved big things in the tech world. He started the company to make smart and user-friendly tech solutions. Thanks to his sharp thinking, focus on quality and the motto of never giving up, TechCommuters became a top player in the industry. His commitment to excellence has propelled the company to a leading position in the industry.
Popular Post


Recent Post
How To Fix Issues Downloading from the Microsoft Store On Windows
Introduction: Downloading apps from the Microsoft Store should be a simple task. You open the Store, search for an app, and click install. In most cases, the process works without any problem. However, there are times when the download does not start. In some cases, it may stay stuck at a certain percentage. You may […]
How To Fix Windows Update Issues Easily On Windows [2026]
Introduction Windows updates play an important role in keeping a computer stable and secure. They bring new features, fix known bugs, and improve overall performance. When updates work as expected, the system runs smoothly. However, when they fail, users often face slow performance, missing features, or security risks. This is why it becomes important to […]

How To Check If Your PC Is Infected? [Complete Guide]
Computers now sit at the center of almost everything we do. Well, yes! From sending emails to watching videos, we depend on them without much thought. Because of this, even a small issue can disrupt daily tasks. One common problem is hidden malware. It does not always show clear signs at first. It can enter […]
Repair Apps And Programs: Repair Apps That Aren’t Working
Computers have become an essential part of everyday life, supporting work, study, communication, and entertainment. Most of these activities rely on apps and programs, so when one stops functioning, even simple tasks can be disrupted. Common problems include error messages, frozen screens, or apps that fail to open. On Windows systems, such issues often arise […]
Troubleshooting Microphone Privacy Settings: Complete Guide
Sound is a basic part of how we use computers today. People attend meetings, record audio, speak to others, and use voice tools almost every day. A working microphone makes all these tasks easy. When the microphone fails, even simple work becomes difficult. Many users first think the device is broken. In reality, the issue […]
Windows Sound Settings – Sound Control Panel: Complete Guide
Sound plays an important role in how we use a computer every day. It supports both work and leisure. You need it for meetings, videos, music, and alerts. When audio fails, even simple tasks become difficult. Many users feel stuck when sound issues appear. This usually happens because they are not familiar with Windows Sound […]
Run a Troubleshooter For PC Issues Windows: Complete Guide
A computer plays an important role in everyday life. People use it for work, study, communication, and entertainment. When a problem appears, it can interrupt everything. Even a small issue can waste time and create frustration. Many users feel unsure about how to fix such problems. They often think they need expert help. In reality, […]
![Adjusting Audio Output Settings Complete Guide [2026]](https://www.techcommuters.com/wp-content/uploads/2026/03/Adjusting-Audio-Output-Settings-Complete-Guide.webp)
Adjusting Audio Output Settings: Complete Guide [2026]
Sound is part of almost everything we do on a computer. It lets you watch videos, join calls, play music, and hear alerts. When the audio stops working the right way, it can interrupt both work and daily use. That is why adjusting audio output settings matters for every user. Many people get unsure when […]

Artificial Intelligence Explained: Concepts, Terminology, Benefits, and Future Trends
Artificial Intelligence, or AI, is basically computers doing things that usually need a human brain. We’re talking about stuff like learning from experience, figuring out problems, understanding language, and making decisions. It’s not magic, just a lot of data, pattern-spotting, and math behind the scenes. Now, AI doesn’t actually think or feel like we do. […]
Resolving Microphone Detection Problems: Latest Guide [2026]
Microphones are important tools in daily life. People use them for office meetings, online classes, interviews, gaming, customer support, and content creation. When a system fails to detect a microphone, communication stops at once. This situation can cause stress and confusion. Many users believe the microphone is damaged. In reality, most problems are simple and […]

