Fix: Mac External Hard Drive Not Mounting
Last updated on September 2nd, 2023 at 1:34 pm
Introduction
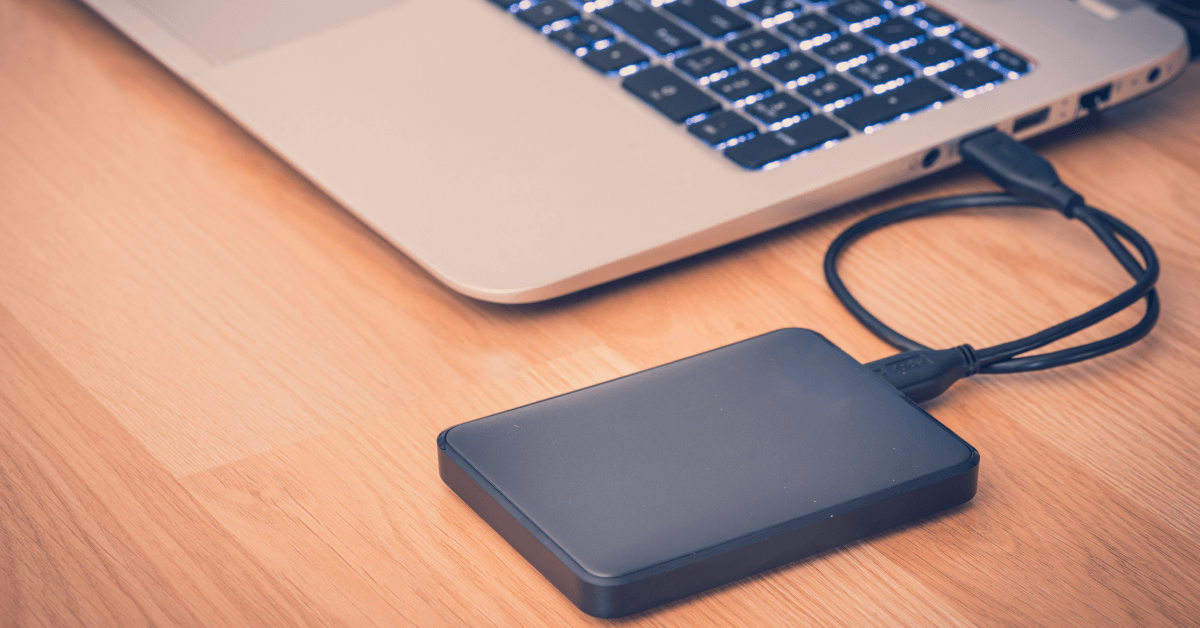
Most people typically keep their data and files on the computer, like images, pictures, songs, documents, and so on. Mac devices’ hard drives and SSDs assure high-quality performance and data storage benefits. However, in some cases, users do notice some issues here, like the drives not appearing on Disk Utility, Finder, or Desktop section when one plugs the device into the Mac.
One common reason for the error is Mac external hard drive not mounting. To explain, the process allows users access to the file system in the computer where all directories and files within the storage device are present. If the external hard drive available is not mounting, the operating system cannot recognize it.
Therefore, finding the best solution to fix the issue is highly crucial.
Common Reasons for The External Hard Drive Not Mounting Prompt on Mac
There are specific situations that result in users getting the “external hard drive not mounting Mac” message. Before figuring out the solutions to the problem, you should understand the common causes. These include causes like:
- Issues in the disk drive
- Unsuitable preferences
- Malfunction in the hardware
- Corruption in the SMC data
- An outdated operating system for the device
- Incompatible external hard drive format
Depending on the main cause of the mounting issues on your Mac device, you must proceed with the best solution.
Best Methods to Fix the Mac External Hard Drive Not Mounting Issues
Indeed, if you notice the prompt for Mac external hard drive not mounting on your system, that will affect your regular processes heavily. The following are the best solutions to fix the problem directly after checking your hardware first.
Fix 1: Connect the External Hard Drive Device Again
In some cases, the problem of the external hard drive not mounting Mac occurs due to the wrong way the drive is connected. The best solution is to unplug the hard drive and insert it into the system again. This can kickstart the connection properly again.
Fix 2: Restart the Mac Device
Another quick fix for Mac users to try for the mounting problem with the external hard drive is to restart the device. This is useful when the issues occur due to some configuration or loading issues when you activate some function on the computer.
After rebooting the system, that problem will block the action causing the error in the first user session midway. Then, the other system functions will restart health functioning fully.
Fix 3: Force Quit the Finder App
While you are restarting the MacBook device and reconnecting the hard drive, it will remove any underlying glitches or bugs from the previous user session and allow the system to start again. Then, you must reconnect the external hard drive.
In this period, the external hard drive not mounting Mac-based issue can be removed if you force quit the Finder app. Doing this step will restart your file explorer section, allowing the hard drive to mount safely.
How to proceed:
Step 1: Unplug the external hard drive.
Step 2: Restart the Mac > Access Finder.
Step 3: Hold the Shift key and choose the Apple icon from the menu bar.
Step 4: Tap on the “Force Quit Finder” option.
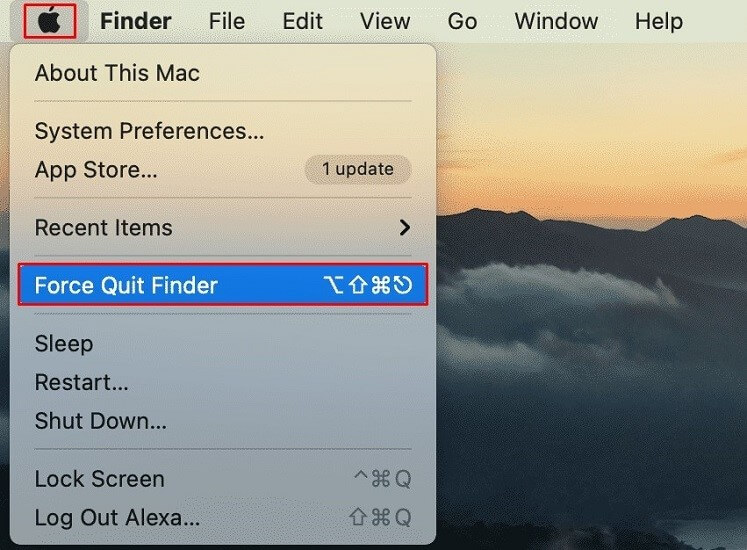
Step 5: Reconnect the external hard drive.
Fix 4: Adjust the macOS Settings
Another way to fix the Mac external hard drive not mounting problem is to fix the preferences set in the system as default. This is because some of the preset preferences in the Settings section can block the regular viewing of the external hard drives through the device file system.
So, you must go to the Finder app and make changes to the Settings for your Mac device.
How to proceed:
Step 1: From the Dock section, go to Finder, available on the top-most menu bar. Next, click on Preferences.
Step 2: In the next window, tap on the General tab.
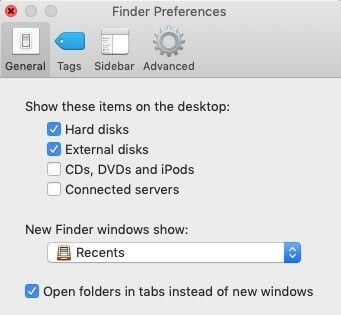
Step 3: Click the tickmark beside the “External drives” option under the “Show these items on the desktop” section.
Step 4: Tap on the Sidebar tab through the Location section. In the Sidebar tab, click the checkmark beside “External Drive”.
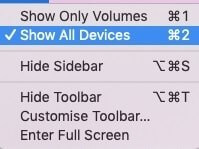
Step 5: Hit the Command + Space keys and access Spotlight > type Disk Utility.
Step 6: Choose “Show All Devices” for the view menu of Disk Utility. Now, the external drives will become visible in the sidebar.
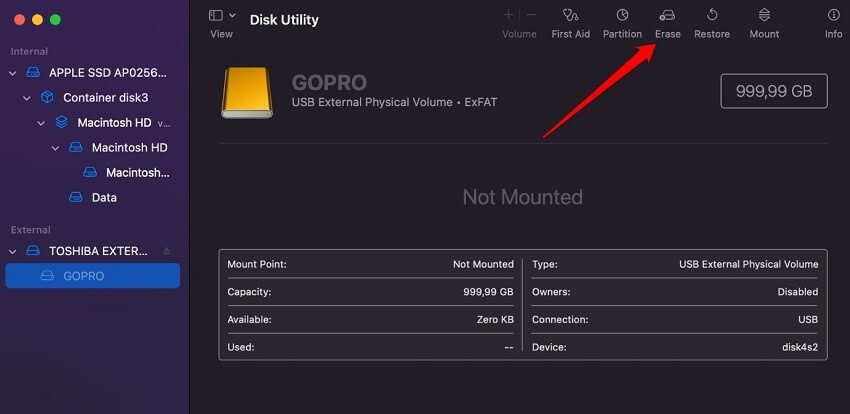
Fix 5: Reformat the External Hard Drive
One of the best solutions to fix the external hard drive not mounting Mac issue is to reformat the main drive completely. This is suitable if you have a corrupted filesystem in your hard drive.
Of course, this is a complex choice for most to take since reformatting the hard drive will remove all data from it. It would be best to use capable software like EaseUS Data Recovery Wizard for Mac to restore your lost files later.
How to proceed:
Step 1: Access Disk Utility and tap on your preferred disk drive that is hard to mount.
Step 2: Tap on the Erase button.
Fix 6: Remount the External Disk via Disk Utility
If you face the external hard drive not mounting on your Mac computer, try to remount it via Disk Utility. The steps for it are as follows.
How to proceed:
Step 1: Access the Disk Utility from the Spotlight.
Step 2: Choose the relevant disk drive from the list that appears.
Step 3: Tap the Mount button.

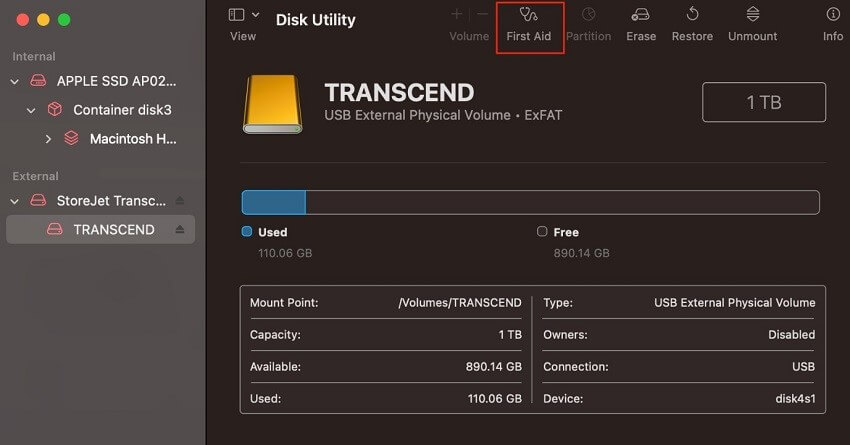
Fix 7: Use the First Aid Feature
In some cases, the Mac external hard drive not mounting problem occurs due to software issues inside the internal hard disk. If you are unsure of the main cause of the problem, utilizing the First Aid tool to test the system is a good solution.
This is a utility that Mac users can work with that scans the device for disk health issues and then handles any problems affecting its functionality. Users can typically access this function through the Disk Utility program.
How to proceed:
Step 1: Connect your external hard drive to the Mac computer.
Step 2: Tap on the Command + Space keys to access Spotlight.
Step 3: Type in “Disk Utility” and click on the option that appears.
Step 4: Choose the connected hard drive from the sidebar.
Step 5: Then press the First Aid icon and run it.
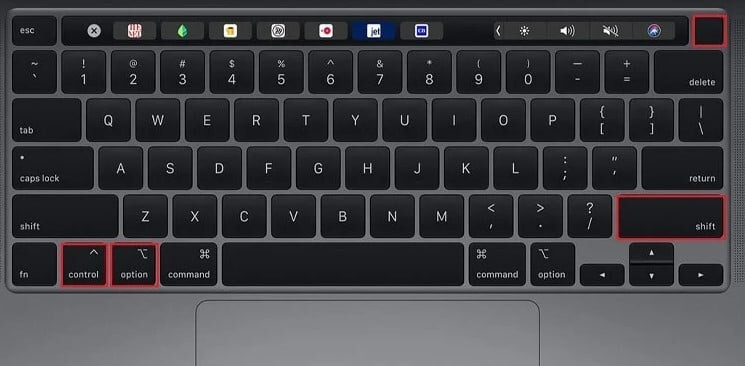
Fix 8: Reset the PRAM/NVRAM
In the situation where you are unaware of what is causing the mounting problem for your hard drives, you can focus on the NVRAM and PRAM functions on your device. You should reset the configurations in place for these programs to handle the problem.
How to proceed:
Step 1: Shut your Mac device down.
Step 2: Then hold the Power button down for 10 seconds. Check if the problem is resolved or not- if not, shut the Mac down again.
Step 3: Hold down on the right-side Shift + left-side Option + left-side Ctrl keys for 7 seconds. Then, hold down the Power button as well for 7 seconds.
Fix 9: Reset the SMC
In Mac devices, the SMC helps users see that all of the available hardware within the Mac device is working properly and at full capacity. If your device has unwanted problems, like an external hard drive not mounting Mac, reconfiguring the SMC function on your computer can help.
How to proceed:
To note, there are different ways to reset the SMC function on Mac devices concerning their system specifications. The following are the different versions.
Macs running with T2 chipset:
Step 1: Shut the Mac device down and unplug your power cable and external hard drive.
Step 2: Hold down the left-side Ctrl + left-side Option + right-side Shift keys on your keyboard for around 7-10 seconds.
Step 3: Keep holding the keys in place and then hold down the Power button for 10 seconds.
Step 4: Power the Mac device and plug in the external hard drive again.
Macs running with M1 chipset:
Step 1: Shut Mac down and unplug the cable for power and the external hard drive.
Step 2: iMac users should keep the device turned off for around 30 seconds, while Macbook users must keep the lid close for around 30 seconds.
Step 3: Start the Mac computer and plug in your external hard drive.
Macs running without M1/T2 chipset:
Step 1: Shut the Mac device and unplug the power cable/external hard drive.
Step 2: On the keyboard, hold down the left-side Ctrl + left-side Option + left-side Shift + Power buttons for around 10 seconds simultaneously.
Step 3: Restart the Mac computer and plug in your external hard drive again.
Macs running with any removable battery:
Step 1: Shut off the Mac computer. Unplug the external hard drive and power cable.
Step 2: Take the battery out from the back-side panel.
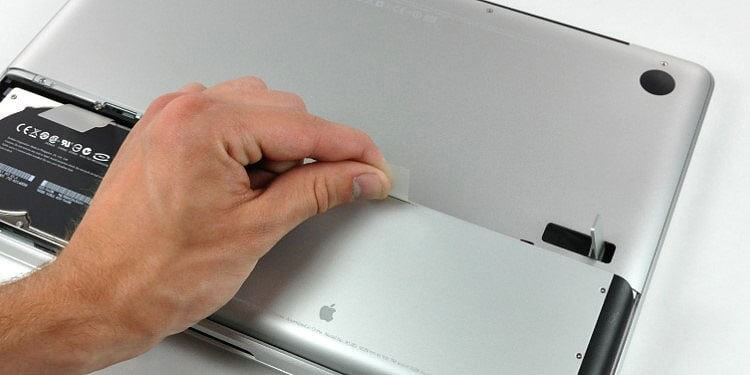
Step 3: Press down on the Power button for around 5 seconds.
Step 4: Power the Mac device up again and plug in your external drive.
Fix 10: Forcefully Mount the Hard Drive via Terminal
Another complex method for fixing the issue of external hard drives not mounting on Mac devices is to handle some Terminal command lines. These specific commands can remove the files blocking the regular mounting of the external hard drive.
However, this is not the go-to fix since it is relatively complicated for most beginner-level users. Plus, it is not a full-proof solution for all undetected disks. So, use this solution if no other process performs suitably.
How to proceed:
Step 1: On your Mac device, connect the external hard drive.
Step 2: Go to the Spotlight Search and launch the Terminal app.
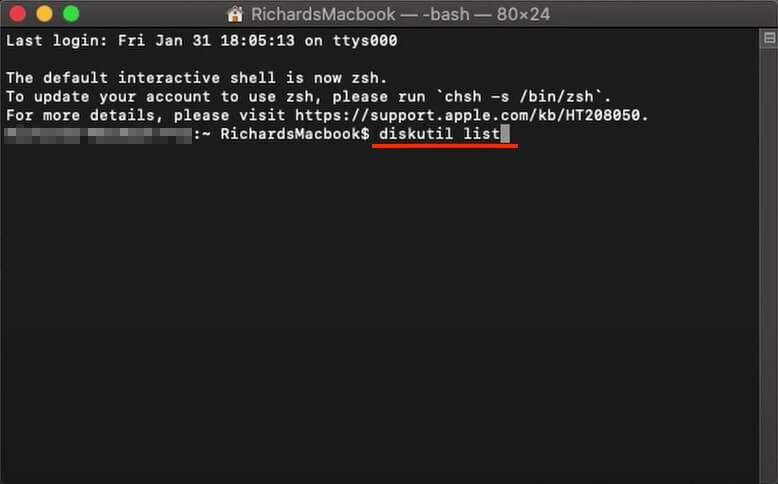
Step 3: Next, type the following command line and then press the Enter button:
diskutil list
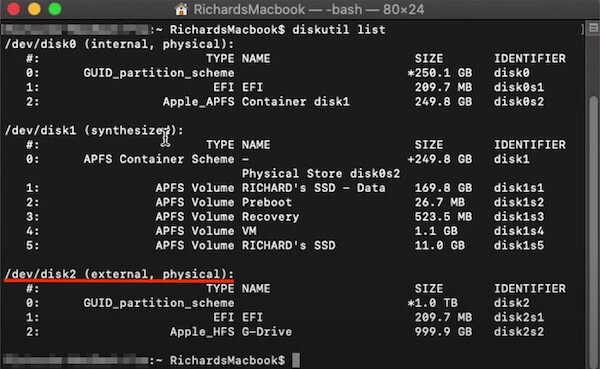
Step 4: Look for the external drive not mounting issue from the next list. The internal appearance of the macOS drive will get mentioned as disk2. The “2” numerical in this term can change for different users depending on the external hard drive they are focusing on
Step 5: Add the command mentioned below and hit the Enter button.
diskutil eject disk2
Step 6: Pull the drive from the Mac device and reconnect it again. The external hard drive should appear in the list this time.
Conclusion
Certainly, all of the methods mentioned are high-grade options for rectifying the unmountable external hard drive issue in Mac devices. Take time to understand the cause of the issue after trying out the standard fixes, like restarting the device, since the issue requires more focused work for the former.
Found this post helpful? Check out other such content available here, detailing solutions for many more system issues.
Author Bio:
Dinesh Lakhwani 

Dinesh Lakhwani, the entrepreneurial brain behind “TechCommuters,” achieved big things in the tech world. He started the company to make smart and user-friendly tech solutions. Thanks to his sharp thinking, focus on quality and the motto of never giving up, TechCommuters became a top player in the industry. His commitment to excellence has propelled the company to a leading position in the industry.
Popular Post


Recent Post
Run a Troubleshooter For PC Issues Windows: Complete Guide
A computer plays an important role in everyday life. People use it for work, study, communication, and entertainment. When a problem appears, it can interrupt everything. Even a small issue can waste time and create frustration. Many users feel unsure about how to fix such problems. They often think they need expert help. In reality, […]
![Adjusting Audio Output Settings Complete Guide [2026]](https://www.techcommuters.com/wp-content/uploads/2026/03/Adjusting-Audio-Output-Settings-Complete-Guide.webp)
Adjusting Audio Output Settings: Complete Guide [2026]
Sound is part of almost everything we do on a computer. It lets you watch videos, join calls, play music, and hear alerts. When the audio stops working the right way, it can interrupt both work and daily use. That is why adjusting audio output settings matters for every user. Many people get unsure when […]

Artificial Intelligence Explained: Concepts, Terminology, Benefits, and Future Trends
Artificial Intelligence, or AI, is basically computers doing things that usually need a human brain. We’re talking about stuff like learning from experience, figuring out problems, understanding language, and making decisions. It’s not magic, just a lot of data, pattern-spotting, and math behind the scenes. Now, AI doesn’t actually think or feel like we do. […]

Resolving Microphone Detection Problems: Latest Guide [2026]
Microphones are important tools in daily life. People use them for office meetings, online classes, interviews, gaming, customer support, and content creation. When a system fails to detect a microphone, communication stops at once. This situation can cause stress and confusion. Many users believe the microphone is damaged. In reality, most problems are simple and […]
How To Switch To A Dark Background Theme In Windows [2026]
Most people spend many hours each day in front of a computer screen. Office work, online classes, editing, browsing, and streaming all require long screen time. A bright white background may look clean at first. However, over time, it can feel sharp and tiring. The strong contrast between white backgrounds and black text may cause […]
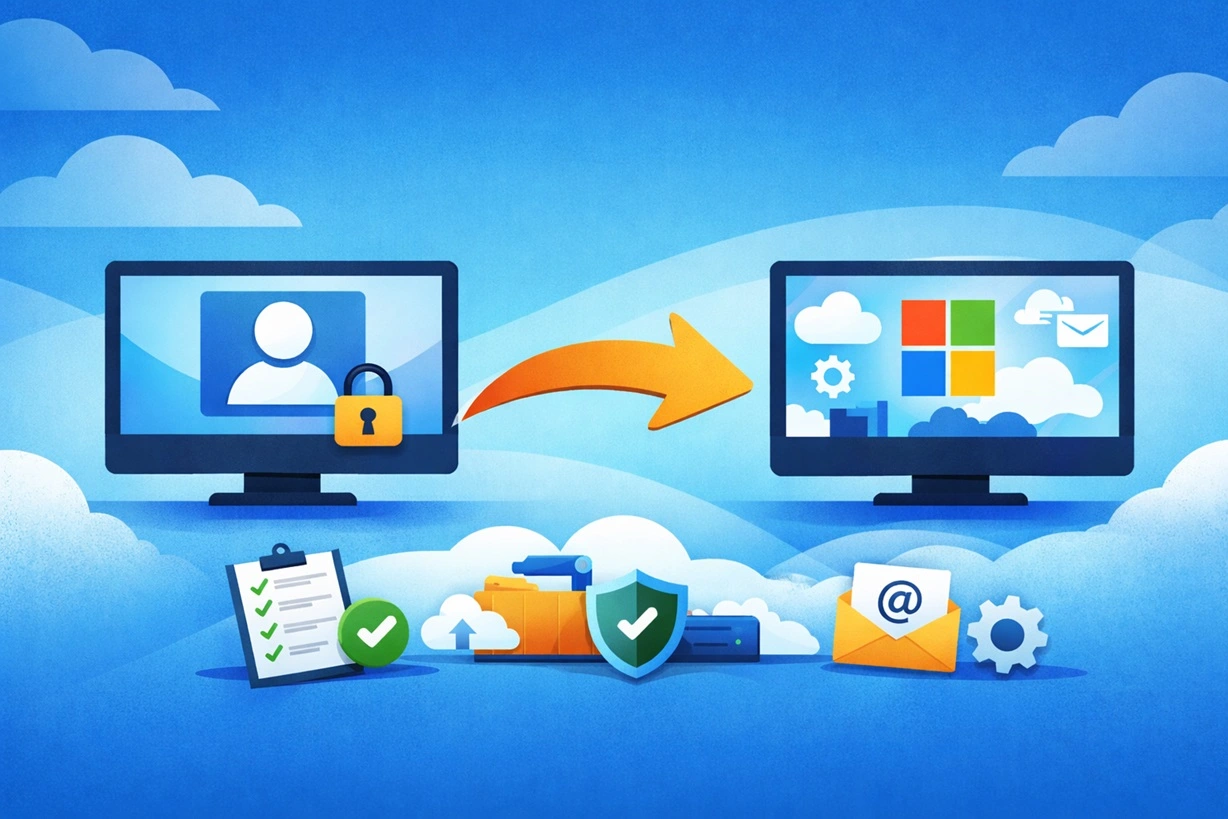
How to Switch From Local To Microsoft Account On Windows
Many users begin with a local account when they set up a new Windows computer. A local account works only on that single device. It stores settings, files, and preferences locally. It does not connect to online Microsoft services. For basic offline use, it works well. However, as digital needs grow, many users want better […]

How to Switch Windows 10 to a Local Account: Complete Guide
Windows 10 allows users to sign in with either a Microsoft account or a local account. When you set up a new computer, the system often suggests using a Microsoft account. This account connects your device to Microsoft services such as Outlook, OneDrive, and the Microsoft Store. It also syncs settings, themes, and passwords across […]

How To Change Default Apps For File Types In Windows
Windows is designed to make using your computer easy. One way it does this is by assigning default apps to different file types. This means when you open a file, Windows automatically opens it with a specific program. For example, photos may open with Photos, music with Groove Music, and PDFs with Edge. These default […]

How To Adjust The Mouse Pointer Speed: Complete Guide
Using a computer every day means you use the mouse a lot. The mouse pointer moves on the screen and helps you click, scroll, and select items. Many people never think about the speed of the mouse pointer. They have used the default setting for years. This can cause small problems over time. A slow […]

How to Change Mouse Scrolling Settings In Windows
A mouse is one of the most used computer tools. People use it every day. They scroll through emails. They scroll through documents. They scroll through websites and images. The movement becomes automatic. Most users do not notice it. That is why problems often go unnoticed. Scrolling problems show up slowly. At first, it feels […]

