Disable Microsoft Defender in Windows 11: Step-by-Step Guide
Last updated on September 5th, 2023 at 1:26 pm
Introduction
Since its introduction in 2006, Microsoft Defender has been integral to all Windows operating systems, offering free and thorough antivirus protection. It is capable of finding and containing malware and providing ongoing security. On the downside, it’s a resource-consuming and will only stop running in the background if permanently deactivated.
Methods to Permanently Turn Off Microsoft Defender in Windows 11
Here are the three effective methods to permanently disable Windows Defender if you no longer require its services. Learn how to deactivate this software.
Method 1: Permanently Turn Off Microsoft Defender in Windows 11 through Group Policy.
Using the Group Policy security tool, you can disable Defender. Follow these instructions:
Step 1: Navigate to Settings from the Start menu.

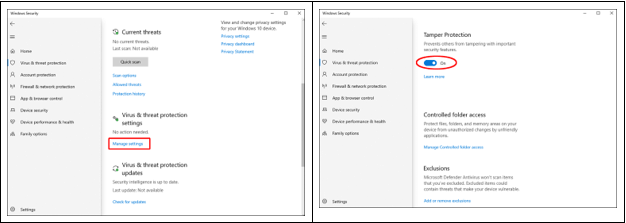
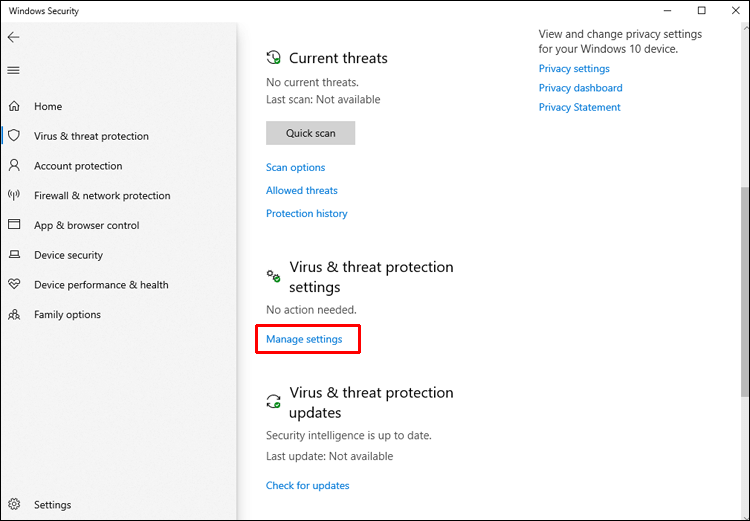
Step 2: Select Privacy & Security, then Windows Security and Virus & threat protection.
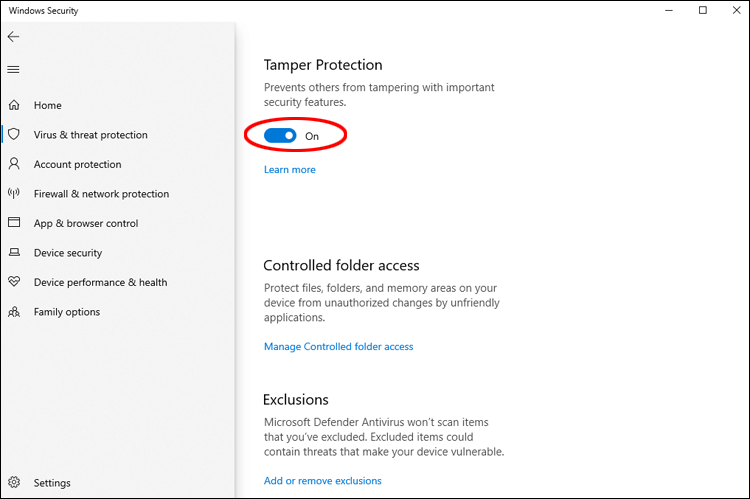
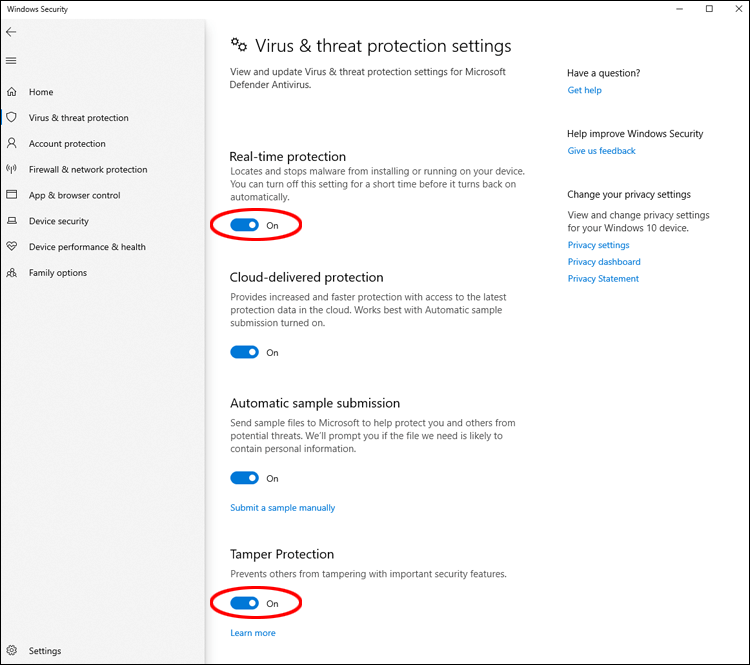
Step 3: Check Manage settings in the Virus & threat protection section, then turn off Tamper Protection by toggling the slider.
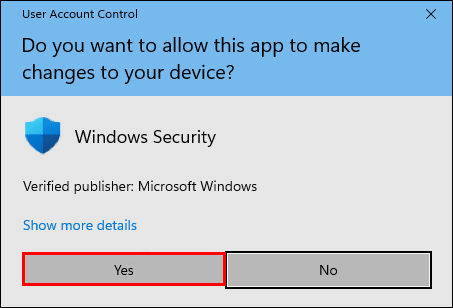
Step 4: To confirm making device changes, click Yes when prompted.
Step 5: A message will be shown in the Tamper Protection section affirming that your device might not be secure; close this window using the x in the top right corner.
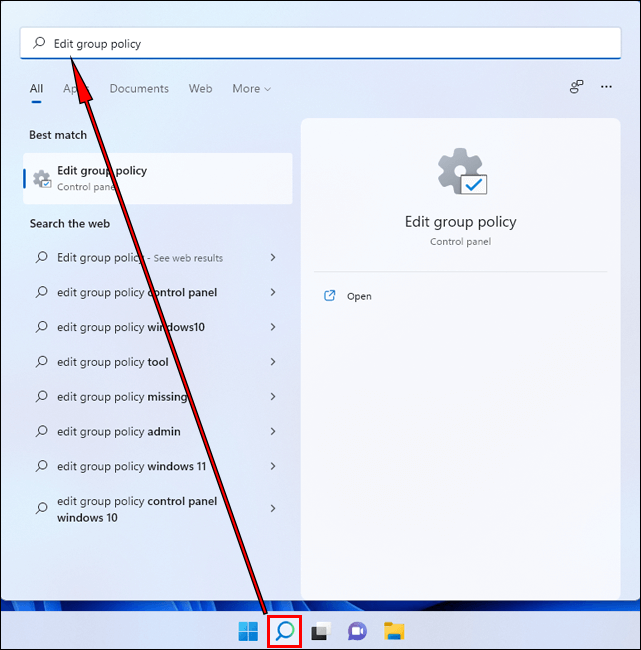
Step 6: Press the search icon on the taskbar to access the Microsoft Defender Antivirus settings.
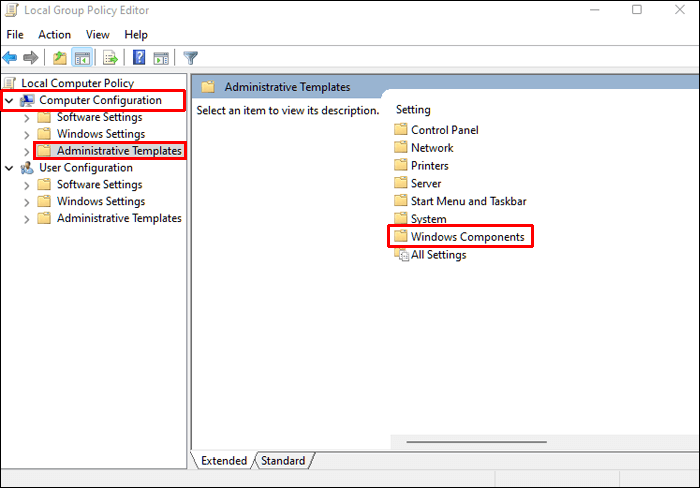
Step 7: Type ‘Edit Group Policy’ and click the result to launch the app. Open, select Computer Configuration from the left pane, followed by Administrative Templates and then Windows Components.
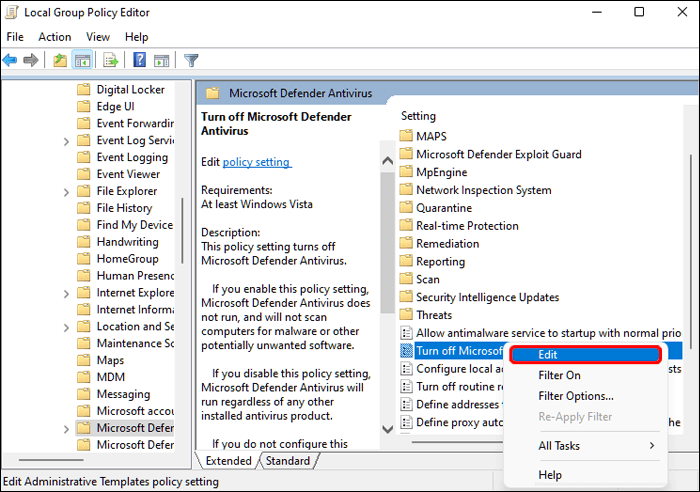
Step 8: Scroll down until you land on Microsoft Defender Antivirus, where several settings will be visible on the right pane.
Step 10: Right-click on ‘Turn off Microsoft Defender Antivirus’ and hit Edit to check the Enabled box before clicking Apply and OK.
Step 11: Then do the same for ‘Allow antimalware service to remain running always’, but instead choose Disabled this time round.
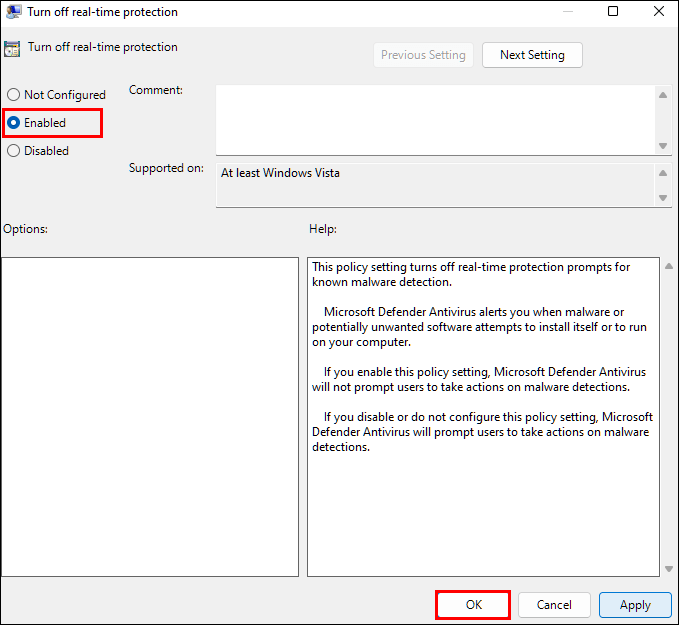
Step 12: Finally, enter the Real-time Protection folder and right-click ‘Turn off real-time protection’, editing it again to check Enabled.
Method 2: Permanently Turn Off Microsoft Defender by Modifying Registry
Similarly to Group Policy, you can deactivate Defender protection by modifying the registry. This method requires disabling the “Tamper Protection” setting to prevent Defender settings from being altered.
Step 1: The first step is to click Start, then Settings.
Step 2: Select Privacy & Security, Windows Security, then Virus & threat protection.
Step 3: Under Virus & threat protection settings, click Manage settings.
Step 4: Switch the slider to Off for the Tamper Protection option.
Step 5: To allow the changes, select Yes.
Step 6: To close the window, click the x in the top right corner.
Step 7: From the Windows Defender branch in the Registry Editor.
Step 8: Create three DWORD (32-bit) values. To do so, right-click any white space in the right pane, select New, then DWORD (32-bit) Value.
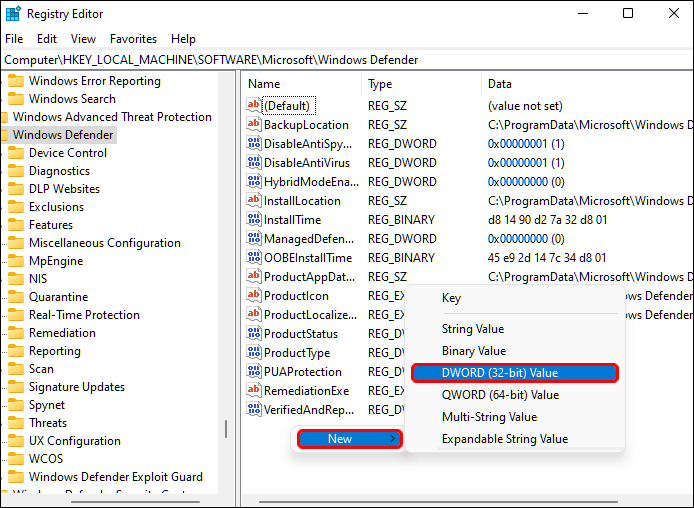
Here are the new values:
- Disable anti-virus software
- Turn off AntiSpyware
- StartStates of Services
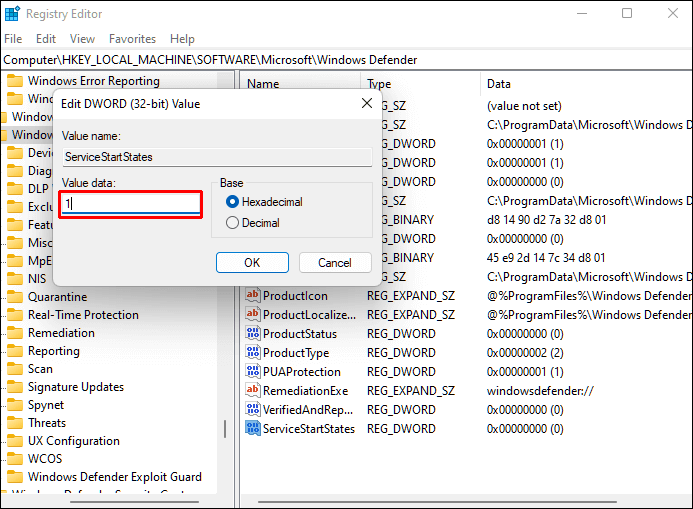
Step 9: Change the Value data field to 1 by right-clicking each value and selecting Modify.
Step 10: Close the Registry Editor and restart your computer.
Step 11: Windows Defender will be disabled once your computer restarts.
Method 3: Permanently Turn Off Microsoft Defender by using Autoruns
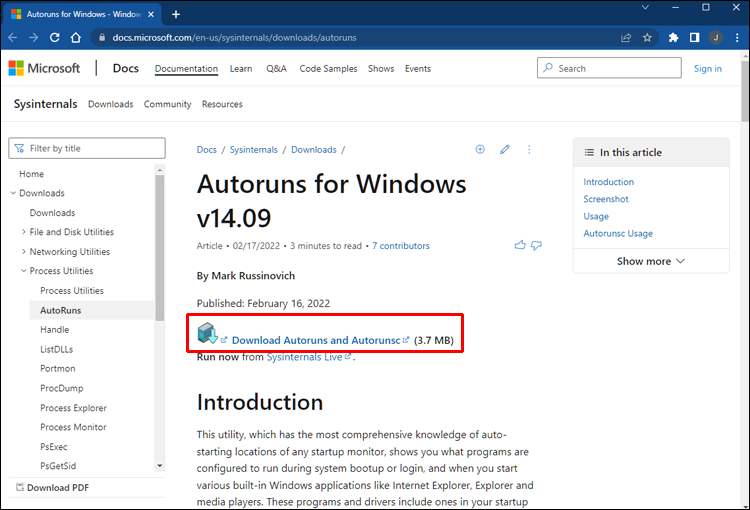
The Autoruns for Windows utility tool can also permanently disable Windows Defender.
Step 1: Install the updated version of Autoruns for your Windows.
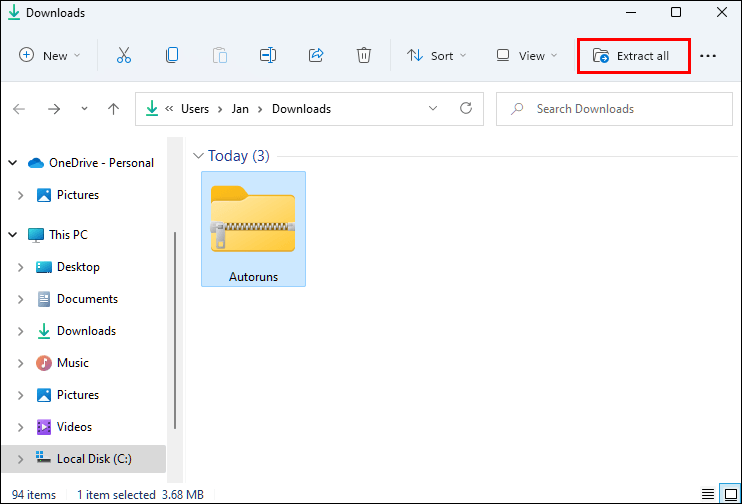
Step 2: Right-click the Autoruns folder in the downloaded file and select Extract All. Consider moving the folder to your desktop for easy access.
Now, you need to disable permanent protection and boot in safe mode.
Step 1: From the taskbar, select the Windows icon, then Settings.
Step 2: Then select Privacy & Security, Windows Security, and Virus & Threat Protection.
Step 3: Select Manage settings under Virus & threat protection.
Step 4: To deactivate Real-time Protection and Tamper Protection, press the sliders.
Step 5: To put your computer in Safe Mode, locate the System Configuration app using a search engine and open it.
Step 6: Select the Boot tab in System Configuration.

Step 7: The Minimal option will be automatically selected when the Safe boot box is checked under Boot options.
Step 8: Restart the computer after clicking Apply, OK, and Restart.
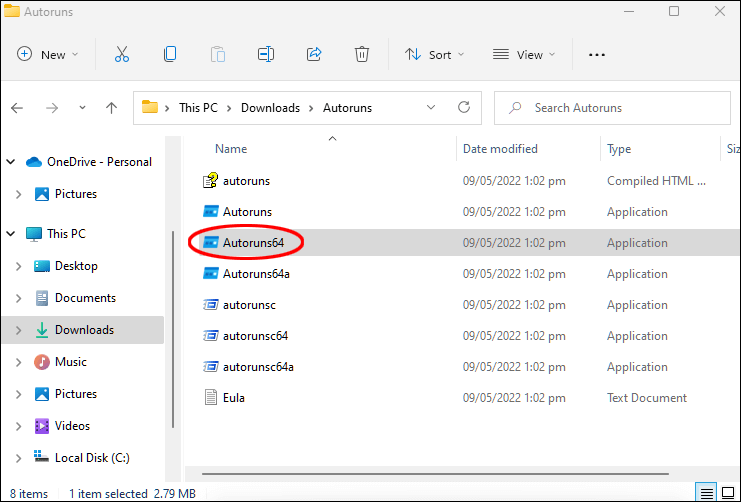
Step 9: To start it, open the Autoruns folder on your desktop, click the Autoruns64.ex file, and then click Run.
Step 10: The Autoruns License Agreement window will appear. Click agree button, if you agree with the terms.
Step 11: Select the Services tab in the Autoruns window.
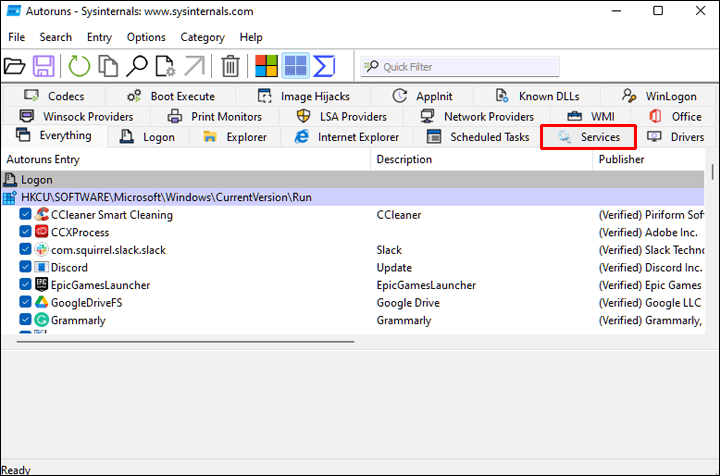
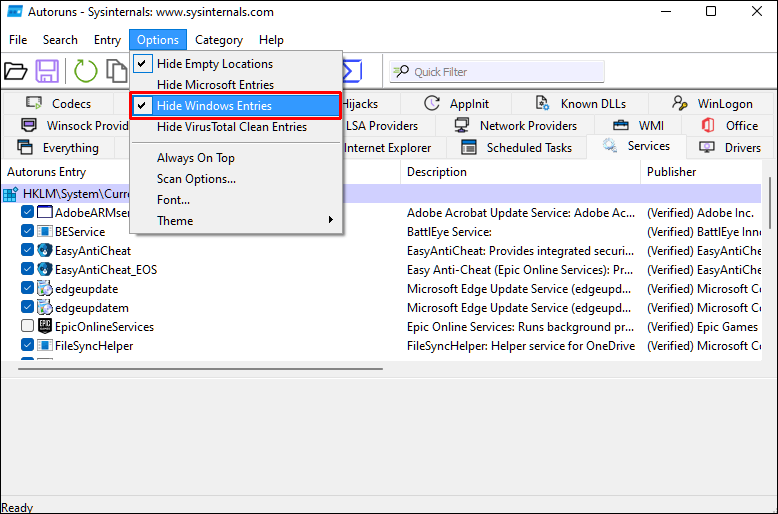
Step 12: Windows services are hidden by default. To make them visible, click on Options from the main menu, then uncheck Hide Windows Entries.
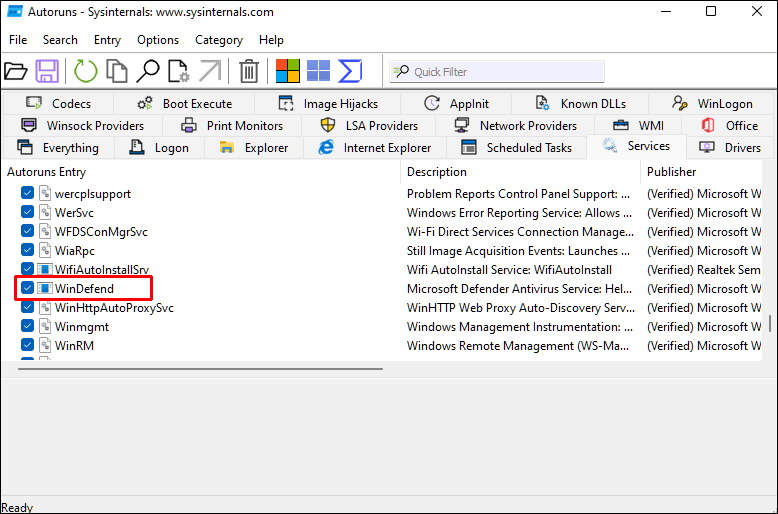
Step 13: If you uncheck the WinDefend box in the list of services for Windows Defender, Windows Defender will not be automatically launched each time the computer reboots.
Reboot your computer into normal mode after closing Autoruns as follows:
Step 1: Select System Configuration from the Search icon on the taskbar.
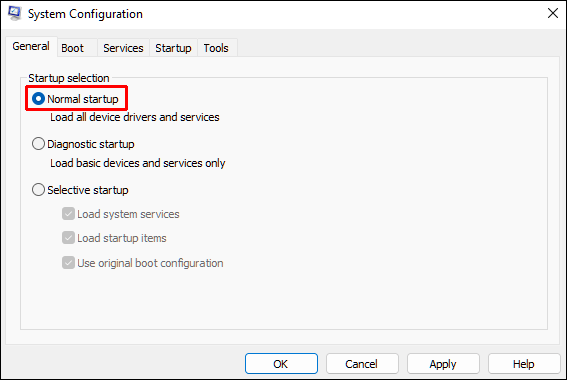
Step 2: Select the Normal startup option.
Step 3: Restart the computer after clicking Apply, OK, and Restart.
Start Task Manager and check if Windows Defender is running after your computer has rebooted:
Step 1: Go to Privacy & security, Windows Security, Virus & threat protection, then Home to see the Virus & threat protection status.
Step 2: Make sure that the Virus & Threat Protection status is set to Unknown.
Method 4: Permanently Turn Off Microsoft Defender through Commond Prompt
To disable Microsoft Defender, you must paste a registry change instruction into the Command Prompt app. Here’s how:
Step 1: Press Win + R to open the Run command box.
Step 2: Click Ctrl + Shift + Enter to open Command Prompt with administrator permissions.
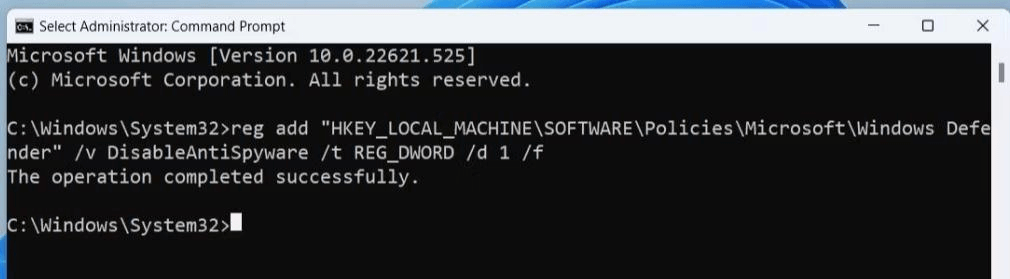
Step 3: Next, type the following instructions:
reg add “HKEY_LOCAL_MACHINE\SOFTWARE\Policies\Microsoft\Microsoft Defender” /v DisableAntiSpyware /t REG_DWORD /d 1 /f
Step 4: Upon successfully executing the before command, a notice will appear stating “The operation was successful.”.
Step 5: Type exit to dismiss the Command Prompt window.
Step 6: The sixth step is to reboot your computer.
Conclusion
By default, Windows Defender – a free antivirus software – is set to stay enabled even if it’s been turned off in Virus & threat protection. It may be hard to disable on your computer as Microsoft has installed fail-safe mechanisms.
Before you decide to deactivate it, turn off Tamper Protection. If you don’t want to use Defender, using another antivirus program is an excellent way to protect your PC from malware. To ensure that the Defender disabling is permanent, you can update the policy, modify the registry or disable it with the “Autoruns for Windows” utility tool. These three methods will ensure that Windows Defender will remain deactivated.
Author Bio:
Dinesh Lakhwani 

Dinesh Lakhwani, the entrepreneurial brain behind “TechCommuters,” achieved big things in the tech world. He started the company to make smart and user-friendly tech solutions. Thanks to his sharp thinking, focus on quality and the motto of never giving up, TechCommuters became a top player in the industry. His commitment to excellence has propelled the company to a leading position in the industry.
Popular Post


Recent Post

How to Switch Windows 10 to a Local Account: Complete Guide
Windows 10 allows users to sign in with either a Microsoft account or a local account. When you set up a new computer, the system often suggests using a Microsoft account. This account connects your device to Microsoft services such as Outlook, OneDrive, and the Microsoft Store. It also syncs settings, themes, and passwords across […]

How To Change Default Apps For File Types In Windows
Windows is designed to make using your computer easy. One way it does this is by assigning default apps to different file types. This means when you open a file, Windows automatically opens it with a specific program. For example, photos may open with Photos, music with Groove Music, and PDFs with Edge. These default […]

How To Adjust The Mouse Pointer Speed: Complete Guide
Using a computer every day means you use the mouse a lot. The mouse pointer moves on the screen and helps you click, scroll, and select items. Many people never think about the speed of the mouse pointer. They have used the default setting for years. This can cause small problems over time. A slow […]

How to Change Mouse Scrolling Settings In Windows
A mouse is one of the most used computer tools. People use it every day. They scroll through emails. They scroll through documents. They scroll through websites and images. The movement becomes automatic. Most users do not notice it. That is why problems often go unnoticed. Scrolling problems show up slowly. At first, it feels […]

Keyboard Light Settings: Keyboard Lighting Control [Complete Guide]
Keyboards are no longer simple typing tools. Well, yes! Over time, they have evolved to include features that improve comfort, visibility, and overall experience. One of the most useful features today is keyboard lighting. It helps users work comfortably in low-light conditions. It also reduces strain when typing for long hours. Many users first notice […]

Customizing Pointer Appearance: Complete Guide
The way your mouse pointer looks on your computer may seem like a small detail. But customizing pointer appearance can make using your PC more comfortable and visually appealing. Many users do not realize that they can change the pointer size, color, and style to fit their needs. Whether you want a bigger pointer for […]

How To Choose a Computer Monitor: Monitor Buying Guide
Buying a monitor looks easy. Many people think all screens are the same. That belief causes regret later. A monitor is not just a display. It is a daily tool. You read on it. You work on it. You relax with it. Small problems become big over time. Poor brightness hurts eyes. Bad size causes […]

How To Get Help With File Explorer in Windows 11 [Complete Guide]
File Explorer is one of the most important tools in Windows 11. It is used to open folders, view files, and manage stored data. Almost every action on a Windows computer depends on it in some way. When users open documents, save downloads, or organize photos, File Explorer is always involved. Because it is used […]

How To Fix A Frozen Computer: Complete Guide [Windows 11/10]
A frozen computer is one of the most common problems Windows users face. The screen stops responding. The mouse pointer does not move. Keyboard inputs do nothing. You may hear the fan running loudly. Sometimes the system looks alive, but nothing works. This situation often happens when you are busy or working on something important. […]

How to Upgrade Computer RAM: Complete Guide
Upgrading RAM is one of the simplest ways to improve a computer. It helps the system feel faster and smoother. Apps open quicker. Browsers handle more tabs. Games and tools run with less delay. Many users search for how to upgrade computer RAM because it gives real results without high cost. You do not need […]

