Backup and Restore In Windows 11: Complete Guide To Use
Last updated on September 25th, 2024 at 3:21 am
Imagine waking up one day to discover that all your cherished photos, crucial documents, and important files have vanished instantly from your PC. That sounds terrifying, doesn’t it? Well, this is why it’s so important to back up your computer. It’s like having a protective shield for all your digital belongings. Windows 11, the newest version of Microsoft’s operating system, offers some handy tools to help you keep your files secure and intact.
In this guide, we’ll explain the details of backup and recovery in Windows 11. We’ll demonstrate how to use Windows 11’s built-in features to guard your digital world, and we’ll also look at some additional options to ensure your data stays safe.
By the end of this article, you’ll be an expert at protecting your digital life, giving you confidence and peace of mind every time you use your computer.
Overview: Windows 11 Back and Restore
Windows 11 has special tools to help you keep your information and computer settings safe. These tools let you make copies of your files, folders, and even your whole computer, so you can get your stuff back if something goes wrong. When you back up your data, you save a copy of it at a certain time, and when you need it, you can use the restore feature to put that data back on your computer.
The backup and restore tools in Windows 11 are easy to use and can help everyone from people who just want to save their personal files to those who need to make complete copies of their computer.
Whether you’re just copying files or making a full copy of your system, Windows 11 has the right tools for your needs. These features work smoothly with the Windows 11 system, making it simple for you to regularly save copies of your important information.
Why Do I Need to Backup and Restore Windows 11?
There are several compelling reasons why you should make use of the backup and restore features in Windows 11:
- Preventing data loss from hardware issues: Sometimes, storage devices like hard drives and SSDs can stop working suddenly, which could cause you to lose your files.
- Keeping your files safe from harmful software: Dangerous online threats can damage or lock your files, stopping you from using them.
- Fixing mistakes you make: If you accidentally delete or change a file, having a backup lets you get it back.
- Restoring your computer easily: If your computer has big problems, you can bring it back to how it was before the issues started.
- Feeling secure: Knowing your files are safely copied somewhere else helps you worry less about losing them.
- Making computer upgrades simpler: When you get a new computer, having backups helps you move your files and settings to the new one.
- Getting your data back fast after problems: If your computer is stolen or damaged by something like a flood, you can quickly get your files back on a new device.
- Preservation of important memories: Family photos, videos, and personal documents are irreplaceable – backups ensure they’re always safe.
- Compliance with regulations: Some industries require regular data backups to meet legal and regulatory requirements.
- Time-saving: Restoring from a backup is often quicker than manually reinstalling software and reconfiguring settings.
We’ll start with the methods you can use for Windows 11 backup and restore process:
How to Back Up and Restore Files in Windows 11
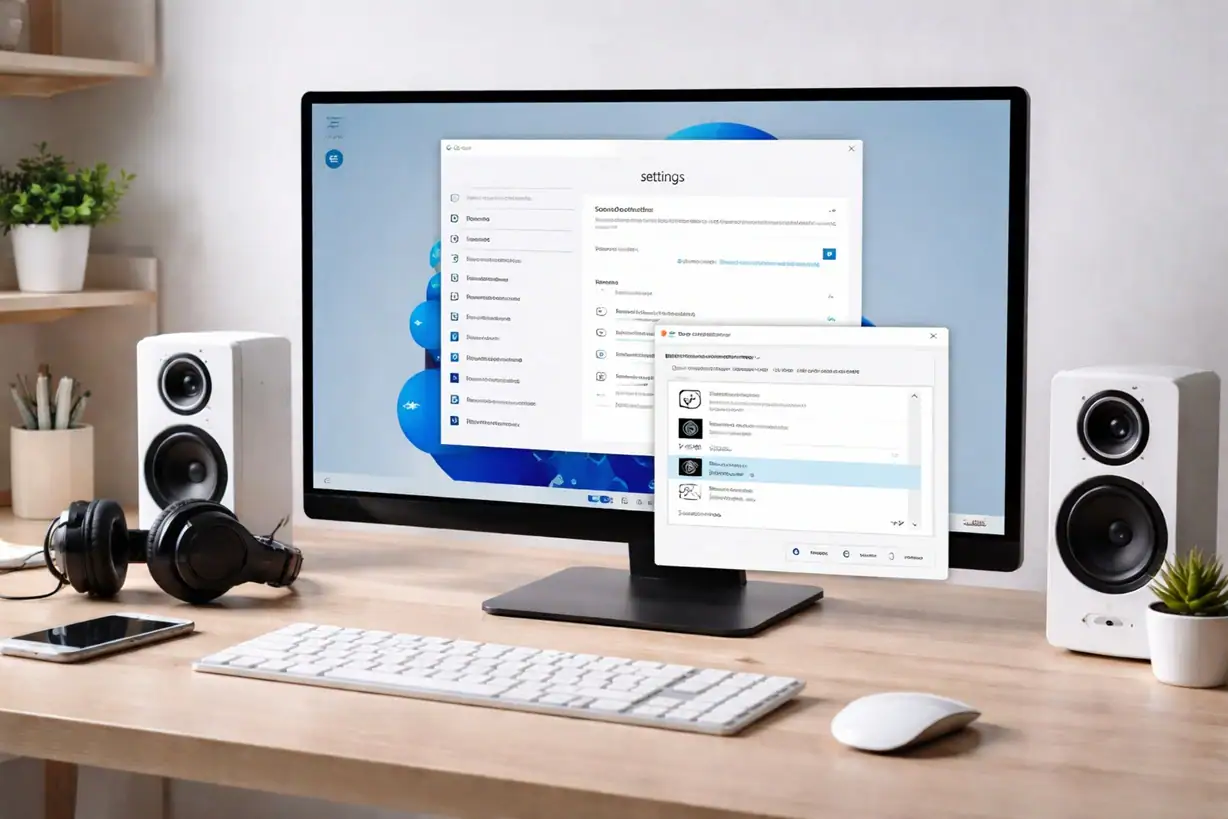
Method 1: Backup and Restore Windows 11 Via Control Panel
The Control Panel method, also known as Backup and Restore is a legacy feature that Microsoft has retained in Windows 11 for users who prefer this traditional approach.
Here’s how to use it backup and restore Windows using the built-in feature:
First things first! Open the Control Panel app on your PC. In the Control Panel, click on “Backup and Restore” option.

To create a new backup:
Step 1: Click on “Set up backup” on the right side of the window. Choose where you want to save your backup. This can be an external hard drive, a network location, or DVDs.

Step 2: Select what you want to backup. You can let Windows choose (recommended for most users) or select specific folders yourself.

Step 3: Review your settings and click “Save settings and run backup.”

Step 4: Windows Backup and Restore usually makes copies of your files every Sunday evening at 7:00. But you can change when it happens. Just click “Change Schedule” to pick a time that works better for you.

To restore files from a backup:
Step 1: In the Backup and Restore window, click on “Restore my files.” Choose whether you want to search for specific files, browse for folders, or restore all files from a particular date.

Step 2: Select the location where you want to restore the files. Click “Restore” to begin the process.
This method for backup and restore Windows 11 is particularly useful for users who want a straightforward, familiar backup solution.
Method 2: Windows 11 Backup and Restore with File History
File History is a more modern backup feature introduced in Windows 8 and improved in subsequent versions. It’s designed to continuously protect your files by creating regular backups.
File History works by copying stuff from certain folders on your main drive (C:) to another storage device. It backs up things like your Documents, Music, Pictures, Downloads, Videos, and Desktop folders. It even backs up OneDrive files that are on your computer.
To use File History, you need an extra storage device, like a USB stick or an external hard drive. Just plug it in and keep it connected to your computer. Then File History can automatically save copies of your files to this device.
Here’s how to use File History in Windows 11:
Step 1: Press the Windows key and R at the same time. This opens a small box called “Run.” Type “FileHistory” in the box and press Enter.

Step 2: You’ll see the File History page. If you’ve never used it before, it will be turned off.
Step 3: Plug in a USB drive or external hard drive to your computer. Click the “Turn On” button to start File History.
File History will now start copying your files to the drive you plugged in. It will save stuff from your Libraries, Desktop, Contacts, and Favorites.
To restore files using File History:
Step 1: Open File Explorer and navigate to the folder containing the files you want to restore. Click on the “Home” tab in the ribbon and select “History.”
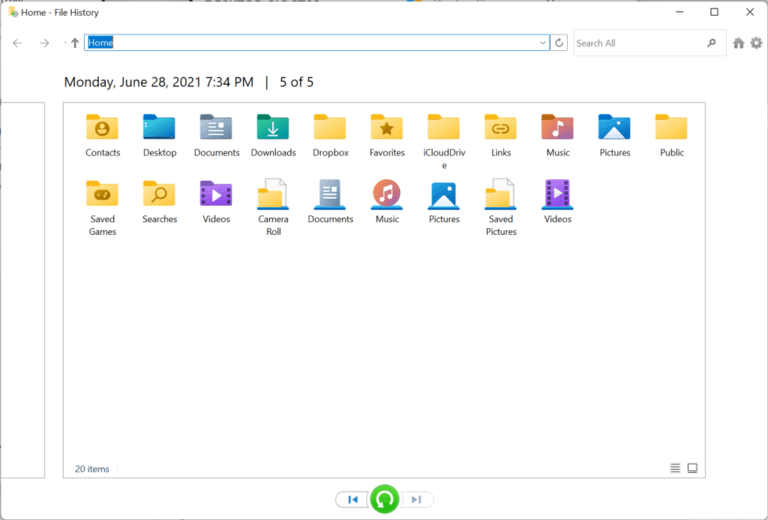
Step 2: Browse through the different versions of your files and select the one you want to restore. Click the green restore button to bring back the selected version.
File History is an excellent option for users who want an automated, continuous backup solution that focuses on personal files rather than system files.
Method 3: How To Restore An Entire System Image Backup Via Backup And Restore?
Creating and restoring a system image backup is a more comprehensive approach to backing up your Windows 11 PC. Here’s how to do it:
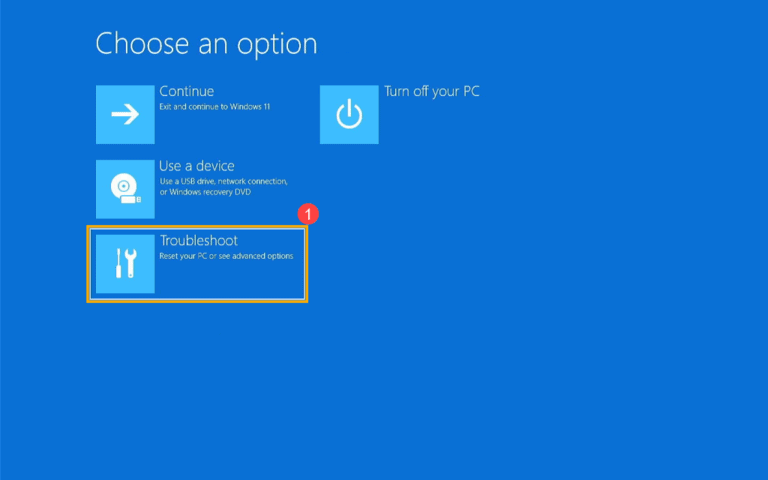
After starting the Windows 11 installer, follow these steps to recover your backup:
Step 1: Choose your language, keyboard, and time settings, then click “Next.” Look for “Repair your computer” at the bottom of the screen and select it.

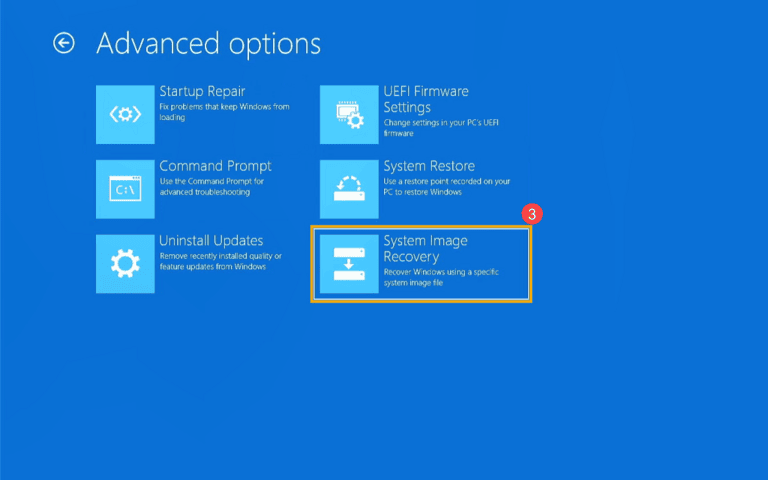
Step 2: Click “Troubleshoot,” then “System Image Recovery.” The restore tool will automatically detect your external hard drive backup. Click “Next.”
Step 3: On the next screen, you shouldn’t need to change anything. Just click “Next” again. Click “Finish” to start the recovery process, then confirm by clicking “Yes.”
The recovery will take some time. When it’s done, your computer will restart and load Windows 11 with all your backed-up data restored.
This method is ideal for users who want a complete backup of their entire system, including the operating system, applications, settings, and personal files.
Method 4: Use a Third-Party Backup Tool
While Windows 11 offers built-in backup solutions, some users might prefer third-party tools for additional features or a different user interface. Here are some popular options:
- EaseUS Todo Backup: Offers a user-friendly interface and features like disk cloning and cloud backup.
- Macrium Reflect: Known for its fast and reliable system imaging capabilities.
- Acronis True Image: Provides comprehensive backup solutions, including anti-ransomware protection.
Third-party tools can offer more flexibility and features than built-in Windows options, but they often come with a cost and require separate installation and maintenance.
Tips and Tricks to Backup and Restore Windows 11
Here are some useful tips and tricks that you use to ease the Windows 11 backup and restore process:
- Use different ways to back up your data: Don’t just use one method. Use File History to keep your files safe all the time and make full backups of your computer sometimes for extra protection.
- Follow the 3-2-1 backup rule: Have 3 copies of your data, on 2 different types of storage, and keep 1 copy somewhere else or online.
- Check your backups often: From time to time, try to get some files back from your backups to make sure they work.
- Name your backup drives: If you use external drives, write clearly on them the date and what kind of backup is on them.
- Set reminders for backups: If you don’t have automatic backups, set reminders on your calendar to do backups regularly.
- Use online storage for important files: Services like OneDrive can help protect your most important documents.
- Make a backup before big updates: Always back up your computer before installing big Windows updates or making big changes to your computer.
- Exclude unnecessary files: To save space and speed up backups, exclude temporary files, browser caches, and other non-essential data.
- Create a recovery drive: Make a Windows 11 recovery drive on a USB stick for easy access to recovery tools if your system doesn’t boot.
By following these tips and tricks, you can create a robust backup strategy that ensures your data is always protected and easily recoverable in Windows 11.
Conclusion
Backing up and restoring data in Windows 11 is crucial for safeguarding your digital information. You can use the built-in features of Windows, such as File History and Backup and Restore, or choose other software options. The key is to set up a regular backup schedule. This way, you keep your important files, like family pictures and work documents, secure and easy to recover.
Choose a backup method that you find easy to use and make it a regular habit. As you get used to it, you can look into more complex methods to improve your backup strategy. With Windows 11’s backup tools, you can feel confident using your computer, knowing your data is safe from unexpected problems.
FAQs:
How often should I backup my Windows 11 PC?
It’s recommended to backup your important files at least once a week. For critical data that changes frequently, consider using File History for continuous backups.
Can I access my Windows 11 backups on another computer?
Yes, you can access File History backups on another Windows computer by connecting the backup drive and using File Explorer. For system image backups, you’ll need to restore them to a compatible system.
How much storage space do I need for Windows 11 backups?
The required space depends on the amount of data you’re backing up. For a full system image, you’ll need at least as much space as your system drive uses. For file backups, start with at least 1.5 times the size of the data you’re backing up.
Is it possible to automate backups in Windows 11?
Yes, both File History and third-party backup tools offer options to schedule automatic backups. You can set them to run daily, weekly, or at custom intervals.
Author Bio:
Dinesh Lakhwani 

Dinesh Lakhwani, the entrepreneurial brain behind “TechCommuters,” achieved big things in the tech world. He started the company to make smart and user-friendly tech solutions. Thanks to his sharp thinking, focus on quality and the motto of never giving up, TechCommuters became a top player in the industry. His commitment to excellence has propelled the company to a leading position in the industry.
Popular Post


Recent Post

How To Check If Your PC Is Infected? [Complete Guide]
Computers now sit at the center of almost everything we do. Well, yes! From sending emails to watching videos, we depend on them without much thought. Because of this, even a small issue can disrupt daily tasks. One common problem is hidden malware. It does not always show clear signs at first. It can enter […]

Repair Apps And Programs: Repair Apps That Aren’t Working
Computers have become an essential part of everyday life, supporting work, study, communication, and entertainment. Most of these activities rely on apps and programs, so when one stops functioning, even simple tasks can be disrupted. Common problems include error messages, frozen screens, or apps that fail to open. On Windows systems, such issues often arise […]

Troubleshooting Microphone Privacy Settings: Complete Guide
Sound is a basic part of how we use computers today. People attend meetings, record audio, speak to others, and use voice tools almost every day. A working microphone makes all these tasks easy. When the microphone fails, even simple work becomes difficult. Many users first think the device is broken. In reality, the issue […]
Windows Sound Settings – Sound Control Panel: Complete Guide
Sound plays an important role in how we use a computer every day. It supports both work and leisure. You need it for meetings, videos, music, and alerts. When audio fails, even simple tasks become difficult. Many users feel stuck when sound issues appear. This usually happens because they are not familiar with Windows Sound […]

Run a Troubleshooter For PC Issues Windows: Complete Guide
A computer plays an important role in everyday life. People use it for work, study, communication, and entertainment. When a problem appears, it can interrupt everything. Even a small issue can waste time and create frustration. Many users feel unsure about how to fix such problems. They often think they need expert help. In reality, […]
![Adjusting Audio Output Settings Complete Guide [2026]](https://sp-ao.shortpixel.ai/client/to_webp,q_glossy,ret_img,w_1228,h_819/https://www.techcommuters.com/wp-content/uploads/2026/03/Adjusting-Audio-Output-Settings-Complete-Guide.webp)
Adjusting Audio Output Settings: Complete Guide [2026]
Sound is part of almost everything we do on a computer. It lets you watch videos, join calls, play music, and hear alerts. When the audio stops working the right way, it can interrupt both work and daily use. That is why adjusting audio output settings matters for every user. Many people get unsure when […]

Artificial Intelligence Explained: Concepts, Terminology, Benefits, and Future Trends
Artificial Intelligence, or AI, is basically computers doing things that usually need a human brain. We’re talking about stuff like learning from experience, figuring out problems, understanding language, and making decisions. It’s not magic, just a lot of data, pattern-spotting, and math behind the scenes. Now, AI doesn’t actually think or feel like we do. […]

Resolving Microphone Detection Problems: Latest Guide [2026]
Microphones are important tools in daily life. People use them for office meetings, online classes, interviews, gaming, customer support, and content creation. When a system fails to detect a microphone, communication stops at once. This situation can cause stress and confusion. Many users believe the microphone is damaged. In reality, most problems are simple and […]
How To Switch To A Dark Background Theme In Windows [2026]
Most people spend many hours each day in front of a computer screen. Office work, online classes, editing, browsing, and streaming all require long screen time. A bright white background may look clean at first. However, over time, it can feel sharp and tiring. The strong contrast between white backgrounds and black text may cause […]

How to Switch From Local To Microsoft Account On Windows
Many users begin with a local account when they set up a new Windows computer. A local account works only on that single device. It stores settings, files, and preferences locally. It does not connect to online Microsoft services. For basic offline use, it works well. However, as digital needs grow, many users want better […]

