The Definitive Guide to Managing Your Mac’s Storage Space
Are you struggling with low storage space on Mac? Wondering what is taking up so much space?
You are at the right place. Here we will discuss how to reclaim space on Mac.
Gone are those days when you used Mac machines only for p
rofessional purposes. Now, everything from downloading movies to streaming content, saving 4K videos, creating high-resolution videos, and whatnot Mac is used; due to this, the dreaded “Your disk is almost full” error is often encountered.
If this bothers you, we will explain what you can do to free up space on Mac in this post.
So, without wasting any time, let us learn how to clean up space.
| Before we start – A Quick Solution Junk, old downloads, large files, unwanted language files, and a whole lot more can take an enormous amount of space. Locating and getting rid of this data manually is an uphill task for beginners and advanced users. If you don’t like this idea, here’s a tip: Try CleanMyMac X and remove user cache, app leftovers, iTunes and Photos junk, old mail downloads, junk files, malware, and much more from your Mac. Using the app is a straightforward task; you will be surprised to see how CleanMyMac X works. |
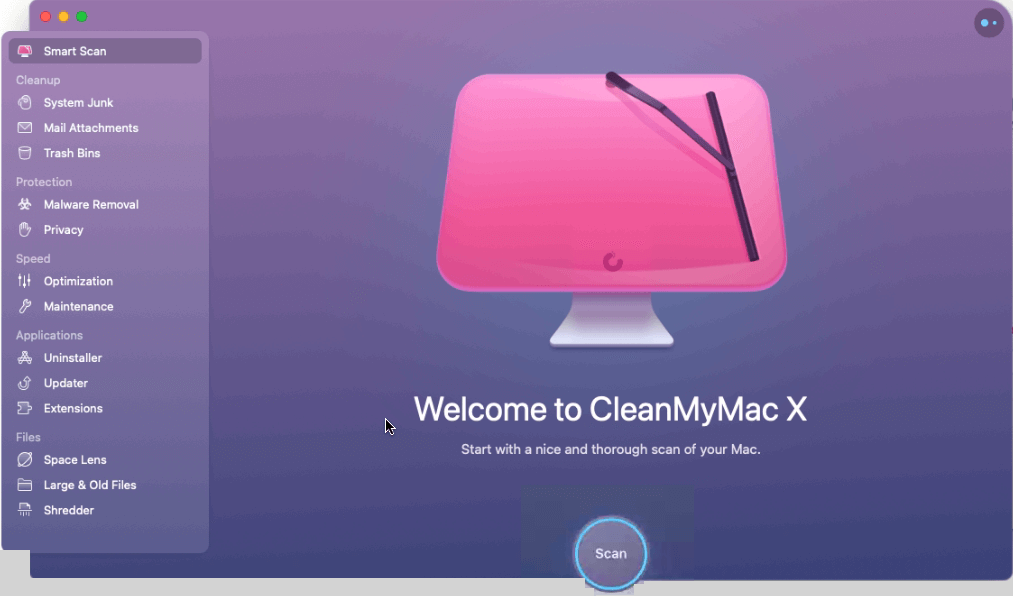
Now that you know how to recover gigabytes of storage space automatically. Let us learn other best ideas & manual ways to identify what is taking up space on your Mac & how to clean up and manage storage space on Mac.
| Fact: You need 10% storage free to run Mac smoothly. This means to avoid facing any issues you must know how to manage storage space on Mac. |
Best Ways to Manage Storage Space on Mac
There are multiple ways to free up disk space on Mac. However, if you are in a rush and you want to free up a limited amount of space to save an important task, here are a few quick tips:
- Clean Old Downloads
The downloads folder is a dumpster of old zip files, duplicates, and other junk data. It is the best place to start when you want to free up space on Mac.
Note: To avoid deleting any important data, sort files by size. This makes sifting through each file easy.
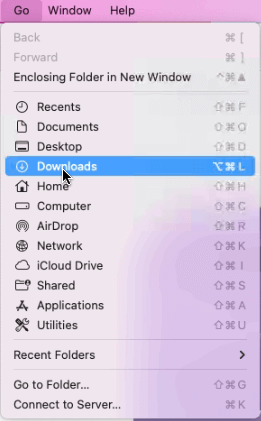
1 Open Finder > Go > Downloads folder
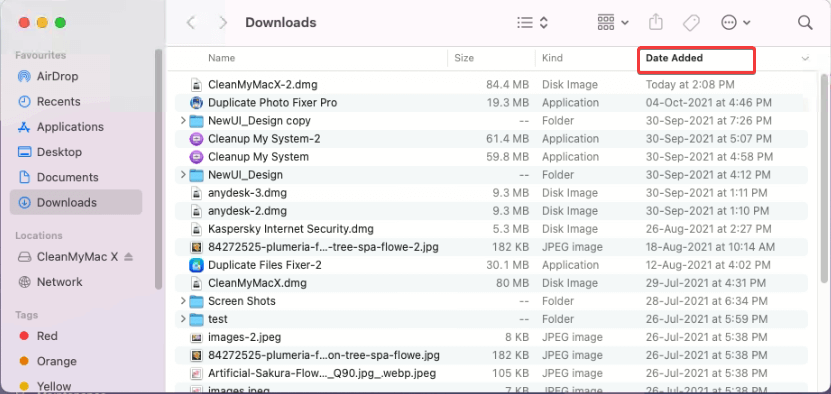
2 Sort files by Date Added and select old downloads or files you know you don’t need.
3 Right-click > Move to Bin/Trash.
- Remove large files
- Open Finder > Go > Home folder or press Shift + H
- Next, click the search icon to find the files. You can also sort files in different folders. To open them double click the folder.
- After that click the drop-down as shown in image below and select Size option.
- You will now see files sorted from 100 MB to 1 GB
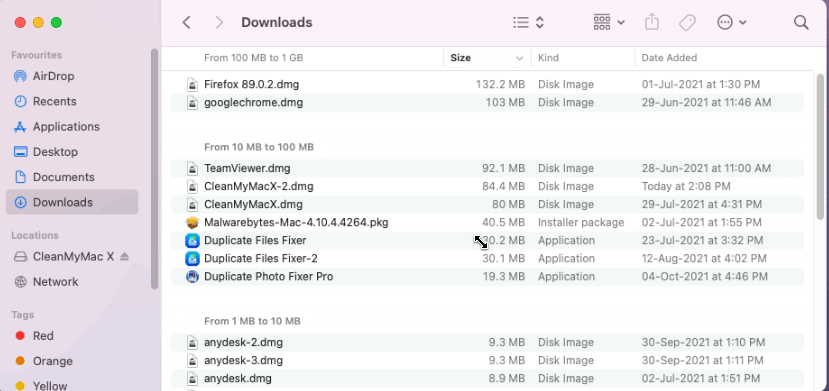
5. Select the ones you don’t need right-click > Move to Bin
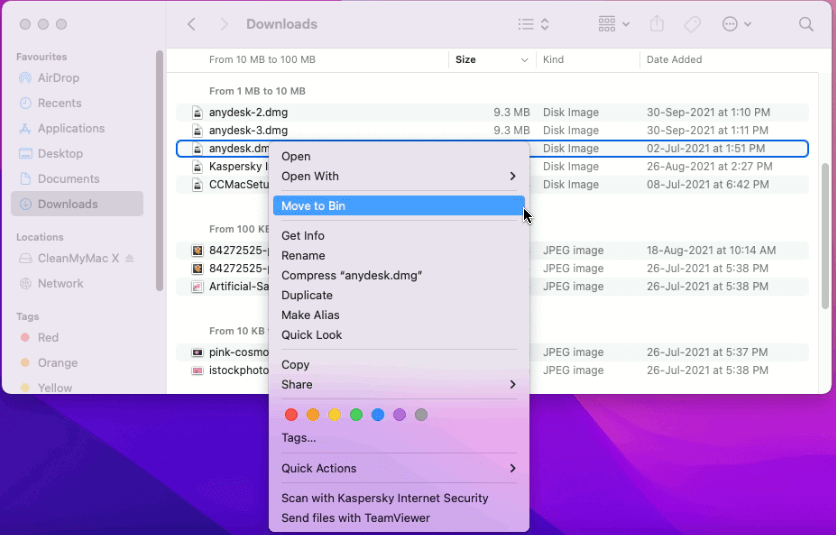
Using the same steps, you can sort files by Date Added. For this, instead of choosing ‘size’’ select from either of the date options – Date Last Opened, Date Added, Date Modified, & Date Created.
Select the file you don’t need > right-click > Move to Bin.
3. De-clutter Desktop
If your desktop is a mess, and you save everything on it, removing documents and files from there to recover space is a good idea. To do so, follow these steps:
- Launch Finder > Go > select Desktop folder
- Sort by Size and delete unnecessary things that are particularly large.
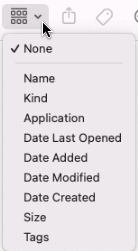
3. Alternatively, you can sort by Kind and locate media files that take more space compared to other file types.
4. Select files > right-click > Move to Bin.
In addition to this, you can also use Stacks to categorize files based on the file types automatically.
Steps to use Stacks
- Right-click desktop > select Stacks from context menu.
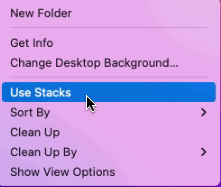
That’s all. Your desktop will now be clean and tidy.
4. Empty Trash
Like Windows has Recycle Bin, Mac also has a Trash folder where all deleted files are moved. To permanently remove these files you need to clean the Bin. To do so, follow these steps:
Right-click Bin > Empty Bin.
This will help recover a decent amount of storage space.
However, if you need more and don’t want to see the unpleasant running out of space message again, check your Mac to know what is taking up space.
- Click on the Apple logo > About This Mac.
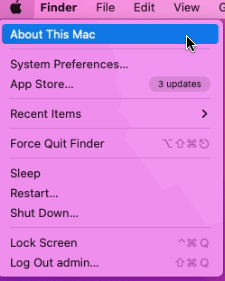
2. Click the Storage tab > wait for the space calculation process to finish.

3. You will now get different bars indicating free and occupied space.
4. To see what each represents, hover over the bars. This will help know which file types are taking more storage space.

If photos and videos take the most space, move them to iCloud.
| Note:- Apple gives 5GB of free iCloud storage. If that isn’t enough, you can pick from any storage plans Apple offers to buy more space. |
5. Moving Files and Photos to iCloud
- Click on the Apple logo > About This Mac > Storage > Manage.
- You will now get a new window to store files in iCloud click Store in iCloud.
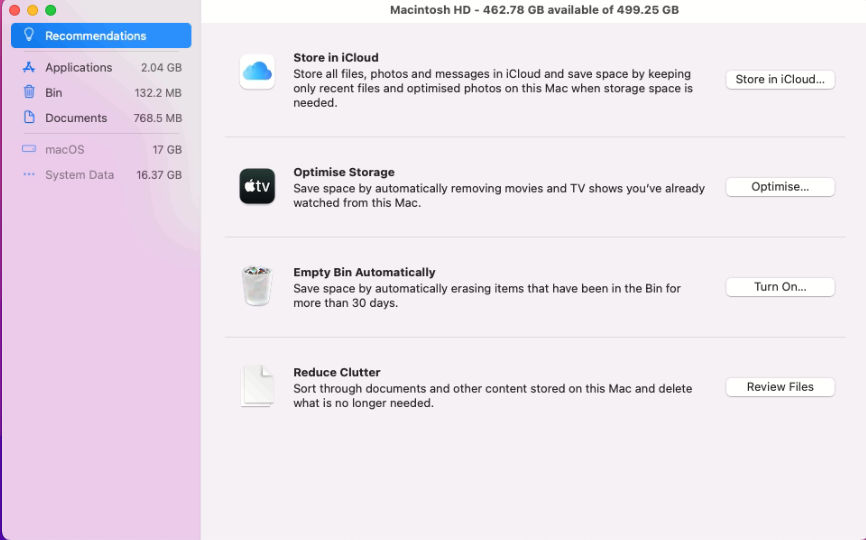
3. Select the files > click on Store in iCloud.
6. Delete Old Bookmarks from Browser
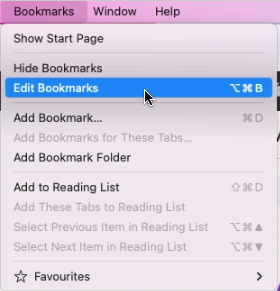
- Launch Safari, the default web browser.
2. Select Bookmarks option from the top menu > Edit Bookmarks > right-click > Delete
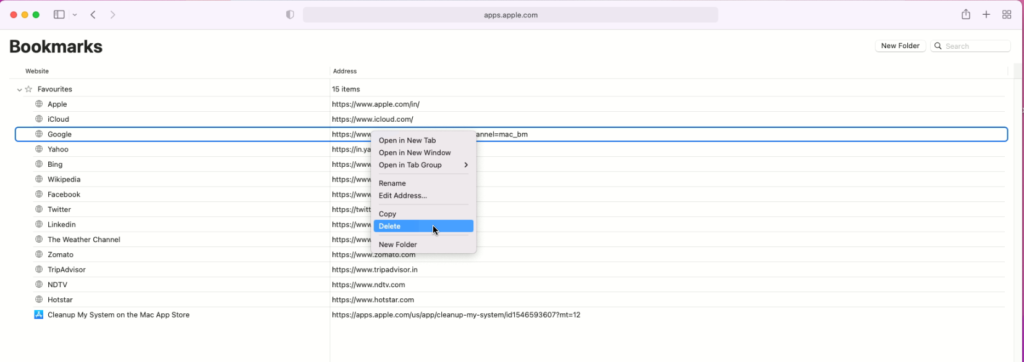
This will decrease page load time, and the browser will be faster.
7. Optimise Storage
Another way to avoid getting storage clogged up is to enable Optimise Storage on Mac.
| Note: Alongside removing already watched TV shows or films, Optimise Storage will also delete old email attachments. Remember, email attachments will still be available on the email server, and the purchased show will be available on Apple’s iTunes Store. |
1 Click Apple icon > About My Mac.
2 Hit the Storage tab > Manage and click on Optimise Storage.
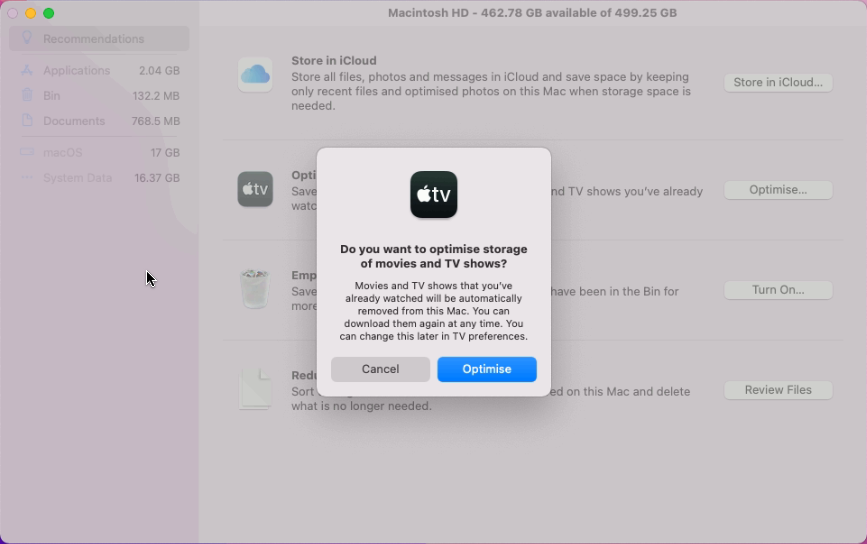
Once the option is enabled, storage will be optimised.
8. Empty Trash Automatically
The feature will work on files that have been in the bin for 30 days.
To empty Trash automatically, follow these steps:
- Click Apple logo > About My Mac > Manage.
- Choose the Empty Trash Automatically option and enable it
- You get a confirmation box asking if you want to erase Trash automatically.
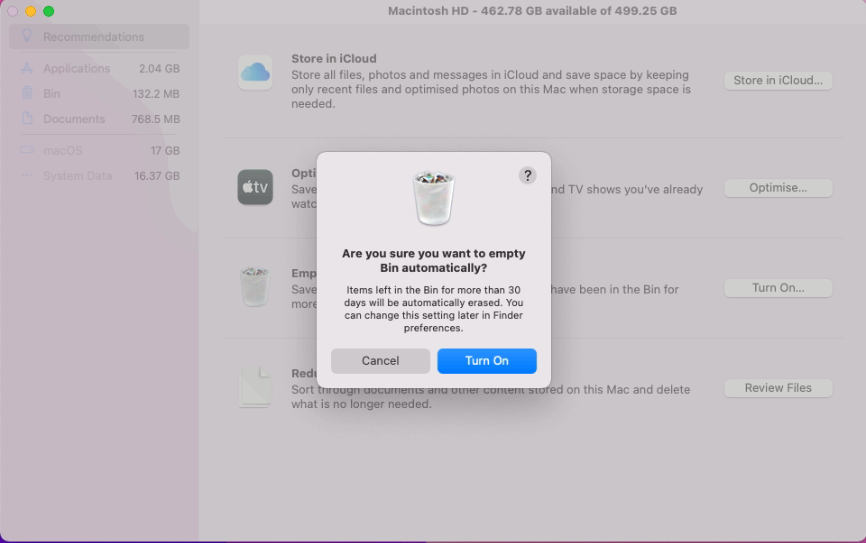
9. Remove duplicates
If you have a large photo collection, the chances of having duplicate pictures are more. These duplicate images unnecessarily occupy space. There are apps in the market that help detect and delete duplicate photos on Mac.
10. Clean System Junk
Applications leave temporary, broken files and other items behind. This makes cleaning system junk on Mac essential. To perform this task, you can use a dedicated System Junk module.
- Launch CleanMyMac X.
2. Click System Junk > Grant Access > Press Scan button.

3. Wait for the scan to finish, review results > press Clean.
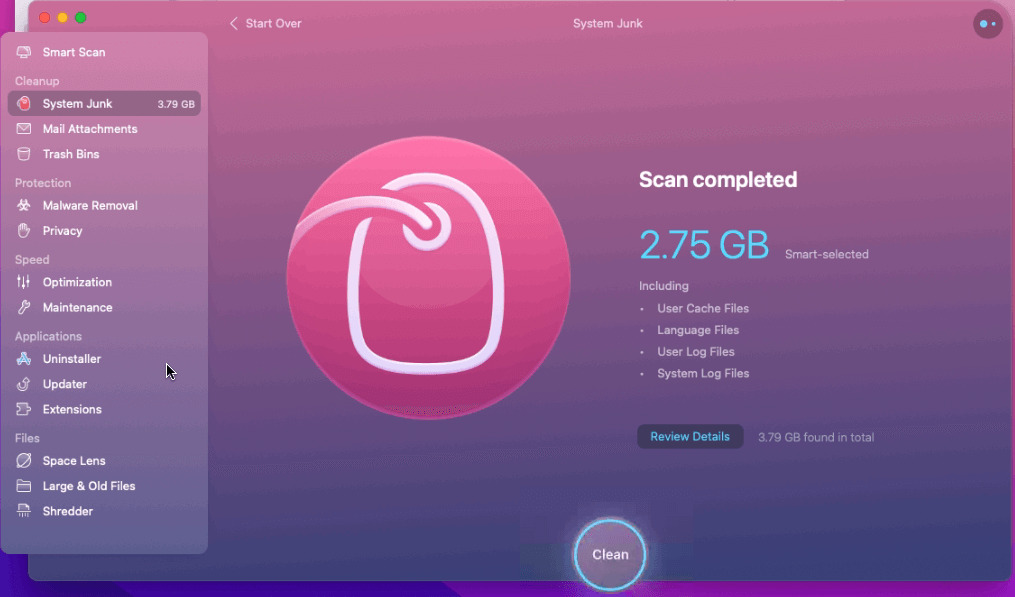
This will clean system logs, temporary files, and user cache files that you no longer need.
11. Manage login items
When you remove unwanted data from the system, why leave the startup. To improve Mac’s performance, remove unnecessary login items.
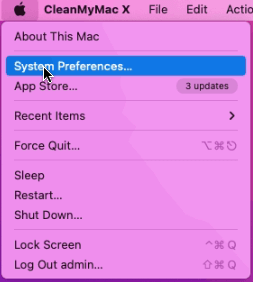
- Click Apple menu > System Preferences
2. Select Users & Groups
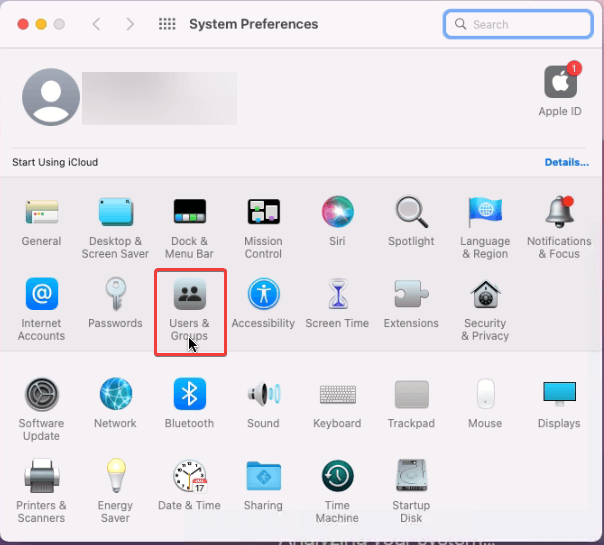
3. Select the user name > Login Items tab
4. Select the item > click padlock > click ‘-‘ from the bottom left corner to remove items from here.
12. Uninstall Unused apps
Another way to manage storage and optimize Mac is to uninstall apps you no longer use.
To do so follow these steps:
- Launch Finder > Go > Applications.
- Select the application you no longer use > right-click > Move to Bin
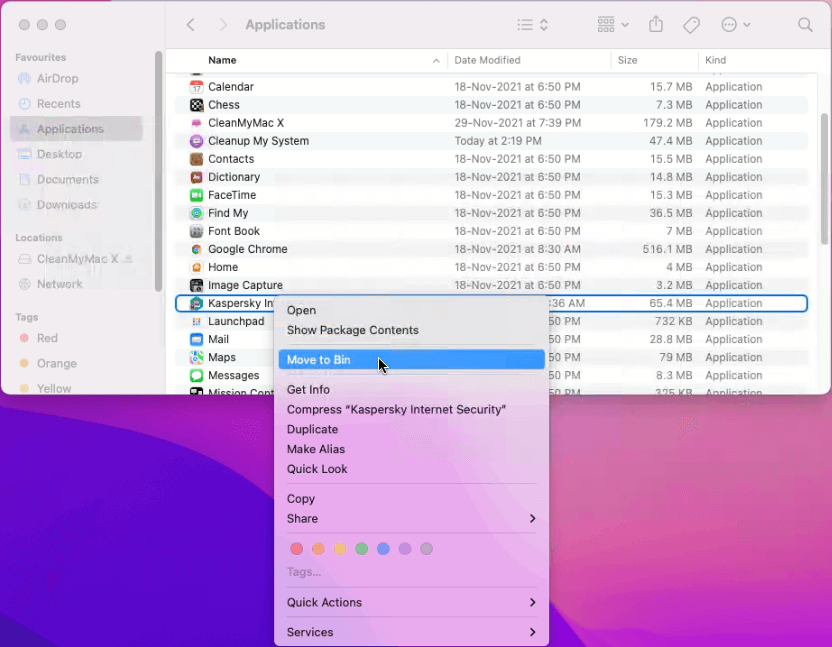
In addition to this, you can use CleanMyMac X. The advantage of using this best Mac optimizer and uninstaller is that it completely removes applications and clears the leftover data.
Manual method sometimes leaves corresponding files adding up to the junk data. But with CleanMyMac X this is not the case.
13. Clean Cache Files
Cache files help Mac load applications quickly. They are like a blueprint of programs and activity of the users.
However, these cache files accumulate over time and take unwanted space. Therefore, to keep performance-optimized and storage space free, clean these files.
To remove Cache files:
- Launch Finder window > Go > Go to Folder
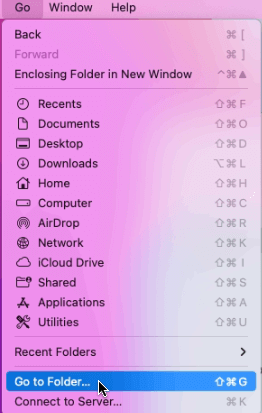
2. Type in ~/Library/Caches and delete the files/folders taking up the most space.
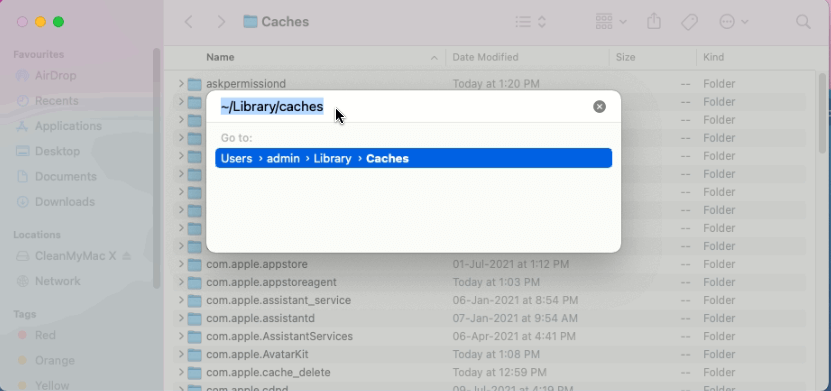
3. Next, again click on Go to Folder.
4. Type in /Library/Caches (simply lose the ~ symbol)And, again, delete the folders that take up the most space.
14. Delete Unnecessary Language Files
Language packs, also known as Localization files, take up the most amount of unnecessary space. To clean space taken by these packs, follow these steps:
- Launch CleanMyMac X
- Click the System Junk option from the left pane
- Review scan details > click Language Files.
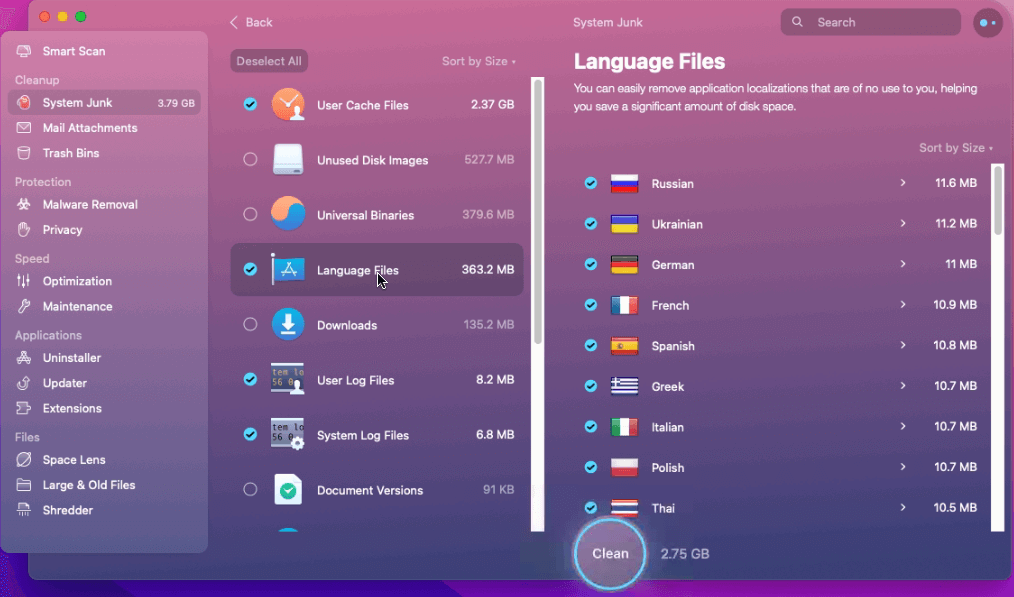
4. Select unwanted languages > Clean.
That’s all for now. Using this descriptive guide you can easily clean and manage storage space on Mac efficiently. Obviously you can use manual ways to free up space but it will be time consuming and requires technical knowledge. Therefore, if you are looking for an effective way to manage space and optimize Mac, then try CleanMyMac X that helps clean and optimize Mac intelligently.
We hope you enjoyed the post and will use the tips. Do share your feedback about the tutorial and CleanMyMac X app.
Popular Post
Recent Post
Top 9 Browsers With Built-In VPN – VPN Browser
Online browsing is no longer private by default. Every website collects data in some form. This includes location details, device information, and browsing habits. Over time, this data builds a clear picture of user behavior. Many people are now uncomfortable with this level of tracking. A VPN browser helps reduce this exposure. It adds a […]
AI In Cyber Security: Who is Winning, Hackers or Security Companies
Cybersecurity once followed clear rules. Companies built firewalls. Users created passwords. Antivirus tools scanned files and removed known threats. When an attack happened, security teams studied it and added new rules. This method worked for many years. It created a sense of control and stability. That sense is gone today. Artificial intelligence has changed how […]
The Biggest AI-Run Cyber Attacks Of All Time
Artificial intelligence is now part of everyday technology. It helps people search faster. It improves medical research. It supports businesses in making better choices. But AI is not used only for good purposes. Cyber criminals have also learned how to use it. This has changed the nature of cyber attacks across the world. In the […]
Switch To a Dark Background Theme on Windows: Enable Dark Mode
People often like a screen that feels gentle on the eyes. A darker style softens bright areas and makes long computer sessions easier to handle. It also gives the desktop a cleaner and more modern feel. When you switch to a dark background theme in Windows, the colors shift to deeper shades that reduce glare […]
Complete Guide on Managing Audio Input Devices [Latest In 2026]
People use microphones for meetings, games, classes, recordings, and voice chats, so any problem with the device can interrupt their work. Even a small system error can make the voice weak or stop it fully. This is why knowing the basics of managing audio input devices is helpful for new and experienced users. Windows includes […]
Resetting Audio Settings on Windows 11: Complete Guide
Sound problems can disrupt work, study, or entertainment. Many users face issues where the audio becomes too low, too loud, unclear, or does not play at all. A common way to solve these problems is by resetting audio settings to their original state. This helps Windows rebuild its sound setup from the beginning. Windows 11 […]
Troubleshooting Headphone Detection: Headphones Not Detected/Working
A lot of users run into sound problems at some point. A common one is when the computer does not pick up the headphones. You plug them in, but the speakers keep playing. This can break your focus during work, movies, music, or calls. It also causes confusion because the reason is not always clear […]
How To Re-Pair Bluetooth Earbuds For Stereo Sound on Windows
Wireless earbuds are often paired with computers for rich stereo sound, but things don’t always go smoothly. Sometimes, the system defaults to mono audio or fails to activate the correct playback mode. This can disrupt music, calls, or gaming, making the sound feel flat and lifeless. These glitches usually stem from improper setup. Windows might […]
How To Manage Camera Permissions for App On Windows: Complete Guide [2026]
Many users run into issues when trying to join video calls or online meetings—their camera simply won’t turn on. This can happen for a few reasons: Windows might be blocking access, or the app may not have the correct permissions. These hiccups often lead to confusion and frustration. Fortunately, Windows provides straightforward tools to help […]
Help With Color Management In Windows: Complete Guide [2026]
Color often decides how we experience a picture, a video, a website, or even a simple chart. Many users feel confused when colors look different on each screen. A monitor may show a softer shade while a laptop shows a sharper one. This creates doubt and slows down work. It can also lead to mistakes […]







![Complete Guide on Managing Audio Input Devices [Latest In 2026]](https://www.techcommuters.com/wp-content/uploads/2025/12/Complete-Guide-on-Managing-Audio-Input-Devices.webp)




![Help With Color Management In Windows Complete Guide [2026]](https://www.techcommuters.com/wp-content/uploads/2025/12/Help-With-Color-Management-In-Windows-Complete-Guide.webp)

