How To Backup & Sync Device Contacts With Google Accounts
It’s hard to manage multiple Android devices or if you’re planning to go for a new smartphone in the near future, Do you know that all your contacts can be synced with Google contacts? You can find all your Google contacts on any Android device you associate with your Google account? But what about isolated contacts which are left on your phone’s local storage?
Since those aren’t stored in your Google account, you won’t be able to access them on other devices. If you are wondering how to get them all in one place, we have got the solution for you.
It’s Easy! You can backup & sync device contacts with Google account and keep all your contacts at one place. We’ll show you how to do that in a few easy steps. We assume that you have a smartphone device that is configured with a Google account, and it contains all your contacts on the local storage.
EXPORT OR BACK UP CONTACTS
Android Device
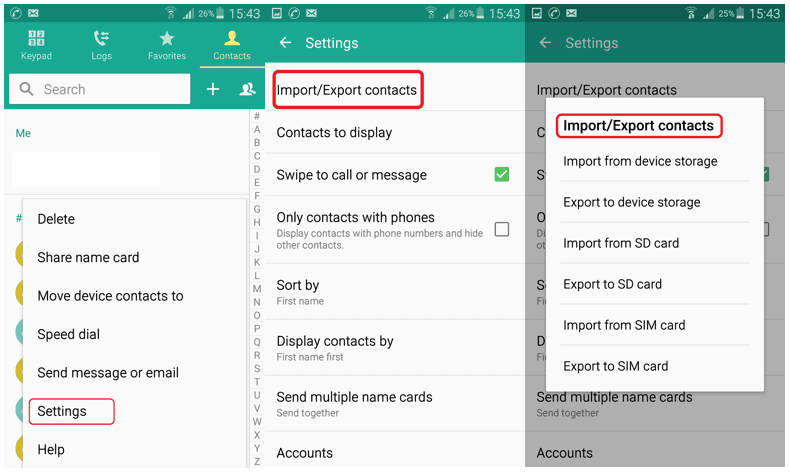
Step 1. Open the ‘Contacts App’ on your Android smartphone or tablet.
Step 2. Tap the app’s Overflow menu (Three horizontal lines in the upper left corner). Tap ‘Menu’ and then ‘Settings’ and then ‘Export’.
Step 3. Select one or more accounts from where you want to export contacts.
Step 4. Tap ‘Export to .VCF file’.
Turn Automatic Backup Off or On
When you set up your Google Account for the first time on your device, it asks you if you want to back up your data. You can turn ON automatic updates or you can change this setting at any time.
Step 1. Open your device’s ‘Settings’ App.
Step 2. Tap ‘System’ and then tap ‘Backup’.
Step 3. Turn On or Off ‘Back up to Google Drive’ as per your preference.
Computer Settings
If you want to add your contacts to another email account, you need to first download them as a ‘.CSV’ or ‘vCard’ file on your PC.
Step 1. Go to Google Contacts.
Step 2. Put a check on the boxes that appear next to their names to select contacts.
Step 3. Click More and then Export.
Step 4. To back up your contacts, select Google CSV.
Step 5. To save your file, click Export.
Backup Android Phone’s Contacts to Gmail Account

You must be delighted to know that it is invariably possible to backup or sync Android contacts to your Gmail account using your computer or a laptop. Simply follow these instructions properly and you should be able to back up your contacts to Gmail at the end of this guide.
Firstly, you need to open contacts application on your Android phone then tap on the menu button and click on ‘Import/Export’. Tap on ‘Export to Storage’ and save all the contacts to your phone’s storage device or memory card. Next, connect your phone to PC and copy the ‘.VCF’ file on your computer. Or, you may keep the phone connected and use the following steps.
Step 1. Go to Gmail.com and login with your email ID and password.
Step 2. From the top left corner that says ‘Gmail’, click on the drop-down icon.
Step 3. Click on ‘Contacts’ followed by ‘More’ and then click on ‘Import Contacts’ from the drop-down options.
Step 4. Browse and select the ‘.VCF’ file which is saved on your phone storage or PC and click on ‘Open’ to initiate the process. (If the file is saved on your phone then choose the file from your phone storage path or email it to yourself and download the file on the system before following this step.)
Step 5. Now check for all your Android contacts on your Gmail contacts folder and they should be there on your Gmail account.
Also Read: Duplicate Contacts Remover Apps For iPhone
Backup and Sync on iPhone
You can backup and sync all your Google Contacts on your phone, tablet, and computer simultaneously. If you edit a contact on one device, the contact details are changed and saved on all the devices.
Step 1. Open ‘Settings App’ on your iPhone or iPad.
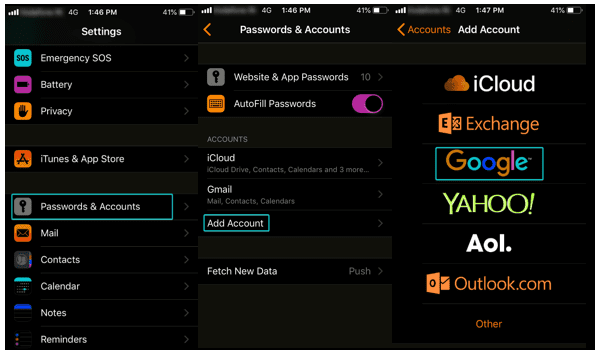
Step 2. Go to ‘Passwords & Accounts’ and then under ‘Add Accounts’, Select ‘Google’.
Step 3. Enter your credentials (Email ID & Password), Complete 2-Step verification if prompted.
Step 4. When you go next, enable ‘Contacts’ sync and Tap on ‘Save’.
Note: To start syncing, you will need to open your iPhone or iPad’s ‘Contacts App’.
Windows 10 Computer
Configuring a Google account to Sync contacts is absolutely easy on your Windows computer.
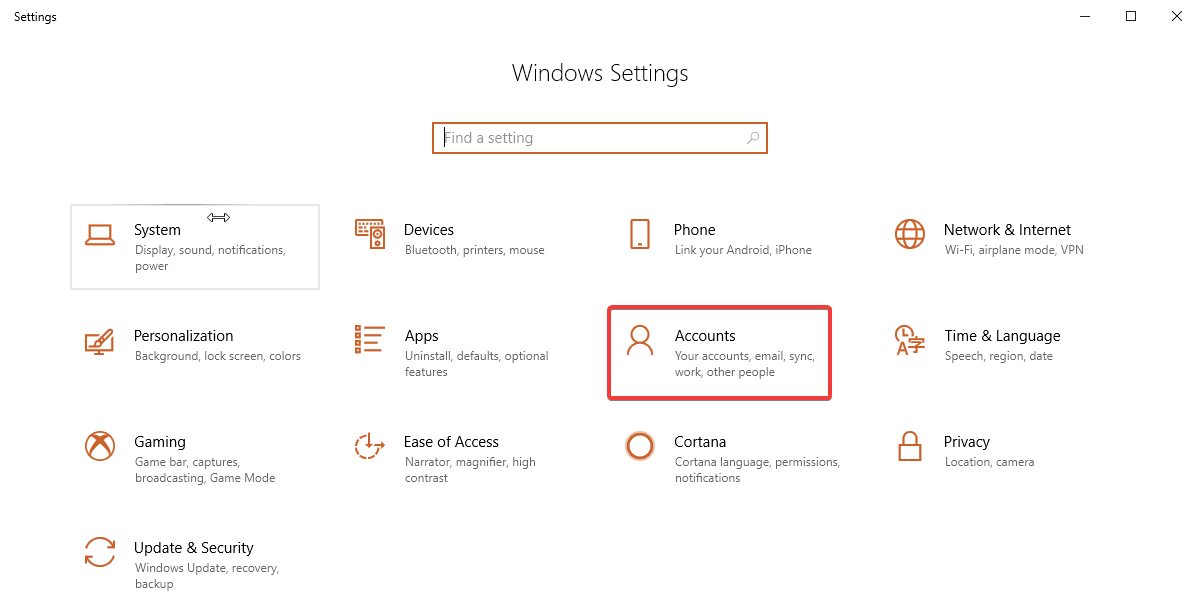
Step 1. Click on ‘Start Button’ and go to ‘Settings’.
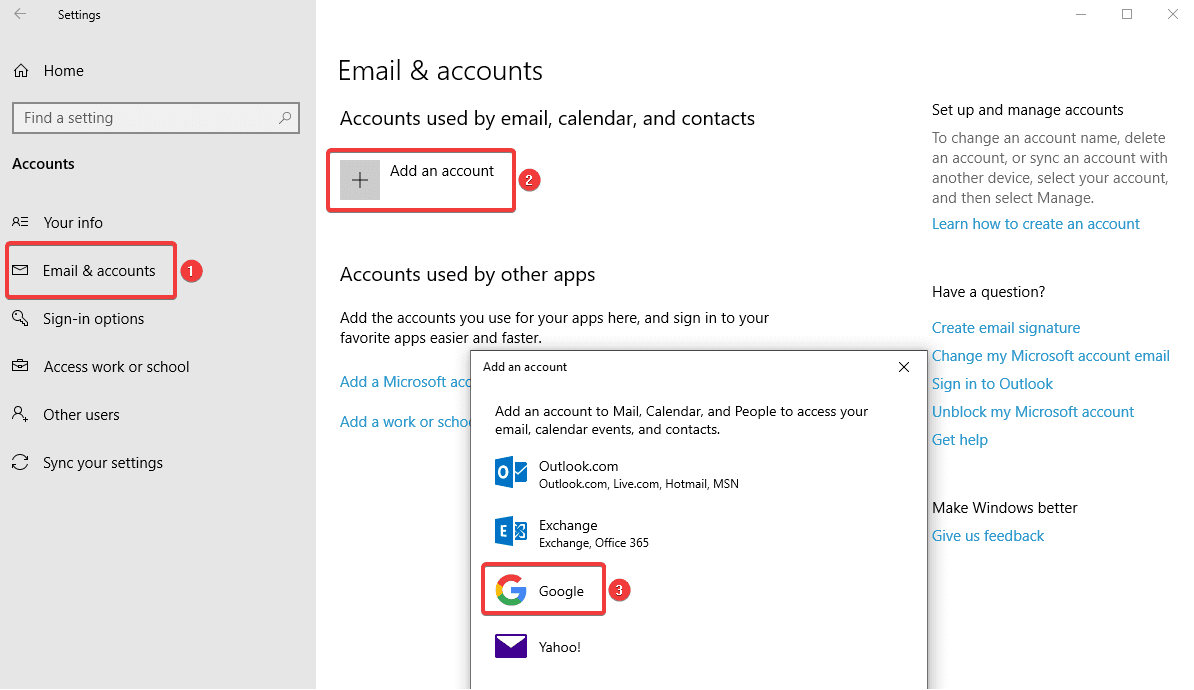
Step 2. Under ‘Windows Settings’ box, Click on ‘Accounts’ click on ‘Email & Accounts’ on the left-hand side panel Click on (+ sign to ‘Add an Account’). Select ‘Google’.
Step 3. Enter your credentials (Email Address & password) and click on ‘Next’.
Step 4. Review permissions and then click on ‘Allow’ and ‘Done’.
RESTORE CONTACTS FROM BACKUPS
Step 1. Open your device’s Settings App.
Step 2. Tap Google.
Step 3. Under ‘Services’ tap ‘Restore Contacts’.
Step 4. If you have multiple ‘Google Accounts’ to choose from which account’s contacts you want to restore, tap ‘From Account’.
Step 5. Tap the device with the contacts to copy.
Step 6. If you don’t wish to copy or sync contacts from your SIM card or device storage, you can turn off sync with SIM card or Device storage.
Step 7. Tap Restore, and wait until you see ‘Contacts restored’.
Step 8. To avoid duplicate contacts, your device only restores contacts that don’t exist. Your restored contacts automatically get synced with Google Account and all other devices.
Unable to Sync Contacts?
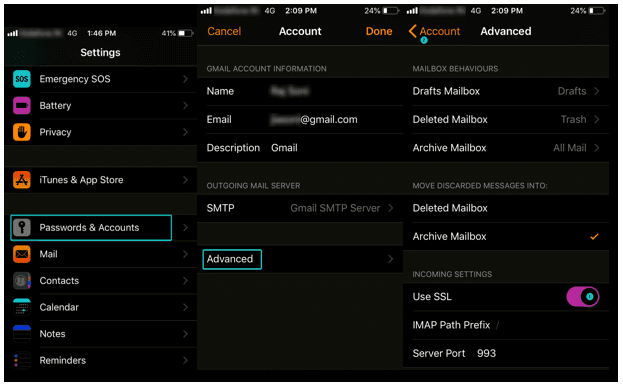
You need to ensure that your Google Account is configured on your iPhone or iPad using (SSL), It is recommended and secure connection for additional security.
Step 1. Open ‘Settings App’ on your iPhone or iPad.
Step 2. Go to ‘Contacts’ ‘Default Account’
Step 3. Tap on your Google Account.
Step 4. Put a tick on selected accounts and switch ‘Contacts’ ON.
Step 5. Tap ‘Password & Account’ ‘Advanced’ switch ‘Use SSL’ ON Tap ‘Account’ again Tap ‘Done’.
Note: You can try adding your account after configuring these settings and it should be done.
Import Contacts
Step 1. Open the Contacts app.
Step 2. Tap the app’s Overflow menu.
Step 3. Tap ‘Settings’ Tap ‘Import’ Tap ‘Google’.
Step 4. Select Import ‘vCard’ file.
Step 5. Locate and select the ‘vCard’ file which you want to import.
Step 6. Allow the import process to complete.
Step 7. By default, all the contacts on your device will be automatically synced with your Google account, so there is no further action required.
Conclusion
We have collated steps on how to sync Google contacts with Android / iPhone / Computers and other devices, now you can ensure that all your contacts are synced and backed up at one place. You can view/edit any contact on any device and all devices will have the updated details.
You can add a contact on any device and all the devices will have that contact added in the contacts list. So now stay assured about keeping all your contacts in one place and backup & sync device contacts with Google account so that you never miss out on any of your contacts on any of your devices.
If you know more such interesting ways to backup & sync device contacts with Google Accounts, then feel free to share in the comments below.
Popular Post
Recent Post
AI In Cyber Security: Who is Winning, Hackers or Security Companies
Cybersecurity once followed clear rules. Companies built firewalls. Users created passwords. Antivirus tools scanned files and removed known threats. When an attack happened, security teams studied it and added new rules. This method worked for many years. It created a sense of control and stability. That sense is gone today. Artificial intelligence has changed how […]
The Biggest AI-Run Cyber Attacks Of All Time
Artificial intelligence is now part of everyday technology. It helps people search faster. It improves medical research. It supports businesses in making better choices. But AI is not used only for good purposes. Cyber criminals have also learned how to use it. This has changed the nature of cyber attacks across the world. In the […]
Switch To a Dark Background Theme on Windows: Enable Dark Mode
People often like a screen that feels gentle on the eyes. A darker style softens bright areas and makes long computer sessions easier to handle. It also gives the desktop a cleaner and more modern feel. When you switch to a dark background theme in Windows, the colors shift to deeper shades that reduce glare […]
Complete Guide on Managing Audio Input Devices [Latest In 2026]
People use microphones for meetings, games, classes, recordings, and voice chats, so any problem with the device can interrupt their work. Even a small system error can make the voice weak or stop it fully. This is why knowing the basics of managing audio input devices is helpful for new and experienced users. Windows includes […]
Resetting Audio Settings on Windows 11: Complete Guide
Sound problems can disrupt work, study, or entertainment. Many users face issues where the audio becomes too low, too loud, unclear, or does not play at all. A common way to solve these problems is by resetting audio settings to their original state. This helps Windows rebuild its sound setup from the beginning. Windows 11 […]
Troubleshooting Headphone Detection: Headphones Not Detected/Working
A lot of users run into sound problems at some point. A common one is when the computer does not pick up the headphones. You plug them in, but the speakers keep playing. This can break your focus during work, movies, music, or calls. It also causes confusion because the reason is not always clear […]
How To Re-Pair Bluetooth Earbuds For Stereo Sound on Windows
Wireless earbuds are often paired with computers for rich stereo sound, but things don’t always go smoothly. Sometimes, the system defaults to mono audio or fails to activate the correct playback mode. This can disrupt music, calls, or gaming, making the sound feel flat and lifeless. These glitches usually stem from improper setup. Windows might […]
How To Manage Camera Permissions for App On Windows: Complete Guide [2026]
Many users run into issues when trying to join video calls or online meetings—their camera simply won’t turn on. This can happen for a few reasons: Windows might be blocking access, or the app may not have the correct permissions. These hiccups often lead to confusion and frustration. Fortunately, Windows provides straightforward tools to help […]
Help With Color Management In Windows: Complete Guide [2026]
Color often decides how we experience a picture, a video, a website, or even a simple chart. Many users feel confused when colors look different on each screen. A monitor may show a softer shade while a laptop shows a sharper one. This creates doubt and slows down work. It can also lead to mistakes […]
How To Install Pending Windows Updates Easily On Windows 11
Windows updates keep your computer healthy. They fix problems and improve security. Many people ignore updates because they worry about errors or slow performance. In most cases, the process is simple. You only need to follow a clear routine and give your computer enough time to finish the job. A regular update habit saves you […]



![Complete Guide on Managing Audio Input Devices [Latest In 2026]](https://www.techcommuters.com/wp-content/uploads/2025/12/Complete-Guide-on-Managing-Audio-Input-Devices.webp)



![Help With Color Management In Windows Complete Guide [2026]](https://www.techcommuters.com/wp-content/uploads/2025/12/Help-With-Color-Management-In-Windows-Complete-Guide.webp)
