












Losing a file can happen in seconds. You clear your desktop, hit Delete, and empty the Recycle Bin. Then, just when you need that file again, it seems to have vanished. This guide will walk you through ways to restore files removed from the Recycle Bin. We will begin with simple fixes, then look at […]
How To Recover Files Deleted from the Recycle Bin [Windows 11]
Losing a file can happen in seconds. You clear your desktop, hit Delete, and empty the Recycle Bin. Then, just when you need that file again, it seems to have vanished.
This guide will walk you through ways to restore files removed from the Recycle Bin. We will begin with simple fixes, then look at backups, built‑in Windows options, and recovery software.
What Happens When You Delete a File?
When you delete a file, Windows does not erase it right away. Instead, it moves the file into the Recycle Bin, much like dropping paper into a bin under your desk. The file is still there. You can restore it anytime.
Every drive has a hidden Recycle Bin folder. On the C drive, it is found at C:$Recycle.Bin. The desktop icon is not the actual folder but only a shortcut that lets you open and view its contents.
Emptying the Recycle Bin works differently. Windows removes the file’s entry from the drive index. Think of a book where the chapter title disappears from the table of contents, but the chapter itself remains in the pages. The drive now treats that space as free, even though the old data stays until something new is written over it.
This is why recovery is possible, but also why speed matters. The longer you keep using the drive, the greater the chance that new files will take over the space and replace the old data.
Some files skip the Recycle Bin. This happens when you:
- Press Shift+Delete to remove a file directly
- Delete from a USB drive or SD card
- Delete from a network drive
- Remove large files that do not fit in the Recycle Bin
- Use a cleaner tool to erase files permanently
For these files, nothing waits in the bin. You will need one of the later methods.
Recover Files Deleted from Recycle Bin
Method 1: Restore Files
Check the bin first. Sometimes the file is still there, and you just did not look.
Follow these steps:
- Double-click the Recycle Bin icon. If you cannot see it, press the Windows key, type Recycle Bin, and press Enter. Look for your file. Use the search box at the top right if the list is long.
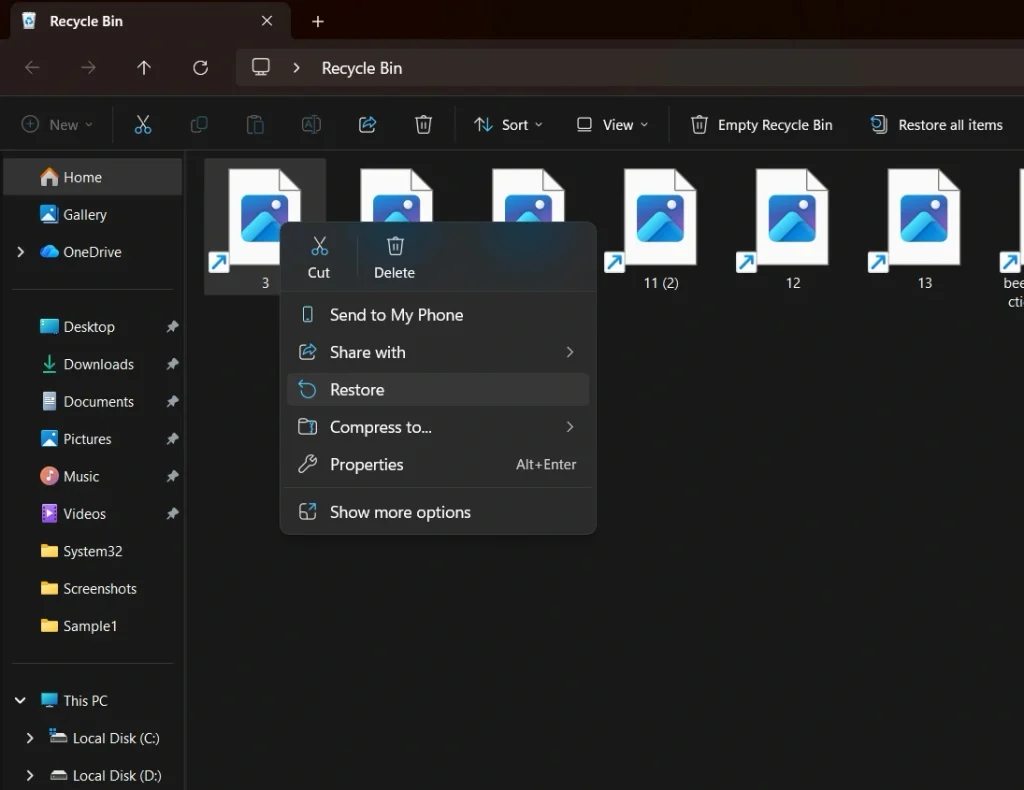
- Right-click the file and choose Restore. Open the folder where the file used to live. It should be back.
You can restore many files at once. Hold Ctrl and click each file. Then right-click and choose Restore. To bring back everything, click Restore all items in the top bar.
Quick TIP: Not sure of the file name? Right-click in the empty space and choose Sort by. Then pick Date deleted or Original location. This makes it easy to spot files from the folder you cleaned.
Method 2: Try Undo Right Away

Did you delete the file a moment ago? Try Undo. Open the folder in File Explorer. Press Ctrl and Z. Windows will put the last deleted file back. You can also right-click an empty spot in the folder and choose Undo Delete.
This works only for a short time. If you closed File Explorer or restarted your PC, it may not work. In that case, move on.
Is Recovery Possible After You Empty the Bin?
Yes, in many cases you can recover files deleted from the Recycle Bin, even after it has been emptied. But there are no guarantees. Your chances depend on these:
First, time. The sooner you act, the better.
Second, drive activity. If you kept saving files, browsing, or installing apps, the old data may be gone.
Third, the type of drive matters. A traditional hard disk often keeps deleted data for a long time. A solid-state drive is different. Many SSDs use a feature called TRIM, which clears deleted data in the background. This makes recovery harder and lowers the chances of success.
While you plan your next move, keep a few things in mind. Do not run a disk cleaner. Do not defragment the drive. Do not install big apps or copy large files onto it. Even a Windows update can write a lot of data. If you can, pause the update and work from another device while you read this guide.
The methods below go from easy to advanced. Try them in order. Start with the ones that need no extra tools.
Method 3: Check OneDrive and Other Cloud Storage
Do you use OneDrive, Google Drive, or Dropbox? If yes, your file may have a second life online.
On Windows PCs, OneDrive is the most common backup service. It can automatically save copies of your Desktop, Documents, and Pictures folders. When you delete a file that is synced, OneDrive keeps a copy in its own recycle bin, giving you another chance to restore it.
Here is how to check:
- Go to onedrive.live.com and sign in. Click Recycle bin in the left menu.
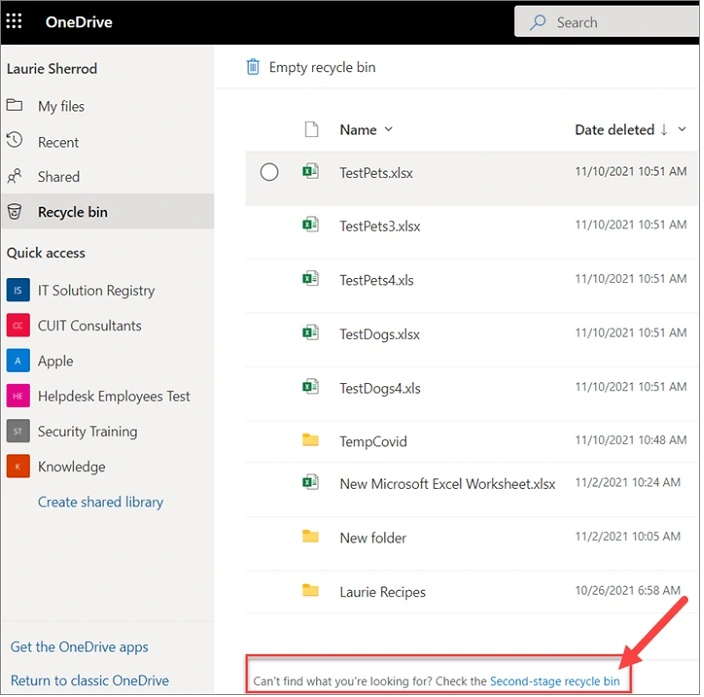
- Select the file you want. Click Restore.
OneDrive keeps deleted files for 30 days on personal accounts. Work and school accounts often get 93 days. After that, the files are removed.
Method 4: Use File History
File History is a backup feature built into Windows. It saves copies of your files to an external drive. If it was turned on, it is often the quickest way to restore files that were deleted from the Recycle Bin.
Keep in mind that it must be on before the file was lost. It cannot help after the fact.
Here is how to use it:
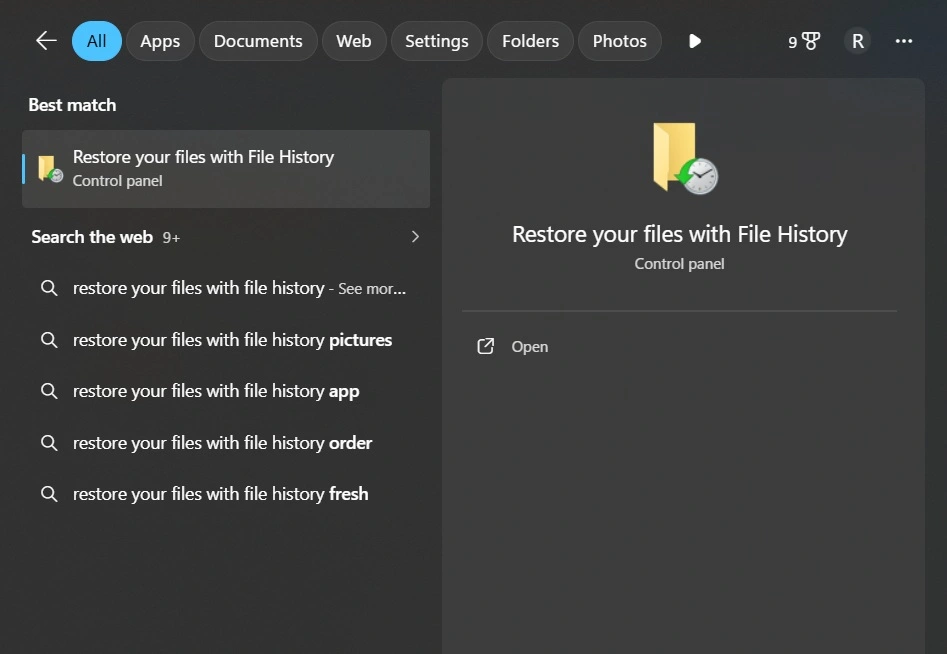
- Connect the drive that holds your File History backup. Press the Windows key and type Restore your files with File History. Press Enter.
- Browse to the folder that held your file. Use the left and right arrows at the bottom to move through older versions.
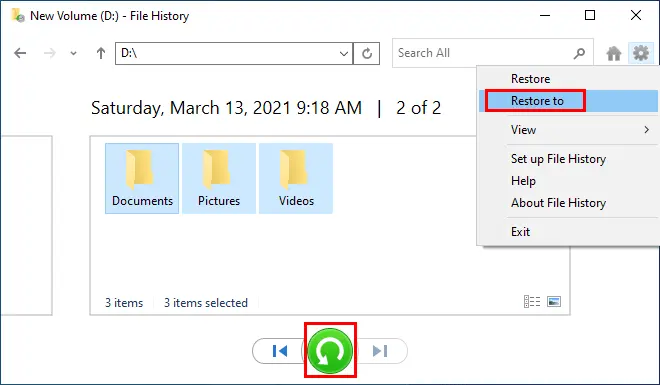
- Click the file to preview it. Click the green Restore button.
Windows puts the file back in its old place. To save it somewhere else, right-click the green button and choose Restore to.
File History covers your Desktop, Documents, Music, Pictures, and Videos folders by default. Files outside those folders are not saved unless you add them.
Method 5: Use Previous Versions
Windows can keep older copies of your folders. These are called shadow copies. They are made when Windows creates restore points or when File History runs. If System Protection was on for your drive, you may find your file here.
Follow these steps:
- Open File Explorer and go to the folder where the file used to be. Right-click the folder. On Windows 11, click Show more options first. Choose Restore previous versions.
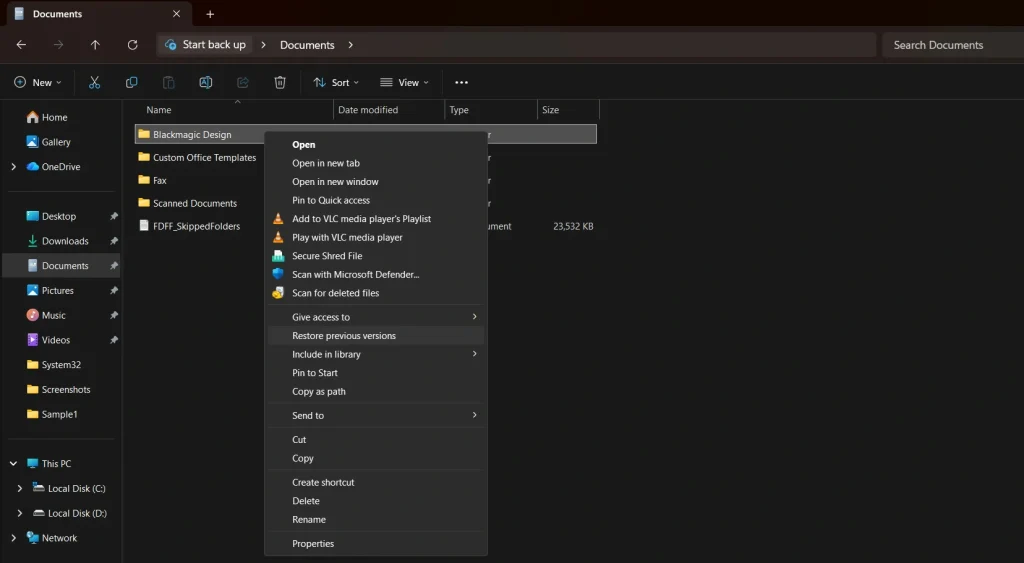
- Pick a version from a date before you deleted the file. Click Open to check what is inside. Click Restore to, and pick a safe spot such as your desktop.
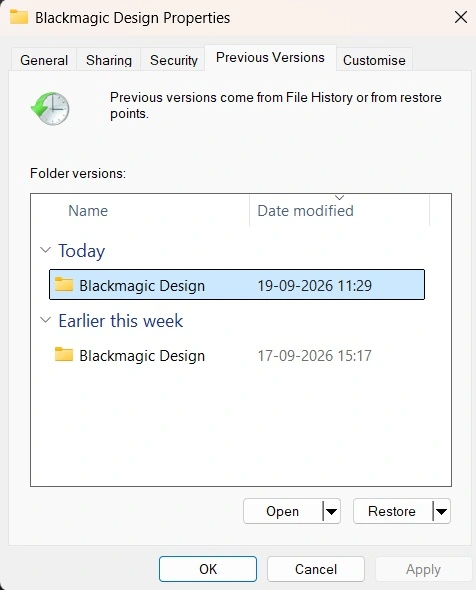
Be careful with the plain Restore button. It can replace the whole folder with the old version. Newer files in that folder may be lost. Restoring to a different place is safer. Then copy over what you need.
If the Previous Versions tab is empty, this method is not available to you. Move on to the next one.
Method 6: Use Backup and Restore
Did you ever set up a backup with Backup and Restore? Windows 10 and 11 still include it. It carries the name Windows 7 because it came from that version.
Here is how to use it:
- Open the Start menu and type Control Panel. Press Enter. Click Backup and Restore (Windows 7). In Category view, it sits under System and Security. Under Restore, click Restore my files.
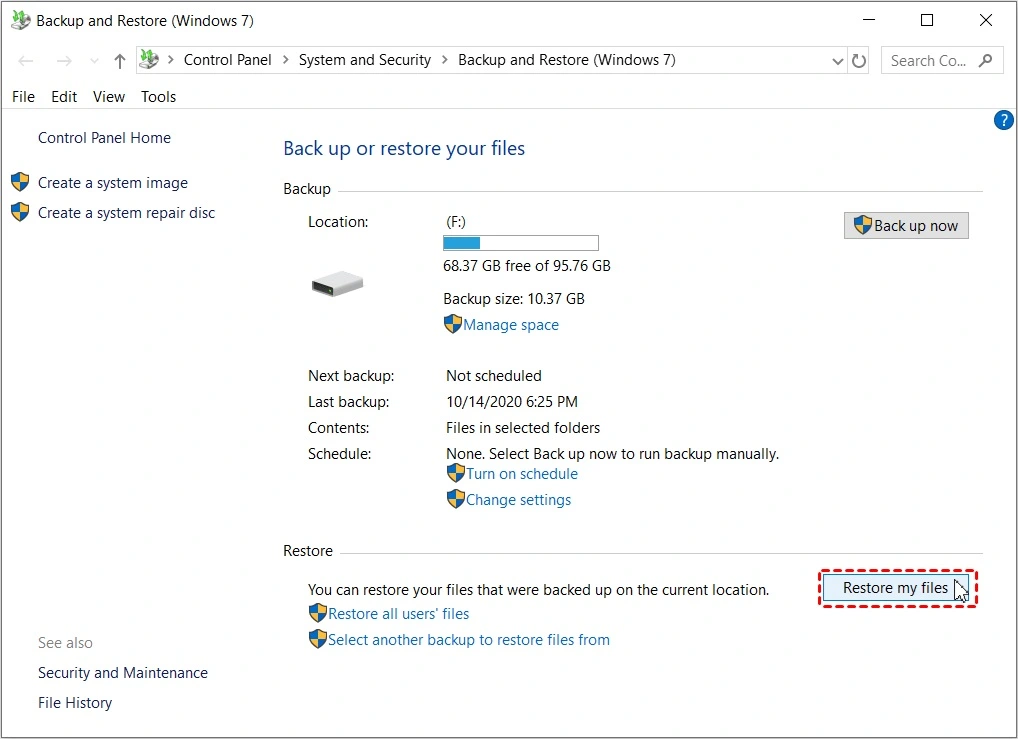
- Click Browse for files or Browse for folders. Select your file and click Add files. Click Next. Choose the original location or a new one. Click Restore.
If you see no backup, none was created. Look for other backup tools too. Some brands ship their own backup apps. Some people use a NAS device. Check old backup drives in your desk drawer as well.
Method 7: Use Windows File Recovery
Now we move to the harder methods. Windows File Recovery is a free app from Microsoft. It can recover files deleted from Recycle Bin when no backup exists. It works on Windows 10 version 2004 or newer, and on Windows 11.
It has no buttons or menus. You use it in a command window. Do not worry. The commands are short.
Step 1: Install the tool. Open the Microsoft Store. Search for Windows File Recovery. Click Get.
Step 2: Open it. Press the Windows key and type Windows File Recovery. Right-click the result. Choose Run as administrator. Click Yes.
Step 3: Type the command. The basic format looks like this:
winfr source: destination: /mode /switches
The source is the drive where you lost the file. The destination is a different drive where the recovered files will go. Never use the same drive for both.
Here are two examples.
winfr C: D: /regular /n \Users\YourName\Documents\
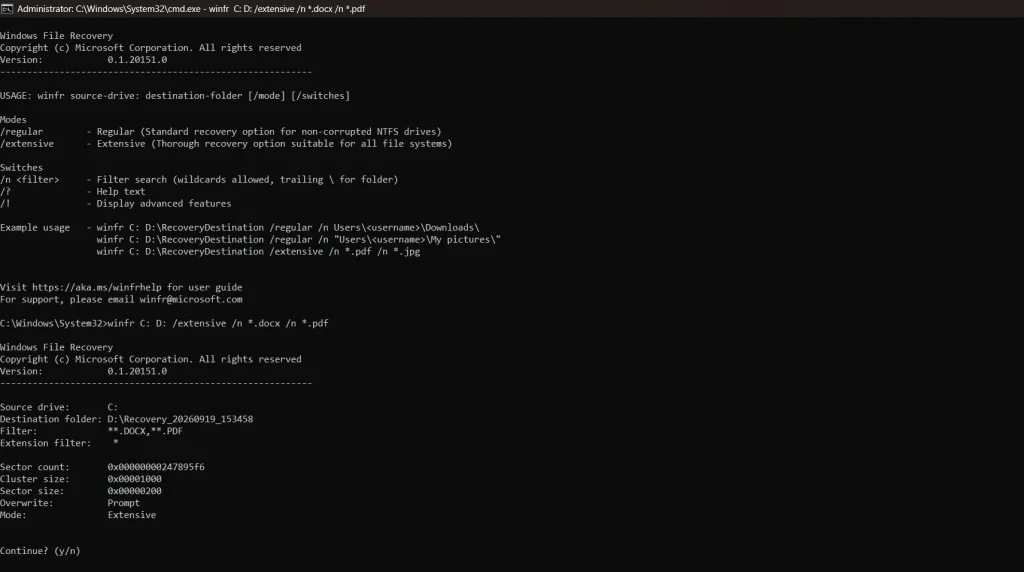
This scans the C drive for deleted files in your Documents folder. It saves them to the D drive. Replace YourName with your username.
winfr C: D: /extensive /n *.docx /n *.pdf
This runs a deeper scan. It looks for Word and PDF files anywhere on the C drive.
Step 4: Confirm and wait. Press Y when the tool asks to continue. The scan can take a while. Let it finish.
Step 5: Find your files. Open the destination drive. Look for a folder that starts with Recovery. Your files are inside.
Which mode should you pick?
Regular mode is quick. It works best for files deleted recently on an NTFS drive. Most Windows system drives use NTFS. Extensive mode is slower. It digs deeper. Use it if the regular scan finds nothing, or if the file was deleted long ago.
You need a second drive to save to. A USB flash drive works well.
If you see an error, do not panic. Check that you opened the tool as administrator. Check that the drive letters are right. Make sure the destination drive has enough free space. Then type the command again and watch for typos. One wrong letter can change the result.
Method 8: Use Data Recovery Software
If the command line feels like too much, try recovery software. These apps have simple screens and file previews. A good tool can recover deleted files from Recycle Bin even when Windows tools come up empty.
Popular choices include Recuva, Disk Drill, EaseUS Data Recovery Wizard, and Stellar Data Recovery. TestDisk and PhotoRec are free and open source. They are powerful, but less easy to use.
The steps are much the same in each tool.
- Download the tool from its official website. Save the installer on a different drive, such as a USB stick. Install it there if you can. This protects the lost data on your main drive.
- Open the tool and pick the drive where the file was. Some tools list the Recycle Bin as a scan spot. Pick it if you see it.
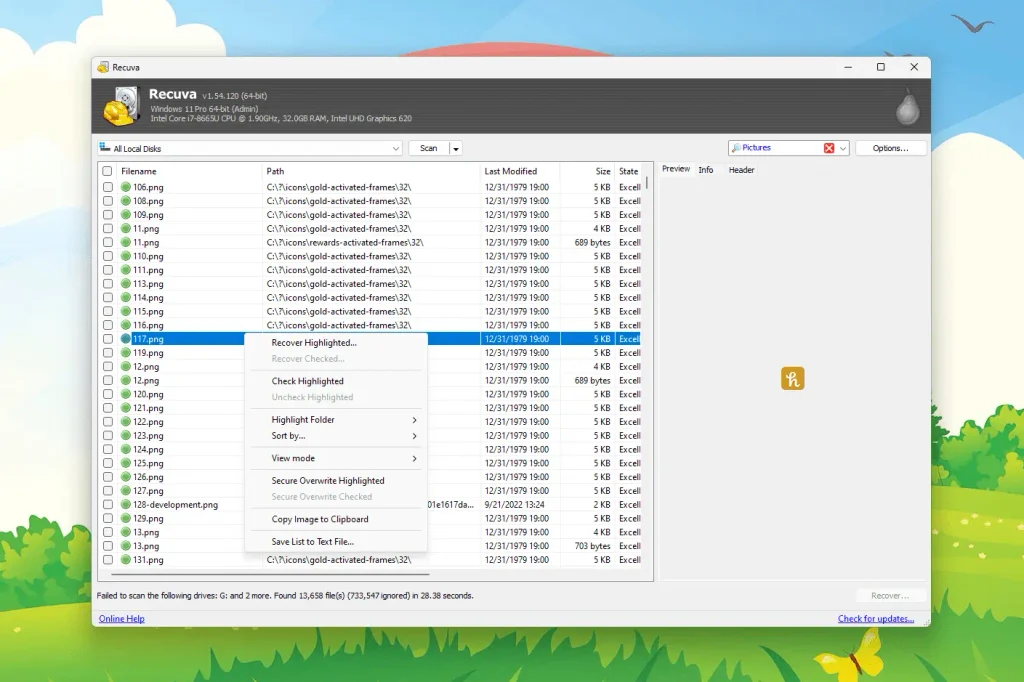
- Start a quick scan first. If it finds nothing, run a deep scan. A deep scan takes longer. It may run for hours on a big drive.
- Preview the results. Open photos and read documents. Files with a size of zero may be damaged. Select the files you want and click Recover. Save them on a different drive. Never save on the drive you scanned.
Do not be surprised by odd file names after a deep scan. The tool may lose the original names and folders. You might see names like File001 or a long string of numbers. Sort the list by file type, date, or size. Then use the preview to find the right one. It takes patience, but the file is usually worth it.
Here is what to look for in a good tool:
- A free scan and preview, so you can see what it finds before you pay
- Support for your file types
- Clear and honest pricing
- Recent reviews from real users
- No extra junk software in the installer
Be careful with random download sites. Fake recovery tools exist. Some carry malware. Stick to the official site of the tool you pick.
Which Method Should You Pick?
Eight methods can feel like a lot. Use this table to find the right one fast.
| Your Situation | Best Method | Effort | Why It Helps |
| Deleted a moment ago | Method 2: Undo, or Method 1: Recycle Bin | Easy | Quick fix. No tools needed. |
| File was in a synced folder | Method 3: OneDrive or other cloud storage | Easy | The cloud may hold a copy for 30 days or more. |
| Made a backup before | Method 4: File History, Method 5: Previous Versions, or Method 6: Backup and Restore | Easy to Medium | Brings the file back from a saved copy. |
| No backup, and the loss is recent | Method 7: Windows File Recovery, or Method 8: Recovery software | Medium to Hard | Scans the drive for data that is still there. |
| Deleted long ago | Method 8: Deep scan in recovery software, or Method 7 in extensive mode | Medium to Hard | Digs deeper to find older data. |
| Drive is damaged | Data recovery lab | Needs an expert | Stops you from causing more harm. |
Not sure where to start? Begin at the top of the table and work down. Stop as soon as you get your file back.
Why Recovery Sometimes Fails?
Sometimes a file cannot be saved. Here are the most common reasons.
- The space was overwritten. New files took the place of the old data. Once that happens, the file is gone for good.
- TRIM cleaned it up. On many SSDs, deleted data is wiped fast in the background.
- The drive is damaged. Clicking noises or a drive that will not show up point to a hardware fault.
- Too much time has passed. Over weeks, a busy drive rewrites a lot of its free space.
If the file is very important, stop trying random tools. Each scan and save adds risk. Turn off the PC. Then talk to a data recovery lab. It costs more, but labs have special tools and clean rooms.
Tips to Keep Your Files Safe
Follow these tips, and you may never need to recover files deleted from Recycle Bin again.
- Turn on File History. Plug in an external drive. Open Control Panel, click File History, and click Turn on.
- Use OneDrive backup. Open OneDrive settings and turn on backup for Desktop, Documents, and Pictures.
- Follow the 3-2-1 rule. Keep three copies of key files. Store them on two kinds of media. Keep one copy off-site, such as in the cloud.
- Look before you empty. Open the Recycle Bin. Scan the list. Only then click Empty.
- Avoid Shift and Delete. This shortcut skips the bin. Use plain Delete instead.
- Make the bin bigger. Right-click the Recycle Bin and choose Properties. Set a larger maximum size.
- Slow down Storage Sense. This feature can clear old bin items on its own. Open Settings, go to System, then Storage. Click Storage Sense and set the Recycle Bin option to a longer time, or to Never.
- Turn on System Protection. Search for Create a restore point. Select your drive and click Configure. Then choose Turn on system protection. This can keep older copies of your files.
- Act fast. If you lose a file, stop using that drive at once. Every minute counts.
- Save recovered files elsewhere. Always use a different drive for recovered data.
- Test your backups. Once in a while, try to restore one file. A backup you never tested may not work when you need it.
Conclusion
Deleting the wrong file is a bad feeling. But it is rarely the end of the story. Now you know how to recover files deleted from Recycle Bin, and what to try when the bin is empty.
Start with the easy steps. Check the bin. Try Undo. Look in OneDrive. Then check File History, Previous Versions, and Backup and Restore. If those fail, try Windows File Recovery or a trusted recovery tool. Save whatever you find on a different drive.
No method is perfect. But each one gives you a fair shot. Try them calmly, one at a time.
Most of all, stop using the drive fast. That one habit gives you the best chance. And once your file is safe, set up a backup. A few minutes today can save you a lot of stress later.
FAQs
Q1. Can I get my files back after I empty the Recycle Bin?
Yes, in many cases. You can recover deleted files from Recycle Bin even after emptying it, as long as new data has not overwritten the old files. Try File History, a backup, Windows File Recovery, or recovery software. Act fast and save the recovered files on another drive.
Q2. Where do files go when I empty the Recycle Bin?
They do not go anywhere. Windows removes the file’s entry from the drive index and marks the space as free. The data stays on the drive until new data overwrites it. That is why a deep scan can often find it.
Q3. How long do files stay in the Recycle Bin?
There is no fixed time. Files stay until you empty the bin. They may also go when the bin hits its size limit, and Windows removes the oldest items. If Storage Sense is on, it can clear items after 30 days or another time you set.
Author Bio:
Dinesh Lakhwani 

Dinesh Lakhwani, the entrepreneurial brain behind “TechCommuters,” achieved big things in the tech world. He started the company to make smart and user-friendly tech solutions. Thanks to his sharp thinking, focus on quality and the motto of never giving up, TechCommuters became a top player in the industry. His commitment to excellence has propelled the company to a leading position in the industry.
Popular Post
Recent Post

Disk Drill Data Recovery Tool Explained: Full Review and Guide
It happens in a split second. You delete a folder by mistake. Your drive stops showing up. A photo album from your last trip just vanishes. And your stomach drops. Lost files feel personal. They are not just data. They are memories, work hours, and sometimes years of effort packed into a few gigabytes. When […]

Recover Deleted Files In Windows 11 With Software & Without
Introduction What is the first thing that goes through your mind the second an important file vanishes from a Windows 11 PC? For most people, it is a mix of panic and disbelief, followed by a frantic click through every folder that file could possibly be hiding in. It happens in a split second: one […]

EaseUS Data Recovery Wizard: Everything To Know
Data loss does not always come from a big disaster either. Most cases start small and boring. A drive gets formatted by mistake. A laptop freezes mid-save and restarts on its own. A memory card stops showing up after being pulled out too fast. None of these feel like emergencies at first, until you realize […]

Recuva Data Recovery Tool: Is it Actually Worth it?
When I first tried Recuva Data Recovery, I wanted to see if it could really bring back lost files. The tool is free, small in size, and promises quick recovery, which made me curious enough to test it on my own PC. The setup was fast, and the wizard guided me step by step. I […]

GetData Recover My Files Data Recovery Tool: Honest Review
A hard drive error brings a special kind of silence. Well, yes! The screen freezes, then a message appears saying the drive can’t be found or must be formatted. In that moment, years of photos and work files feel at risk. It never happens at a good time. Coffee spills near a laptop, a memory […]
Windows File Recovery: A Complete Review [Tried & Tested]
Imagine this. You spend hours perfecting a video project. You hit save. Then your laptop freezes, reboots, and when the screen comes back. The file is gone. Your stomach sinks. It’s not just you. Lost files happen all the time. A dropped hard drive, a bad update, an accidental delete, or a corrupted partition can […]

5 Best Data Recovery Software For Windows 11 and Windows 10
Introduction: A crashed drive can ruin a whole day. One minute your photos, work files, and tax records sit safe on your PC. The next minute they are gone. A power cut, a bad update, or one wrong click can wipe out years of memories and months of work in seconds. That sinking feeling is […]
How To Update NVIDIA Drivers On Windows 11/10 PC
Learn how to update NVIDIA drivers on Windows 11/10 with simple methods, safety tips, and easy steps for smoother gaming and better PC performance.

Top AI Features Hidden Inside Windows 11
Explore the top AI features in Windows 11, from Copilot to Recall, plus safety tips and simple steps to use each tool the right way.

