










The photos folder looked normal at first glance. Then the storage warning popped up. One trip photo appeared four times. A tax PDF sat in three different folders. Two old setup files were still in Downloads, and each one was over 500 MB. Nobody plans this mess. Copies pile up slowly. A download runs twice. […]
Monitor Screen Calibration Guide: Everything You Should Know
Your monitor shows colors every single day. But are those colors actually correct? Most people never stop to check this. They just use the screen as it comes out of the box. This habit can lead to wrong colors in photos, videos, and work files. Colors may look too warm or too cold without you even noticing. Over time, this can affect how you edit, design, or simply enjoy your screen.
Monitor screen calibration means adjusting your screen settings the right way. You fix the brightness, contrast, and color balance. This makes the screen show true and natural colors. It also helps reduce eye strain after long hours of use. Gamers, editors, and designers need this step the most. But normal users who watch movies or browse photos can benefit too. A few small changes can make a big difference in daily comfort.
Many people think this process is hard or needs costly tools. That is not always true. There are free tools built right into your operating system. There are also paid tools for those who want deeper control. This guide will explain every method in simple words. You will learn what to check, how to adjust settings, and what mistakes to avoid. By the end, your screen will look sharper, clearer, and far more accurate than before.
Why Monitor Screen Calibration Matters?
Screens are not all built the same way. Two monitors from the same brand can still show slightly different colors. Factory settings are often tuned for bright store displays, not real home use. This means colors on your screen may not match what you see in real life.
If you edit photos or videos, wrong colors can ruin your final result. A photo may look great on your screen but appear dull when printed. A video may look fine to you but odd to viewers on other screens. Calibration helps fix this gap. It brings your screen closer to true color standards used across the industry.
Even casual users gain from this process. Reading documents, browsing the web, and watching shows all feel better on a well-tuned screen. Colors look natural. Text looks sharp. Your eyes feel less tired by the end of the day. This is why more people are starting to learn this simple skill.
Precautions Before You Start
Before you begin, keep these points in mind. Following them will give you better and more reliable results.
- Turn on your monitor at least 20 minutes before testing. Screens need time to warm up and settle.
- Set your room lighting to normal levels. Avoid very bright or very dark rooms during testing.
- Clean your screen first. Dust and smudges can affect how colors and brightness appear.
- Close all extra apps and windows. This avoids distractions and false color readings.
- Note down your current settings. This helps you undo changes if something looks wrong later.
- Use the original power cable and display cable for the most stable results.
- Avoid testing right after waking your PC from sleep mode. Give the screen a few minutes first.
- Sit at your normal viewing distance. Testing too close or too far can change how colors look.
- Turn off any blue light filter or night mode before you begin the process.
These small steps matter more than people think. Skipping them can lead to wrong readings and poor results.
How to Calibrate Your Monitor Screen
There are several ways to adjust your screen. Below are simple methods that anyone can follow at home. Each one has clear steps with no confusing terms.
Method 1: Use the Built-In Windows Tool
Windows has a free tool made for this exact task. It walks you through each setting one step at a time. This tool works well for beginners who want quick and easy results without extra downloads.
Step 1: Open the Start menu and type “Calibrate Display Color.” Click on the result to open the tool. Read each screen carefully before moving forward.
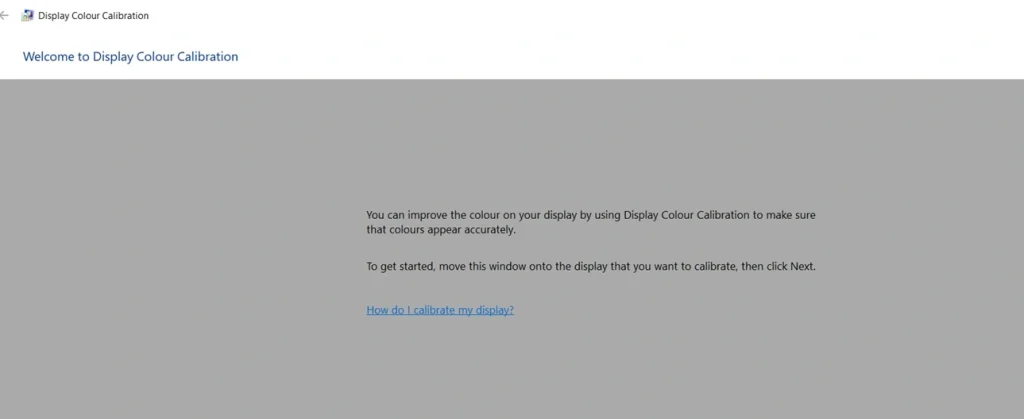
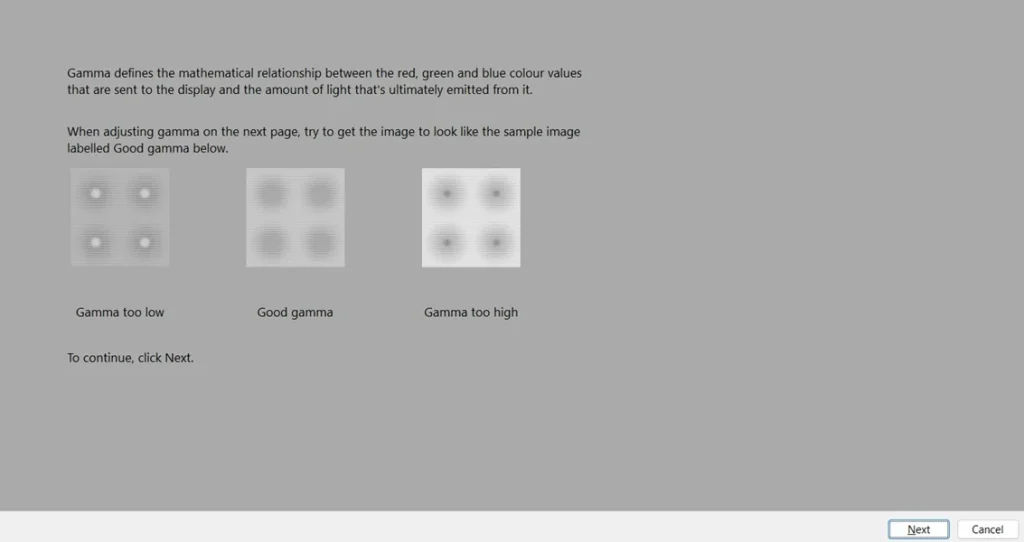
Step 2: Follow the on-screen guide. Adjust gamma, brightness, contrast, and color balance as instructed. Click Finish once all steps are complete and save the new profile.
Method 2: Adjust Settings Using Monitor Buttons
Most monitors come with physical buttons or an on-screen menu. These let you change settings directly without installing any software at all.
Step 1: Press the menu button on your monitor. Look for options like brightness, contrast, sharpness, and color temperature inside the menu.
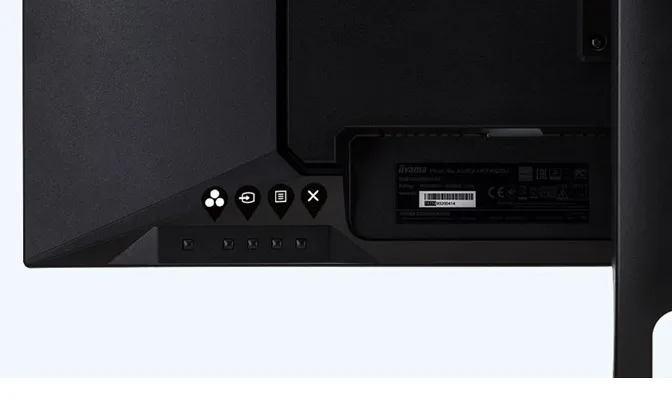
Step 2: Change each setting slowly and carefully. Compare the screen to a printed photo or a known reference image. Stop adjusting once the colors look close to real life.
Method 3: Use Third-Party Calibration Software
Some online tools offer more control than the basic Windows option. These are useful for photographers, video editors, and anyone who wants finer detail in their results.
Step 1: Download a trusted calibration tool like Windows HDR Calibration from the Microsoft Store. Install the program and open it once setup is complete.
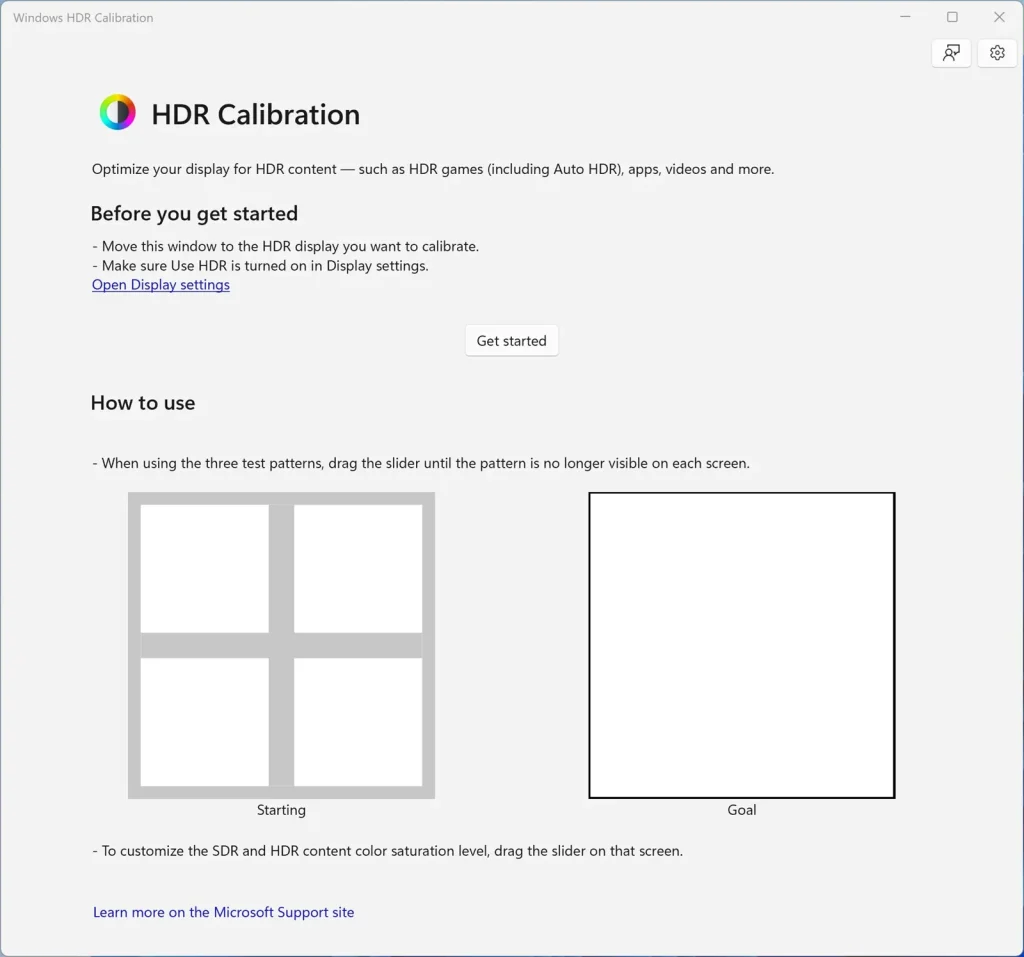
Step 2: Follow the steps shown inside the app. It will guide you through several brightness and color tests. Save the new profile once every test is finished.
Method 4: Use a Hardware Calibration Device
A hardware tool, often called a colorimeter, gives the most accurate result of all. It reads your screen directly instead of relying on your own eyes.
Step 1: Attach the device to your screen as shown in its instruction manual. Open the matching software on your computer before starting the scan.
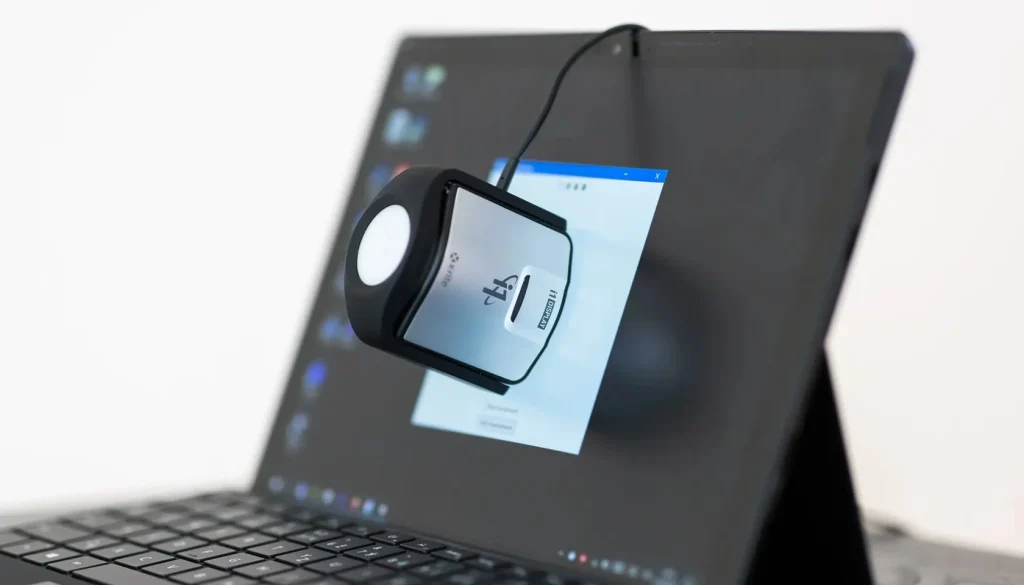
Step 2: Run the full color scan. The tool will test many shades and tones automatically. It then creates a custom profile that matches your exact screen.
This method takes a bit more time and costs more money. But it offers the truest and most reliable results for serious work.
Tips for Better Results
- Repeat the calibration process every month for consistent results.
- Avoid testing your screen in direct sunlight. Natural light changes throughout the day and affects readings.
- Keep your monitor’s firmware updated. Updates can improve color accuracy and display performance.
- Use the sRGB mode if your monitor offers it. This mode is closer to natural, real-world colors.
- Save your old settings before making any new changes. This gives you a safe way to go back.
- Test your results twice on different days to confirm they remain stable over time.
- If you edit photos for clients, always calibrate before starting any major project.
- Avoid placing your monitor near windows or bright lamps that may interfere with testing.
- Give your eyes a short break before judging final colors. Tired eyes can misread shades.
Advantages and Disadvantages
Advantages
- True colors make photo and video editing more reliable.
- Reduced eye strain during long hours of screen use.
- Better viewing experience while watching movies or playing games.
- Printed photos match the screen more closely after calibration.
- Improves overall confidence in creative and professional work.
Disadvantages
- Hardware tools can be costly for casual users.
- Manual methods take time and patience to learn properly.
- Results may differ slightly across multiple monitors.
- Some budget monitors offer very limited adjustment options.
- Settings may shift again after months of regular use.
Author’s Tip
Always test your results using a real photo, not just plain color bars. Photos reveal small color shifts that simple bars often miss. This one habit can save you from poor results later. Color bars look simple and even, but real images have many shades mixed together in one frame.
It also helps you judge skin tones, shadows, and bright areas more accurately during real editing work. Skin tones are tricky because small shifts can make a photo look unnatural fast. Shadows and bright spots also show problems that flat color bars cannot reveal. Pick a photo with a mix of light and dark areas for the best test.
Try using the same test photo every time you check your screen. This gives you a fair comparison across different months. Over time, you will notice patterns and learn what to look for quickly. This small habit makes the whole calibration process much easier to repeat.
Common Questions About Screen Calibration
Does calibration affect gaming performance or speed?
No, this process does not change your frame rate or input speed in any way. It only changes how colors and brightness appear on screen. Gamers may notice better visibility in dark scenes after adjusting their settings. This makes gameplay more enjoyable without slowing down your system or adding any lag.
Can I use the same settings on two different monitors?
You can try, but each screen may still show slight differences. Display panels are made in batches and can vary even within the same model. It is best to test each monitor separately for accurate results. This way, both screens come as close to matching as possible.
Will this process fix a broken or damaged screen?
No, adjusting settings only changes color and brightness levels. It cannot repair cracked screens, dead pixels, or other hardware faults. If your screen has physical damage, you will need a proper repair service instead. This process only improves how the picture looks, not any physical issues.
Is this the same thing as changing resolution settings?
No, these are two completely different settings. Resolution controls how sharp or clear the image appears on your screen. Color and brightness adjustments control how true and natural everything looks. Both settings work together to give you the best possible viewing experience overall.
Conclusion
Getting your monitor screen calibration right is a simple but powerful step. It helps your display show true colors and better overall contrast. Whether you use built-in tools or invest in a hardware device, the process is not as hard as it may sound. Anyone can learn it with a little time, patience, and practice.
Taking care of your screen settings also protects your eyes over the long run. Long hours spent on a poorly tuned screen can lead to strain and tiredness by the end of the day. A properly adjusted monitor feels far more comfortable to use every single day. It also makes your photos, videos, and documents appear at their very best.
Start with the free Windows tool if you are new to all of this. Move on to better software or hardware options as you grow more confident in your skills. With regular checks and a bit of patience, your screen will stay sharp, accurate, and reliable for a long time to come.
Frequently Asked Questions (FAQ)
How often should I check my monitor screen calibration?
Most experts suggest checking it once every month. If you do heavy editing work, you may want to check every two weeks instead. Regular checks help keep your colors accurate over time. Screens can shift slightly as they age, so frequent checks help maintain steady quality throughout the year.
Do laptops also need this kind of screen adjustment?
Yes, laptop screens benefit from this process just as much as desktop monitors. Built in screens can show color shifts over time, just like external displays. Many laptop users skip this step, but it still helps a lot. A quick adjustment can noticeably improve your laptop’s visual quality.
Can I use my phone camera to help with this process?
Some apps use your phone camera to assist with rough adjustments at home. These are not as accurate as proper tools but can still help in a pinch. They work well for casual users who want a quick and simple fix. For serious or professional work, a proper tool remains the better choice.
Author Bio:
Dinesh Lakhwani 

Dinesh Lakhwani, the entrepreneurial brain behind “TechCommuters,” achieved big things in the tech world. He started the company to make smart and user-friendly tech solutions. Thanks to his sharp thinking, focus on quality and the motto of never giving up, TechCommuters became a top player in the industry. His commitment to excellence has propelled the company to a leading position in the industry.
Popular Post
Recent Post
Wise Duplicate Finder Review: Real Results from Wise Duplicate Finder
Read my honest Wise Duplicate Finder review. See features, pricing, pros and cons, and real PC test results. Find out if this free duplicate cleaner can free up your Windows storage.
How to Recover Deleted Files from Pen drive, USB Drive, SD Card
Introduction: On tech forums, you’ll often see posts like this: “I connected my pen drive to my laptop this morning, but the folder was empty. All my college project files had vanished. I don’t have a backup. Can someone help me?” Stories like this are very common. Pen drives, USB drives and SD cards are […]
How To Recover Files Deleted from the Recycle Bin [Windows 11]
Losing a file can happen in seconds. You clear your desktop, hit Delete, and empty the Recycle Bin. Then, just when you need that file again, it seems to have vanished. This guide will walk you through ways to restore files removed from the Recycle Bin. We will begin with simple fixes, then look at […]
Disk Drill Data Recovery Tool Explained: Full Review and Guide
It happens in a split second. You delete a folder by mistake. Your drive stops showing up. A photo album from your last trip just vanishes. And your stomach drops. Lost files feel personal. They are not just data. They are memories, work hours, and sometimes years of effort packed into a few gigabytes. When […]
Recover Deleted Files In Windows 11 With Software & Without
Introduction What is the first thing that goes through your mind the second an important file vanishes from a Windows 11 PC? For most people, it is a mix of panic and disbelief, followed by a frantic click through every folder that file could possibly be hiding in. It happens in a split second: one […]
EaseUS Data Recovery Wizard: Everything To Know
Data loss does not always come from a big disaster either. Most cases start small and boring. A drive gets formatted by mistake. A laptop freezes mid-save and restarts on its own. A memory card stops showing up after being pulled out too fast. None of these feel like emergencies at first, until you realize […]

Recuva Data Recovery Tool: Is it Actually Worth it?
When I first tried Recuva Data Recovery, I wanted to see if it could really bring back lost files. The tool is free, small in size, and promises quick recovery, which made me curious enough to test it on my own PC. The setup was fast, and the wizard guided me step by step. I […]

GetData Recover My Files Data Recovery Tool: Honest Review
A hard drive error brings a special kind of silence. Well, yes! The screen freezes, then a message appears saying the drive can’t be found or must be formatted. In that moment, years of photos and work files feel at risk. It never happens at a good time. Coffee spills near a laptop, a memory […]
Windows File Recovery: A Complete Review [Tried & Tested]
Imagine this. You spend hours perfecting a video project. You hit save. Then your laptop freezes, reboots, and when the screen comes back. The file is gone. Your stomach sinks. It’s not just you. Lost files happen all the time. A dropped hard drive, a bad update, an accidental delete, or a corrupted partition can […]

