How to turn off/disable OneDrive on Windows?

Last updated on January 31st, 2025 at 6:56 am
Cloud storage is the ultimate solution for the different needs of modern smart device users. Windows has solved the dilemma of selecting the perfect cloud solution for its users by introducing OneDrive, which works seamlessly on all the latest versions. However, many people look for different ways to turn off/ disable OneDrive on Windows 10.
Let us go through all the possible solutions on how to turn off OneDrive. We’ll start with a brief overview of OneDrive, followed by the possible reasons for quitting its services. The step-by-step guide for disabling OneDrive on Windows 10 will help readers understand all about it in detail.
OneDrive- An Overview
It is a cloud service by Microsoft connecting with different system files. Launched in 2007, it allows file and data saving on the cloud with free storage of up to 5GB. It can sync files across different Windows, MacOS, iOS, and Android devices. Starting from Windows 10, OneDrive is pre-installed on these systems. Let us now have a quick look at some of its top features:
OneDrive features
- It is easy to send the link to anyone for sharing files and folders in OneDrive.
- It has an Office Online feature allowing the uploading, creating, editing, and sharing of different OneNote, PowerPoint, Excel, and Word documents.
- All the online edited files in OneDrive are saved in real-time for improved data protection.
- It can sync pictures automatically. Hence, it uploads pictures from the available device to the cloud and offers a quick backup if the device fails, and that too without any manual intervention.
Why disable OneDrive on Windows 10?
After going through OneDrive’s top features, time for the top reasons citing the need to disable it on Windows 10. While OneDrive seems to be the best possible solution for cloud storage on different operating systems, many Windows users may look to disable it. This can be due to the following reasons:
- If the user wants to remove the data from the specific device connected to OneDrive.
- If the user wants to switch to other cloud storage options.
- If the system is already using some cloud storage solution.
Methods to turn off/ disable OneDrive on Windows
After going through the different reasons for disabling OneDrive, it comes down to the steps to do it. So, here you’re at the top methods to turn off or disable OneDrive on Windows systems. The top methods for the same include the following:
Method 1: Using settings
The settings menu can be used to disable OneDrive on Windows 10. You must have the details you’re your email address, and other account-related information to complete the process. Hence, before starting to use the settings menu, be ready with all the OneDrive account-related details to complete the OneDrive disabling process.
Once you’re ready with all the details, it is easy to follow the following detailed steps for the same are:
Step 1: Open the OneDrive icon in the taskbar.
Step 2: Go to the context menu and select “More” to continue.
Step 3: Go to the “Settings” option.
Step 4: Go to the pop-up menu and uncheck the option “Start OneDrive automatically when I sign into Windows.
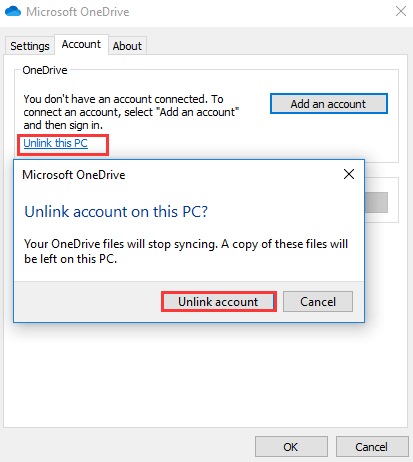
Step 5: Next, go to the “Accounts” option and click on “Unlink this PC.”
Step 6: Lastly, press the “Unlock account” to complete the process.
Step 7: You’ll be prompted to enter the email address and other account details for disabling OneDrive.
Method 2: Using the registry editor
The registry editor is a useful and powerful tool for different system settings. However, all you need to do is change all its values and keys carefully, as a minute difference can make the entire system useless.
The important step in using the registry editor for turning off OneDrive is to keep its backup. It can be achieved using different tools. You can select any of the available tools and then go ahead for registry editor backup.
Once the backup is complete, it saves the system from unnecessary changes, and you can go ahead for using it to turn off OneDrive. The detailed steps for using the registry editor to turn off OneDrive are as follows:
Step 1: Start by pressing Windows and R keys to open the “Run” dialog.
Step 2: Once the registry editor opens navigate to the following key
HKEY_LOCAL_MACHINE\SOFTWARE\Policies\Microsoft\Windows

Step 3: Now right-click on the Windows key and select the “New” option followed by the “Key” option.
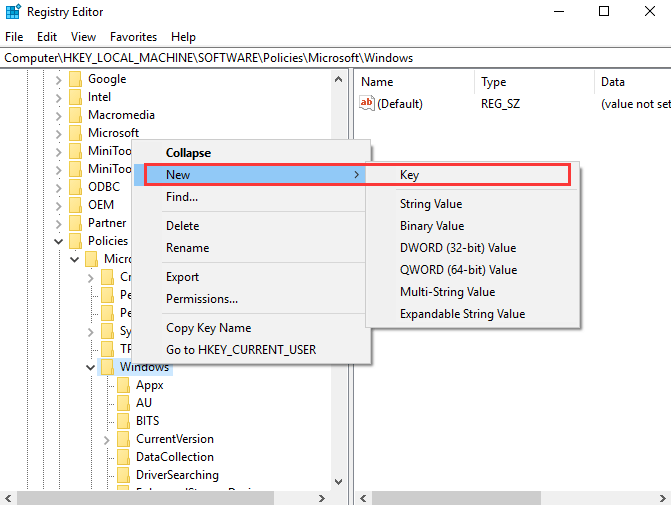
Step 4: Name the new key “OneDrive.”
Step 5: Next, select the OneDrive key and right-click on the right white area. Now, select the “New” option followed by “DWORD(32-bit) Value” to continue.
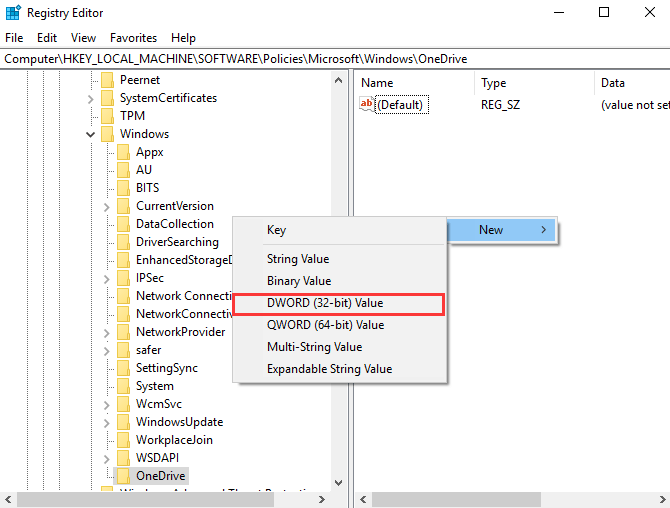
Step 6: Name the new key and double-click the new key and change the Value Data to 1.
Step 7: Lastly, close the Registry Editor window and reboot the system now.
Method 3: Using group policy
Group policy controls the working environment of the user accounts and computer accounts on Windows system. It offers an efficient management of the Windows system with ease of administration. Users can quickly deploy software, updates, and other patches through group policy only.
Some of the other top uses of the group policy in Windows include folder redirection configuration and better password policy enforcement.
Hence, it can be help Windows users to disable the OneDrive from the system safely. All you need to do start by safely opening the group policy and follow the directed steps to use it. The quick steps for using the group policy to turn off OneDrive are:
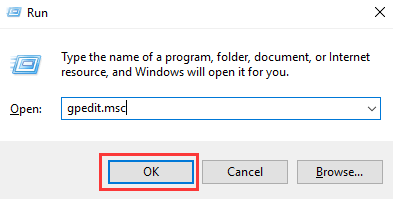
Step 1: Press Windows and R key together to open the “Run” dialog.
Step 2: Now type “msc” in the dialog box and click on the “OK” option.
Step 3: The Local Group Policy Editor window will open now. Go to the “OneDrive” folder by selecting “Computer Configuration,” “Administrative Templates,” “Windows Components,” and “OneDrive” options.
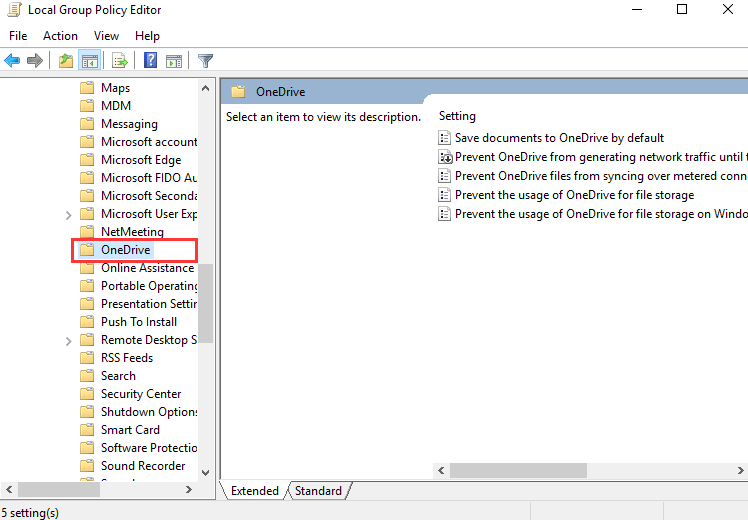
Step 4: Click on the item “Prevent the usage of OneDrive for file storage.”
Step 5: Now, a pop-up window will open. All you need to do is select the “Enabled” option and press “Apply” followed by “OK” to confirm the changes.
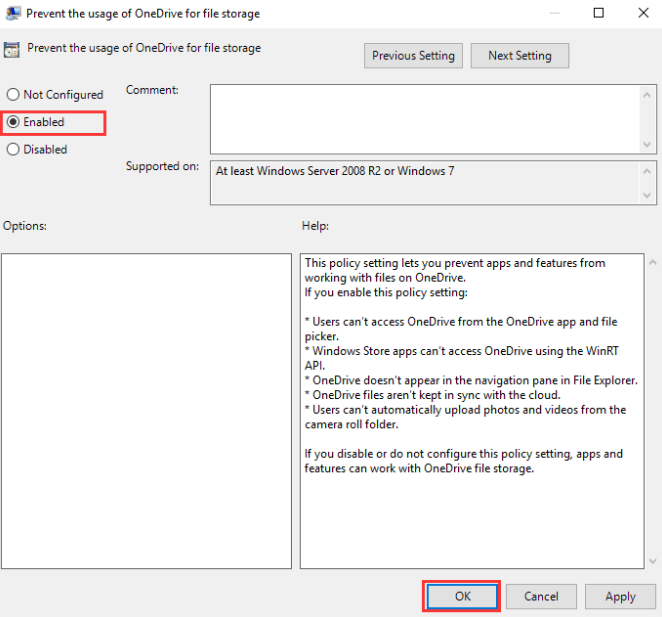
Step 6: Now, restart your system to confirm if OneDrive is available or not.
Wrapping Up
Hope everything is clear to our readers about how to turn off OneDrive. It is the powerful cloud storage service offered by Microsoft, which is available for different operating systems, including Windows. It is a feature-rich service offering automatic data saving and quick file sharing using simple links.
Different reasons, like switching to other cloud options, using some other compulsory cloud solutions, etc., may compel users to disable OneDrive on Windows 10. Users can go for the different methods mentioned above to safely and quickly turn off OneDrive from their Windows devices. The easy to use steps further makes it possible for the beginners and professionals to manage OneDrive on their own.
Author Bio:
Dinesh Lakhwani 

Dinesh Lakhwani, the entrepreneurial brain behind “TechCommuters,” achieved big things in the tech world. He started the company to make smart and user-friendly tech solutions. Thanks to his sharp thinking, focus on quality and the motto of never giving up, TechCommuters became a top player in the industry. His commitment to excellence has propelled the company to a leading position in the industry.
Popular Post


Recent Post

Resolving App-Specific GPU Problems: Complete Guide (8 Quick Methods)
Introduction: Modern computers rely heavily on the GPU for smooth performance. Well, yes! It helps run games, design software, video editing tools, and many other apps. When the GPU works well, everything feels fast and stable. But when issues appear in a single app, it can become confusing and frustrating. Many users face cases where […]

Resolving Screen Flickering Problems On Windows 11/10: Complete Guide
Introduction Screen flickering is a common issue in both Windows 10 and Windows 11 systems. It may appear as quick flashes, blinking lines, or unstable brightness on the screen. This problem can interrupt your work and make it difficult to focus for long periods. Many users notice this issue after installing updates, changing drivers, or […]

Adjusting Volume Balance Settings On Windows 11: Complete Guide
Introduction: Sound is an important part of using a computer every day. You may watch videos, listen to music, attend online meetings, or play games. In all these tasks, clear and balanced sound makes a big difference. Sometimes, audio may not feel right. One side may sound louder than the other. This can make listening […]

Resetting Audio Settings: How To Reset Sound Settings [2026]
Introduction Sound issues can affect your daily work and entertainment. You may notice that your speakers stop working, or your headphones produce unclear audio. In some cases, the sound may suddenly drop or become uneven. These problems can be frustrating, especially when you do not know the cause. Many users try random fixes, but that […]

How To Troubleshoot Miracast Connection Issues On Windows
Introduction Miracast is a useful feature that allows you to share your screen without using cables. It lets you mirror your Windows device to a TV, monitor, or projector. This feature works through wireless display technology. Many people use it for work meetings, school presentations, and home entertainment. It removes the need for HDMI cables […]

How To Fix Issues Downloading from the Microsoft Store On Windows
Introduction: Downloading apps from the Microsoft Store should be a simple task. You open the Store, search for an app, and click install. In most cases, the process works without any problem. However, there are times when the download does not start. In some cases, it may stay stuck at a certain percentage. You may […]
How To Fix Windows Update Issues Easily On Windows [2026]
Introduction Windows updates play an important role in keeping a computer stable and secure. They bring new features, fix known bugs, and improve overall performance. When updates work as expected, the system runs smoothly. However, when they fail, users often face slow performance, missing features, or security risks. This is why it becomes important to […]

How To Check If Your PC Is Infected? [Complete Guide]
Computers now sit at the center of almost everything we do. Well, yes! From sending emails to watching videos, we depend on them without much thought. Because of this, even a small issue can disrupt daily tasks. One common problem is hidden malware. It does not always show clear signs at first. It can enter […]

Repair Apps And Programs: Repair Apps That Aren’t Working
Computers have become an essential part of everyday life, supporting work, study, communication, and entertainment. Most of these activities rely on apps and programs, so when one stops functioning, even simple tasks can be disrupted. Common problems include error messages, frozen screens, or apps that fail to open. On Windows systems, such issues often arise […]

Troubleshooting Microphone Privacy Settings: Complete Guide
Sound is a basic part of how we use computers today. People attend meetings, record audio, speak to others, and use voice tools almost every day. A working microphone makes all these tasks easy. When the microphone fails, even simple work becomes difficult. Many users first think the device is broken. In reality, the issue […]

