PC Turns on But No Display or Power to Keyboard and Mouse: 9 Ways To Fix
Introduction:
Stuck with the PC turns on but no display or power to keyboard and mouse issue? When your PC turns on but exhibits no display or power to the keyboard and mouse, it’s a confounding scenario that disrupts your computing routine. In this guide, we’ll explore nine troubleshooting methods to tackle this issue head-on, aiming to restore the connection between your system, its display, and essential peripherals.
By exploring these troubleshooting methods, you’ll begin the process of reviving your system’s display and reestablishing the functionality of your crucial peripherals.
PC On But Not Power to Keyboard or Mouse? What Triggers This Issue?

Here are some potential triggers for the issue where the PC is on but doesn’t power the keyboard or mouse:
- Faulty hardware connections: Loose cables or improperly connected peripherals can disrupt the power supply.
- Driver issues: Outdated or corrupted drivers may hinder communication between the computer and peripherals.
- Power supply problems: Insufficient power or a failing power supply unit might cause peripheral devices to remain inactive.
- BIOS settings: Incorrect BIOS configurations could lead to a lack of recognition or power distribution to connected devices.
- Overheating: Excessive heat within the system can trigger safety measures that disable certain components, including USB ports.
- Hardware failures: Damaged components, such as a malfunctioning motherboard or faulty USB ports, can cause power supply issues to peripherals.
How to Fix the PC Turns ON but No Display or Power to the Keyboard and Mouse Issue?
Solution 1: Check Connections and Reset Cables
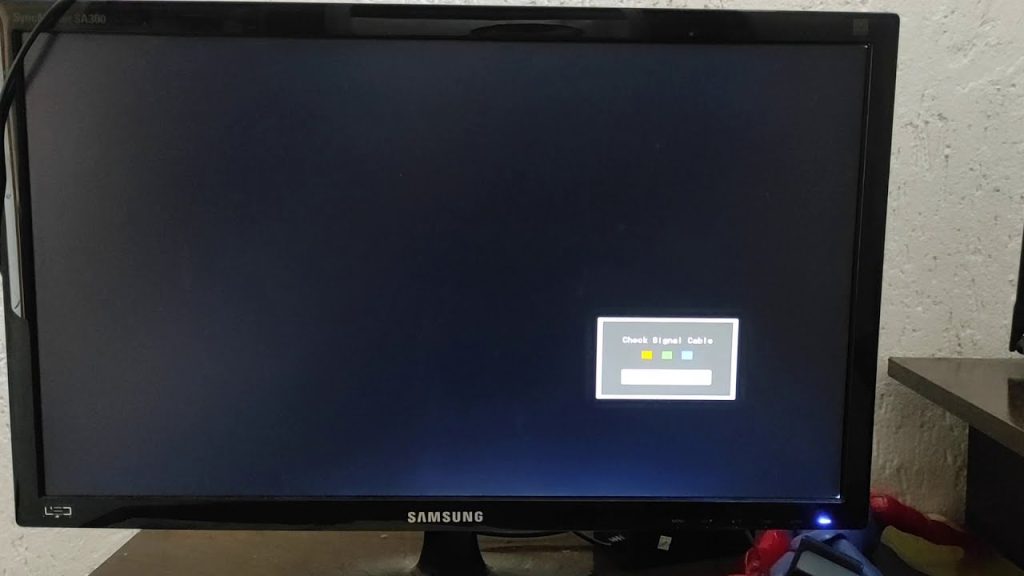
The first step is to check that all the relevant cables are properly plugged into the back of your computer and monitor/display device. Carefully check that the video cable connecting your monitor is securely inserted into the computer’s video output port and the monitor’s video input port. Also, check that the keyboard and mouse USB cables are fully inserted into functioning USB ports on your computer.
If the connections seem fine, unplug each cable fully from both ends, blow into the ports to clear dust, wipe down contacts with a microfiber cloth, and then firmly reinsert each cable. This often fixes connection issues caused by dust contamination or slightly loose cables.
Solution 2: Verify Monitor and Peripherals Function on Another Source
Before further PC troubleshooting, test your display, keyboard, and mouse on another computer or device source to confirm the peripherals themselves are still functioning properly. Connect your display and USB keyboard and mouse to a laptop, another PC, or a USB charger.
If the peripherals do not receive power or connect successfully to another source, then it is likely there is an issue with the peripheral device itself rather than your main PC system. Replace damaged peripherals.
Solution 3: Try Different Ports and Cables
If your peripherals work on another system, the issue may be with the ports or cables connecting them to your PC. Try connecting your display video cable to another matching video out port on your computer if one is available. Also test your various USB keyboard/mouse receivers and cables by plugging them into different working USB ports on your PC, especially directly on the motherboard if connecting via the front chassis panel.
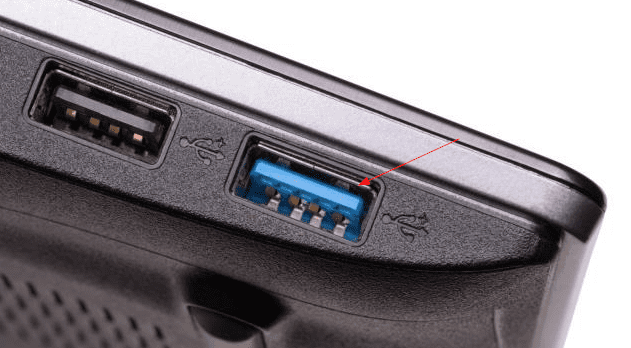
Check for bent or broken pins on ports and replace cables with damaged or exposed connectors. If another port or spare cable works, it indicates the previous cable or port was the issue.
Solution 4: Check for Overheating
Over time, accumulated dust and debris can obstruct cooling components within your computer, leading to overheating issues. High temperatures trigger protective measures that may cause the system to withhold power from certain components, including USB ports responsible for keyboard and mouse connectivity. To address the PC turns on but no display or power to keyboard and mouse issue, follow these steps:
- Clean Internal Components: Shut down the PC, unplug it from the power source, and carefully open the case. Use compressed air or a soft brush to gently remove dust from fans, heat sinks, and vents. This aids in maintaining proper airflow and prevents overheating.
- Monitor Temperature: Utilize software tools to monitor the system’s temperature. Elevated temperatures, especially in critical components like the CPU or GPU, might signal potential overheating issues.
- Improve Ventilation: Make sure the computer is situated in a location with good ventilation. You might want to think about installing extra fans or modifying the airflow inside the case to improve heat dissipation.
By addressing overheating concerns, you can potentially prevent the system from triggering safety protocols that interrupt power supply to essential peripherals like the keyboard and mouse.
Solution 5: Update Drivers
Outdated or corrupt drivers can disrupt the communication between your PC and its peripherals, leading to issues like no display output or lack of power to the keyboard and mouse. Here’s how to update these drivers:
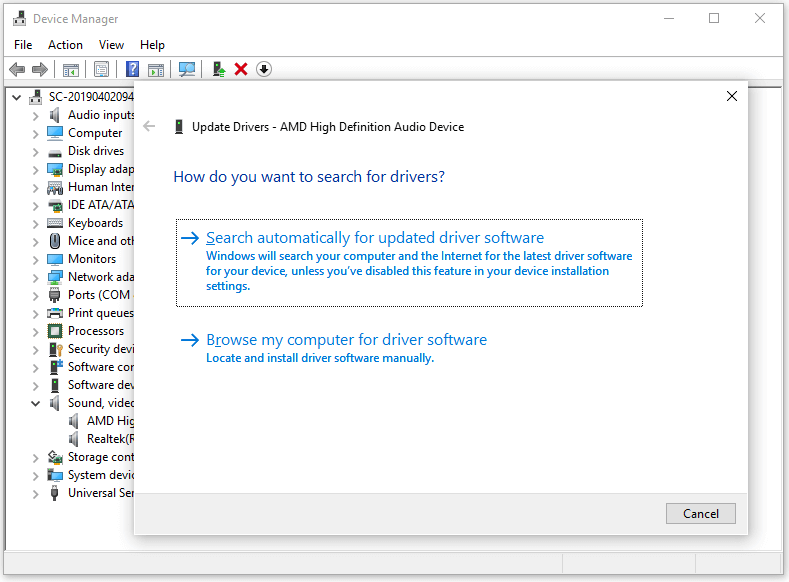
Step 1: Open the Device Manager on your PC. On Windows, you can do this by right-clicking the Start button and selecting “Device Manager” from the menu. Alternatively, press the Win + R key combination to open the run dialog box, type “Devmgmt.msc” and hit Enter.

Step 2: Look for the display adapter, keyboard, and mouse sections in the Device Manager. They might appear under “Display Adapters,” “Keyboards,” or “Mice and other pointing devices.”
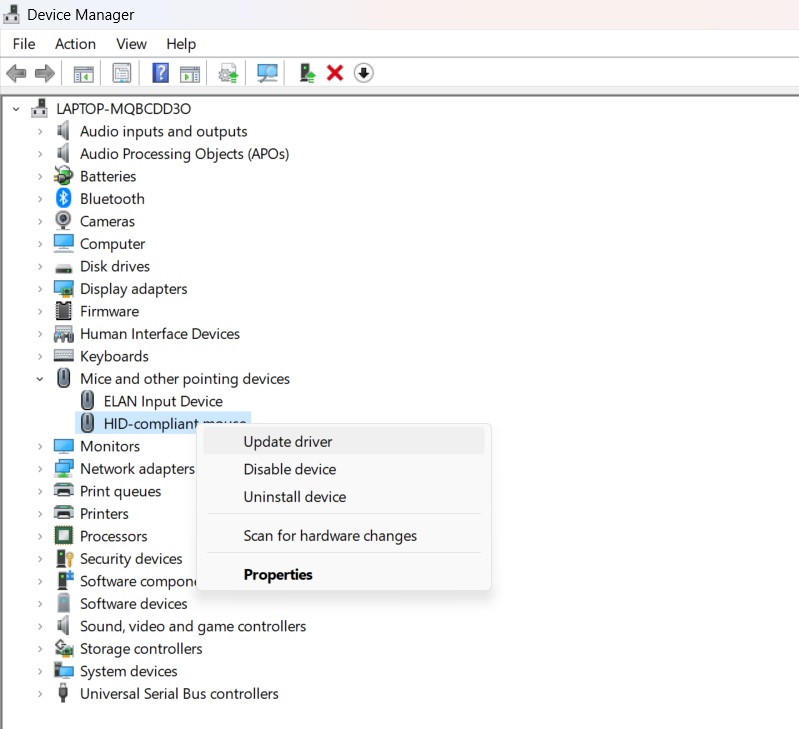
Step 3: Right-click on each device, select “Update driver,” and choose the option to search automatically for updated driver software. Follow the on-screen instructions to complete the update process.
Step 4: If Windows doesn’t find updates, visit the manufacturer’s website for your display adapter, keyboard, and mouse. Download the latest drivers compatible with your system and install them manually.
Step 5: After updating the drivers, restart your computer to ensure the changes take effect.
By ensuring that your drivers are up to date, you improve the compatibility and functionality of your peripherals, potentially resolving issues related to the lack of display output or power to the keyboard and mouse.
Solution 6: Reset BIOS Settings
Here comes the next solution to fix the PC turns on but no display or power to keyboard and mouse issue. The BIOS (Basic Input/Output System) controls the fundamental operations of your computer, including hardware configurations. Incorrect BIOS settings could lead to devices not being recognized or powered properly. Here’s a step-by-step guide to resetting BIOS settings:
- Access BIOS: Restart your computer and access the BIOS or UEFI settings. This is typically done by pressing a specific key during the boot-up process, such as Del, F2, F10, or Esc, depending on your motherboard or system manufacturer.
- Load Default Settings: Within the BIOS menu, navigate to the option that allows you to load default settings or reset the BIOS. This option might be labeled differently based on your BIOS version.
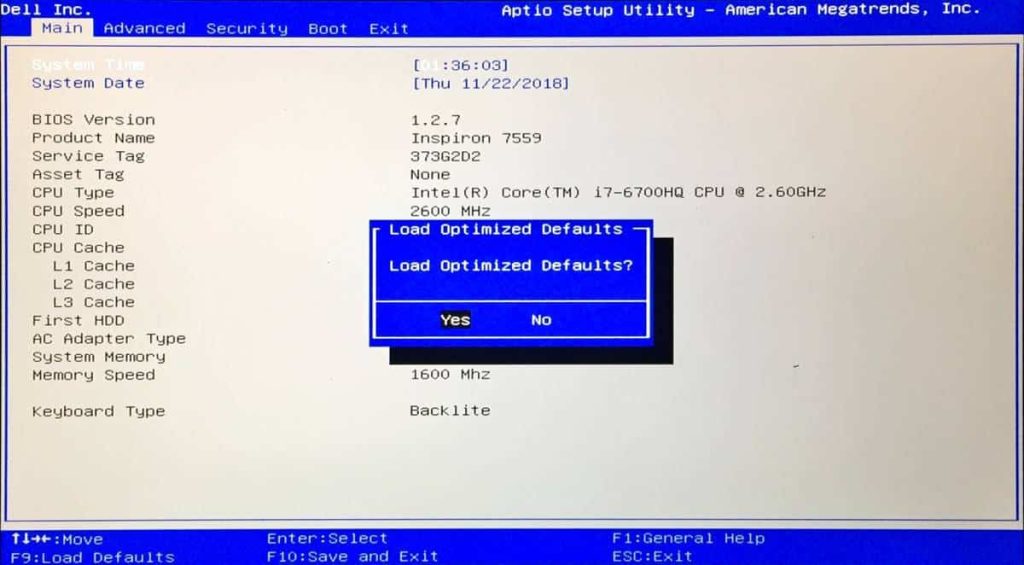
- Confirm Changes and Restart: Follow the prompts to confirm and save the changes. Exit the BIOS, ensuring that you save the changes before restarting your PC.
- Check Peripheral Connectivity: After the restart, verify that your peripherals are connected properly and test if the issue persists.
Resetting the BIOS to default settings eliminates any incorrect configurations that might have hindered the recognition or power distribution to connected devices. This can potentially resolve issues related to a lack of display output or power to the keyboard and mouse.
Solution 7: Test with Minimal Hardware
Sometimes, conflicts between hardware components can lead to issues where the display remains blank, or the keyboard and mouse receive no power. Testing with minimal hardware helps identify potential conflicts and isolates the problem:
- Disconnect Unnecessary Peripherals: Shut down the PC and disconnect all peripherals except the essential ones required for operation, such as the monitor, keyboard, and mouse.
- Remove Additional Cards and Drives: If applicable, remove additional expansion cards (like graphics cards, and sound cards) and non-essential drives (extra HDDs or SSDs, optical drives) temporarily.
- Boot with Minimal Configuration: Restart your PC and observe if it boots up correctly with only the essential components connected. Check if the display shows output and if the keyboard and mouse receive power.
- Reintroduce Components: Gradually reconnect the disconnected components one by one and restart the system after each reintroduction. This helps identify if any particular hardware addition triggers the issue.
By testing the system with minimal hardware, you can pinpoint potential conflicts or faulty components that might cause the lack of display output or power to the keyboard and mouse. This step-by-step process allows you to gradually reintroduce components to identify the source of the problem.
Solution 8: Try External Diagnostic Tools
Sometimes, employing external diagnostic tools or connecting the hard drive to another system can help pinpoint whether the issue stems from hardware or software problems:
Use diagnostic software tools that can boot from a USB drive or CD/DVD to test hardware components like RAM, CPU, and hard drives. These tools can identify hardware faults that might be causing the display issue or power problems with peripherals.
Remove the hard drive from the problematic PC and connect it to another computer. This allows you to access the files and check the functionality of the hard drive. It helps determine if the issue lies within the hard drive or if it’s related to other components of the system.
Solution 9: Seek Professional Assistance
If the problem persists despite trying various troubleshooting steps, seeking professional assistance might be necessary:
- Professional Technicians: Contact a certified technician or computer repair professional who has expertise in diagnosing hardware issues. They can conduct more in-depth tests and inspections to identify the root cause of the problem.
- Manufacturer Support: Reach out to the manufacturer’s support team for guidance. They may provide specific troubleshooting steps or recommend a course of action, especially if the PC is under warranty.
- Repair or Replacement: Depending on the diagnosis, professionals can advise on repairing or replacing the faulty hardware components, ensuring a comprehensive solution to the issue.
Seeking professional assistance ensures a thorough assessment and resolution of the problem, especially if it’s related to complex hardware issues that might require specialized tools or expertise beyond basic troubleshooting steps.
Solution 10: Check the monitor
Make sure the monitor is turned on and connected to the correct video output port on your computer (VGA, HDMI, DVI, etc). Here are a few things to try!
- Check the monitor by making sure the monitor power cable is securely plugged into the wall outlet and the monitor.
- Check that the monitor is turned on by pressing the power button and look for indicator lights. Ensure the monitor video cable is properly inserted into the output port on the back of the computer and it should click into place.
- Try connecting the monitor video cable to a different video output port on the PC if available. Verify the monitor video input settings match the video connection type (HDMI, DisplayPort, DVI, VGA).
- Inspect the video cable for any bent pins or damage and replace if needed. Refer to the monitor manual to ensure all hardware is connected properly.
Solution 11: Inspect cables thoroughly
Carefully examine all video, power, and data cables connected between the computer and monitor. Replace any damaged cables. Make sure all connections are secure. Reconnect both ends of each cable firmly.
Make sure the video cable is plugged completely into the port on the back of the computer and monitor and screw it in if possible. Try using a different video cable if available to rule out cable issues. For laptops, verify the display cable is properly seated on both ends where it connects to the motherboard. Avoid running cables over or under power cords to prevent signal interference.
Solution 12: Reset the Graphics Card
An improperly installed graphics card is a common reason for no display. Turn off the computer, unplug power cables, then remove and reinsert the graphics card into the PCIe slot. Make sure it is fully seated then replace and firmly connect all power and data cables.
Also, check for any dirt, debris or obstructions in the PCIe port and graphics card gold contacts and clean if needed. Line up the graphics card with the PCIe slot and firmly but gently press it directly into place until it clicks and locks.
Replace and tighten any screws or latches that hold the card in place. Reconnect all necessary power connector cables to the graphics card, making sure they click into place. Reconnect any video cables to corresponding ports on the back of the card.
Solution 13: Test and replace the RAM
Faulty RAM can sometimes cause display issues. If you have multiple RAM sticks, remove all but one then power on to see if display appears. Test each stick individually in each slot to identify any bad modules.
Follow these steps to replace RAM:
- Open the PC case and locate the RAM slots on the motherboard.
- Remove all but one RAM stick, making note of which slots they came from.
- Boot the PC and see if display appears. If not, power down and swap in the other sticks one at a time, testing each.
- If display problems disappear with a specific stick removed, that module is likely defective. Replace it.
- Try reseating problematic RAM sticks by gently removing and firmly reinserting them into their motherboard slots.
- Make sure RAM is inserted completely with retention clips or latches engaged to hold it in place.
Solution 14: Test or replace the power supply
An inadequate power supply can fail to deliver enough consistent power to PC components. Use a power supply tester to check the PSU health or swap in a known good unit and see if the no-display problem is resolved.
Here are a few things to consider:
- Listen and feel for the power supply fan spin when the PC is turned on to ensure the PSU is active.
- Make sure all power connectors from the PSU are inserted firmly into the motherboard and components.
- Check for any loose, damaged, or burnt power cables. Replace if needed.
- Use a multimeter or dedicated power supply tester to measure key voltages and confirm PSU outputs are stable and within spec.
- If voltages are abnormal or unstable, have the PSU repaired or replaced immediately.
Solution 15: Inspect the motherboard connections
Inspect the motherboard connections by examining the motherboard closely under bright lighting for damaged components or burnt areas. Check for cracked, bent, or loose connectors on ports and slots like PCIe, RAM, SATA, and the 24-pin ATX power cable. Reconnect all motherboard power cables, data cables, and cards to ensure firm, secure connections.
Remove any dust or debris near ports and slots using compressed air, avoiding moisture or liquids. Visually verify all motherboard stand-offs under the board match the holes to avoid shorts.
Solution 16: Check CPU temperature
Check CPU temperature by downloading hardware monitor software like Speccy or HWInfo to check CPU temps. Boot into BIOS and observe current CPU temperature readings during idle and under load if available. If over 90°C when idle, reapply the thermal paste between the CPU and cooler, cleaning the old paste first. Make sure the CPU heatsink is tightened down properly using diagonally opposite screw pairs.
Also, ensure the CPU fan is running when under load. If not, reconnect the fan power cables. Consider upgrading to a larger CPU cooler or radiator if operating near the max rated temperature.
Solution 17: Examine BIOS/UEFI display settings
Examine BIOS/UEFI display settings by accessing the BIOS settings menu on startup by pressing the BIOS key (F2, F10, Del, etc.). Navigate to display or video-related BIOS submenus and confirm primary display output source is set correctly.
Make sure integrated graphics or PCIe graphics card is set as the primary video output source, depending on your system. If multiple display ports are present, indicate the correct one connected to your monitor. Check that the display resolution matches your monitor’s native resolution spec.
Solution 18: Boot into Safe Mode
Boot into Safe Mode by continuously pressing F8 on bootup to access Advanced Boot Options and selecting Safe Mode. If the display works normally in Safe Mode, it indicates a driver, software, or OS issue is likely causing the fault. Use Safe Mode to uninstall problematic applications or roll back recent driver updates.
Update graphics drivers, chipset drivers, and other key hardware drivers to the latest stable versions. Consider refreshing the Windows installation to fix corrupted OS files after backing up data first. As a last resort, clean install Windows to start fresh with up-to-date drivers.
Conclusion
In the realm of technology, encountering a situation where a PC turns on but has no display or power to keyboard and mouse issue can be puzzling. However, armed with a variety of troubleshooting methods, it’s possible to navigate and resolve these issues effectively.
From checking connections and cables to resetting BIOS settings, updating drivers, and even employing external diagnostic tools, this guide has outlined a comprehensive array of solutions. By systematically exploring these steps, users can isolate and address the root causes behind the lack of display output or power to peripherals.
Remember, troubleshooting such issues often requires patience and systematic testing. If despite these efforts the problem persists, seeking professional assistance from certified technicians or the manufacturer’s support team ensures a thorough diagnosis and appropriate resolution.
FAQs:
PC turns on but no display or power to the keyboard and mouse? What could be the problem?
Several factors might cause this issue. It could be due to loose connections, faulty cables, outdated drivers, BIOS settings, or even hardware failures. Try checking connections, testing different ports, and updating drivers to troubleshoot the problem.
Why aren’t my keyboard and mouse receiving power when my PC is running?
Power supply issues, faulty connections, or damaged USB ports can lead to a lack of power to peripherals. Try connecting the keyboard and mouse to different USB ports, checking cables for damage, and ensuring the power supply unit is functioning correctly.
I’ve updated drivers and checked connections, but the problem persists. What else can I do?
Try performing a BIOS reset to default settings, testing with minimal hardware to isolate conflicts, monitoring for overheating issues, and utilizing external diagnostic tools to pinpoint hardware faults that might cause the display or power problems.
When should I seek professional help for these issues?
If you’ve exhausted troubleshooting steps without resolving the problem, it’s advisable to seek professional assistance. Certified technicians or the manufacturer’s support team can conduct more advanced diagnostics and recommend repair or replacement options for any faulty hardware components.
Author Bio:
Dinesh Lakhwani 

Dinesh Lakhwani, the entrepreneurial brain behind “TechCommuters,” achieved big things in the tech world. He started the company to make smart and user-friendly tech solutions. Thanks to his sharp thinking, focus on quality and the motto of never giving up, TechCommuters became a top player in the industry. His commitment to excellence has propelled the company to a leading position in the industry.
Popular Post


Recent Post

Common Windows 11 Problems and Solutions (2026 Version)
Windows 11 has become more polished over the years, but it is still not completely free from problems. Even after regular updates from Microsoft, many users continue to face issues like lagging performance, failed updates, audio troubles, random crashes, and network errors. Some problems appear after installing new features, while others develop gradually as the […]

Fortect Driver Updater Review: Features, Steps, Pros, and Cons.
A new PC usually feels quick and responsive. Applications open instantly, games run smoothly, and everything works as expected. As time passes, however, you may notice slower performance, system crashes, hardware glitches, or devices that stop working properly. While many people assume malware or low storage space is to blame, outdated drivers are often the […]

New Features Coming in Windows 11 This Year [2026]
Microsoft is always working to make Windows better. This year is no exception. The company has announced and rolled out several exciting updates for its users. These updates touch almost every part of the operating system. From the Start menu to system settings, changes are arriving fast. If you use Windows daily, you will want […]

Top 14 Duplicate Photo Finder and Remover For Windows [2026]
Introduction: Photos pile up fast. Well, yes! You take ten shots of the same moment. You download the same image twice. You back up your folder and forget you already did it. Before you know it, your storage is packed with copies. A good duplicate photo finder helps you take back that space without losing […]

Advanced System Settings on Windows 11: Complete Guide
Windows 11 is a powerful operating system. It comes with many features that most users never explore. One of the most useful areas is the System Properties panel. This is where you can control how your computer performs, starts up, and handles memory. Many users only change basic settings like wallpaper or display options. But […]

21 Advanced Windows Security Settings: Latest Updates
Introduction: Your computer holds a lot of important data. From personal photos to work files, everything sits on your Windows system. That is why protecting it properly matters more than ever. Windows security settings have come a long way. Microsoft keeps adding stronger layers of protection with every update. Most users never go beyond the […]
Security Upgrades of Microsoft Windows in This Decade [Complete Guide]
Introduction Microsoft has been working hard to make Windows safer every year. Cyberattacks are growing fast. Hackers are smarter now. They target millions of Windows users every single day. That is why Microsoft has added many powerful new security upgrades of Microsoft Windows since 2020. These upgrades protect your data, your identity, and your device […]
How To Link a Microsoft Account to a Digital License on Windows [2026]
Most people never think about Windows activation until it suddenly stops working. Something as simple as replacing hardware or reinstalling Windows can cause the system to lose its activated status. Linking your Microsoft account to your digital license beforehand helps prevent unnecessary trouble and makes activation recovery much easier later on. Many people using Windows […]
Monthly Round Up: All Big Incidents Happened for Windows Users in The Month of April 2026
Windows users had a turbulent April 2026. On April 14, Microsoft rolled out its scheduled Patch Tuesday security updates, a routine release meant to close vulnerabilities and resolve known issues. What followed was anything but routine. Rather than strengthening systems, the updates triggered a cascade of fresh problems across Windows 10, Windows 11, and Windows […]
How To Add Or Remove Programs On Windows 11: 4 Quick Methods to Try.
Introduction: Managing software on your computer is something every Windows user should know. Whether you want to install a useful new app or remove programs you no longer need, understanding how to add remove programs can help your PC stay clean, organized, and fast. It also helps free up storage space, reduce clutter, and improve […]

