How to Watch Netflix 4K Videos on Mac?
Netflix is one of the biggest streaming services currently, with almost 214 million subscribers. Users can easily Watch Netflix 4K content on their laptops or PC, but this is only available for Windows.
Mac aims to offer the MacOS Big Sur with Safari 14 updates for users to stream the content on Netflix in HDR 4K definition. However, the software would work on specific laptop and desktop versions of Mac that can support compatible hardware.
How to Watch Netflix Videos in 4K on Mac
There are particular methods available for Mac users to stream their Netflix content on Mac devices. We tried out different options to see the most suitable and easy processes for current versions. Prerequisites include a Netflix Premium account, Mac device with Kaby Lake or newer Intel processor type, HDCP 2.2-supported 4K TV, and a Windows 10 copy.
Here are the top methods available.
Method 1: Install Windows 10 and Parallels Desktop on Mac
One manner of watching Mac Netflix 4K content is using a virtual machine, such as Parallels Desktop on your device. With this, you can operate Windows 10 through your Mac computer or laptop. Users who do not want to boot their system in specific manners prefer this method since they can easily switch between Windows and macOS.
This method is suitable for systems with a dual-monitor setup alternatively but can run on single-monitor systems.
How to do this?
Step 1: It is important to open the Parallels Desktop 15 site and download the software with a free trial or full plan.
Step 2: Open the Finder app from your system search bar after the download completes. Look for the file ParallelsDesktop.dmg here and double-click your cursor on it.
On the other hand, you can directly search for the file through Spotlight.
Step 3: The Parallels Dekstop window would come up. Double-click your cursor on top of the “Install” button.
Step 4: The software would show a confirmation prompt. Click on “Open” to begin the installation.
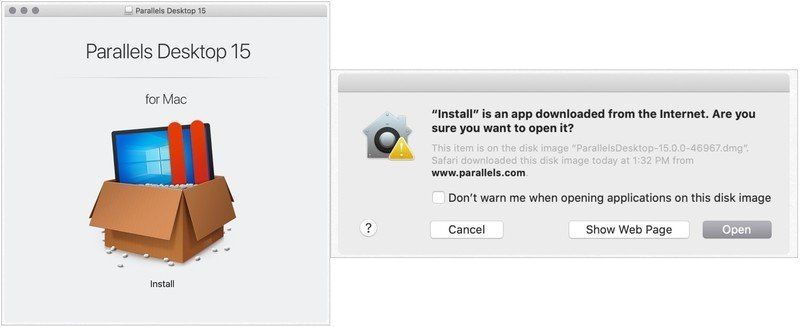
Step 5: Click Yes on the License Agreement prompt.
Step 6: On the next window, add the Administrator Name and then the Password in the correct fields.
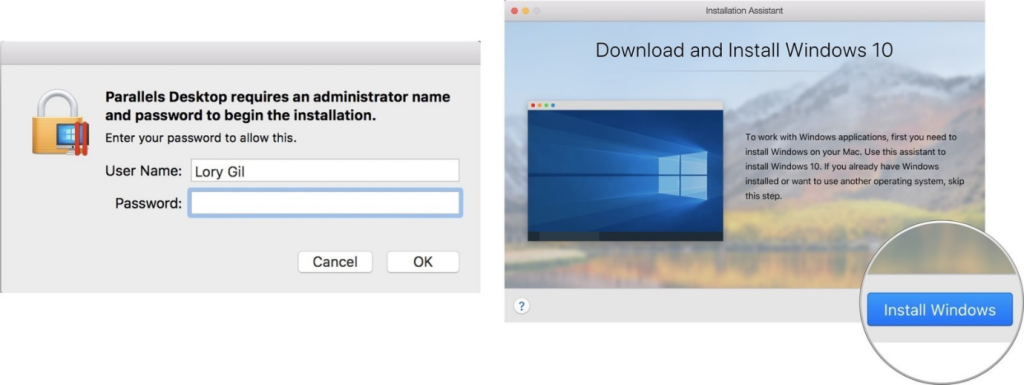
Step 7: After it installs, the software will automatically open the page for Windows 10 download on your Mac device.
Click on the “Install Windows” button to start the installation or “Skip” if you have a Windows 10 copy.
Step 8: Next, users are re-directed to the page for the Parallels Desktop account. Create a new one if you do not have an account or Sign-in to your available one.
Step 9: A new window would appear with a simulated Windows interface. Stream Mac Netflix 4K content through there.
Method 2: Use Bootcamp to Install Windows 10 on Mac
Another method to Watch Netflix 4K content on Mac is to use the Bootcamp software. Users can expect a native Windows-centric experience here. The Bootcamp partitions the SSD or HDD of the Mac into a section where one can install the Windows 10 version. Here, you can select the Windows partition to steam Mac Netflix 4K videos and then use the Mac partition later.
How to do this?
The following is a three-part breakdown of the setup of Windows 10 OS on Mac via Bootcamp for easy Mac Netflix 4K streaming.
Sequence 1: Install Windows 10 using BootCamp
First, you must download the Windows 10 version on the Mac device. Then, use the next steps for further installation.
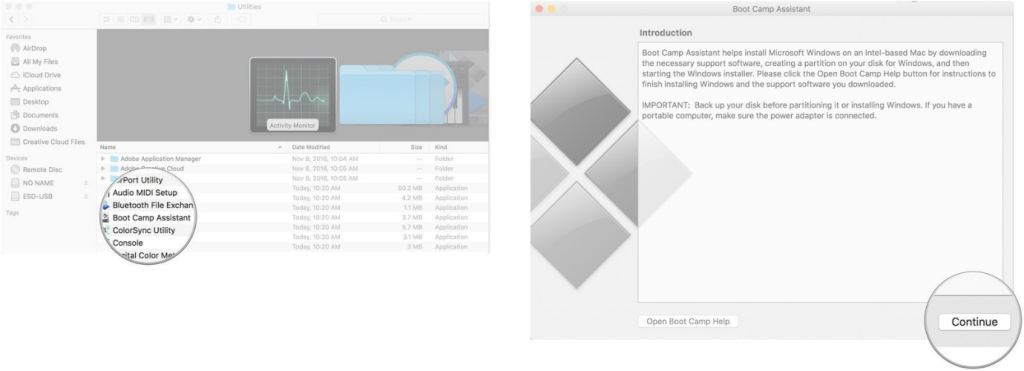
Step 1: Open Applications > Utilities. Find the “Boot Camp Assistant” option and launch the application.
Step 2: Click on the Continue button. The BootCamp software would automatically search for the Windows 10 ISO file you downloaded.
Step 3: Under the Partition section, click on the slider and drag it to the side. This would set the default 458 GB storage. Users have the choice to adjust their storage requirements depending on the space limits inside the drive.
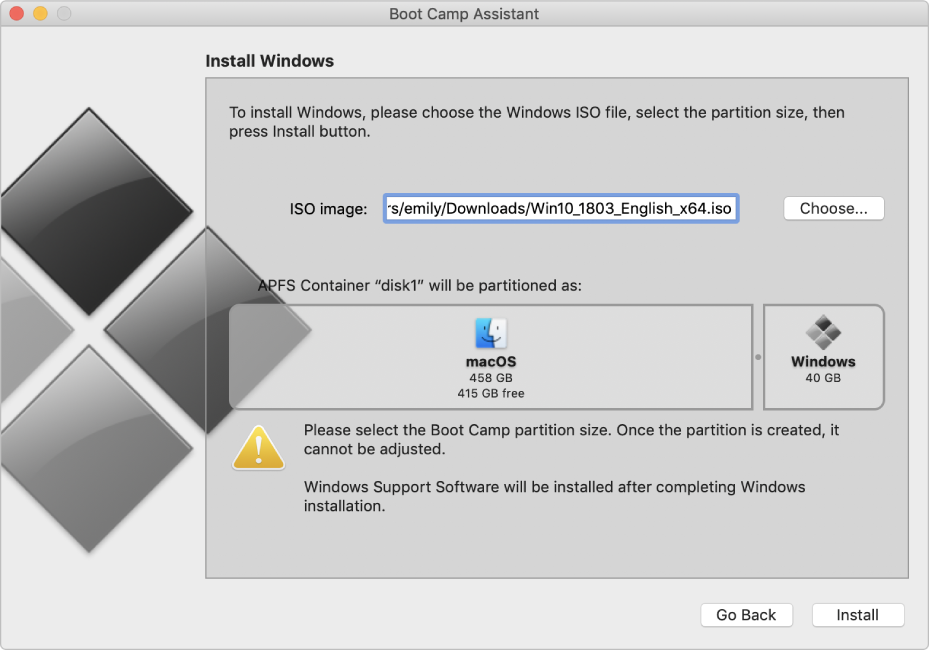
Step 4: Click on the “Install” button. This would download the Windows support.

Step 5: Add your set password in the available field.
Step 6: Click on the OK button. This would restart the Mac device, and the Windows 10 setup window would appear next.
Step 7: Select the preferred language out of the list.
Step 8: Click on the “Install Now” button.
Step 9: Either add your product key code or click the cursor on the “I don’t have a key” option. This step is possible after the installation as well.
Step 10: Choose the Windows 10 Pro option > Next.
Step 11: Click the cursor on the “Custom: Install Windows Only” option on the next window.
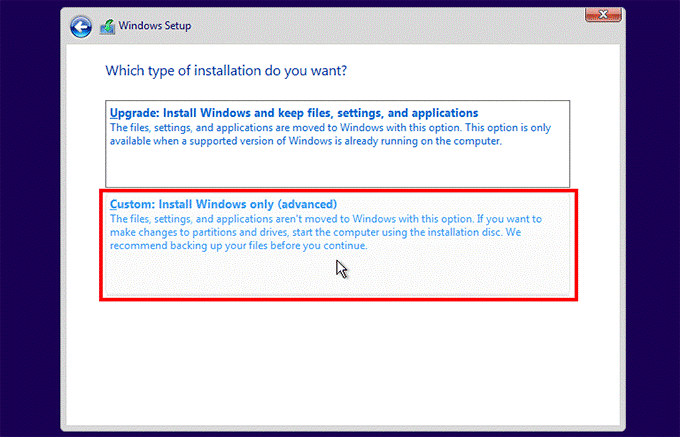
Step 12: Click on top of the “Drive 0 Partition X: BOOTCAMP” option only and then choose Next. This will begin Windows 10 installation.
The Mac device you are using would restart multiple times.
Step 13: On the next setup window, click on the “Customize your installation” or “Use Express Settings” option
Step 14: If you choose the latter, type the username and password of your choice. Then, click the “Next” button.
Step 15: You can select Cortana use or avoid it. The Windows 10 software would boot up completely after this.
Sequence 2: Install the BootCamp on Windows 10 Partition
After the Windows 10 OS loads up on the Mac device, this would activate the BootCamp software installer. The step is important since particular software and drivers enter into the device during the BootCamp installation process. The window for it would crop up on the screen.
Step 1: Click on the “Install” option.
Step 2: Then, choose to agree on the license agreement prompt.
Step 3: Then, click your cursor on the Install option.
Step 4: After the installation is fully done, click on the “Finish” button.
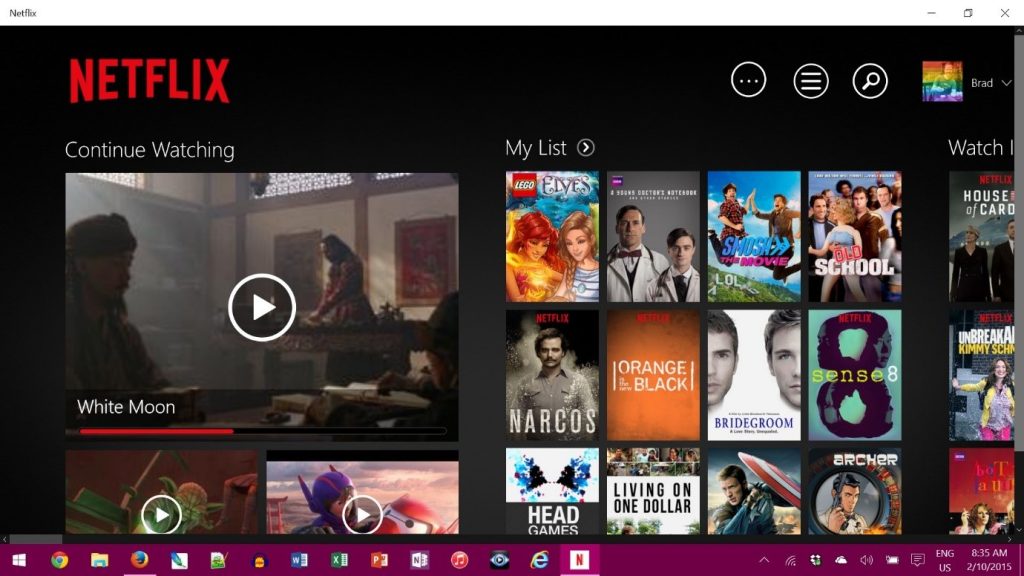
Step 5: Access the Netflix account and Watch Netflix 4K on Mac.
Sequence 3: Return Your Device to macOS Partition
After using the Windows partition screen, it is possible to easily switch the device OS back to macOS.
Step 1: Open the Windows 10 taskbar. Then, click your cursor on the “Show Hidden Icons” option.
Step 2: Click on the Boot Camp option.
Step 3: Then, choose the “Restart in OS X” option.

This would bring the macOS interface again. Alternatively, you can restart the Mac device and press on top of the “Options” key. This would open the boot menu, and you can select your preferred OS for the usage period.
Conclusion
Upon following the different steps correctly, users can Watch Netflix 4K content on their macOS devices. First, check for compatibility to understand which method would work best for your Mac laptop or PC.
If this proved helpful for you, read through our posts for similar guides.
Popular Post
Recent Post
How To Open/Access Computer Management & Advanced Tips
Every Windows computer has many hidden tools. Most users never see them. They only use basic settings. They change wallpapers. They install apps. They adjust sound and display. That is enough for daily work. But problems still happen. The system slows down. Storage fills up. Errors appear without warning. At this stage, normal settings do […]
How To Transfer Photos From Android Phone To PC/Laptop [2026]
Moving photos from a phone to a computer is something most people need to do often. Phones fill up fast. Photos also matter more than apps. You may want a safe backup. You may want to edit images on a bigger screen. This guide explains how to transfer photos from Android to PC without stress. […]
Top 9 Browsers With Built-In VPN – VPN Browser
Online browsing is no longer private by default. Every website collects data in some form. This includes location details, device information, and browsing habits. Over time, this data builds a clear picture of user behavior. Many people are now uncomfortable with this level of tracking. A VPN browser helps reduce this exposure. It adds a […]
AI In Cyber Security: Who is Winning, Hackers or Security Companies
Cybersecurity once followed clear rules. Companies built firewalls. Users created passwords. Antivirus tools scanned files and removed known threats. When an attack happened, security teams studied it and added new rules. This method worked for many years. It created a sense of control and stability. That sense is gone today. Artificial intelligence has changed how […]
The Biggest AI-Run Cyber Attacks Of All Time
Artificial intelligence is now part of everyday technology. It helps people search faster. It improves medical research. It supports businesses in making better choices. But AI is not used only for good purposes. Cyber criminals have also learned how to use it. This has changed the nature of cyber attacks across the world. In the […]
Switch To a Dark Background Theme on Windows: Enable Dark Mode
People often like a screen that feels gentle on the eyes. A darker style softens bright areas and makes long computer sessions easier to handle. It also gives the desktop a cleaner and more modern feel. When you switch to a dark background theme in Windows, the colors shift to deeper shades that reduce glare […]
Complete Guide on Managing Audio Input Devices [Latest In 2026]
People use microphones for meetings, games, classes, recordings, and voice chats, so any problem with the device can interrupt their work. Even a small system error can make the voice weak or stop it fully. This is why knowing the basics of managing audio input devices is helpful for new and experienced users. Windows includes […]
Resetting Audio Settings on Windows 11: Complete Guide
Sound problems can disrupt work, study, or entertainment. Many users face issues where the audio becomes too low, too loud, unclear, or does not play at all. A common way to solve these problems is by resetting audio settings to their original state. This helps Windows rebuild its sound setup from the beginning. Windows 11 […]
Troubleshooting Headphone Detection: Headphones Not Detected/Working
A lot of users run into sound problems at some point. A common one is when the computer does not pick up the headphones. You plug them in, but the speakers keep playing. This can break your focus during work, movies, music, or calls. It also causes confusion because the reason is not always clear […]
How To Re-Pair Bluetooth Earbuds For Stereo Sound on Windows
Wireless earbuds are often paired with computers for rich stereo sound, but things don’t always go smoothly. Sometimes, the system defaults to mono audio or fails to activate the correct playback mode. This can disrupt music, calls, or gaming, making the sound feel flat and lifeless. These glitches usually stem from improper setup. Windows might […]








![Complete Guide on Managing Audio Input Devices [Latest In 2026]](https://www.techcommuters.com/wp-content/uploads/2025/12/Complete-Guide-on-Managing-Audio-Input-Devices.webp)

