How To Use Do Not Disturb Mode on Android
Last updated on September 2nd, 2023 at 1:10 pm
Introduction
On the phone, there are different applications that people use daily. Most of them have an in-built alerting system that constantly sends push notifications to phones, from information related to software upgrades to text alerts. While these are useful, getting notifications from all of the apps on your phone can become troublesome after a while.
Luckily, there is Android DND Mode that you can enable to manage notification-related settings as per your preferences. You can turn off all alerts or set notifications from certain apps through this section. Are you wondering how it works? Read this post to learn how to utilize the Android Do Not Disturb settings efficiently.
How to handle different settings for Android DND Mode?
You can take different steps to set up different settings related to Android’s Do Not Disturb mode. Follow the given methods carefully.
Method 1: Manage the DND stings from the notification panel
It cannot be easy to open the Settings menu each time you have to use the DND mode on your smartphone. In this case, you can directly add the toggle for Do Not Disturb in the Quick Settings menu on your phone.
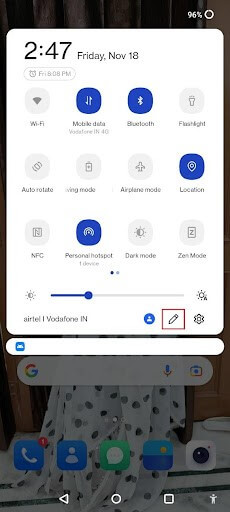
Step 1: Slide the notification panel of your device down.
Step 2: Tap on the pencil icon.
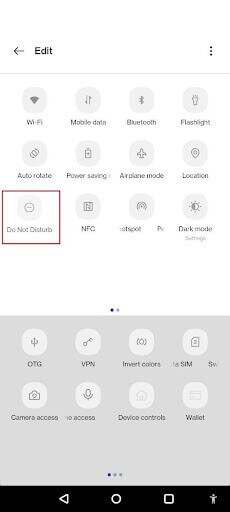
Step 3: Choose the Do Not Disturb icon and move it to your preferred location in the panel.
Step 4: Then, you have to press the back button. Then, you can use it to control the Android Do Not Disturb setting to activate or deactivate notifications from the notification panel directly. This functionality is usable on different Android version models.
Step 1: On the main Android smartphone screen, slide and pull down your notification panel.
Step 2: You will see many notifications here, like the Bluetooth, WiFi, Hotpot, Mobile Data, DND, Power Saving Mode, and Flash Light settings.
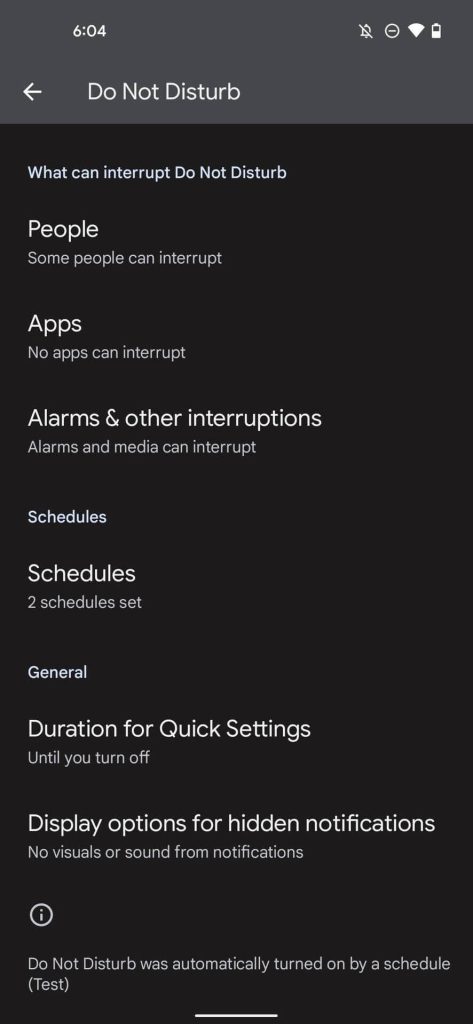
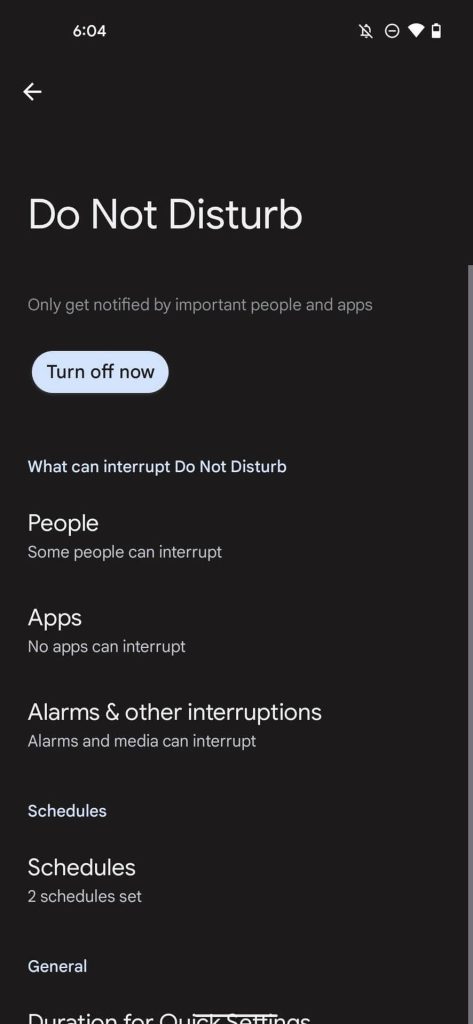
Step 3: Click on the icon on Android DND Mode to activate the feature. Open the settings from there for the Do Not Disturb mode to choose which chats and apps appear on alerts and the ones you will put on silent. It is possible to disable the mode and set up specifically scheduled time-outs from here as well.
Method 2: Schedule automatic turn-on and turn-off mechanism for Do Not Disturb Mode
Another easy solution for operating the Do Not Disturb mode on your device is to set up a specific schedule for the feature to activate. This assures that your selected function will be enabled or disabled at your scheduled timings.
One of the standard settings related to this function is sleeping mode. This is where the DND mode activates automatically at the assigned periods of your REM cycle. You can use this function or set up other customized settings for the Do Not Disturb functionality at other times.
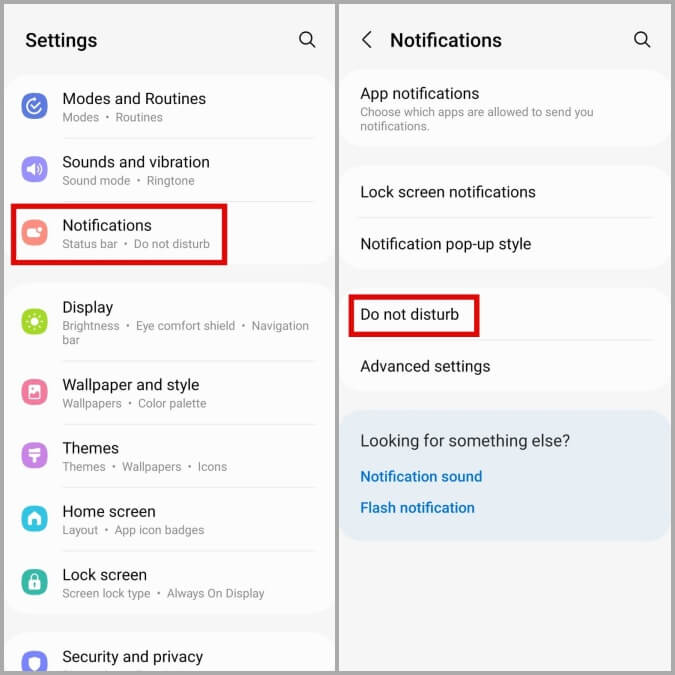
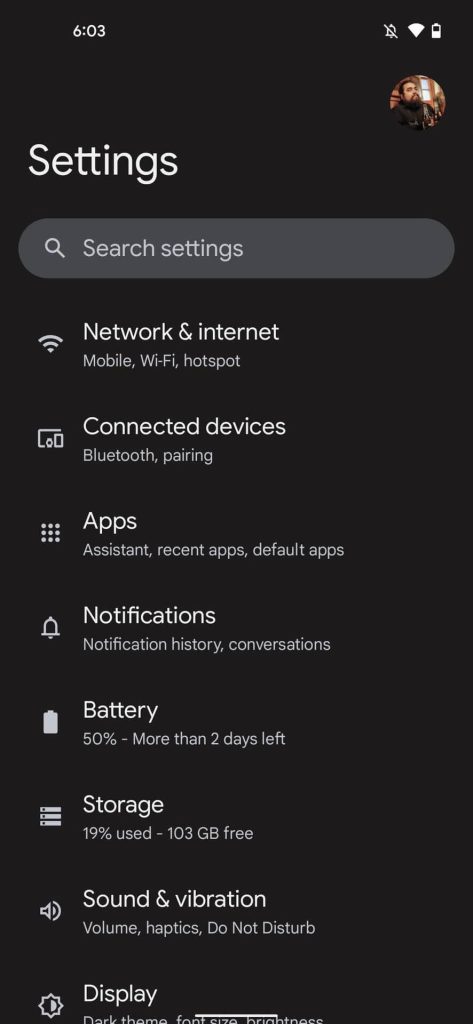
Step 1: Click on the Settings app from your menu.
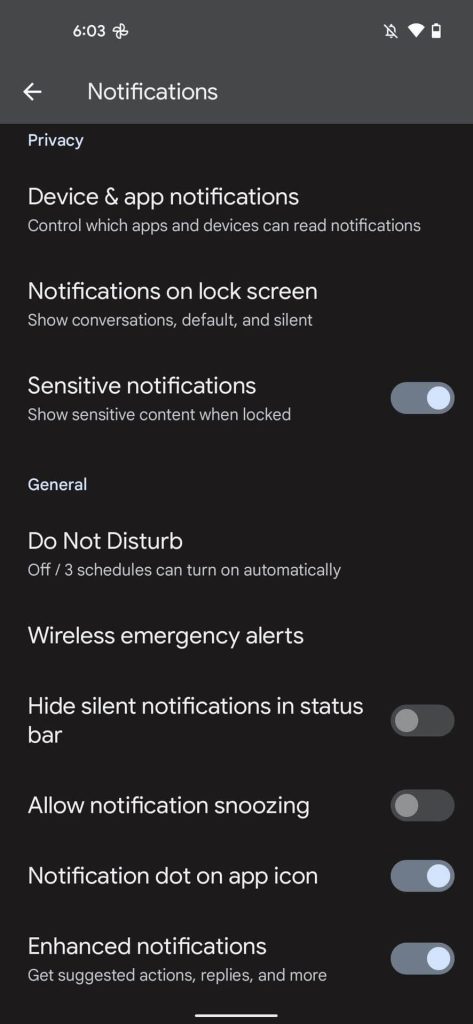
Step 2: Under the Settings section, scroll down and choose the Notifications option.
Step 3: Click on the Do Not Disturb option.
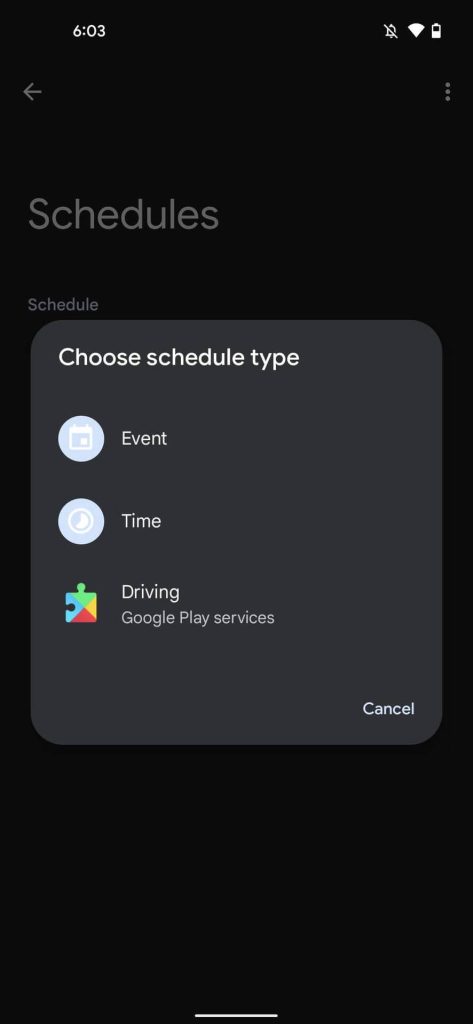
Step 4: Then choose the Schedules selection from your menu.
Step 5: Click on the Gear icon next to change the listed schedule or directly choose the Add More button here. Then, make your personalized schedule.
Step 6: Select the preferred schedule type.
Step 7: Type in a name and tap on the Add button.
Step 8: Make changes to the date and time of your schedule.
Step 9: Keep the Use Schedule toggle active to make sure that this process is in working condition.
Method 3: Set up a specific duration for the DND mode
You can use the schedule setup process to plan your Do Not Disturb settings timeline for different apps. Besides that, another useful method that you can try is activating the duration-based scheduling factor on your Android smartphone.
This is useful for one-time occasions or short-term events like meetings or functions that do not require per-day scheduling. In these situations, the duration-based setup through the Android Do Not Disturb setting is very efficient. However, activating this function is only available through the quick toggles on your smartphone, so make sure to add this feature to that first.
Step 1: On your Android smartphone, click on the Settings app.
Step 2: Then, go to the Notifications option from the menu.
Step 3: Under this section, choose the Do Not Disturb option to access the settings for that.
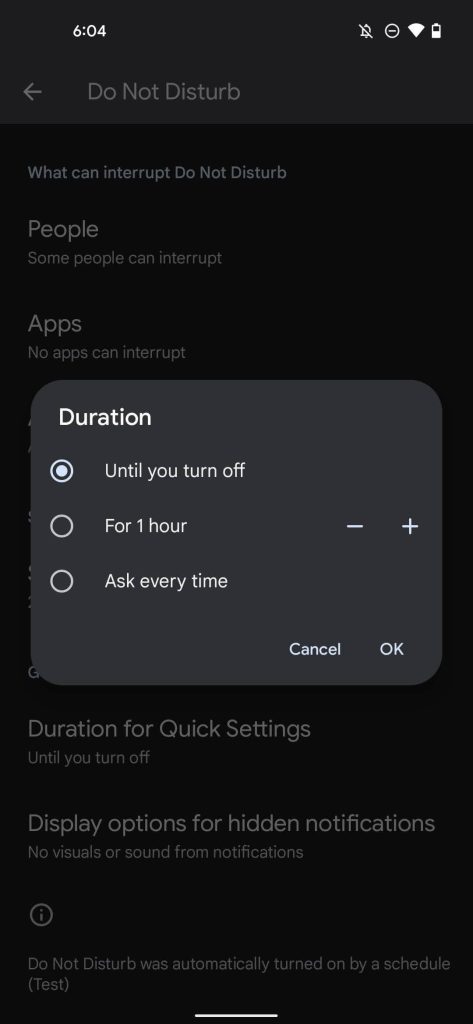
Step 4: Scroll downward and click on the Duration for Quick Settings option.
Step 5: Choose your preferred duration and tap on the OK button.
Method 4: Select which alerts to show or hide
Another popular feature from the Android Do Not Disturb settings that you can operate is to choose to show or hide specific notifications. This is useful for some apps sending too many notifications you do not require, e.g., a shopping app’s sale updates.
You can temporarily deactivate the notifications for that specific app and other such apps and reactivate them later at your convenience. However, remember that this function does not mute the critical alerts on your phone system, like battery percentage warnings or OS upgrade notifications.
Step 1: Click on Settings on your Android smartphone from the homepage or list of apps.
Step 2: In this menu, tap on the Notifications option.
Step 3: Click on the Do Not Disturb option under the Notifications section.
Step 4: Click on the People option and select the specific Messages and Calls that you will allow unrestricted access.
Under the Apps section, select the particular app whose notifications you want to be switched on.
Select which additional interruptions and notifications you want to come through under the Alarms & other interruptions option.
Conclusion
It is possible for users to quickly set up different levels of notifications-related controls through the Do Not Disturb mode on Android. Follow the different steps to set up various settings for the feature on your phone to control the number of alerts that come in.
Author Bio:
Dinesh Lakhwani 

Dinesh Lakhwani, the entrepreneurial brain behind “TechCommuters,” achieved big things in the tech world. He started the company to make smart and user-friendly tech solutions. Thanks to his sharp thinking, focus on quality and the motto of never giving up, TechCommuters became a top player in the industry. His commitment to excellence has propelled the company to a leading position in the industry.
Popular Post


Recent Post

How to Switch Windows 10 to a Local Account: Complete Guide
Windows 10 allows users to sign in with either a Microsoft account or a local account. When you set up a new computer, the system often suggests using a Microsoft account. This account connects your device to Microsoft services such as Outlook, OneDrive, and the Microsoft Store. It also syncs settings, themes, and passwords across […]

How To Change Default Apps For File Types In Windows
Windows is designed to make using your computer easy. One way it does this is by assigning default apps to different file types. This means when you open a file, Windows automatically opens it with a specific program. For example, photos may open with Photos, music with Groove Music, and PDFs with Edge. These default […]

How To Adjust The Mouse Pointer Speed: Complete Guide
Using a computer every day means you use the mouse a lot. The mouse pointer moves on the screen and helps you click, scroll, and select items. Many people never think about the speed of the mouse pointer. They have used the default setting for years. This can cause small problems over time. A slow […]

How to Change Mouse Scrolling Settings In Windows
A mouse is one of the most used computer tools. People use it every day. They scroll through emails. They scroll through documents. They scroll through websites and images. The movement becomes automatic. Most users do not notice it. That is why problems often go unnoticed. Scrolling problems show up slowly. At first, it feels […]

Keyboard Light Settings: Keyboard Lighting Control [Complete Guide]
Keyboards are no longer simple typing tools. Well, yes! Over time, they have evolved to include features that improve comfort, visibility, and overall experience. One of the most useful features today is keyboard lighting. It helps users work comfortably in low-light conditions. It also reduces strain when typing for long hours. Many users first notice […]

Customizing Pointer Appearance: Complete Guide
The way your mouse pointer looks on your computer may seem like a small detail. But customizing pointer appearance can make using your PC more comfortable and visually appealing. Many users do not realize that they can change the pointer size, color, and style to fit their needs. Whether you want a bigger pointer for […]

How To Choose a Computer Monitor: Monitor Buying Guide
Buying a monitor looks easy. Many people think all screens are the same. That belief causes regret later. A monitor is not just a display. It is a daily tool. You read on it. You work on it. You relax with it. Small problems become big over time. Poor brightness hurts eyes. Bad size causes […]

How To Get Help With File Explorer in Windows 11 [Complete Guide]
File Explorer is one of the most important tools in Windows 11. It is used to open folders, view files, and manage stored data. Almost every action on a Windows computer depends on it in some way. When users open documents, save downloads, or organize photos, File Explorer is always involved. Because it is used […]

How To Fix A Frozen Computer: Complete Guide [Windows 11/10]
A frozen computer is one of the most common problems Windows users face. The screen stops responding. The mouse pointer does not move. Keyboard inputs do nothing. You may hear the fan running loudly. Sometimes the system looks alive, but nothing works. This situation often happens when you are busy or working on something important. […]

How to Upgrade Computer RAM: Complete Guide
Upgrading RAM is one of the simplest ways to improve a computer. It helps the system feel faster and smoother. Apps open quicker. Browsers handle more tabs. Games and tools run with less delay. Many users search for how to upgrade computer RAM because it gives real results without high cost. You do not need […]

