












Slow computers are a common problem for almost every Windows user. Well, yes! Over time, your PC picks up junk files. These files sit quietly in the background. They take up space and slow things down. Programs open slower. Windows takes longer to boot. Even simple tasks like opening a folder can feel sluggish. There […]
How to Uninstall Problematic Windows Updates Easily
Introduction:
“My computer crashed after the latest update. Now it won’t boot properly. What do I do?”
Many Windows users frequently encounter this issue, as system updates occasionally introduce complications rather than improvements.
Windows updates are meant to improve your system. But they don’t always work as planned. Some updates can break your computer. They might cause crashes, slow performance, or software conflicts. When this happens, you need to know how to uninstall problematic Windows updates easily in Windows.
Getting rid of problematic updates is a straightforward process—once you’re familiar with the correct approach. This walkthrough will guide you step by step, offering multiple techniques tailored to different scenarios. By the time you finish, you’ll be equipped to resolve update-related issues efficiently and without risk.
Fix It in Minutes: The Fastest Way to Uninstall a Windows Update
Running into system slowdowns, app crashes, or a broken feature right after a Windows update? You’re not alone. And the good news is, Windows has a built-in option that lets you roll back a problematic update in just a couple of clicks, no third-party tools required.
Before jumping into the detailed walkthrough, here’s the quickest path to relief. This two-step method works best when you’ve recently installed an update and noticed immediate issues. It’s your fastest route back to a stable, working system.
Step 1: Go to Settings> Windows Update >Update History> Uninstall Updates. Find the update causing issues (sorted by date installed).
Step 2: Click the update, hit Uninstall, follow the on-screen prompts, and restart your PC when asked. Your system will reboot without that update applied.
What You’ll Learn in This Guide
Whether you’re dealing with a frozen screen, missing drivers, or sudden performance drops after a This guide covers everything you need to know about identifying and removing problematic Windows updates, from spotting the warning signs to preventing the same issues from happening again. Here’s what we’ll walk you through:
- Why uninstalling problematic updates matters — and what risks you take if you leave a bad update running on your system
- How to find the update causing the problem — a quick diagnostic process to pinpoint exactly which update is behind your system issues
- 5 methods to uninstall problematic Windows updates — step-by-step instructions using Windows Settings, Control Panel, Command Prompt, System Restore, and Safe Mode
- What to do after uninstalling an update — the follow-up steps to ensure your system is stable, secure, and running smoothly post-removal
- How to prevent future update problems — practical tips to avoid running into bad updates again, including how to manage and monitor Windows updates going forward
Why is it Important to Uninstall Problematic Windows Updates?
Bad Windows updates can turn your smooth-running computer into a nightmare. They can cause system crashes, software errors, and hardware conflicts. Removing these updates quickly is crucial for getting your system back to normal.
Here are the main reasons to uninstall problematic Windows updates easily on Windows:
- System Stability – Bad updates can make your computer unstable and crash frequently
- Performance Issues – Some updates slow down your system or cause programs to run poorly
- Hardware Problems – Updates might break drivers for your printer, graphics card, or other devices
- Software Conflicts – New updates can make your favorite programs stop working properly
- Boot Failures – Serious update problems can prevent Windows from starting at all
- Data Protection – Quick removal prevents further damage to your files and settings
- Time Savings – Fixing the problem fast means less downtime and frustration
- Peace of Mind – Knowing how to fix update problems reduces stress about future updates
How To Find a Windows Update That is Causing Problem?
Finding which update caused your problem is the first step to fixing it. Windows keeps a record of all installed updates. You can check this list to see what was installed recently.
Look for updates that were installed around the time your problems started. Pay special attention to driver updates and major system updates. These are more likely to cause issues than small security patches.
Steps to Find Problem Updates:
- Press Windows key + I to open Settings. Select “Windows Update” from the left menu. Click “View update history”.
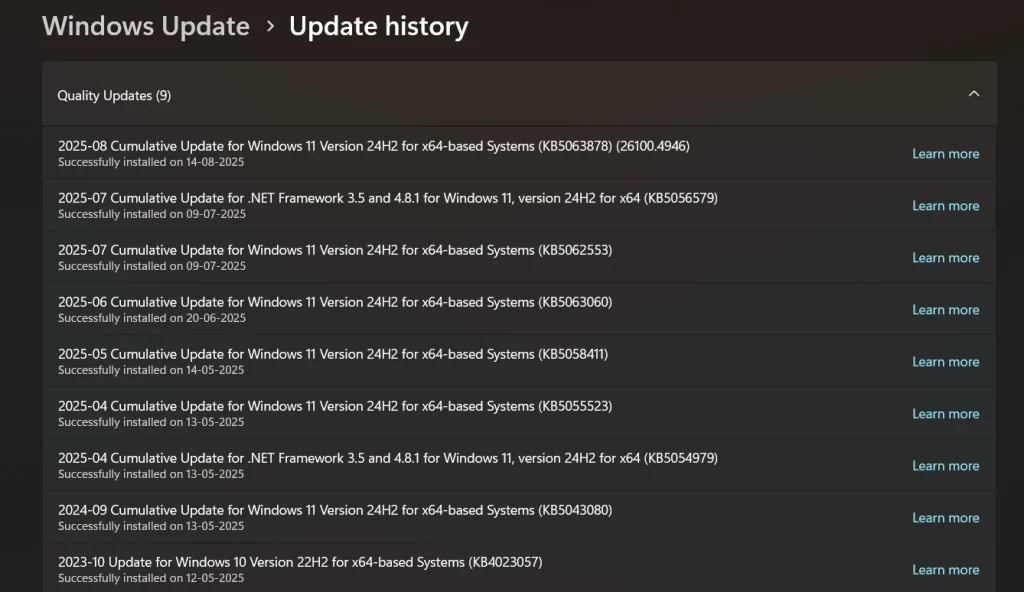
- Look for updates installed near when problems began. Note down the KB number of suspicious updates. Search online for that KB number plus “problems” to confirm issues
How To Uninstall Problematic Windows Updates?
Windows updates are designed to enhance performance, security, and stability—but sometimes, they can introduce unexpected issues like system crashes, software incompatibility, or sluggish behavior.
In Part 3, we’ll walk you through how to safely uninstall problematic updates that may be causing trouble on your device. Whether you’re dealing with a buggy patch or a driver conflict, knowing how to roll back changes can help restore your system’s smooth operation without compromising essential functionality.
Method 1: Using Windows Settings
This is the easiest way to uninstall problematic Windows updates easily Windows. The Settings app provides a simple interface for removing recent updates. It works well for most standard updates and doesn’t require advanced technical knowledge.
Most users should try this method first. It’s safe and straightforward. The process is designed to be user-friendly. Windows will handle most of the technical details automatically.
Why Use This Method:
- User-Friendly Interface – Simple point-and-click process that anyone can follow
- Built-in Safety – Windows prevents you from removing critical system updates
- No Technical Skills – Works without knowing command lines or advanced settings
- Quick Access – Found easily in the main Settings app that most users know
- Visual Confirmation – Shows update details and installation dates clearly
Step 1: Open Settings (Windows key + I). Select Windows Update.
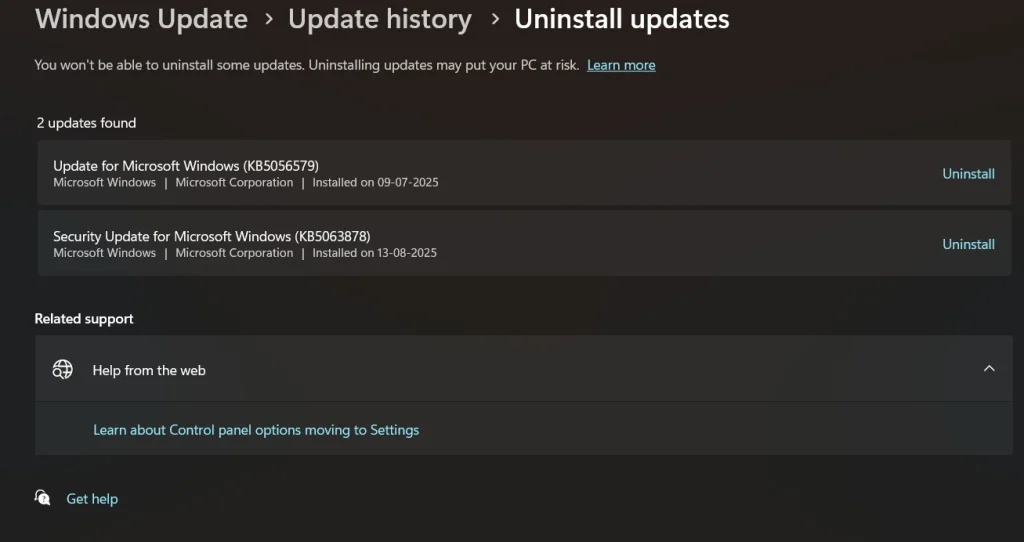
Step 2: Click “View update history”. Click “Uninstall updates”. Select the problem update. Click “Uninstall.”
Method 2: Using Control Panel
The Control Panel method gives you more control over the uninstall process. It shows more detailed information about each update. This method works even when the Settings app has problems.
This approach is reliable for older Windows versions. It also works when other methods fail. The interface might look outdated, but it’s very functional. Many IT professionals prefer this method for its reliability.
Why Use This Method:
- More Reliable – Works when the Settings app is broken or unresponsive
- Detailed Information – Shows complete update descriptions and installation sizes
- Better for Older Systems – Specifically designed for Windows 7/8 compatibility
- Professional Tool – Preferred by IT experts for its consistent performance
- Complete Update List – Displays all updates, including hidden ones
Step 1: Open Control Panel, go to Programs and Features. Click “View installed updates.”
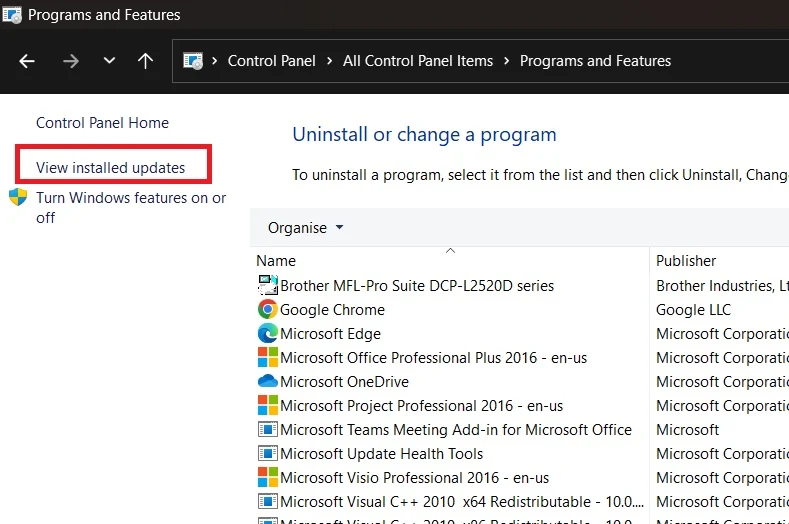
Step 2: Find your problem update in the list, right-click it, and select “Uninstall.”
Method 3: Using Command Prompt
Using Command Prompt is an effective alternative for uninstalling updates, especially when the standard graphical tools aren’t functioning properly. It’s a quicker option for handling multiple updates at once. That said, precision is key—executing the wrong command can lead to unintended consequences.
This approach is best for advanced users. It can fix problems that other methods cannot. The commands are specific and must be typed correctly. Always double-check before pressing Enter.
Step 1: Open Command Prompt as Administrator. Enter the command wusa /uninstall /kb:XXXXXXX in Command Prompt, substituting XXXXXXX with the specific KB update number you want to remove.
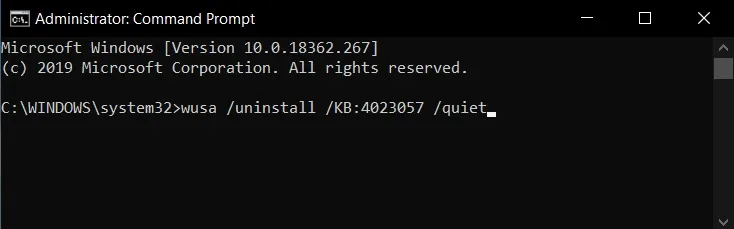
Step 2: Press Enter and follow the prompts to complete the uninstall process.
Method 4: Using System Restore
System Restore can undo multiple updates at once. It takes your computer back to an earlier state. This method is useful when you’re not sure which specific update caused problems. It’s also good for fixing multiple issues.
System Restore is like a time machine for your computer. It doesn’t affect your personal files. However, it will remove programs installed after the restore point. Make sure you have restore points enabled before problems occur.
Step 1: Type “System Restore” in the Start menu, open it. Choose “Restore my computer to an earlier time.”
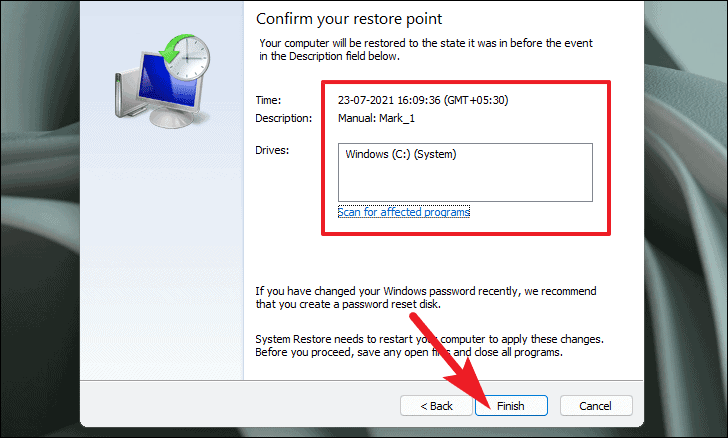
Step 2: Select a restore point from before your problems started, then click “Next” and “Finish.”
Method 5: Using Safe Mode
Safe Mode helps when Windows won’t start normally. It loads only essential drivers and services. This makes it easier to uninstall problematic Windows updates easily Windows. Use this when regular methods don’t work.
Safe Mode bypasses many startup programs and drivers. This often allows Windows to boot when it normally can’t. Once in Safe Mode, you can use other uninstall methods. It’s a lifesaver for serious update problems.
Step 1: Restart your computer and press F8 repeatedly during boot, then select “Safe Mode.”
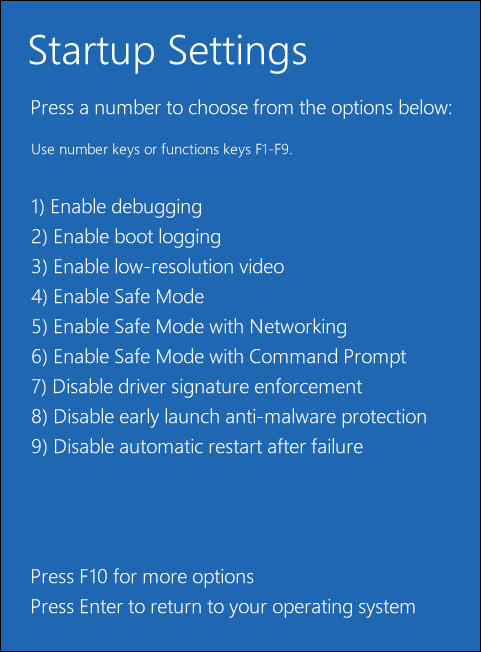
Step 2: Once in Safe Mode, use Settings or Control Panel to uninstall the problem update.
How To Prevent Future Update Problems?
Prevention is always better than fixing problems after they happen. You can take simple steps to avoid update issues. These methods help you stay safe while keeping your system updated.
Smart update management saves time and frustration. It also reduces the risk of system crashes. Most prevention methods are easy to set up. They work automatically once configured properly.
Prevention Steps:
- Create Restore Points – Make manual restore points before major updates
- Pause Updates – Use Windows Update settings to delay automatic installations
- Research Updates – Check online forums for reported problems before installing
- Backup Important Data – Keep copies of critical files on external drives
- Test Updates – Install on less critical computers first if possible
- Enable System Protection – Turn on automatic restore point creation
- Monitor System Performance – Watch for changes after each update
Common Signs of Problematic Updates
Knowing the warning signs helps you identify bad updates quickly. Early detection makes removal easier and safer. Some symptoms appear immediately, while others develop over time.
Watch for these problems after installing new updates. They often indicate that an update is causing system issues. Quick action can prevent more serious damage to your computer.
Warning Signs to Watch For:
- Slow Boot Times – Windows takes much longer to start than usual
- Program Crashes – Software that worked fine before now closes unexpectedly
- Blue Screen Errors – System crashes with blue error screens
- Hardware Issues – Printer, audio, or graphics problems that weren’t there before
- Internet Problems – Network connections become unstable or stop working
- High CPU Usage – Computer runs hot and fans work harder than normal
- File Access Errors – Cannot open or save documents properly
- Display Issues – Screen resolution, colors, or multiple monitor problems
What To Do After Uninstalling Updates?
Removing a bad update is just the first step. You need to take additional actions to ensure your system stays stable. These steps help prevent the same problems from happening again.
Post-removal tasks are important for long-term system health. They also help you avoid reinstalling the same problematic update. Taking time for these steps saves trouble later.
Post-Uninstall Actions:
- Restart Your Computer – Always reboot after removing updates to complete the process
- Test System Functions – Check that previous problems are actually fixed
- Hide the Update – Prevent Windows from reinstalling the same problematic update
- Update Drivers Manually – Install the correct hardware drivers if the update affected them
- Run System Scan – Use built-in tools to check for any remaining issues
- Monitor for a Few Days – Watch system performance to ensure stability returns
- Document the Issue – Keep notes about which update caused problems for future reference
Author’s Tip
Always create a system restore point before installing major updates. This gives you an easy way back if something goes wrong. It takes just a few minutes, but it can save hours of troubleshooting later. Think of it as insurance for your computer.
Don’t install updates immediately when they’re released. Wait a few days and check online forums. Other users often report problems quickly. This waiting period helps you avoid known problematic updates. It’s better to be safe than sorry.
Keep a list of recently installed updates and when problems started. This makes it much easier to identify the culprit. Take screenshots of error messages, too. This information helps when searching for solutions online or asking for help.
Will You Lose Any Files? Here’s What Actually Changes When You Uninstall a Windows Update
One of the biggest concerns people have before removing a Windows update is whether their personal files, apps, or settings will disappear. The short answer is: in most cases, your data stays completely intact. However, a few things do change at the system level that are worth knowing before you proceed.
Here’s a clear breakdown of what gets affected — and what doesn’t:
- Personal files remain untouched — Documents, photos, videos, downloads, and desktop files are not part of Windows update packages, so they are never removed or modified during an uninstall.
- Installed apps stay in place — Third-party applications like browsers, Office, Photoshop, or games are unaffected; only Windows system-level components installed with that specific update are rolled back.
- System files revert to their previous version — Any Windows system files that were patched or replaced by the update are restored to the versions that existed before the update was applied.
- Security patches are reversed — This is the key trade-off: uninstalling a security update removes the vulnerability fix it contained, potentially leaving your system exposed until a stable replacement patch is available.
- Drivers linked to the update may revert — If the update included hardware driver improvements (for Wi-Fi, display, audio, etc.), those changes roll back too, which can sometimes resolve, or occasionally reintroduce, device compatibility issues.
- Windows Registry entries may be rolled back — Some updates write configuration entries to the Registry; removing the update can reverse those entries, which is usually harmless but worth noting for advanced users monitoring system changes.
- Update history is logged, not erased — The uninstalled update remains visible in your Windows Update history with a “Removed” status, so you have a clear record of what was changed and when.
- The update may reinstall automatically — Unless you pause updates or hide the specific patch using the Show or Hide Updates tool, Windows may push the same update again during the next update cycle — so it’s worth investigating and reporting the issue to Microsoft if it’s a recurring problem.
Conclusion
Learning to uninstall problematic Windows updates easily Windows is a valuable skill. It can save you time, frustration, and potentially expensive repair bills. The methods in this guide work for most situations you’ll encounter.
Start with the simplest methods first. Use Settings or Control Panel for most problems. Save Command Prompt and Safe Mode for serious issues. System Restore is your nuclear option when nothing else works.
Remember that prevention is better than a cure. Create restore points regularly. Research updates before installing them. With these skills and precautions, you’ll be ready for any update problems that come your way.
FAQs
Q1: Can uninstalling Windows updates harm my computer?
Uninstalling updates is generally safe when done correctly. Windows is designed to handle update removal without major issues. However, removing security updates might leave your system vulnerable to threats. Only remove updates that are clearly causing problems. Always restart your computer after uninstalling updates to ensure changes take effect properly.
Q2: What if I can’t find the problematic update in the list?
Sometimes updates hide in different categories or don’t show up immediately. Try refreshing the update list or waiting a few minutes. Check both Windows Update history and the Control Panel’s installed updates list. If the update still doesn’t appear, it might be a driver update installed through Device Manager. You can also try using Command Prompt with the specific KB number.
Q3: Will I need to reinstall the update later?
Windows will often try to reinstall updates automatically during future update cycles. If the update was problematic, you should hide it to prevent automatic reinstallation. Go to Windows Update settings and look for options to hide or pause specific updates. You can also use Group Policy or registry edits to block specific updates permanently. Only reinstall the update if Microsoft releases a fixed version.
Author Bio:
Dinesh Lakhwani 

Dinesh Lakhwani, the entrepreneurial brain behind “TechCommuters,” achieved big things in the tech world. He started the company to make smart and user-friendly tech solutions. Thanks to his sharp thinking, focus on quality and the motto of never giving up, TechCommuters became a top player in the industry. His commitment to excellence has propelled the company to a leading position in the industry.
Popular Post
Recent Post

CCleaner PC Optimizer Review: A Complete Guide for Windows Users
If your computer has started to feel slow, you are not alone. Most Windows PCs slow down over time. Junk files pile up. The registry gets messy. Too many apps open when you start your PC. All this adds up and makes even a good machine feel tired. This is where a PC cleaner tool […]

Auslogics Duplicate File Finder: Full Review and User Guide
A computer quietly gathers clutter over time. This includes duplicate photos, repeated downloads, and forgotten backups hiding in random folders. This buildup slowly eats away at storage and can make even a fast PC feel sluggish. Manually finding and deleting duplicates is tedious. It means checking every folder, comparing file names, and guessing which copies […]

CCleaner Duplicate File Finder: Key Features, Pricing, Step-by-Step Guide and More
Every computer collects junk over time. Right? Well, yes! Photos often get copied twice. Documents get saved in two folders by mistake. Old downloads pile up and never get deleted. This slowly eats up your storage space, and most people do not even notice until their drive is almost full. That is where a duplicate […]
Duplicate File Finder Pro: A Complete Review, Everything You Should Know
Computers collect thousands of files over time. Well, yes! Many of them end up being duplicates created by backups, downloads, or accidental copies. These extra files take up valuable storage space and make it harder to keep everything organized. Finding and removing them manually can take hours. Right? Duplicate File Finder Pro is a tool […]
Top 3 Duplicate File Finder for Windows 11 & Windows 10
If your PC storage keeps filling up even after you delete big files, duplicate files could be the real reason. Most of us save the same photo twice, download a document more than once, or copy a whole folder by mistake. Over months and years, these duplicate files pile up quietly. You do not even […]

Monitor Screen Calibration Guide: Everything You Should Know
Your monitor shows colors every single day. But are those colors actually correct? Most people never stop to check this. They just use the screen as it comes out of the box. This habit can lead to wrong colors in photos, videos, and work files. Colors may look too warm or too cold without you […]
How To Check Installed RAM and RAM Slots [Complete Guide]
RAM plays an important role in how smoothly a computer runs. Short for Random Access Memory, it stores the data and instructions that Windows and active applications need at any given moment. From opening multiple browser tabs to running games and productivity software, RAM helps keep everything responsive. A system with limited memory may experience […]

What is Microsoft Autopilot Everything You Need To Know
Technology has changed the way companies manage computers. Well, yes! Employees now work from offices, homes, and remote locations. Setting up devices manually for every worker takes time and effort. It can also create mistakes that slow down productivity. This is where Microsoft Autopilot becomes useful. It helps businesses prepare and deploy Windows devices with […]
Enable Automatic Device Locking Feature Windows: Complete Guide
Introduction: Your computer stores important information such as emails, documents, passwords, and personal photos. Leaving it unlocked can put that data at risk. Thankfully, Windows includes built-in features that can automatically lock your device when you are away. Setting up automatic device locking is quick and does not require any extra software. In this guide, […]

