How to Stop Apps from Running at Startup on Mac and Windows?
Last updated on April 1st, 2026 at 1:15 pm
After switching on the PC system or laptop, multiple programs begin operating. Like the Norton Antivirus software, some should auto-start when the system turns on for non-stop protection. However, sometimes, the programs that open when users log in are not apps that they use regularly or intentionally.
This causes performance issues and speed problems with the PC due to the extra load. It would help if you disabled the auto-start functions of the apps directly to avoid automatic loading. The steps for this are different for both Windows and Mac systems. We have compiled the proper steps for both.
Advantages of Stopping Apps from Running in the Background
Reducing the number of apps that launch automatically at startup can make your computer faster, more efficient, and easier to manage. It’s a simple tweak that often delivers noticeable improvements in everyday use.
Faster Boot Times
- With fewer apps loading at startup, your system reaches the desktop more quickly.
Improved Performance
- Background apps consume memory and CPU; disabling them frees resources for active tasks.
Longer Battery Life
- On laptops, fewer background processes mean less power drain and extended battery usage.
Reduced System Clutter
- Prevents unnecessary apps from running silently and slowing down your workflow.
Lower Risk of Crashes
- Fewer processes reduce conflicts between applications, leading to a more stable system.
Enhanced Security
- Disabling unknown or unnecessary apps minimizes the chance of malicious software running unnoticed.
Better Focus
- Keeps distractions at bay by stopping apps from popping up or sending notifications unnecessarily.
Optimized Resource Allocation
- Ensures your system prioritizes important applications rather than wasting resources on unused ones.
Disadvantages of Stopping Apps from Running in the Background
While disabling startup apps has benefits, it’s not always risk‑free. Some applications rely on background processes to function properly, and turning them off may cause inconvenience.
Missed Updates
- Apps like antivirus software may not update automatically if disabled at startup.
Delayed Notifications
- Messaging or email apps may not alert you instantly when background processes are stopped.
Reduced Functionality
- Certain apps require background services to work correctly, and disabling them can limit features.
Manual Launch Required
- You’ll need to open apps manually each time you want to use them.
Potential Compatibility Issues
- Some system tools may depend on background services to run smoothly.
Slower Access to Apps
- Apps that don’t preload at startup may take longer to open when needed.
Risk of Forgetting Important Apps
- Users may accidentally disable essential apps, leading to missed tasks or alerts.
Extra Effort in Management
- You may need to fine‑tune which apps to disable and which to keep, requiring ongoing attention.
How to Stop Apps from Running at Startup on Mac?
The smooth functionality and performance speed are reduced significantly on a Mac system after logging in due to startup programs. We tried out the easy and slightly complex methods for stopping app functions on startup. Here are the common methods available.
Method 1: Turn App Launch from System Preferences
You can use the system Preferences-based route to prevent multiple apps from automatic launch. You can choose the apps specifically or all of the apps directly.
How to do this?
Step 1: Open the Apple Menu; the icon is available on the top left-hand side of the menu bar.
Step 2: Access “System Preferences” and then choose the “Users & Groups” option.
Step 3: Next, click on top on the padlock icon that appears at the bottom left section of your screen. Add the account password.
Step 4: Click on Log-in Items.
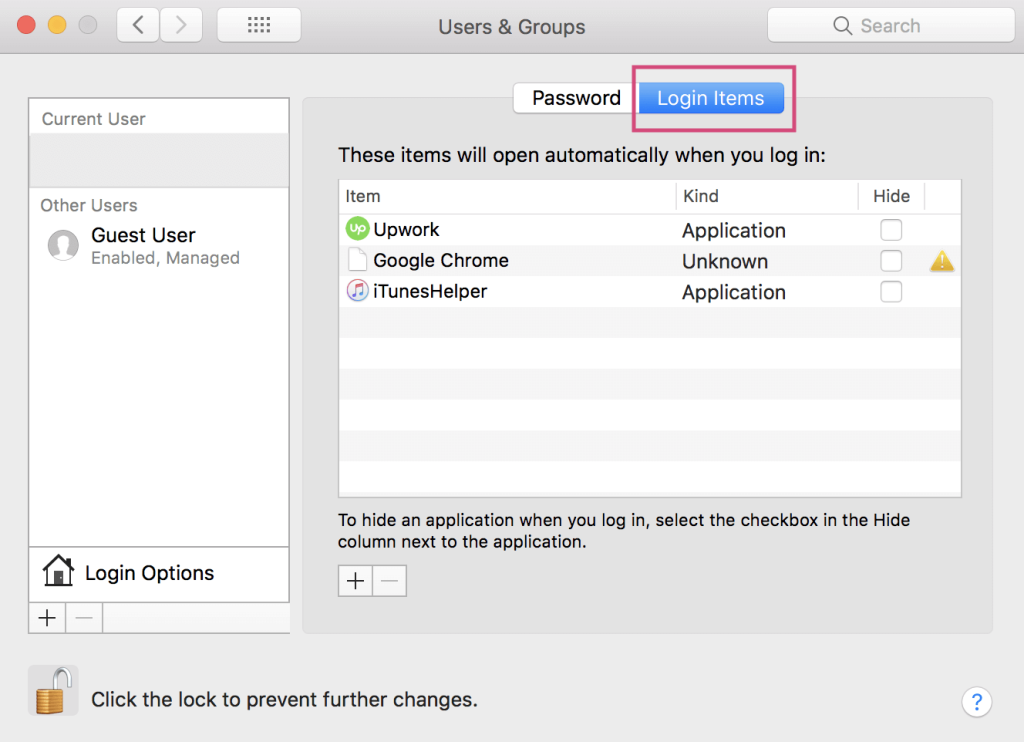
Step 5: Check yes to the unnecessary apps in your system. Search for the specific apps you do not want to start operating and tick the boxes beside each automatically.
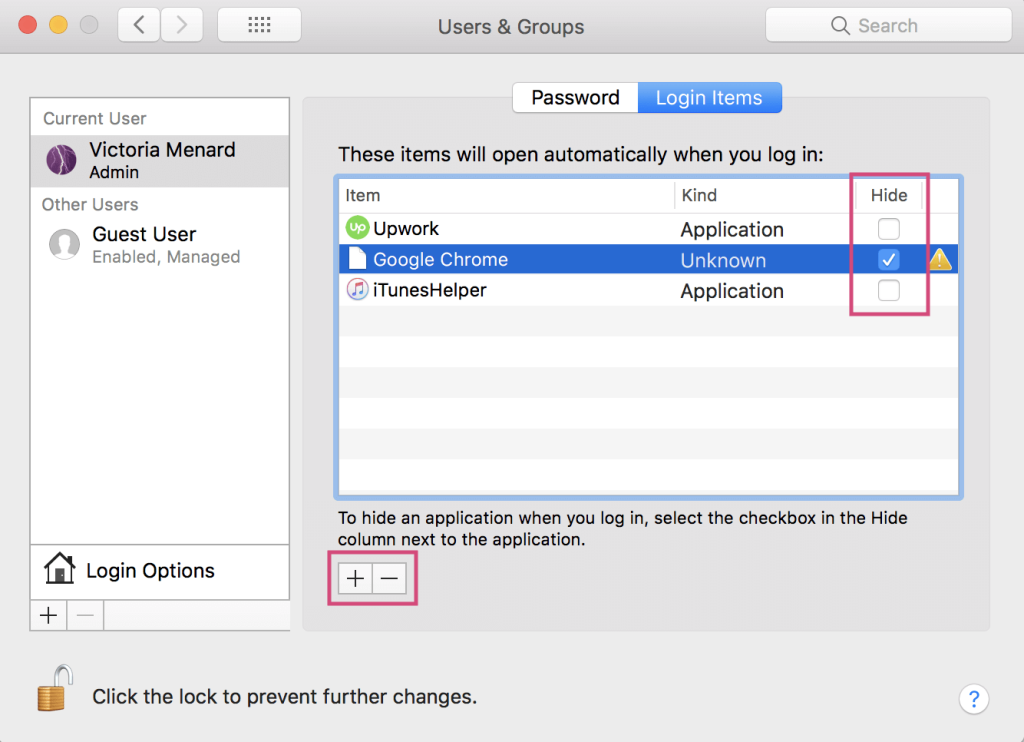
Additionally, click on the Plus button to add apps to the list or the Minus button to delete particular apps.
Method 2: Stop Auto Start-up from the App Settings
If there is only one app that keeps running in the background during system log-in, you can switch it off from the app settings directly.
How to do this?
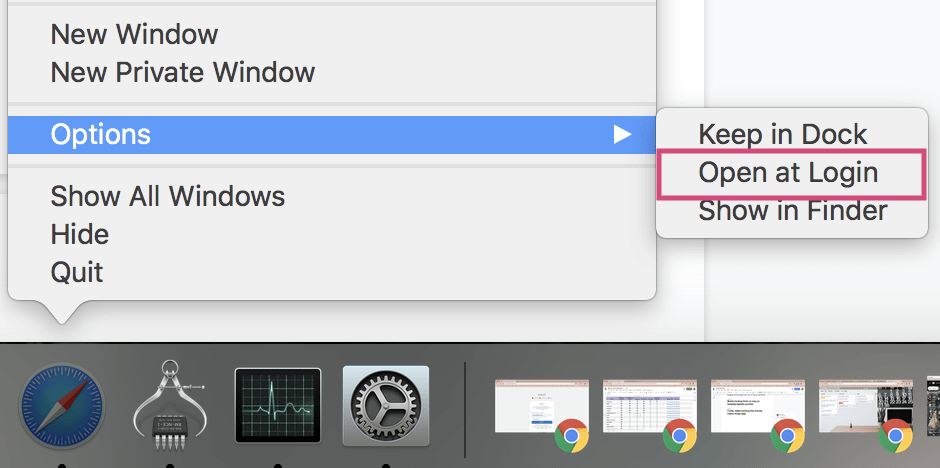
Step 1: Launch the app and then open it. In case it is anchored within the system dock, you can avoid this step and skip to the next one.
Step 2: Right-click your cursor on the app. Alternatively, press [CTRL] + CLICK with a one-button mouse or trackpad. A window would come up.
Step 3: Hover your cursor on Options.
Step 4: On the next menu window, check if a checkmark is beside the “Open at Login” option. Uncheck the box with a click.
Method 3: Use another software like CleanMyMac X
You can install and use CleanMyMac X software to optimize the system’s performance and monitor app functionality. The app is useful for effectively cleaning out system junk, malware, and unwanted apps, improving system safety, and optimizing system speed.
How to do this?
Step 1: Install CleanMyMac X and launch the app.
Step 2: Open the “Optimization” option. Then, click on the choice “View All Items” from the next menu.
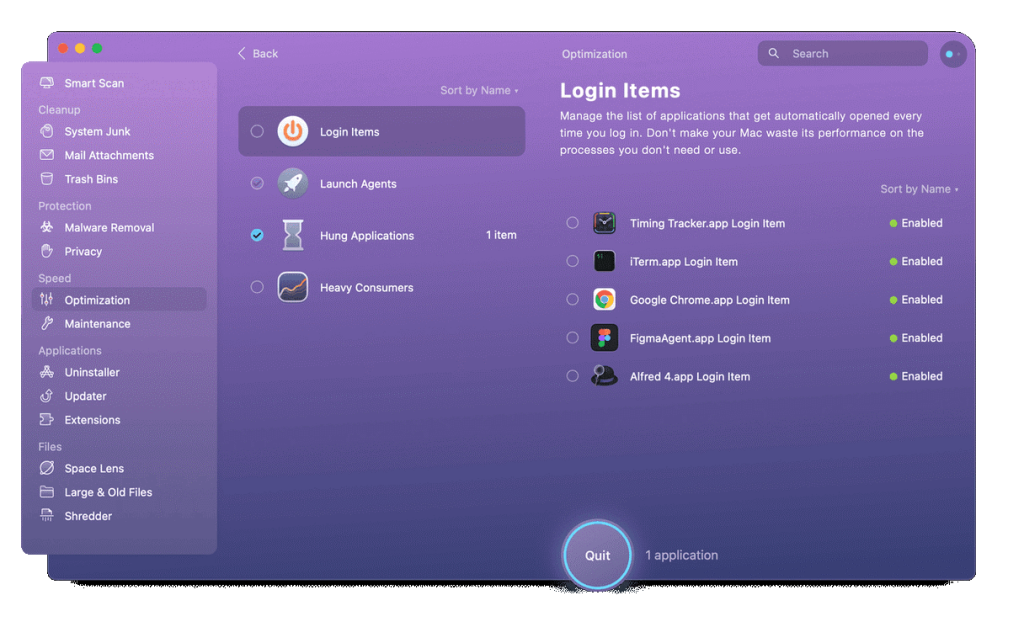
Step 3: Click yes on the box beside the Log-in Items option, and choose the different apps that you want to stop the auto-run function for.
Step 4: Select the “Remove” button.
Step 5: To remove the “LaunchAgents” for the apps that you have already deleted, choose Launch Agents from the “View All Items” menu. Repeat the next steps mentioned.
Method 4: Remove the Launch Agents and Launch Daemons
If some of the programs are still activating after you boot the Mac system, the main cause can be the existing launch daemons/agents. Certain programs have these elements in the libraries and are available in non-detectable folders. The launch daemons/agents are potentially present in different sections of the device.
How to do this?
Step 1: Open Finder and access the disk drive. The default name is usually Macintosh HD.
Step 2: Click on the Library. Search for folders with ‘LaunchDaemons’ or ‘LaunchAgents’ tags.
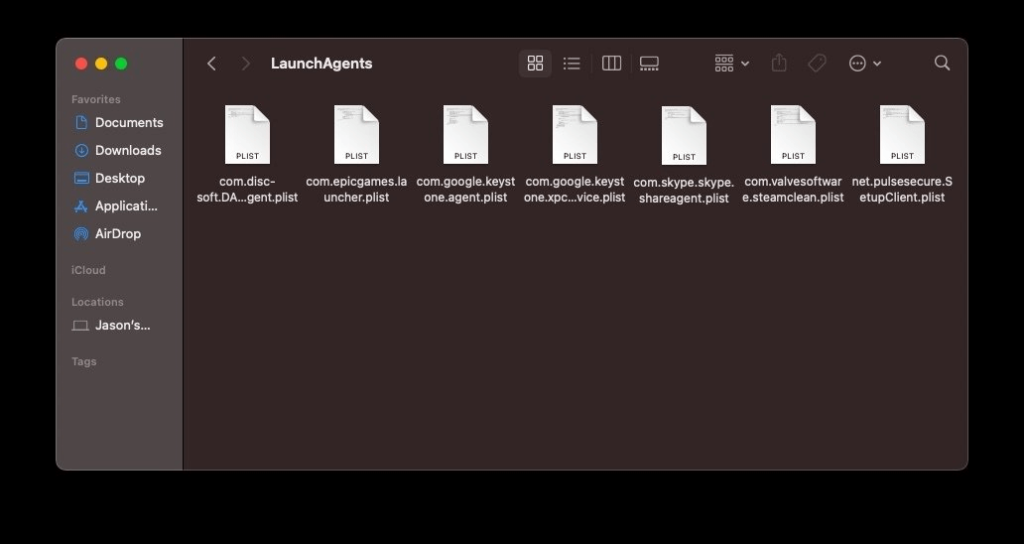
They might stay within the Hidden Files section in the system.
Step 1: Access the Finder feature and then click on the “Go” option.
Step 2: Hold your cursor on the Option key to open the drop-down menu.
Step 3: Choose the folder named “Library” from the choices. Search for ‘LaunchDaemons’ or ‘LaunchAgents’ folders.
How to stop apps from running at startup on Windows?
There are steps that users can take to switch off the auto-run functionality of certain programs on Windows devices. Some apps register into the system and activate automatically during the startup period. Plus, some of their services keep operating in the system background, which lags the system.
You can download CCleaner to boost the startup speed and performance of Windows and use the other methods to stop automated startup programs.
Method 1: Switch of Auto-Running for Apps via Task Manager
On Windows 10 and Windows 11, you can prevent apps from automatically launching during the log-in process through the Task Manager.
How to do this?
Step 1: Click on the Start button.
Step 2: In the next menu, look for the “Task Manager” option and then click it open.
For Windows 11 users, one can type in “Task Manager” after clicking on the Search icon. Then, you can choose the option.
For Windows 10, users can right-click on a portion of the screen near the Taskbar. A pop-up menu would ap
pear; choose Task Manager.
Alternatively, you can right-click your cursor on Start > Task Manager. Or, you can use the shortcut Windows key + Shift + Esc on the keyboard.
Step 3: Click the cursor on the tab, Startup.
Step 4: Choose the app(s) that is running automatically during the startup period.
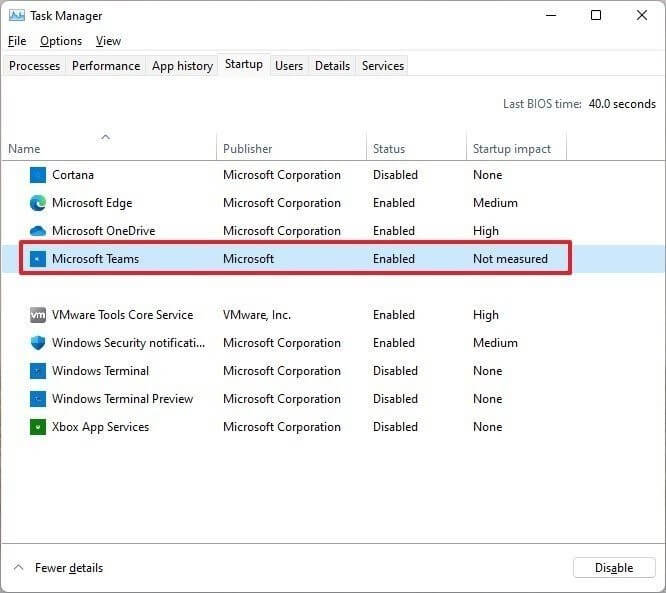
Step 5: Press the Disable button.
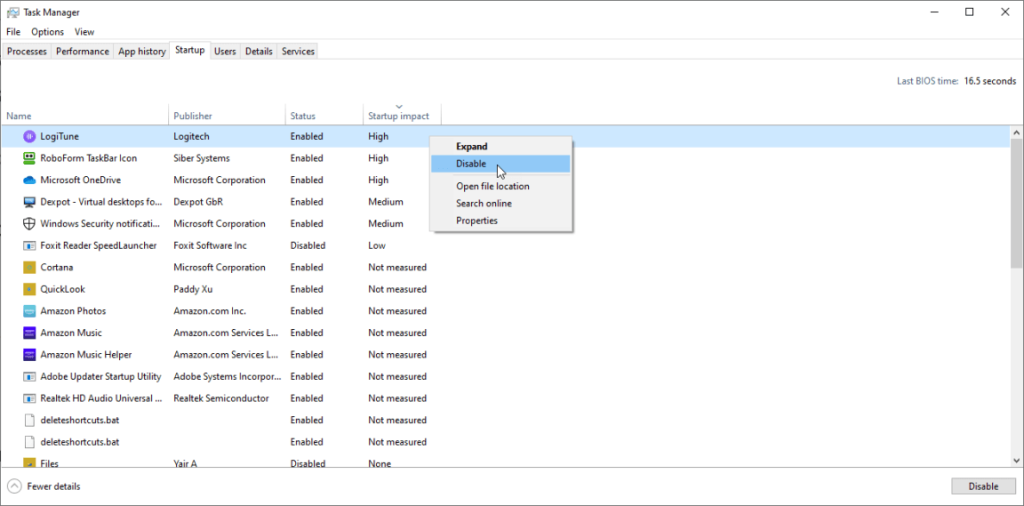
Step 6: Repeat these steps multiple times for each app you want to disable. Later, you can click on the Enable option to activate the auto-launch function.
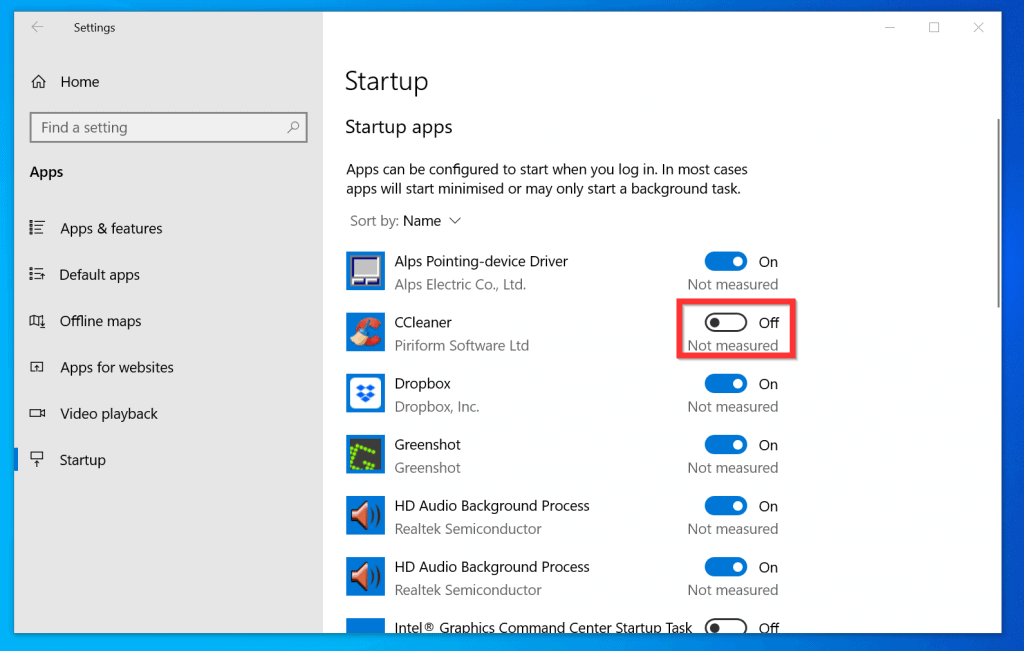
Method 2: Prevent App Launch at Startup Through Settings
You can access System Settings to prevent automated app launches during the startup period. The following steps apply to both Windows 10 and Windows 11.
How to do this?
Step 1: Open the “Settings” menu.
Step 2: Choose the Apps option.
Step 3: On the right side, select Startup.
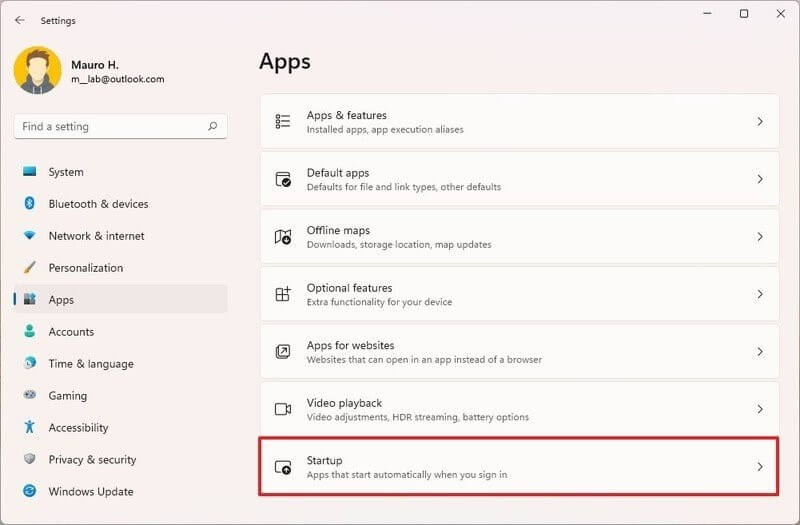
Step 4: A list of apps that are currently active on the system will appear. There is a toggle switch beside each name specifying the impact level- No Impact, Medium Impact, Low Impact, or High Impact. They specify the amount of influence the startup programs have on the disk drive or CPU of the PC system at startup.
Turn the Toggle switch beside the app you want to turn off in the opposite direction to disable it.
Method 3: Prevent Programs from Launching During the Startup Through the Startup Folder
Some apps available on Windows devices register directly with the PC system during the first installation. Besides that, they store their data in the system’s Startup folder. Windows scans this folder each time the PC boots up and automatically runs all apps inside the folder. So, you should access the folder and disable them.
How to do this?
Step 1: Open the “Start” menu.
Step 2: On the Windows 11 version, type in “Run” or directly search the option from the menu under Windows 10.
You can press the Windows key + R keys from the keyboard for the shortcut.
Step 3: Type the given command:
shell: startup
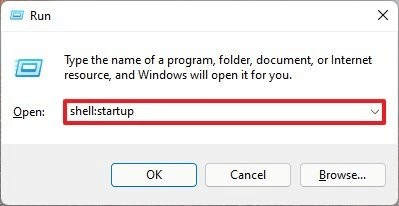
Step 4: Click on Ok.
Step 5: Choose the shortcut of an app or the app folder.
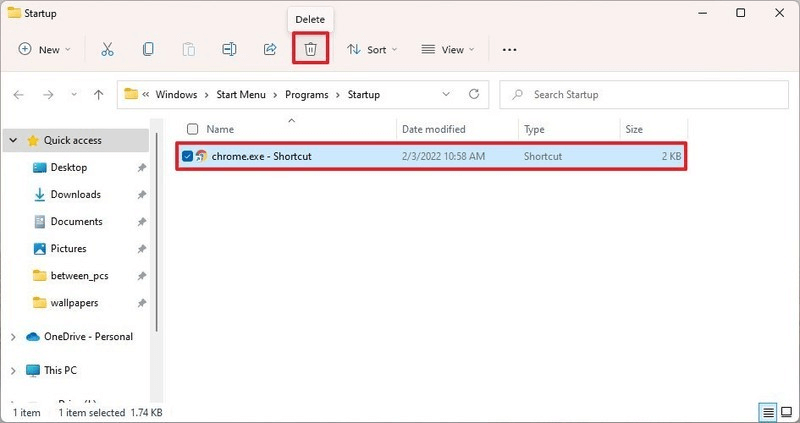
Step 6: Select Delete to remove the folder.
Method 4: Disable the Startup Programs on Windows XP, Vista, or 7 Series
Many apps available in the system improve the system performance or give additional support like privacy and data protection. They can operate at startup, but it is important to disable other apps. On the older Windows devices, there was a tool called MSConfig.
It shows the running programs at startup and allows users to disable app startup through the tool directly.
How to do this?
Step 1: Open Start.
Step 2: Type the following term into the Search section:
msconfig.exe
Multiple options would come up when you type. Please choose the right folder and then press Enter or click your cursor on it.
Under Windows XP, users can access the Start menu and then select the Run option. They have to type the “msconfig.exe” term in the given field and then select OK.

Step 3: Open System Configuration and then choose the Startup tab. The full list of different active startup programs would appear with checkboxes beside them.
Step 4: Uncheck the tick mark beside the apps whose auto-launching function is switched on.
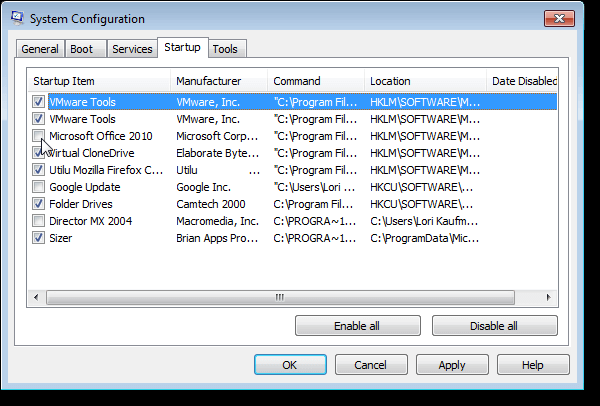
Step 5: Click on OK to activate the changes.
Step 6: Next, a dialog box would appear with the options of restarting the system or the “Exit without Restart” choice. Pick your preferred option.

Conclusion
Some apps should begin operating directly during launch. But for the apps that do not require automatic startup and keep running in the background when not necessary, use the methods mentioned to shut them down efficiently.
Additionally, you can use apps like CCleaner or CleanMyMac X to optimize the system, clean junk files, and run smoothly. Choose the method that suits your system best.
Author’s Tips
1. Prioritize essential apps.
Don’t disable everything—keep critical tools like antivirus or backup software running to ensure your system stays protected.
2. Review startup apps regularly.
As you install new software, check your startup list to prevent unnecessary apps from sneaking in.
3. Balance performance with convenience.
Aim for a setup that speeds up your system without sacrificing important notifications or updates.
FAQs
1. Will disabling startup apps delete them from my computer?
No. Disabling apps at startup only prevents them from launching automatically; you can still open and use them whenever you want.
2. Which apps should I avoid disabling?
Essential apps like antivirus, cloud backup, or system utilities should remain enabled to ensure your computer stays secure and functional.
3. Can I re‑enable apps later if needed?
Yes. You can easily re‑enable apps through Task Manager on Windows or System Preferences on Mac, giving you full control over your startup list.
Author Bio:
Dinesh Lakhwani 

Dinesh Lakhwani, the entrepreneurial brain behind “TechCommuters,” achieved big things in the tech world. He started the company to make smart and user-friendly tech solutions. Thanks to his sharp thinking, focus on quality and the motto of never giving up, TechCommuters became a top player in the industry. His commitment to excellence has propelled the company to a leading position in the industry.
Popular Post


Recent Post
How To Fix Issues Downloading from the Microsoft Store On Windows
Introduction: Downloading apps from the Microsoft Store should be a simple task. You open the Store, search for an app, and click install. In most cases, the process works without any problem. However, there are times when the download does not start. In some cases, it may stay stuck at a certain percentage. You may […]
How To Fix Windows Update Issues Easily On Windows [2026]
Introduction Windows updates play an important role in keeping a computer stable and secure. They bring new features, fix known bugs, and improve overall performance. When updates work as expected, the system runs smoothly. However, when they fail, users often face slow performance, missing features, or security risks. This is why it becomes important to […]

How To Check If Your PC Is Infected? [Complete Guide]
Computers now sit at the center of almost everything we do. Well, yes! From sending emails to watching videos, we depend on them without much thought. Because of this, even a small issue can disrupt daily tasks. One common problem is hidden malware. It does not always show clear signs at first. It can enter […]

Repair Apps And Programs: Repair Apps That Aren’t Working
Computers have become an essential part of everyday life, supporting work, study, communication, and entertainment. Most of these activities rely on apps and programs, so when one stops functioning, even simple tasks can be disrupted. Common problems include error messages, frozen screens, or apps that fail to open. On Windows systems, such issues often arise […]

Troubleshooting Microphone Privacy Settings: Complete Guide
Sound is a basic part of how we use computers today. People attend meetings, record audio, speak to others, and use voice tools almost every day. A working microphone makes all these tasks easy. When the microphone fails, even simple work becomes difficult. Many users first think the device is broken. In reality, the issue […]
Windows Sound Settings – Sound Control Panel: Complete Guide
Sound plays an important role in how we use a computer every day. It supports both work and leisure. You need it for meetings, videos, music, and alerts. When audio fails, even simple tasks become difficult. Many users feel stuck when sound issues appear. This usually happens because they are not familiar with Windows Sound […]

Run a Troubleshooter For PC Issues Windows: Complete Guide
A computer plays an important role in everyday life. People use it for work, study, communication, and entertainment. When a problem appears, it can interrupt everything. Even a small issue can waste time and create frustration. Many users feel unsure about how to fix such problems. They often think they need expert help. In reality, […]
![Adjusting Audio Output Settings Complete Guide [2026]](https://www.techcommuters.com/wp-content/uploads/2026/03/Adjusting-Audio-Output-Settings-Complete-Guide.webp)
Adjusting Audio Output Settings: Complete Guide [2026]
Sound is part of almost everything we do on a computer. It lets you watch videos, join calls, play music, and hear alerts. When the audio stops working the right way, it can interrupt both work and daily use. That is why adjusting audio output settings matters for every user. Many people get unsure when […]

Artificial Intelligence Explained: Concepts, Terminology, Benefits, and Future Trends
Artificial Intelligence, or AI, is basically computers doing things that usually need a human brain. We’re talking about stuff like learning from experience, figuring out problems, understanding language, and making decisions. It’s not magic, just a lot of data, pattern-spotting, and math behind the scenes. Now, AI doesn’t actually think or feel like we do. […]

Resolving Microphone Detection Problems: Latest Guide [2026]
Microphones are important tools in daily life. People use them for office meetings, online classes, interviews, gaming, customer support, and content creation. When a system fails to detect a microphone, communication stops at once. This situation can cause stress and confusion. Many users believe the microphone is damaged. In reality, most problems are simple and […]

