How to Remove Bloatware from Windows 10 Easily

Last updated on August 10th, 2024 at 6:44 pm
Is your brand new laptop bloated with unwanted programs? Unfortunately, then, you are not the only one who is struggling with bloatware. That’s because Microsoft is no longer stronger on bloatware. However, the good thing is that you can remove bloatware in Windows 10 easily.
Today, a new Microsoft device is swamped with a series of unnecessary partnership applications that you might never use. The features like suggestions appearing on your Start Menu or programs running in the background all are bloatware that captures a huge space on your hard drive and slows down your system.
Luckily, there are many ways to debloat Windows 10 gadgets. And in this post, you will get to know all those easy tricks to remove bloatware from your system.
4 Ways to Remove Bloatware in Windows 10
Compared to previous Windows versions, Windows 10 is partnered with more sponsored programs that can increase bloatware in your laptop. On the top, bloatware doesn’t appear in the System > Apps & Features list. Therefore, it is essential for you to know how to debloat Windows 10 quickly, such as—
1. Remove Ads and Suggestions
Do you want to remove certain brand’s ads or Start Menu suggestions? Then, you can have an option to block suggestions from Windows 10. To do so, go to the Start button, enter “suggestion,” and choose the “Show suggestions occasionally in Start” tab.
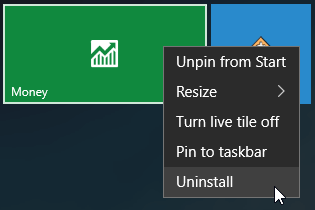
One more thing you can do is clean your Start Menu toolbar. Simply right-click on the program that you no longer need, and then click “Unpin from Start.” This will put a great relief on your system’s bloatware.
Also, if you are using an annoying Windows 8 tile Start Menu, immediately until it and easily locate the bloated applications.
2. Uninstall Bloated Applications
You can also use the simple uninstall approach to remove bloatware in your Windows 10. To uninstall bloated applications, you can follow these steps—
- Click on the Windows icon from the bottom-left corner.
- Next, navigate for the program that you want to remove and right-click on it.
- Finally, click on the Uninstall button and confirm it.
You can repeat the process until you remove all the unwanted bloated applications.
3. Use PowerShell
Here is the automatic method to debloat your Windows 10—PowerShell. Windows PowerShell is a user interface developed by Microsoft to automate tasks and configure management. There you have two options to remove bloatware using PowerShell, including—
Remove-AppxPackage
In this method, you can debloat your computer without removing applications from your system. Instead, you will simply hide the applications, and it won’t disturb you reappearing in Windows reinstalls.
Before you start PowerShell, make sure that no other programs are running on your computer. Now, follow these steps—
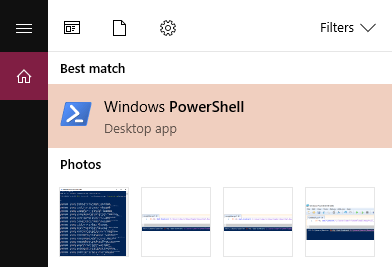
- Enter PowerShell in the search box located at the lower-left corner of the screen.
- Then, click on the “Run as Administrator” option.
- Click on “Yes” to confirm the process.
- Use the below-listed command with the application that you want to hide.
Get-AppxPackage *appName* | Remove-AppxPackage
- Just simply replace the ‘appName’ with the application you want to uninstall and then press Enter.
- Repeat the process until you uninstalled all the applications, such as—
Calculator
Get-AppxPackage *windowscalculator* | Remove-AppxPackage
Alarms & Clocks
Get-AppxPackage *windowsalarms* | Remove-AppxPackage
Camera
Get-AppxPackage *windowscamera* | Remove-AppxPackage
Get Office
Get-AppxPackage *officehub* | Remove-AppxPackage
Groove Music
Get-AppxPackage *zunemusic* | Remove-AppxPackage
Voice Recorder
Get-AppxPackage *soundrecorder* | Remove-AppxPackage
Weather
Get-AppxPackage *bingweather* | Remove-AppxPackage
Use DISM
The second way to completely destroy bloatware with PowerShell is using the DISM command. DISM stands for Deployment Imaging Service and Management. You can implement this command as follows—
- Put PowerShell in the search box located at the lower-left corner.
- Click on the “Run as Administrator” button.
- Press “Yes” to confirm the process.
- You can view the entire bloatware list using this command—
DISM /Online /Get-ProvisionedAppxPackages | select-string Packagename
- Navigate for the program that you want to delete from the system.
- Copy the Packagename for the app and the following command—
DISM /Online /Remove-ProvisionedAppxPackage /PackageName:PACKAGENAME
- Replace the Packagename word with the application name that you wanted to delete based on the earlier generated list. For example—
DISM /Online /Remove-ProvisionedAppxPackage /PackageName:Microsoft.Xbox.TCUI_1.24.10001.0_neutral_~_8wekyb3d8bbwe
- Keep on repeating the process until you have fully removed all bloated applications from your PC.
- Restart your computer to see the effect.
4. Use Third-party Bloatware Apps
If PowerShell is too complicated and traditional uninstallation is too simple for you, in that case, you can use third-party software to remove bloated applications. There are plenty of different bloatware removal apps available in the market, such as NoBloat, FreshStart, Windows 10 Debloater app, and many more.
To use different applications, you have to follow the different steps depending upon the app. For example, if you are using the Debloater app to remove bloatware apps, you have to follow these steps—
- Navigate to the Windows 10 Debloater site.
- Click on the Clone or Download button.
- Click on the Zip download and then save the file to your computer.
- Now, click on the “Extract all” button to extract all files from the downloaded zip folder.
- Check the “Show extracted files when complete” box to quickly locate the files.
- Right-click on the Windows10DebloaterGUI and choose “Run with PowerShell.”
- Click open, type Y, and press Enter.
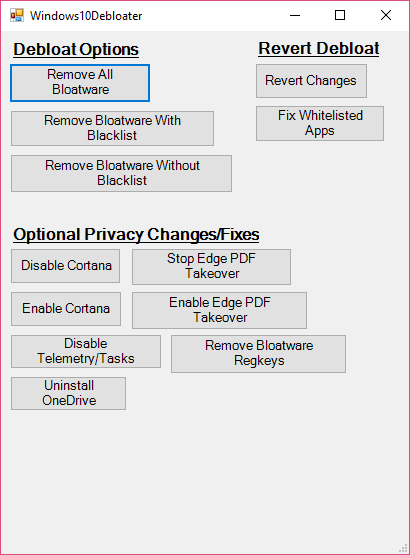
- Windows 10 Debloater will appear on your screen.
- Click on the “Remove All Bloatware” button.
- That’s it will immediately remove all bloated applications from your computer system.
So there you go! You now know how to remove bloatware from your Windows 10 computer on time. Whenever your new PC slows down, don’t forget to run a bloatware cleaning and free up sufficient space on your hard drive.
If you have any more questions, you can share them in the comments. And don’t forget to like and share this post with your friends!
Author Bio:
Dinesh Lakhwani 

Dinesh Lakhwani, the entrepreneurial brain behind “TechCommuters,” achieved big things in the tech world. He started the company to make smart and user-friendly tech solutions. Thanks to his sharp thinking, focus on quality and the motto of never giving up, TechCommuters became a top player in the industry. His commitment to excellence has propelled the company to a leading position in the industry.
Popular Post


Recent Post

How to Switch Windows 10 to a Local Account: Complete Guide
Windows 10 allows users to sign in with either a Microsoft account or a local account. When you set up a new computer, the system often suggests using a Microsoft account. This account connects your device to Microsoft services such as Outlook, OneDrive, and the Microsoft Store. It also syncs settings, themes, and passwords across […]

How To Change Default Apps For File Types In Windows
Windows is designed to make using your computer easy. One way it does this is by assigning default apps to different file types. This means when you open a file, Windows automatically opens it with a specific program. For example, photos may open with Photos, music with Groove Music, and PDFs with Edge. These default […]

How To Adjust The Mouse Pointer Speed: Complete Guide
Using a computer every day means you use the mouse a lot. The mouse pointer moves on the screen and helps you click, scroll, and select items. Many people never think about the speed of the mouse pointer. They have used the default setting for years. This can cause small problems over time. A slow […]

How to Change Mouse Scrolling Settings In Windows
A mouse is one of the most used computer tools. People use it every day. They scroll through emails. They scroll through documents. They scroll through websites and images. The movement becomes automatic. Most users do not notice it. That is why problems often go unnoticed. Scrolling problems show up slowly. At first, it feels […]

Keyboard Light Settings: Keyboard Lighting Control [Complete Guide]
Keyboards are no longer simple typing tools. Well, yes! Over time, they have evolved to include features that improve comfort, visibility, and overall experience. One of the most useful features today is keyboard lighting. It helps users work comfortably in low-light conditions. It also reduces strain when typing for long hours. Many users first notice […]

Customizing Pointer Appearance: Complete Guide
The way your mouse pointer looks on your computer may seem like a small detail. But customizing pointer appearance can make using your PC more comfortable and visually appealing. Many users do not realize that they can change the pointer size, color, and style to fit their needs. Whether you want a bigger pointer for […]

How To Choose a Computer Monitor: Monitor Buying Guide
Buying a monitor looks easy. Many people think all screens are the same. That belief causes regret later. A monitor is not just a display. It is a daily tool. You read on it. You work on it. You relax with it. Small problems become big over time. Poor brightness hurts eyes. Bad size causes […]

How To Get Help With File Explorer in Windows 11 [Complete Guide]
File Explorer is one of the most important tools in Windows 11. It is used to open folders, view files, and manage stored data. Almost every action on a Windows computer depends on it in some way. When users open documents, save downloads, or organize photos, File Explorer is always involved. Because it is used […]

How To Fix A Frozen Computer: Complete Guide [Windows 11/10]
A frozen computer is one of the most common problems Windows users face. The screen stops responding. The mouse pointer does not move. Keyboard inputs do nothing. You may hear the fan running loudly. Sometimes the system looks alive, but nothing works. This situation often happens when you are busy or working on something important. […]

How to Upgrade Computer RAM: Complete Guide
Upgrading RAM is one of the simplest ways to improve a computer. It helps the system feel faster and smoother. Apps open quicker. Browsers handle more tabs. Games and tools run with less delay. Many users search for how to upgrade computer RAM because it gives real results without high cost. You do not need […]

