


A slow computer makes it hard to focus. Programs take too long to open. Free space keeps shrinking until the disk is almost full. This happens to most PC owners at some point. Even new machines can slow down after a while. That is the exact problem cleanup tools are built to solve. They comb […]
How To Fix Xvdd SCSI Miniport Issue On Windows 10 and Windows 11
Introduction:
The xvdd SCSI miniport issue is a common problem that affects Windows 10 and Windows 11 users. It occurs when the xvdd.sys driver fails to load properly, leading to problems with SCSI devices like hard drives and optical drives. This can cause crashed applications, data loss, and BSOD errors, and prevent your system from booting properly.
In this comprehensive guide, we will discuss what causes the XVDD SCSI Miniport issue and provide multiple solutions to fix it on Windows 10 and 11.
We will cover basic troubleshooting, driver updates, system restores, DISM and SFC scans, registry edits, and more. By the end, you will have the knowledge to diagnose and resolve XVDD errors for good.
What is the XVDD SCSI Miniport?
What is Xvdd SCSI Miniport? Xvdd, short for Xen Virtual Disk D, is a virtual disk drive on your computer. Unlike physical drives, Xvdd is not physically connected to your system. It’s commonly used by certain games and software to create virtual disks for storing game or software data.
SCSI stands for Small Computer System Interface, which is a standard set of protocols for connecting peripherals to your computer. It was widely used in devices like CD/DVD drives, floppy drives, and scanners, but SATA has gradually replaced it.
Issues with Xvdd SCSI Miniport on Windows 10/11 often occur when game or software data is improperly mounted on virtual disks. Other factors, such as malware interference or outdated/corrupt device drivers, can also contribute to these problems. Don’t worry; in this article, we’ve compiled 8 effective methods to fix these issues.
What Causes xvdd.sys Errors?
Before jumping into solutions, let’s take a closer look at the root causes of xvdd SCSI port issues:
- Corrupted Windows System Files: The system files are related to xvdd.sys (like scsiport.sys) can become damaged or corrupted, preventing xvdd from loading properly at boot. This can happen after a bad Windows update, improper shutdowns, malware infection, etc.
- Outdated Drivers: Using outdated and incompatible SCSI or storage drivers can clash with xvdd, causing it to fail or crash. Keeping your SCSI drivers updated is key.
- Hard Disk Errors: Physical bad sectors or file system corruption on your hard drives can spread to the xvdd driver files, damaging the xvdd.sys file itself. Disk errors have to be fixed separately.
- Incorrect Registry Entries: Registry corruption and invalid entries related to the xvdd service can stop it from initializing properly at boot. The Parameters key is especially prone to issues.
- Buggy Windows Update: Some recent Windows 10 updates themselves may be buggy and interfere with storage drivers. Uninstalling problematic Windows updates may help.
- Virus or Malware: Viruses like the infamous ransomware WannaCry specifically target and replace key system drivers like xvdd.sys. Removing malware is crucial.
- Driver Conflicts: Conflicts with third-party drivers like VPNs, WiFi or graphics drivers can also cause xvdd problems directly or indirectly.
- Boot Errors: Other boot errors like BOOTMGR issues can cascade and lead to xvdd also failing to load.
- BIOS Issues: In rare cases, incorrect or outdated system BIOS settings may be incompatible with newer versions of xvdd.
So in summary, the xvdd BSOD or crash can be caused by file corruption, driver conflicts, viruses, boot issues, or BIOS problems. Understanding the root cause will help you fix xvdd issues more efficiently. Now let’s explore the solutions.
How to Fix XVDD SCSI Miniport Issue on Windows?
Solution 1: Restart Your PC
Let’s start with the most basic troubleshooting step – restarting your Windows 10 or Windows 11 computer. Restarting essentially performs a power cycle that forces software services, drivers, and programs to reload from scratch.
Any stuck processes, memory leaks, or temporary software glitches can be fixed with a simple restart. Here are the quick steps to reboot your system:
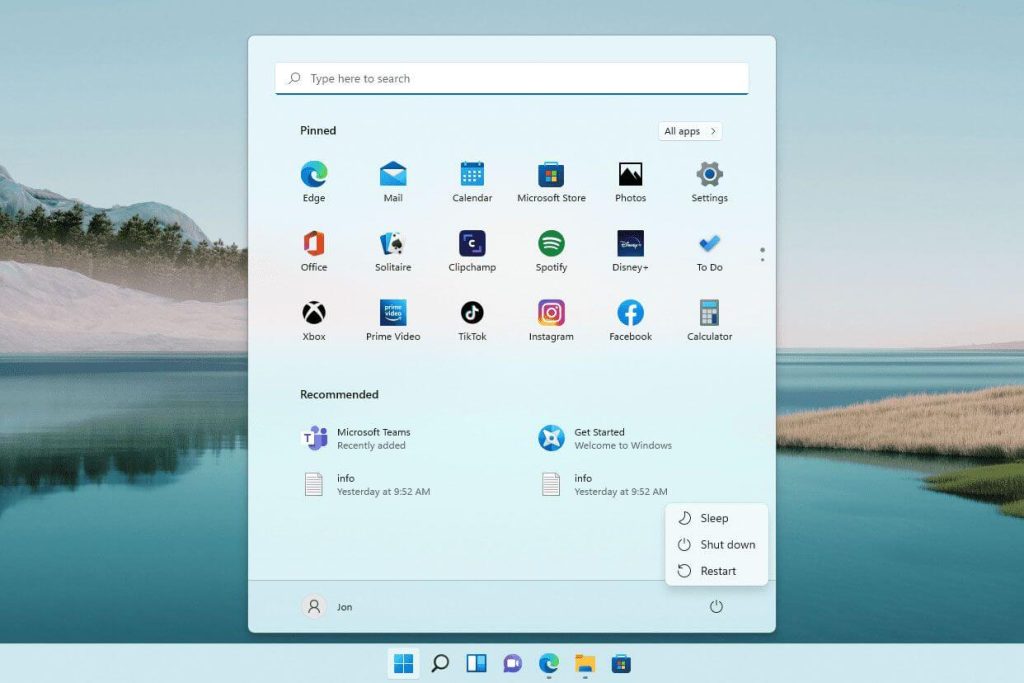
- Windows 10 – Press the Start Menu, click the Power icon at the top right, and select Restart.
- Windows 11 – Press the Start button, select the Power options at the top right, and choose Restart.
- You can also use the Ctrl + Alt + Del keyboard shortcut to open the Power options and restart your PC.
After your system boots back up, check if the xvdd errors still appear. A restart often clears up temporary conflicts and resets drivers to their proper functional state. Try it before moving on to other solutions.
Solution 2: Update Your SCSI Drivers
One of the main culprits behind xvdd.sys Blue Screens is outdated, corrupt, or incompatible drivers. The best way to fix driver issues is to simply update them.
For xvdd errors specifically, pay close attention to your SCSI drivers. Here are the detailed steps:
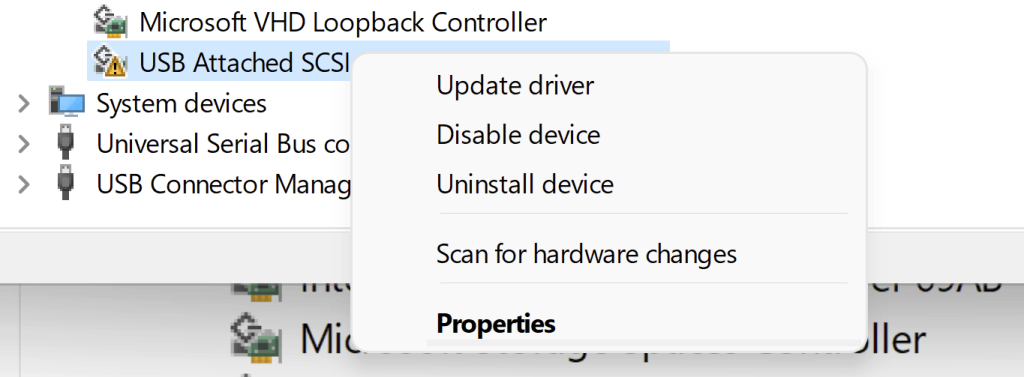
Step 1: Open Device Manager by right-clicking the Start Menu and selecting it.
Step 2: Expand the “SCSI and RAID controllers” section and locate your SCSI drivers. Popular drivers are LSI Logic, JMicron, etc. Right-click your SCSI driver and select Update driver.
Step 3: In the update wizard, choose the option to automatically search for updated drivers online.
Windows will now check for and install the latest driver version tailored for your storage hardware.
Step 4: Follow the on-screen prompts and allow the driver update installation to complete.
Step 5: Finally restart your PC for the changes to take effect.
Updating to the latest SCSI drivers gives the xvdd.sys file better compatibility, support, and access to your connected storage hardware like hard drives. Often the latest drivers resolve any conflicts or bugs that could be preventing xvdd from loading at boot.
If updating drivers does not help, you can try uninstalling the current drivers completely from Device Manager, rebooting your system, and letting Windows automatically reinstall fresh driver copies on its own.
Make sure to install SCSI drivers specifically designed for Windows 10 or Windows 11, and your processor architecture (32-bit or 64-bit). Match your Windows and hardware specifications for the best driver compatibility.
Solution 3: Perform a System Restore To Xvdd Scsi Miniport
If your xvdd issues started only recently, chances are it is being caused by a recent change like a Windows Update, new driver installation, or new app.
Undoing these changes can be accomplished with the System Restore utility. It lets you roll back your Windows instance to a previous state or snapshot.
Follow these steps to perform System Restore on Windows 10 and Windows 11:
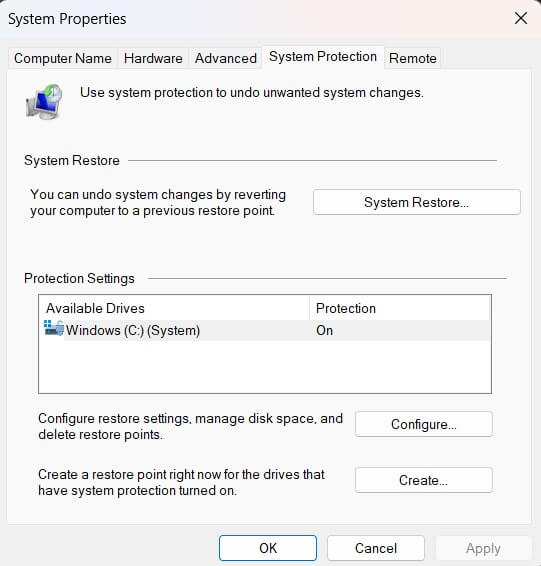
Step 1: Type Create a Restore Point in the search bar and open the result.

Step 2: In the System Protection tab, click the System Restore button.
Step 3: On the next screen, click Next to proceed to the restore point selection.
Here you will see a list of previous restore points and dates created automatically by Windows.
Step 4: Choose a restore point created prior to when you first noticed xvdd issues. The older the restore point the better.
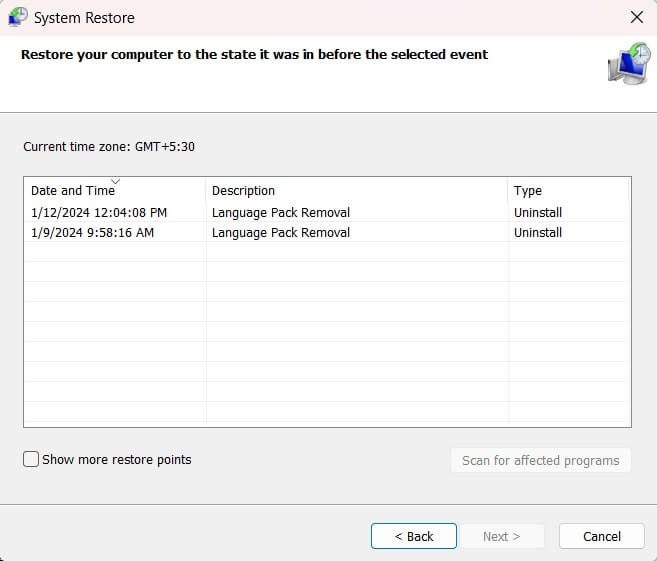
Step 5: After selecting the desired restore point, click Scan for affected programs. This is optional but useful to check which apps and drivers will be affected.
Step 6: Finally click Close, then click Next, and then Finish to confirm the system restore.
Windows will now restart your computer and reverse changes back to the restore point you chose. With recent system changes undone, the xvdd problem should hopefully be resolved.
Solution 4: Run DISM and SFC Scans
Corruption or errors in critical Windows system files like registry hives and other core components can also manifest as xvdd BSODs.
To scan for and repair damaged system files, you need to run the DISM and SFC utilities:
DISM (Deployment Image Servicing and Management tool) can fix the Windows image files themselves that may be corrupted. Here are the steps to run it:
Step 1: Type cmd in the search bar, right-click on it, and select Run as Administrator.
Step 2: In the command prompt, type the following command and press Enter:
DISM /Online /Cleanup-Image /RestoreHealth
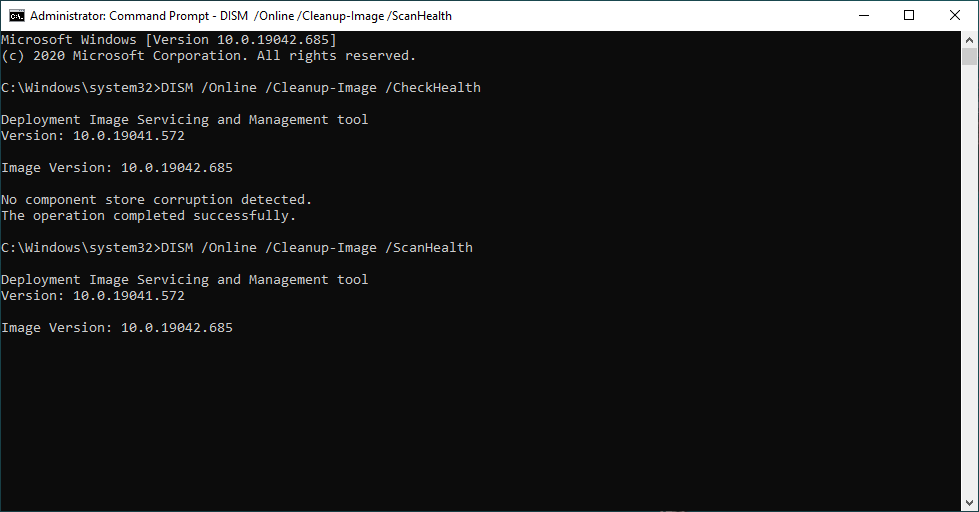
Step 3: DISM will now scan and repair any corruption in the Windows image files. Wait for the scan to complete.
Step 4: Restart your PC once the DISM scan finishes.
SFC (System File Checker) scans for corrupt system files and replaces them using a cache:
Step 1: Again open the admin command prompt as shown above.
Step 2: Now type this command and press Enter:
sfc /scannow
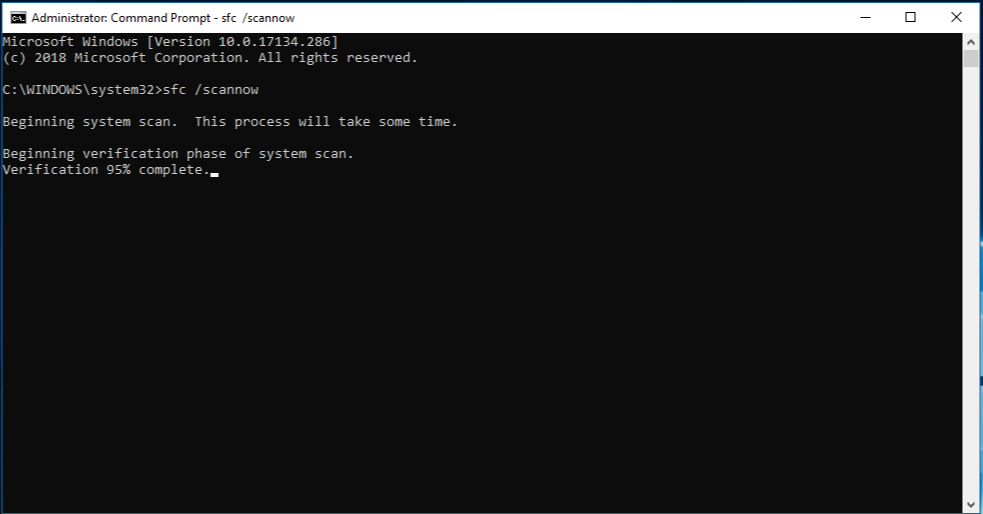
SFC will immediately scan and replace any corrupted Windows system files. Once finished, restart your computer.
Running DISM and SFC scans in sequence can fix the vast majority of system file errors – including any that are preventing xvdd from loading correctly.
Solution 5: Install Windows Updates
An outdated Windows version can also cause issues with storage drivers like xvdd. Make sure your Windows 10 or Windows 11 is completely updated using these steps:
Step 1: Open Settings and go to Windows Update. Click the Check for updates button.
Step 2: Windows will now check online and display any pending updates.
Step 3: Click Download and Install to get all the Important and Optional updates.

Step 4: If prompted, restart your PC to finish installing the Windows updates.
Microsoft regularly patches Windows and provides bug fixes through Windows Update. Installing the latest updates can fix compatibility issues and ensure your OS is stable.
Solution 6: Uninstall Buggy Windows Updates
Paradoxically, recent Windows updates themselves can sometimes be buggy and cause xvdd problems. If you think a particular Windows update is responsible, uninstall it as follows:
Step 1: Go to Settings > Windows Update > View update history.
Step 2: Click the Uninstall updates link. Here find and select the Windows update(s) you suspect are problematic. Focus on updates installed right before the xvdd issues began.
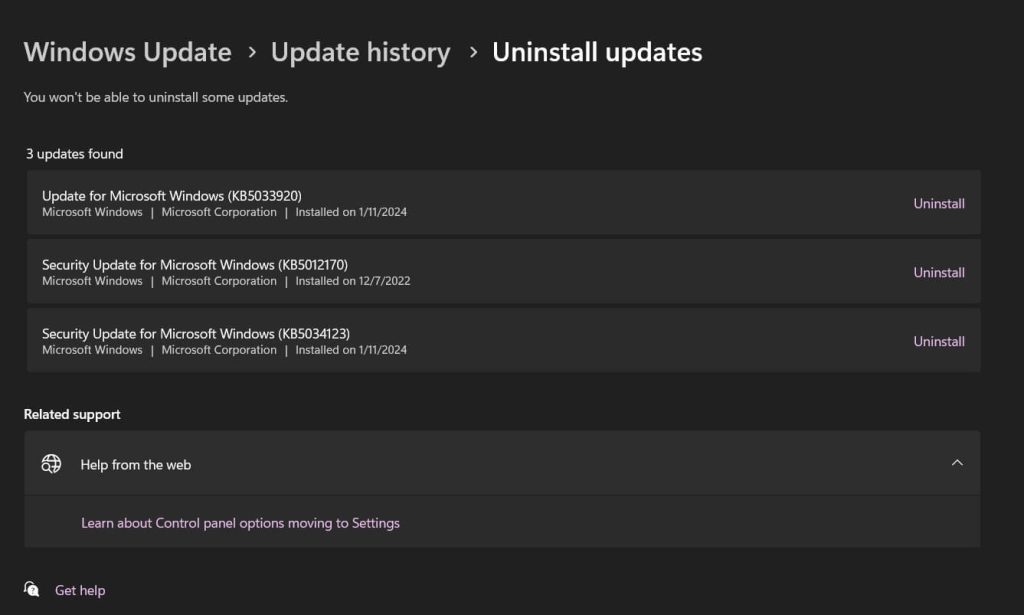
Step 3: Press Uninstall and confirm on the next screen.
Step 4: Restart your PC to complete the removal.
Bad Windows updates will be uninstalled, potentially fixing any conflicts or issues with xvdd.sys. If the problem persists, you can try removing other recent updates one by one.
Solution 7: Modify xvdd Registry Entry To Fix Xvdd Scsi Miniport
The Windows registry contains important configuration settings for drivers like xvdd. Corruption or incorrect values here can affect driver behavior.
You can try modifying the xvdd registry parameters as a solution:
Step 1: Press Windows + R to open the Run command box. Type regedit and press Enter to open the Registry Editor.
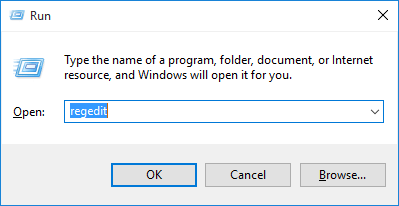
Step 2: Navigate to the path:
HKEY_LOCAL_MACHINE\SYSTEM\CurrentControlSet\Services
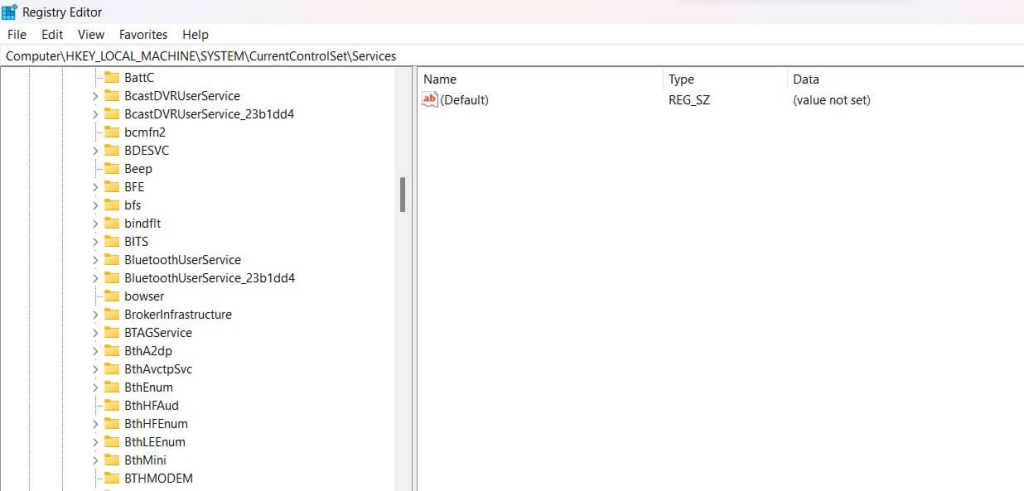
Step 3: Expand the xvdd key, right-click on Parameters, and choose Modify.
Change the ErrorControl value data from 1 to 0.
Step 4: Click OK and close Regedit. This prevents Windows from disabling xvdd on error.
Step 5: Restart your PC for the changes to apply.
Modifying the registry parameters may allow successful loading of xvdd at boot. Keep in mind that extreme care is required when editing the registry. Back up the keys first and make sure you are comfortable with registry editing before making changes.
Solution 8: Check System Resources
Too many taxing background apps can deprive xvdd and other drivers of enough CPU, memory, and disk resources to operate properly.
Check for resource bottlenecks:
Step 1: Open Task Manager using Ctrl + Shift + Esc. Monitor the CPU, Memory, and Disk usage under the Performance tab.
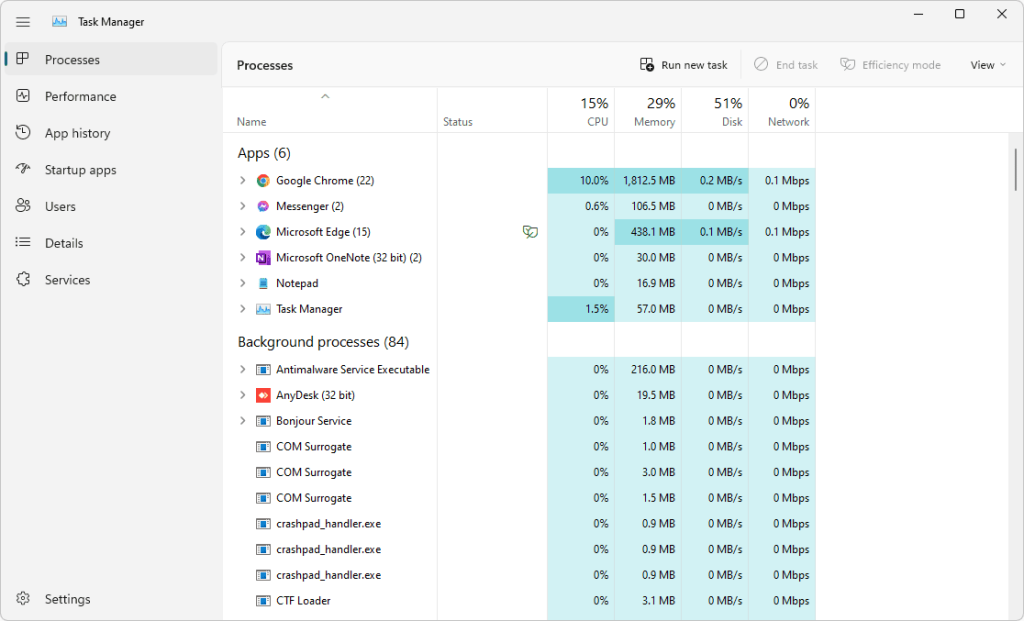
Step 2: If any values remain consistently high (over 95%), you have a resource crunch.
Step 3: Under Processes and Apps, check which specific apps are consuming too many system resources.
Step 4: Consider uninstalling or disabling performance-heavy apps if they are non-essential.
Step 5: Upgrade to more RAM or a larger SSD if a hardware upgrade is required.
Freeing up system resources prevents xvdd and Windows from being starved of CPU, memory, and disk space.
Conclusion
The xvdd SCSI miniport error can prevent you from booting, cause data loss, and lead to application crashes. This comprehensive guide covers 8 proven solutions to fix xvdd issues for good.
Some quick things to try are restarting your PC, updating drivers, running DISM and SFC scans, and uninstalling buggy Windows Updates. For advanced troubleshooting, system restores, registry tweaks, and installing the newest Windows updates may resolve the problem.
Bookmark this page and use it as a reference for diagnosing and repairing xvdd errors on your Windows 10 or Windows 11 computer. With the right troubleshooting steps, you can get your system back up and running normally again.
FAQs:
What is the Xvdd SCSI Miniport driver, and why does it cause errors?
The Xvdd SCSI Miniport driver is commonly linked to virtual disk and virtualization features in Windows. Errors usually appear when the driver becomes outdated, conflicts with system updates, or is left behind by software such as virtual machines or sandbox tools. When this happens, Windows may log repeated warnings or show startup delays.
Is it safe to disable or remove the Xvdd SCSI Miniport driver?
It is safe to disable or remove the driver only if you are not actively using virtualization features that depend on it. If the driver belongs to software you no longer use, removing it can stop error messages without affecting system performance. However, disabling it while virtual environments are still in use may lead to unexpected issues.
Can Windows updates fix the Xvdd SCSI Miniport issue automatically?
Sometimes Windows updates resolve the problem by replacing outdated or incompatible drivers. However, updates alone may not fix the issue if the driver is tied to third-party software. In such cases, manually updating, reinstalling, or removing the related software provides a more reliable solution.
Author Bio:
Dinesh Lakhwani 

Dinesh Lakhwani, the entrepreneurial brain behind “TechCommuters,” achieved big things in the tech world. He started the company to make smart and user-friendly tech solutions. Thanks to his sharp thinking, focus on quality and the motto of never giving up, TechCommuters became a top player in the industry. His commitment to excellence has propelled the company to a leading position in the industry.
Popular Post
Recent Post

Fortect Software Review: The Ultimate PC & Mobile Cleaning, Optimization & Security Tool
Slow computers are a common problem for almost every Windows user. Well, yes! Over time, your PC picks up junk files. These files sit quietly in the background. They take up space and slow things down. Programs open slower. Windows takes longer to boot. Even simple tasks like opening a folder can feel sluggish. There […]

CCleaner PC Optimizer Review: A Complete Guide for Windows Users
If your computer has started to feel slow, you are not alone. Most Windows PCs slow down over time. Junk files pile up. The registry gets messy. Too many apps open when you start your PC. All this adds up and makes even a good machine feel tired. This is where a PC cleaner tool […]

Auslogics Duplicate File Finder: Full Review and User Guide
A computer quietly gathers clutter over time. This includes duplicate photos, repeated downloads, and forgotten backups hiding in random folders. This buildup slowly eats away at storage and can make even a fast PC feel sluggish. Manually finding and deleting duplicates is tedious. It means checking every folder, comparing file names, and guessing which copies […]

CCleaner Duplicate File Finder: Key Features, Pricing, Step-by-Step Guide and More
Every computer collects junk over time. Right? Well, yes! Photos often get copied twice. Documents get saved in two folders by mistake. Old downloads pile up and never get deleted. This slowly eats up your storage space, and most people do not even notice until their drive is almost full. That is where a duplicate […]

Duplicate File Finder Pro: A Complete Review, Everything You Should Know
Computers collect thousands of files over time. Well, yes! Many of them end up being duplicates created by backups, downloads, or accidental copies. These extra files take up valuable storage space and make it harder to keep everything organized. Finding and removing them manually can take hours. Right? Duplicate File Finder Pro is a tool […]
Top 3 Duplicate File Finder for Windows 11 & Windows 10
If your PC storage keeps filling up even after you delete big files, duplicate files could be the real reason. Most of us save the same photo twice, download a document more than once, or copy a whole folder by mistake. Over months and years, these duplicate files pile up quietly. You do not even […]

Monitor Screen Calibration Guide: Everything You Should Know
Your monitor shows colors every single day. But are those colors actually correct? Most people never stop to check this. They just use the screen as it comes out of the box. This habit can lead to wrong colors in photos, videos, and work files. Colors may look too warm or too cold without you […]

How To Check Installed RAM and RAM Slots [Complete Guide]
RAM plays an important role in how smoothly a computer runs. Short for Random Access Memory, it stores the data and instructions that Windows and active applications need at any given moment. From opening multiple browser tabs to running games and productivity software, RAM helps keep everything responsive. A system with limited memory may experience […]

What is Microsoft Autopilot Everything You Need To Know
Technology has changed the way companies manage computers. Well, yes! Employees now work from offices, homes, and remote locations. Setting up devices manually for every worker takes time and effort. It can also create mistakes that slow down productivity. This is where Microsoft Autopilot becomes useful. It helps businesses prepare and deploy Windows devices with […]

