Ways to Fix Your Ethernet Connection Not Working on Windows 11?
Last updated on January 22nd, 2025 at 9:43 am
Introduction
There have been significant technological improvements, including the gadgets and hardware configurations people use for their work. Different upgrades have happened from desktop computers to laptops and using WiFi adapters to the Ethernet.
However, while you may experience the best network connectivity and speed with Ethernet connections, failures are still imminent. And that can heavily affect your overall productivity and work quality, despite having a powerful Windows 11 system and advanced software. How to fix the Ethernet not connecting Windows 11 problem, you may ask?
In this post, we shall learn the best ways to fix the Windows 11 Ethernet not working issues, keeping with the leading causes. Read ahead.
How to fix the issue of the Ethernet connection not working on Windows 11
You can take different steps to rectify the connection error from Windows 11 Ethernet adapter issues or other problems causing the issue. Here are the main methods to utilize.
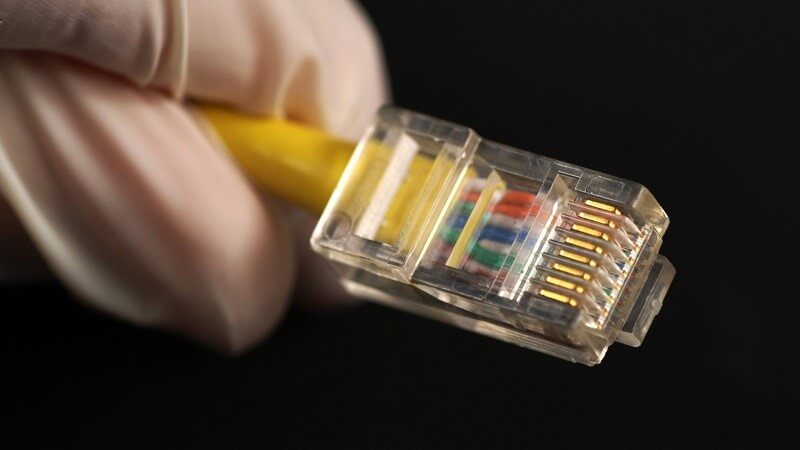
Solution 1: Check the Cable and Port of the Ethernet
One of the easiest and first steps you should take to rectify the Ethernet connection problem is checking to see the condition of the cable and port. Take time to evaluate the plug and cable properly to look for wear and tear. In case of any damage, you must replace this part to fix the issue.
When checking the Ethernet port, note if the LED (only available in select PCs) is blinking or turned on. If not, you have to use a new adapter for a better connection.
Solution 2: Change the router’s selected port
There are many Ethernet ports available on maximum routers. So, if you experience Windows 11 Ethernet adapter issues, it is better to shift to using another port since the one you are using might be defective. Try out connecting to different ports to check if this is the main problem and if you get back a strong internet connection.
Solution 3: Restart the router or modem
Another way to fix the Ethernet not connecting Windows 11 problem is to reboot the router or modem that you are using. The easiest step here is to unplug the main power cable or shut the device off from the power switch.
In some of the new modem models, the batteries are built-in. You have to remove them from these devices besides turning the device off. Then, wait around 2 minutes and plug it back into the power socket. Now, recheck if the Ethernet connection is back or not.
Solution 4: Restart the Windows 11 computer
Sometimes, the issue with Windows 11 Ethernet not working occurs due to configuration issues with the Windows 11 operating system.
In these cases, restarting the device should help manage the issue. A minor bug causing this problem will get removed when you restart the PC since the OS will reload and cut off the activity creating the bug.
Step 1: On the PC’s keyboard, tap on the Alt + F4 keys. This will bring up the Shut Down Windows section.
Step 2: Tap on the dropdown menu and choose Restart.

Step 3: After making this choice, tap on the OK button.
Solution 5: Enable the Network Adapter Troubleshooter
Windows 11 comes with many in-built troubleshooters that fix various utility functions in the system. If you use the Network Adapter-related troubleshooter, ethernet connection-related configuration issues will also fix. It will automatically find and then resolve the errors causing the connection issues.
Step 1: On your keyboard, tap the Win + I keys to open the Settings menu.
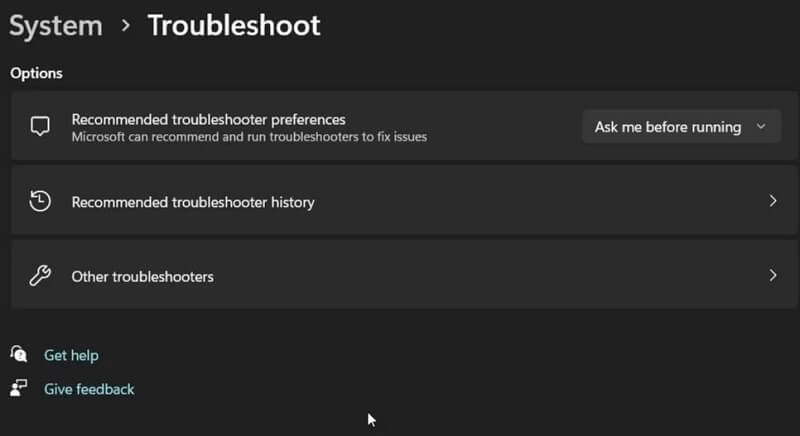
Step 2: Scroll down until you see the System tab. Click on it and choose Troubleshoot.
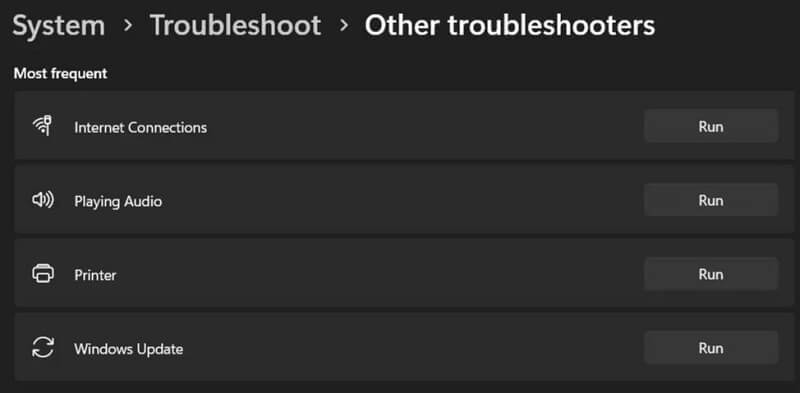
Step 3: In the Troubleshoot section, tap on the “Other troubleshooters” option.
Step 4: Scroll to find the Internet Connections selection. Then, hit the Run button beside it.
Step 5: Choose the “Check my Internet connection for issues” option, and the troubleshooter will analyze the system for issues. Then, you will see relevant recommendations to fix the problem based on what errors it detects.
Step 6: Tap on the best solution that meets the issue, and then you should exit the troubleshooter window to see if things have changed.
If it did not, and the connection problem still exists, click on the System option in the Settings menu again. Choose Troubleshoot > Other troubleshooters.
Step 7: Go down the list on the right pane and click on the Run button beside Network Adapter.
Step 8: In the next dialog box, choose Ethernet > Next. The system will check for issues and suggest repair recommendations. Apply the solutions given and check again to see if the problem is fixed.
Solution 6: Evaluate the Power Management Settings of Your Connected Ethernet Adapter
One of the standard functions in most PCs is that the software cuts off the connection of several synced but inactive features. This is useful for saving your system power but can cause issues for many essential services. So, you should inspect the power management settings of your Ethernet adapter from the Device Manager on your Windows 11 PC.
Step 1: On your Windows 11 computer, tap on the Win + R keys. This will open the Run dialog box.
Step 2: Add the term “devmgmt.msc” in the command field and press the OK button.

Step 3: The Device Manager window will open. Click on Network Adapters to expand it.
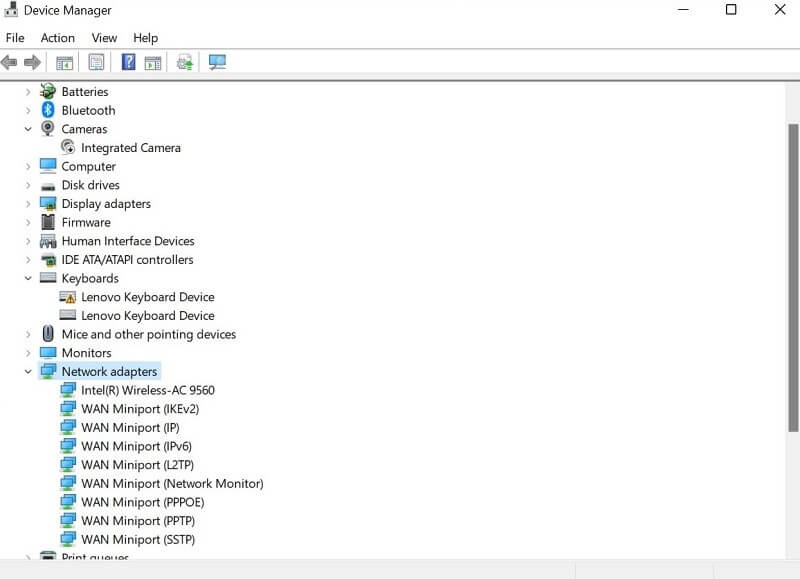
Step 4: Choose the Ethernet Adapter option and right-click on it. Choose Properties.
Step 5: Tap on the Power Management tab.
Step 6: Disable the “Allow the computer to turn off this device to save power” choice. Press OK.
Step 7: Close the Device Manager section and then restart the device. When it reboots, see if the problem persists.
Solution 7: Toggle the Switch of the Ethernet Adapter
Typically, it is possible to manually disable the network adapters on the PC, like Ethernet, WiFi, and Bluetooth, through the Settings menu of Windows 11. In some situations, you can use this method to turn off and then reactivate the Ethernet Adapter. This will kickstart the proper functioning of the device in the system.
Step 1: On the keyboard of your Windows 11 PC, tap on the Win + I keys. This will open the Settings menu.
Step 2: Scroll down the left pane and tap on Network & Internet.
Step 3: On the right panel, scroll down and click on the Advanced network options section.
Step 4: Choose Ethernet under Network adapters and tap the Disable button.
Step 5: You will not see the Ethernet icon on your taskbar. After some time, tap on Ethernet again and click on the Enable button.
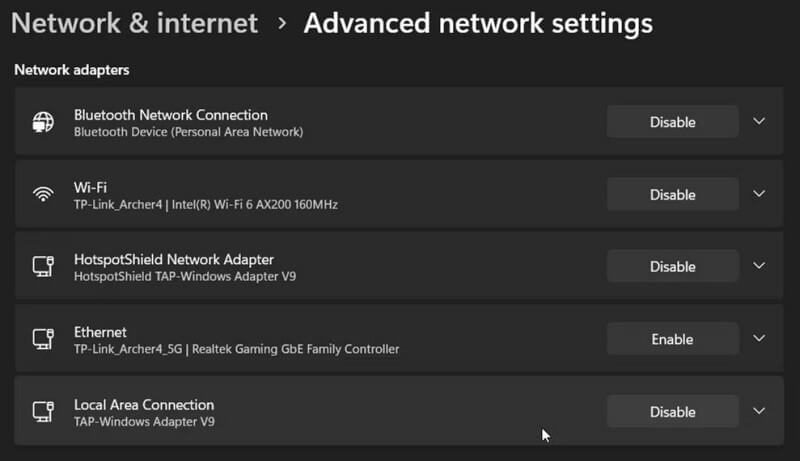
Step 6: Try to connect to the internet again via Ethernet.
Solution 8: Uninstall the Ethernet Adapter drivers
In many cases, the Ethernet not connecting to Windows 11 occurs due to the system’s older or faulty drivers. That can affect the normal functioning of the Ethernet adapters if their drivers are not up-to-date. Therefore, removing the drivers is the best solution to try.
You can use automated software like IObit Driver Booster to automatically scan and upgrade your system’s drivers. Here, you will learn the steps to remove the outdated adapter driver on your own and then reinstall it after the driver is updated.
Step 1: On your keyboard, tap on the Win + R keys.
Step 2: When the Run dialog box opens consecutively, type in “devmgmt.msc” in the text field. Then, press OK to access the Device Manager.
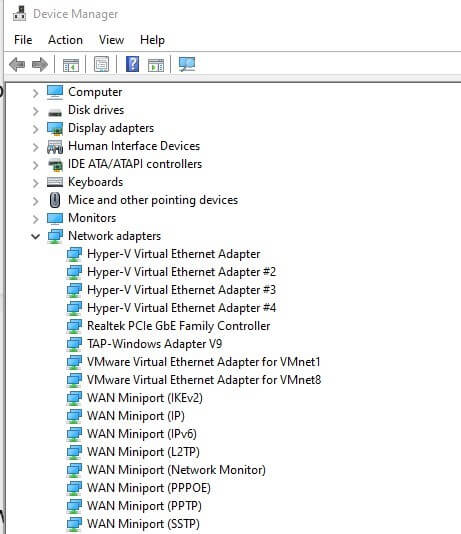
Step 3: In the Device Manager window, tap on the Network Adapters option to expand it.
Step 4: Right-click on the Ethernet Adapter option and choose the “Uninstall device” selection.
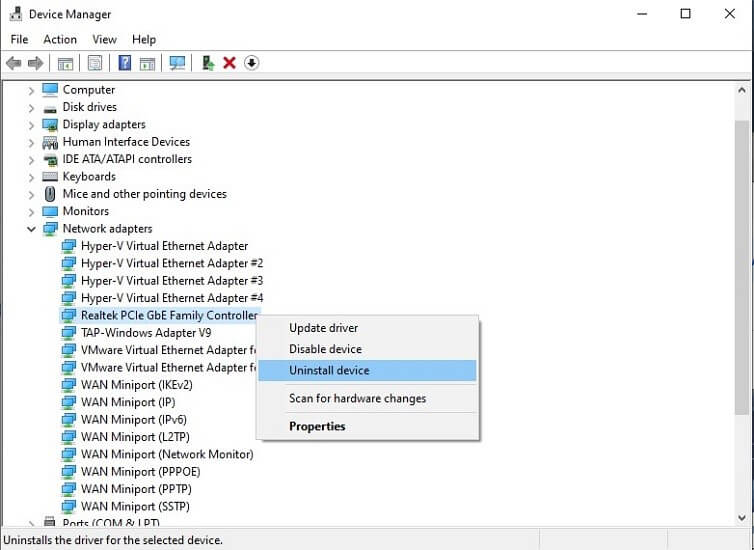
Step 5: Reboot your PC after this deactivation process is complete. The Windows OS will automatically check for connected devices and install the missing driver from Ethernet.
Or, you can use the IObit Driver Booster to update all missing drivers after automatically detecting if Windows does not do this step automatically in your device.
Solution 9: Update the Current OS on the Device
The issue of incorrect Ethernet connection or it not even syncing to the network may have to do with the outdated Windows OS running on your system. It helps update the operating system to the current Windows 11 with all software upgrades activated to fix it. The new OS update can patch issues causing this Ethernet not connecting Windows 11.
Step 1: On Windows 11 computer keyboard, tap on the Win + I keys.
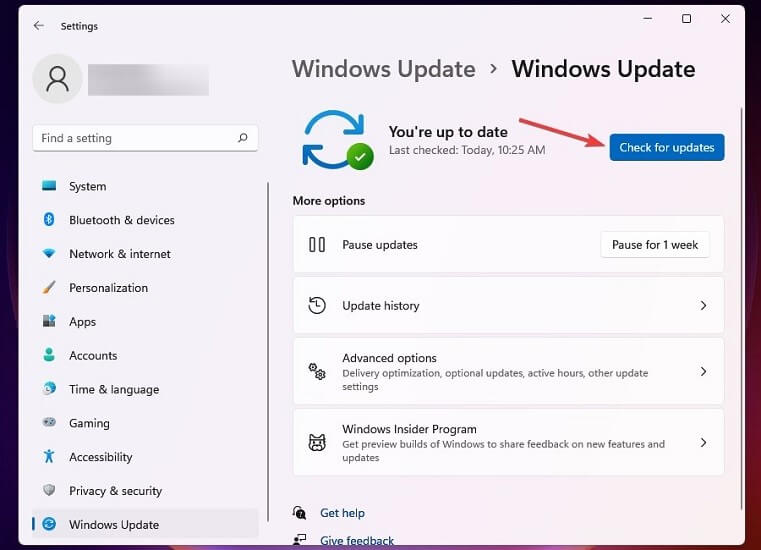
Step 2: When the Settings menu opens, tap on the Windows Update option in the left-hand side list of tabs.
Step 3: Choose the Windows Update option in the Windows Update right panel.
Step 4: Next, tap on the Check for Updates option. This software will scan for available upgrades and download the missing ones instantly.
Conclusion
You can take different methods and subsequent steps to fix the connection issue with Ethernet on Windows 11. Follow all the given methods carefully and try out multiple of these methods if the fix is not immediate. You can also use a suitable solution like CCleaner to quickly fix software issues, bugs, and crashes that may cause this connection problem.
Author Bio:
Dinesh Lakhwani 

Dinesh Lakhwani, the entrepreneurial brain behind “TechCommuters,” achieved big things in the tech world. He started the company to make smart and user-friendly tech solutions. Thanks to his sharp thinking, focus on quality and the motto of never giving up, TechCommuters became a top player in the industry. His commitment to excellence has propelled the company to a leading position in the industry.
Popular Post


Recent Post

How to Switch Windows 10 to a Local Account: Complete Guide
Windows 10 allows users to sign in with either a Microsoft account or a local account. When you set up a new computer, the system often suggests using a Microsoft account. This account connects your device to Microsoft services such as Outlook, OneDrive, and the Microsoft Store. It also syncs settings, themes, and passwords across […]

How To Change Default Apps For File Types In Windows
Windows is designed to make using your computer easy. One way it does this is by assigning default apps to different file types. This means when you open a file, Windows automatically opens it with a specific program. For example, photos may open with Photos, music with Groove Music, and PDFs with Edge. These default […]

How To Adjust The Mouse Pointer Speed: Complete Guide
Using a computer every day means you use the mouse a lot. The mouse pointer moves on the screen and helps you click, scroll, and select items. Many people never think about the speed of the mouse pointer. They have used the default setting for years. This can cause small problems over time. A slow […]

How to Change Mouse Scrolling Settings In Windows
A mouse is one of the most used computer tools. People use it every day. They scroll through emails. They scroll through documents. They scroll through websites and images. The movement becomes automatic. Most users do not notice it. That is why problems often go unnoticed. Scrolling problems show up slowly. At first, it feels […]

Keyboard Light Settings: Keyboard Lighting Control [Complete Guide]
Keyboards are no longer simple typing tools. Well, yes! Over time, they have evolved to include features that improve comfort, visibility, and overall experience. One of the most useful features today is keyboard lighting. It helps users work comfortably in low-light conditions. It also reduces strain when typing for long hours. Many users first notice […]

Customizing Pointer Appearance: Complete Guide
The way your mouse pointer looks on your computer may seem like a small detail. But customizing pointer appearance can make using your PC more comfortable and visually appealing. Many users do not realize that they can change the pointer size, color, and style to fit their needs. Whether you want a bigger pointer for […]

How To Choose a Computer Monitor: Monitor Buying Guide
Buying a monitor looks easy. Many people think all screens are the same. That belief causes regret later. A monitor is not just a display. It is a daily tool. You read on it. You work on it. You relax with it. Small problems become big over time. Poor brightness hurts eyes. Bad size causes […]

How To Get Help With File Explorer in Windows 11 [Complete Guide]
File Explorer is one of the most important tools in Windows 11. It is used to open folders, view files, and manage stored data. Almost every action on a Windows computer depends on it in some way. When users open documents, save downloads, or organize photos, File Explorer is always involved. Because it is used […]

How To Fix A Frozen Computer: Complete Guide [Windows 11/10]
A frozen computer is one of the most common problems Windows users face. The screen stops responding. The mouse pointer does not move. Keyboard inputs do nothing. You may hear the fan running loudly. Sometimes the system looks alive, but nothing works. This situation often happens when you are busy or working on something important. […]

How to Upgrade Computer RAM: Complete Guide
Upgrading RAM is one of the simplest ways to improve a computer. It helps the system feel faster and smoother. Apps open quicker. Browsers handle more tabs. Games and tools run with less delay. Many users search for how to upgrade computer RAM because it gives real results without high cost. You do not need […]

