ASUS Laptop Screen Flickering On Windows 11 & 10: 12 Solutions
Dealing with ASUS laptop screen flickering can be frustrating, especially on a Windows 11 system. Discover a handful of proven methods to troubleshoot and fix this irksome issue, ensuring a smooth and uninterrupted viewing experience on your ASUS device.
Wondering how do I stop my laptop from flickering. Wait no more and learn how to regain a stable and seamless display experience on your Windows 11 system.
What Causes the ASUS Laptop Screen Flickering Issue?
Here are some potential causes of ASUS laptop screen flickering:
- Driver Issues: Outdated or incompatible display drivers may lead to screen flickering problems.
- Hardware Problems: Loose connections, damaged cables, or a faulty GPU could result in flickering displays.
- Software Compatibility: Certain applications or Windows 11 itself might not be compatible, causing flickering.
- Screen Refresh Rate: Incompatible refresh rates between the display and GPU can cause flickering.
- Power Settings: Incorrect power settings might trigger screen flickering during power fluctuations.
- Malware or Viruses: Infections could interfere with display drivers, causing flickering issues.
- Overheating: Excessive heat can affect hardware components, leading to screen flickering.
- Display Settings: Incorrect or conflicting display settings can cause visual disruptions.
- Physical Damage: Physical damage to the screen or internal components may result in flickering.
How to Stop Screen Flickering on ASUS Laptop?
Solution 1: Update Graphic Drivers
Outdated or incompatible graphic drivers are a common culprit behind screen flickering on ASUS laptops. Use these steps to carry out the update for your graphic drivers:
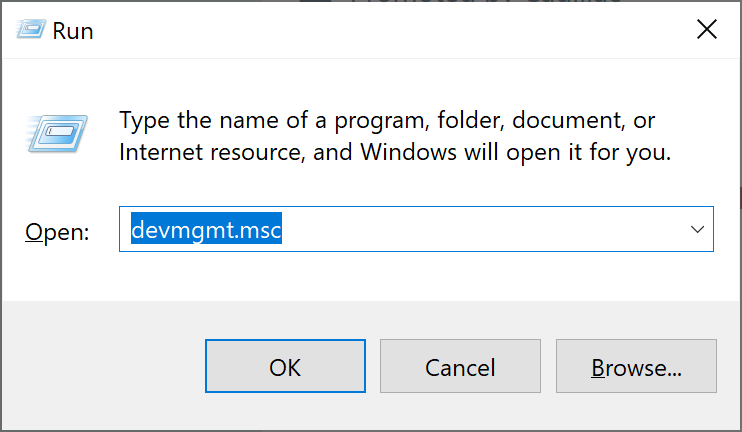
Step 1: Right-click on the Windows icon placed on the Taskbar and select “Device Manager” from the menu. Alternatively, press the Win + R key combination to open the Run dialog box, type “Devmgmt.msc” and hit Enter.
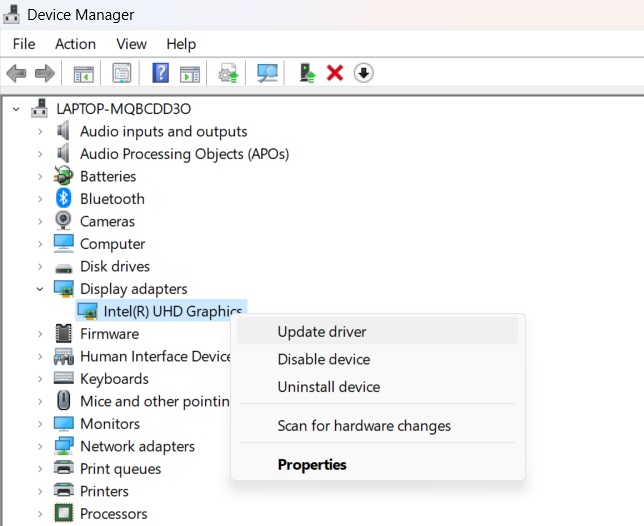
Step 2: In the Device Manager window, expand the “Display adapters” section. Right-click on your graphics card and select “Update driver.”
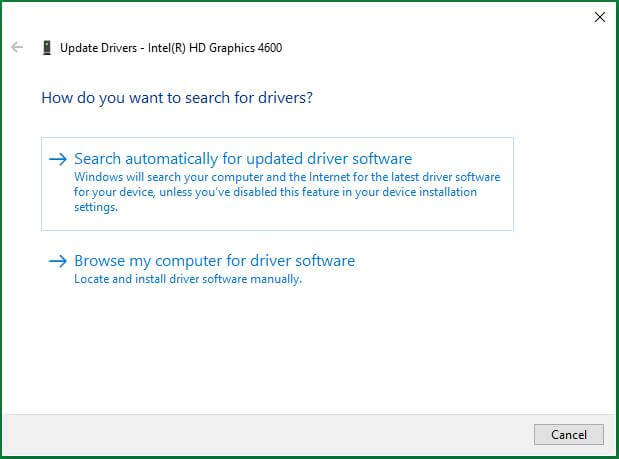
Step 3: Choose “Search automatically for updated driver software” and follow the prompts.
Step 4: Alternatively, visit the ASUS website or the graphics card manufacturer’s site to download the latest drivers. Install them following the provided instructions.
Once updated, restart your laptop and check if the screen flickering issue persists. Alternatively, you can use tools to update drivers.
Solution 2: Adjust Refresh Rate in Display Settings
Sometimes, mismatched refresh rates between the display and GPU can cause screen flickering. To adjust the refresh rate:
Step 1: Right-click on the desktop and select “Display settings.”
Step 2: Scroll down and click on “Advanced display settings.”
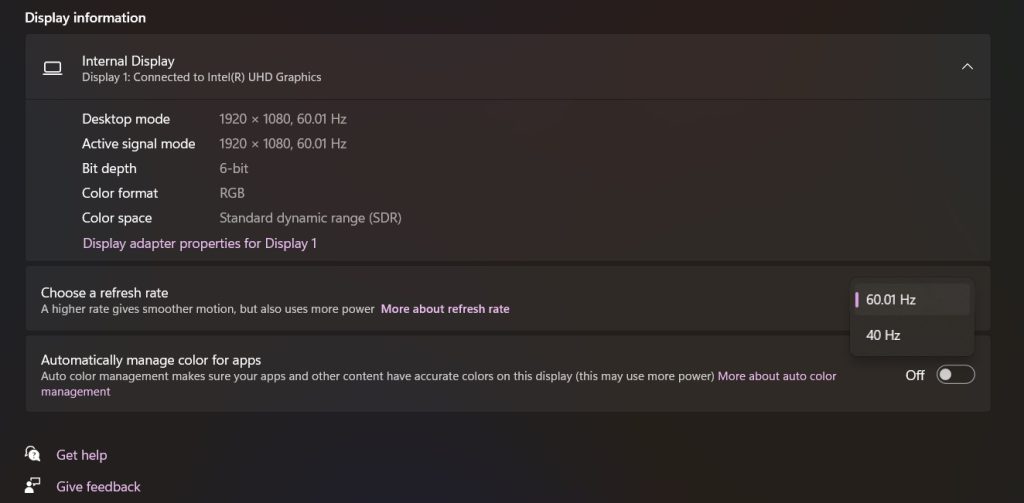
Step 3: Under the “Choose a Refresh Rate” dropdown menu, select a rate compatible with your display and GPU. Common rates include 60Hz or 120Hz.
Step 4: Click “Apply” to save the new settings.
After applying the changes, monitor your laptop’s screen to see if adjusting the refresh rate resolved the ASUS laptop screen flickering issue.
Solution 3: Disable Panel Self Refresh in Intel Graphics Command Center
Disabling Panel Self Refresh can sometimes help in resolving screen flickering issues on ASUS laptops utilizing Intel integrated graphics. For Intel integrated graphics cards, a feature called Panel Self Refresh can sometimes cause screen flickering issues.
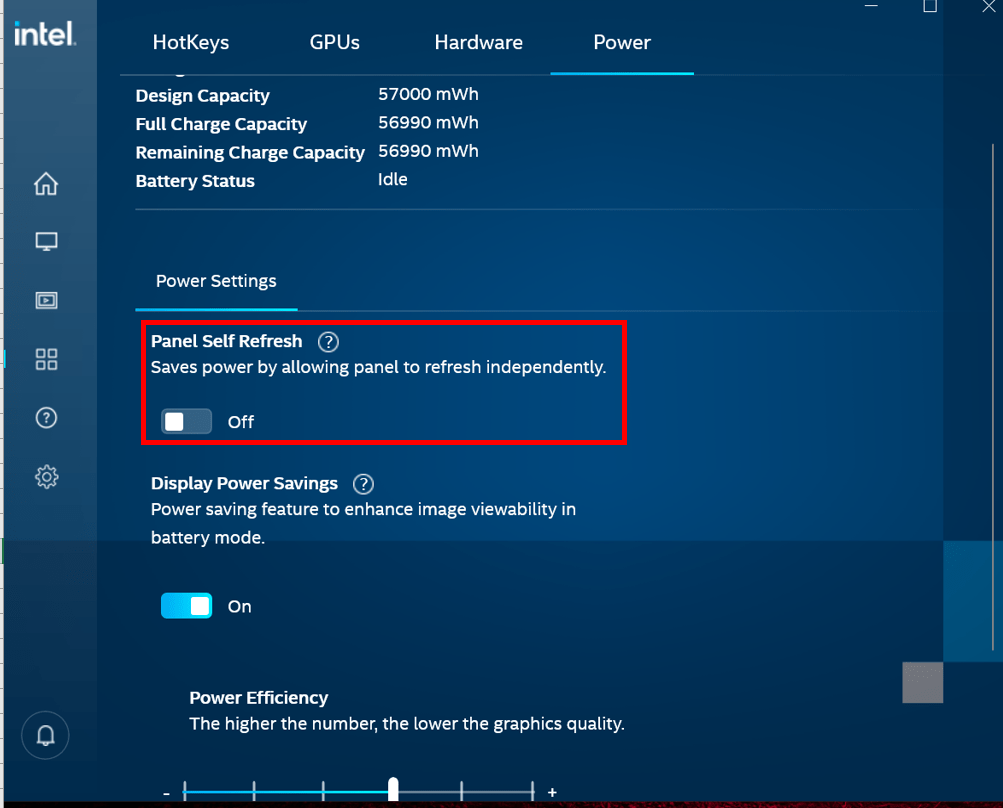
Launch the Intel Graphics Command Center, go to the Power section, find Panel Self Refresh, and disable it. Click Apply, then restart your laptop. Check if doing that stopped the flickering.
Solution 4: Toggle Hardware Acceleration in Apps
Some applications utilize hardware acceleration which, when incompatible with your system, can lead to screen flickering. Follow these steps to stop screen flickering on Asus laptop by toggling hardware acceleration:
Step 1: Launch the specific application experiencing the screen flickering.
Step 2: Look for “Settings,” “Preferences,” or an option menu within the application.
Step 3: Find options related to graphics, display, or performance.
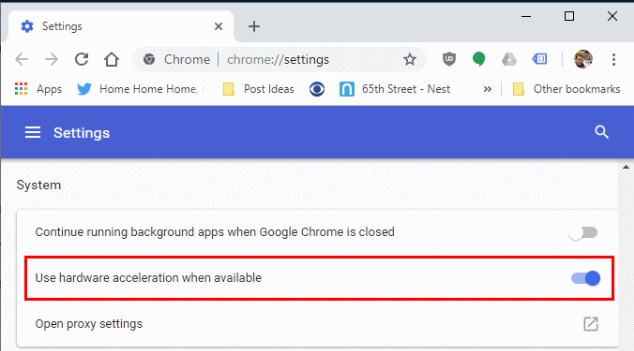
Step 4: Look for an option to toggle “Hardware Acceleration” or “GPU Acceleration” and turn it off.
Step 5: Apply the settings and restart the application if necessary.
By disabling hardware acceleration within the problematic application, you might alleviate the screen flickering issue on your ASUS laptop running Windows 11. Check if this resolves the problem after making the adjustments.
Solution 5: Check for Overheating Issues
Here comes the next solution to fix the ASUS laptop screen flickering issue. Overheating can sometimes trigger screen flickering on ASUS laptops. Here’s how to check for overheating:
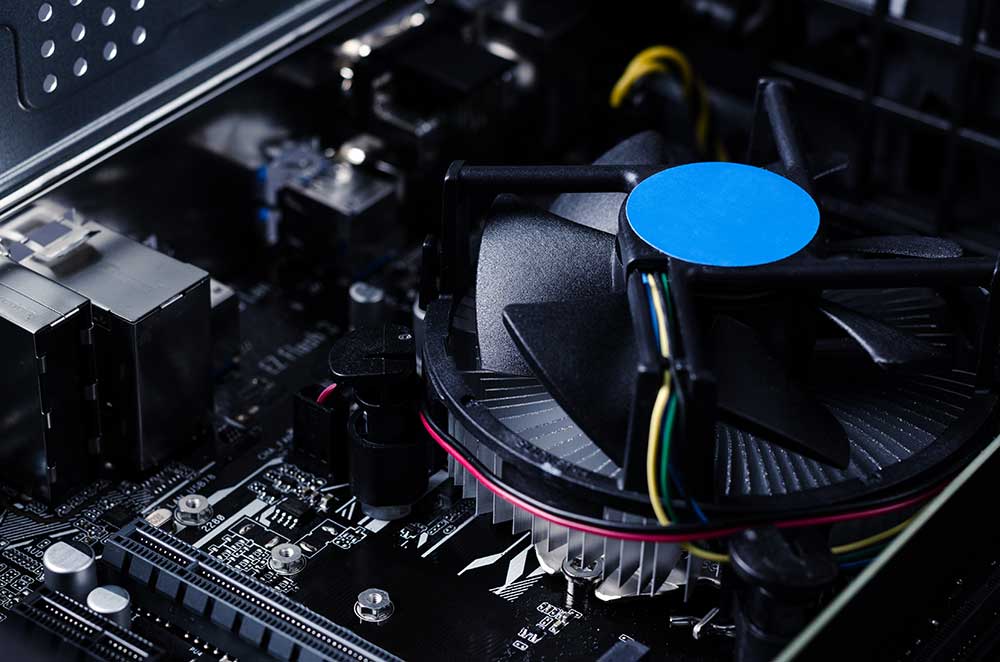
- Monitoring Software: Install monitoring software like HWMonitor or SpeedFan to track temperatures.
- Check Temperatures: Monitor CPU and GPU temperatures while your laptop is in use.
- Ensure Proper Ventilation: Place your laptop on a flat, hard surface to allow proper airflow and prevent overheating.
- Clean Air Vents: Make sure that the air vents are clear and free from blockages caused by dust. If needed, utilize compressed air to remove any obstructions.
- Reduce Load: Avoid running resource-heavy tasks for an extended period, especially in warm environments.
High temperatures can cause components to malfunction, potentially leading to screen flickering. By monitoring and regulating your laptop’s temperature, you might alleviate this issue.
Solution 6: Disable Fast Startup
Windows 11’s Fast Startup feature, while intended to improve boot times, might sometimes conflict with drivers and cause screen flickering. Here’s how to disable it:
Step 1: Press Windows Key + X and select “Power Options” from the menu.
Step 2: On the left sidebar, click on “Choose what the power buttons do.” Change Settings That Are Currently Unavailable: If needed, click on “Change settings that are currently unavailable.”

Step 3: Scroll down to the “Shutdown settings” section and uncheck “Turn on fast startup.”
Step 4: Click “Save changes” to apply the new settings.
Disabling Fast Startup might resolve screen flickering issues on your ASUS laptop running Windows 11 by ensuring a cleaner startup process. Restart your laptop and check if the flickering problem persists.
Solution 7: Uninstall Recent Windows Update
Sometimes, a recent Windows update might trigger compatibility issues leading to screen flickering. Here’s how you can uninstall recent updates:
Step 1: Press Windows Key + I to open Settings. Click on “Windows Update” and then “View update history.
Step 2: Choose “Uninstall updates.”
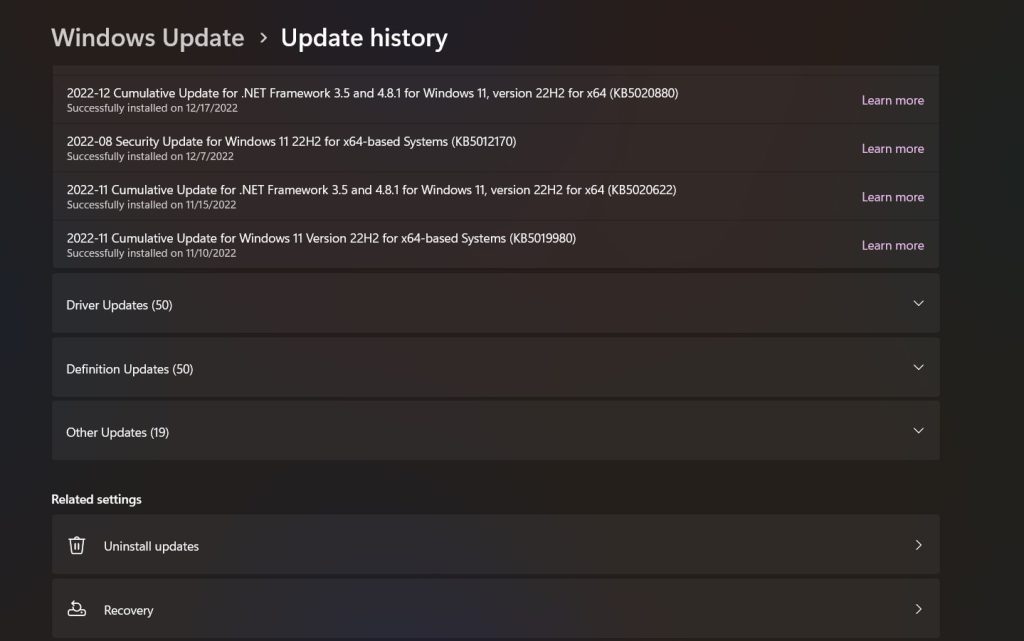
Step 3: Look for the most recent updates installed, right-click on them, and select “Uninstall.”
After uninstalling the recent update, restart your ASUS laptop. Check if the screen flickering issue has been resolved. Note that this process might temporarily halt certain Windows updates, so monitor your system for any pending or reinstallation of updates later on.
Solution 8: Check the Physical Cable Connections
It’s also important to rule out physical damage that could lead to a flickering laptop display. Carefully check that the display cable running from the motherboard to the laptop screen isn’t loose or slightly disconnected from either end.
Reconnect both ends properly and make sure the cable isn’t torn or crimped. Also, check for damage around hinge areas which could affect cables.
Solution 9: Use an Alternative External Display
As a hardware troubleshooting test, connect your ASUS laptop to an external monitor or TV using an HDMI cable. If the external display also starts flickering, it indicates a graphics hardware defect. Try updating BIOS and chipset drivers in this case. If the external display works fine, then try testing with a different OS like Linux via live USB. If the issue persists in Linux too, it likely indicates a faulty display panel.
Solution 10: Run a System File Checker (SFC) Scan
Windows has a built-in tool called System File Checker (SFC) that can scan and repair corrupted system files, which might be causing screen flickering. Here’s how to run an SFC scan:
Step 1: Right-click on the Start menu and select “Windows Terminal (Admin)” or “Command Prompt (Admin).”
Step 2: In the command prompt window, type the command: sfc /scannow and press Enter.
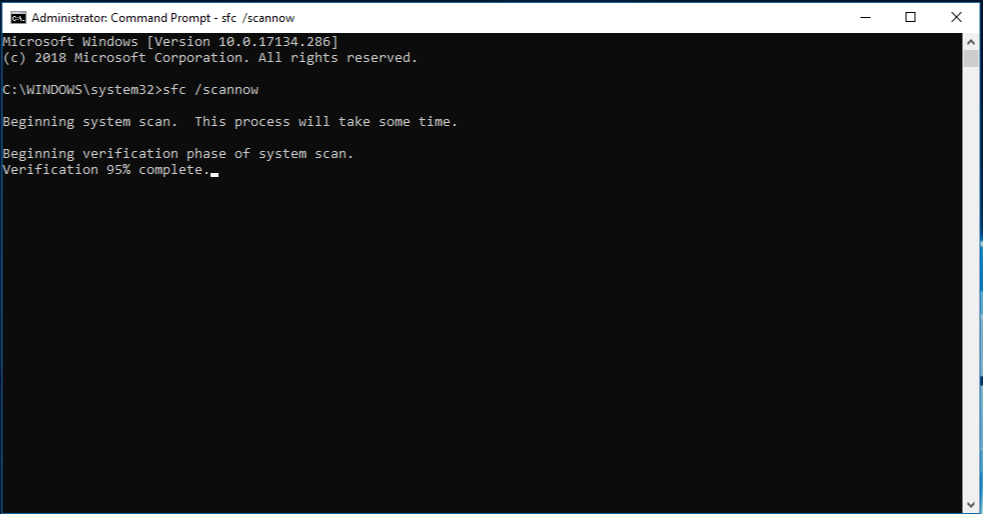
Step 3: The scan might take some time to complete. Let it run without interruptions. If the scan detects any issues, it will attempt to repair them automatically.
Step 4: After the SFC scan finishes, restart your ASUS laptop and check if the screen flickering issue persists.
This scan can often resolve underlying system file issues that might contribute to display problems.
Solution 11: Perform a BIOS Update
Updating the BIOS (Basic Input/Output System) of your ASUS laptop can sometimes address hardware-related issues, including screen flickering. However, proceed with caution as BIOS updates are sensitive and should be done carefully:
Step 1: Find the specific model number of your ASUS laptop. Go to the ASUS support website and locate the support section for drivers and downloads.
Step 2: Enter your laptop’s model number and navigate to the BIOS or firmware section to find the latest BIOS update available for download.
Step 3: Download the BIOS update file and carefully read any provided instructions or documentation accompanying the update.
Step 4: Follow the step-by-step instructions provided by ASUS to update the BIOS. Ensure your laptop is plugged in during this process to prevent interruptions.
Note: Incorrectly flashing the BIOS can render your laptop inoperable. Be extremely cautious and follow instructions precisely. If uncertain, consider seeking professional assistance or contacting ASUS support for guidance before attempting a BIOS update.
Solution 12: Reset Windows
Resetting Windows can be a more extensive solution, often used when other troubleshooting steps fail. Here’s how you can reset Windows 11:
Step 1: Press Windows Key + I to open Settings. Select “System” from the options. Click on “Recovery”.
Step 2: Under the “Reset PC” section, click on “Reset this PC.”
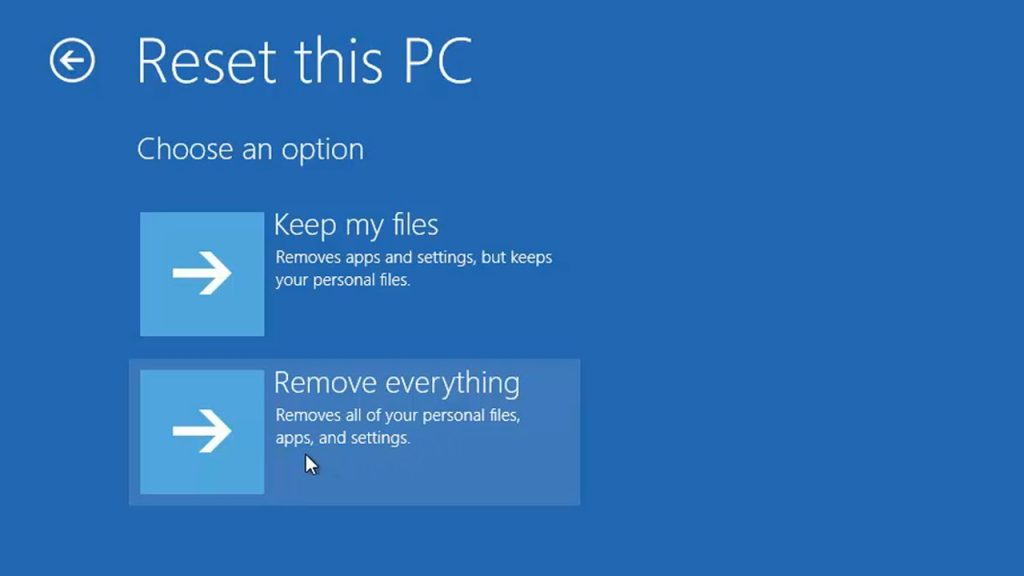
Step 3: You’ll have the choice to keep your files or remove everything. Select the appropriate option based on your preference and the severity of the issue.
Step 4: Windows will guide you through the process, which may take some time. Ensure your laptop is plugged in during this procedure.
Performing a Windows reset reinstalls the operating system while keeping or removing personal files and settings. It’s a significant step and should be considered as a last resort if other solutions haven’t resolved the screen flickering issue on your ASUS laptop running Windows 11. Before you continue, ensure that important files are backed up.
Conclusion
In summary, resolving the ASUS laptop screen flickering issue involves exploring various solutions. From updating drivers to adjusting settings and even considering hardware checks, these steps offer targeted ways to tackle the issue. By systematically applying these fixes, users can regain a stable and enjoyable display experience on their ASUS device.
FAQs:
Q1: Why is my ASUS laptop screen flickering on Windows 11?
Screen flickering on your ASUS laptop can be due to outdated drivers, incompatible software, hardware issues, overheating, or display settings conflicts. Each can trigger this problem.
Q2: How do I update graphic drivers on my ASUS laptop running Windows 11?
To update graphic drivers, access Device Manager, expand “Display adapters,” right-click on your graphics card, select “Update driver,” and either choose automatic updates or manually download the latest drivers from ASUS or the manufacturer’s website.
Q3: Can overheating cause screen flickering on an ASUS laptop?
Yes, overheating can impact hardware components, potentially leading to screen flickering. Ensure proper ventilation, avoid heavy tasks in warm environments, and monitor CPU/GPU temperatures using software tools.
Q4: Is it safe to perform a BIOS update to fix screen flickering on my ASUS laptop?
BIOS updates can address hardware-related issues, but they’re sensitive processes. Follow ASUS’s instructions precisely, as incorrect flashing could render your laptop inoperable. If uncertain, seek professional guidance or contact ASUS support before attempting a BIOS update.
Popular Post
Recent Post
How to Troubleshoot Xbox Game Bar Windows 10: 8 Solutions
Learn how to troubleshoot and fix issues with the Xbox Game Bar not working on Windows 10. This comprehensive guide provides 8 proven solutions to resolve common problems.
How To Record A Game Clip On Your PC With Game Bar Site
Learn how to easily record smooth, high-quality game clips on Windows 11 using the built-in Xbox Game Bar. This comprehensive guide covers enabling, and recording Game Bar on PC.
Top 10 Bass Booster & Equalizer for Android in 2024
Overview If you want to enjoy high-fidelity music play with bass booster and music equalizer, then you should try best Android equalizer & bass booster apps. While a lot of these apps are available online, here we have tested and reviewed 5 best apps you should use. It will help you improve music, audio, and […]
10 Best Video Player for Windows 11/10/8/7 (Free & Paid) in 2024
The advanced video players for Windows are designed to support high quality videos while option to stream content on various sites. These powerful tools support most file formats with support to audio and video files. In this article, we have tested & reviewed some of the best videos player for Windows. 10 Best Videos Player […]
11 Best Call Recording Apps for Android in 2024
Whether you want to record an important business meeting or interview call, you can easily do that using a call recording app. Android users have multiple great options too. Due to Android’s better connectivity with third-party resources, it is easy to record and manage call recordings on an Android device. However it is always good […]
10 Best iPhone and iPad Cleaner Apps of 2024
Agree or not, our iPhones and iPads have seamlessly integrated into our lives as essential companions, safeguarding our precious memories, sensitive information, and crucial apps. However, with constant use, these devices can accumulate a substantial amount of clutter, leading to sluggish performance, dwindling storage space, and frustration. Fortunately, the app ecosystem has responded with a […]
10 Free Best Barcode Scanner for Android in 2024
In our digital world, scanning barcodes and QR codes has become second nature. Whether you’re tracking packages, accessing information, or making payments, these little codes have made our lives incredibly convenient. But with so many barcode scanner apps out there for Android, choosing the right one can be overwhelming. That’s where this guide comes in! […]
11 Best Duplicate Contacts Remover Apps for iPhone in 2024
Your search for the best duplicate contacts remover apps for iPhone ends here. Let’s review some advanced free and premium apps you should try in 2024.
How To Unsubscribe From Emails On Gmail In Bulk – Mass Unsubscribe Gmail
Need to clean up your cluttered Gmail inbox? This guide covers how to mass unsubscribe from emails in Gmail using simple built-in tools. Learn the best practices today!
7 Best Free Methods to Recover Data in Windows
Lost your data on Windows PC? Here are the 5 best methods to recover your data on a Windows Computer.
