


Every computer collects junk over time. Right? Well, yes! Photos often get copied twice. Documents get saved in two folders by mistake. Old downloads pile up and never get deleted. This slowly eats up your storage space, and most people do not even notice until their drive is almost full. That is where a duplicate […]
Complete Guide on Managing Audio Input Devices [Latest]
Quickest Solution to Save Your Time: Easily Manage Audio Input Devices on Windows
If your audio input device is not working, you do not always need to go through every setting. In most cases, the issue comes down to either the wrong device being selected or permissions being turned off. Fixing these two areas often restores your microphone within a minute.
This quick approach is useful when you are in a meeting, recording, or using voice apps and need an immediate fix. Instead of trying multiple methods, you focus on the most common causes first and avoid unnecessary steps.
Step 1:
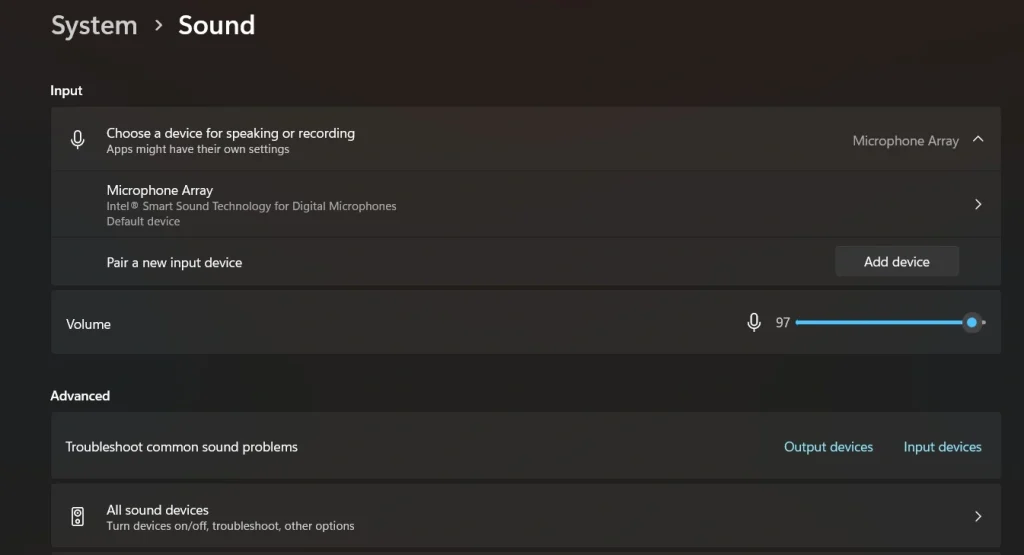
Open Settings > System > Sound, then select the correct input device under Input.
Step 2:
Go to Settings > Privacy & Security > Microphone and make sure microphone access is turned ON for apps.
Quick Summary: What This Article Covers
Managing audio input devices on Windows is simple once you understand where to look. This guide walks through the basic concepts, common fixes, and extra methods that help you control your microphone settings without confusion.
- What audio input devices are and how they work
- How to manage input devices using different Windows tools
- Ways to fix common microphone issues
- Additional methods beyond standard fixes
- Common errors and how to solve them quickly
- Tips to keep your audio input working smoothly
What Are Audio Input Devices?
Audio input devices are hardware components that capture sound and send it to your computer. The most common example is a microphone, which records your voice for calls, recordings, or voice commands. Other devices include headsets, external USB microphones, and built-in laptop mics.
These devices convert sound waves into digital signals that your system can process. Once captured, the audio can be used in apps like video conferencing tools, recording software, or games. Without proper configuration, even a working microphone may not produce any sound, which is why managing these devices correctly is important.
Before You Start, Know The Answers To These Questions:
1. Why is my microphone not showing in Windows?
Your microphone may not appear when the connection is faulty or when the drivers are outdated. Windows sometimes disables devices it cannot detect. If the port has dust or the cable is damaged, the system might skip the device completely. There are also times when privacy settings block access. Many users forget to enable the permission for apps. Once you check the cable, port, privacy panel, and drivers, the microphone usually shows up again without extra tools.
2. Why does the microphone volume stay too low?
A low microphone level usually happens when the input gain is set too low. Some apps also reduce it to protect your ears. Background noise filters can make the sound appear soft as well. If you use external sound cards or mixers, they might override the level chosen inside Windows. When you increase the input volume, check the advanced settings, turn off noise suppression for a moment, and restart the app. These steps often bring the volume back to a normal range.
3. Why do I hear an echo during calls?
Echo occurs when the microphone picks up the sound from your speakers. If the speaker volume is high, the mic catches the output and sends it back into the meeting. This creates a loop. Some apps have built-in echo cancellation, but it is not always perfect. Headphones help stop the feedback completely. You can also lower the speaker volume, move the mic away from the speakers, and disable unnecessary sound enhancements that amplify incoming audio.
4. Why is the sound breaking or cutting?
The sound breaks when the connection is unstable or when the system struggles to process the input. A faulty cable, damaged USB port, or weak Bluetooth link can interrupt the audio. Background processes on your PC may also slow down the audio engine. When you close heavy programs, switch ports, or reconnect the device, the sound often becomes steady again. If it continues, update the drivers and remove unused audio devices that might conflict with the main one.
Precautions Before You Start: Important Things To Keep In Mind
Precautions help you avoid common microphone problems before they even begin. A few simple checks make your device more stable and prevent sudden failures during important calls or recordings. These points guide you toward a smoother experience with your audio setup.
- Check your microphone cable
Make sure the cable is fixed properly. A loose cable often causes sudden drops or cracks in the sound. - Confirm that the device is supported
Some microphones need special drivers. If your device is very new or very old, you may need to install extra software. - Test the microphone before long calls
A short test helps you avoid problems during meetings. It also helps you adjust the volume to a safe level. - Avoid placing the mic near loud fans
Background air noise can disturb your voice. Try to keep the microphone away from fans or noisy equipment. - Check app permissions
Some apps need permission to use your microphone. If the permission is off, they cannot detect it. - Disable unused microphones
Too many active devices can confuse the system. Keep only the microphone you use enabled. - Restart the device after major changes
Some settings work only after a restart. This helps the system apply the new configuration. - Keep your system updated
Updates often fix sound errors. They also improve compatibility with new audio input devices.
How To Manage Audio Input Devices: Easy Methods
Windows gives you several tools to help in managing audio input devices. These tools allow you to choose the right device, check the volume, fix basic problems, and improve clarity.
Below are four methods that work well for most users. Each method is simple and takes only a few minutes.
Method 1: Use the Settings Panel
Many users start with the Settings panel. This is where Windows groups all the main audio options. It is easy to find and simple to use. The panel lets you select the device, adjust the input level, and test the microphone. It is the best place to check if your system detects your device.
The Settings panel shows all active audio input devices in one list. You can see the volume bar move when the system hears your voice. This helps you quickly confirm whether the mic is working. It is also useful for switching between built-in and external microphones.
Step 1. Open Settings and select Sound.
Step 2. Choose your input device and adjust the level.
Method 2: Use the Control Panel
The Control Panel has been part of Windows for many years. It offers deeper access to audio settings. Many users still prefer it because it provides classic options such as device properties, advanced settings, and enhancements.
This method helps when Settings cannot detect your device or when you need more detailed control. It also allows you to check hidden devices and disable extra microphones that cause conflicts. For older hardware, the Control Panel often gives better results.
Step 1. Open the Control Panel and select Sound.
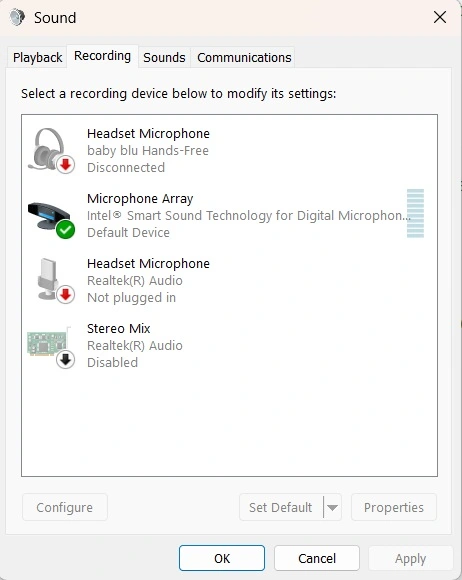
Step 2. Go to the Recording tab and manage your devices.
Method 3: Use the Troubleshooter
The built-in troubleshooter scans your audio input devices and finds common problems. It checks drivers, configurations, permissions, and basic hardware. Many issues are fixed quickly by this tool without extra effort.
The troubleshooter is helpful when you do not know the exact cause of the problem. It guides you through a series of checks and applies fixes automatically. It is a good choice when the microphone stops working suddenly.
Step 1. Open Settings and search for Troubleshoot.
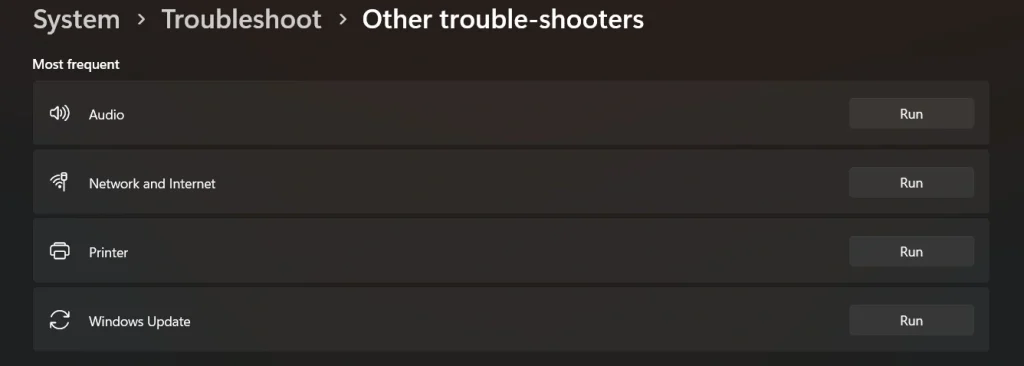
Step 2. Choose the Recording Audio troubleshooter and run it.
Method 4: Update or Reinstall Audio Drivers
Drivers allow Windows to communicate with your audio input devices. When they are outdated or damaged, the microphone stops working or behaves strangely. Updating or reinstalling the driver fixes many of these problems.
This method is useful when the microphone disconnects on its own or when the system shows errors. Once you install the correct driver, the device becomes stable and responds faster. It also improves compatibility with new apps.
Step 1. Open Device Manager and find Audio Inputs and Outputs.
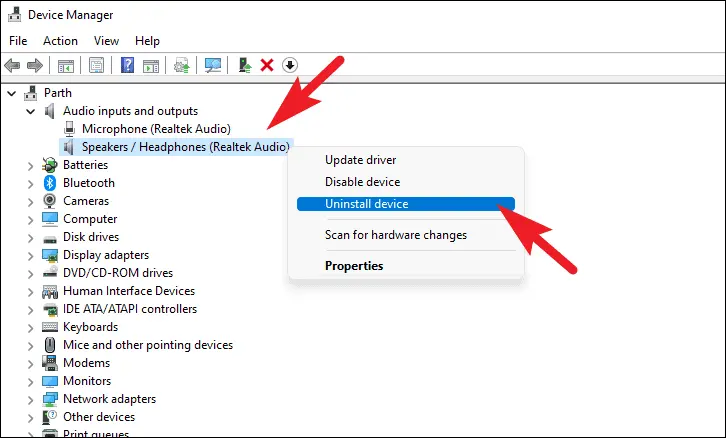
Step 2. Update or reinstall the driver for your microphone.
Method 5: Use Device Manager
Device Manager gives you direct access to your system hardware. If your microphone is not showing up or appears disabled, this is often the quickest place to check. It allows you to manually enable the device or refresh its connection without going through multiple menus.
This method is especially helpful when Windows fails to recognize your audio input device properly. A simple enable or update action here can restore functionality without needing advanced fixes.
Step 1: Press Windows + X, open Device Manager, and expand Audio inputs and outputs.
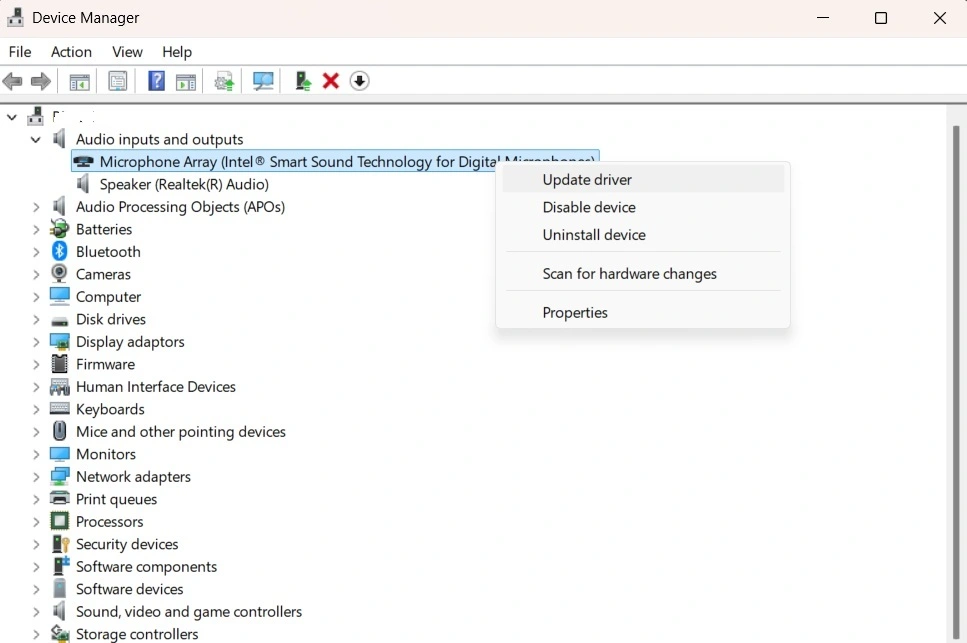
Step 2: Right-click your microphone and choose Enable device or Update driver.
Method 6: Adjust Input Volume and Boost
Sometimes the microphone works, but the input level is too low to detect sound properly. This can make it seem like the device is not working when it is simply underpowered. Adjusting input volume helps improve sound pickup.
Increasing the microphone boost can also enhance clarity, especially for built-in or low-sensitivity mics. This method is useful when your voice sounds too quiet or faint during recordings or calls.
Step 1: Go to Settings > System > Sound, and select your input device.
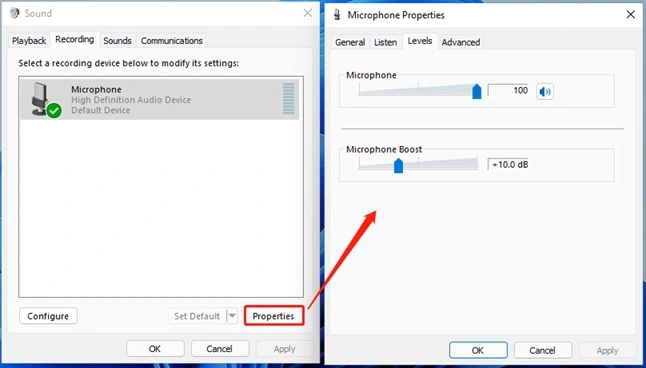
Step 2: Increase the Input volume and open Additional device properties to adjust Microphone Boost if needed.
Author’s Tip
Most users forget to clean their microphone ports. Dust or moisture inside the port can make the connection unstable. A small brush or a dry cloth is enough. A simple cleaning improves the overall clarity and prevents sudden drops in voice.
Another helpful habit is to check levels inside the apps you use. Many meeting apps and recording tools have their own volume controls. If you change only the Windows level, the app may still sound low. Adjusting both gives you a better and clearer result. This also makes it easier when managing audio input devices during important calls.
Advanced Tips: Extra Techniques for Better Control
Advanced tips help you refine the way your microphone works and keep your setup stable. These ideas are useful when basic adjustments are not enough. They give you more control, improve clarity, and reduce small problems that appear during long calls or recordings.
- Use a pop filter
It reduces sharp air sounds and makes your voice clearer. - Check advanced device properties
Sample rate changes can improve sound quality in some cases. - Turn off exclusive mode
This stops apps from taking full control of your microphone. - Use noise suppression when needed
This helps reduce traffic noise or typing sounds. - Keep only one virtual audio tool
Too many virtual devices can confuse the system. - Test the microphone with a recording app
A short recording helps you understand how others hear you. - Avoid using USB hubs for microphones
Direct ports offer better stability and fewer errors. - Use a light audio interface for better clarity
Small external interfaces improve the sound for studio work.
Common Audio Input Issues and How to Fix Them
Audio input problems can appear even when everything seems correctly set. These issues are often caused by small misconfigurations, outdated drivers, or permission settings. Understanding the common errors helps you fix them faster without guessing.
- Microphone not detected
The system does not recognize the device at all, so it does not appear in the input list. This usually happens due to loose connections, disabled hardware, or driver issues. Reconnect the device, try a different port, and check Device Manager to ensure it is enabled. - No sound input
The microphone is selected, but it is not picking up any sound. This can be caused by muted input, very low volume, or incorrect input levels. Check the input volume in sound settings and make sure the microphone is not muted. - Wrong device selected
Windows may automatically switch to another available microphone, especially if multiple devices are connected. This can lead to confusion when the selected mic is not the one you are using. Manually choose the correct device in Sound settings. - Microphone access blocked
Applications cannot use the microphone if system permissions are turned off. This often happens after updates or privacy changes. Go to Privacy settings and enable microphone access for both the system and individual apps. - Driver-related issues
Outdated, missing, or corrupted drivers can prevent the microphone from working properly. This may cause detection failures or unstable performance. Updating or reinstalling the audio driver usually resolves the problem. - Low or distorted audio
The microphone works, but the sound is too quiet, unclear, or distorted. This can be due to low input levels, background noise, or interference. Adjust input volume, enable microphone boost, and reduce nearby noise sources.
Conclusion
Managing audio input devices is easier when you know where to start. The tools inside Windows give you many ways to set the right microphone, fix problems, test the quality, and improve clarity. With the methods in this guide, most users can handle common issues on their own.
When you check your device regularly, update your drivers, and keep your settings organized, your microphone remains reliable. Clear sound helps you stay productive in calls, meetings, and recordings. With steady habits and simple steps, you can avoid most sound problems and enjoy smooth communication.
FAQs:
1. How do I choose a default microphone?
You can set the default microphone through the Sound settings or the Control Panel. Once selected, Windows sends all voice input through that device. Your apps will then use the chosen mic without needing extra changes.
2. Why does Windows switch microphones on its own?
Windows sometimes changes devices when you plug in a new audio accessory. Some apps also switch to the best available device. You can stop this by disabling unused microphones and setting one default device.
3. Should I disable noise suppression for better quality?
Noise suppression helps in busy places but may reduce the natural tone of your voice. If you record music or videos, turning it off gives a clearer result. For meetings, it is usually better to keep it on.
Author Bio:
Dinesh Lakhwani 

Dinesh Lakhwani, the entrepreneurial brain behind “TechCommuters,” achieved big things in the tech world. He started the company to make smart and user-friendly tech solutions. Thanks to his sharp thinking, focus on quality and the motto of never giving up, TechCommuters became a top player in the industry. His commitment to excellence has propelled the company to a leading position in the industry.
Popular Post
Recent Post

Duplicate File Finder Pro: A Complete Review, Everything You Should Know
Computers collect thousands of files over time. Well, yes! Many of them end up being duplicates created by backups, downloads, or accidental copies. These extra files take up valuable storage space and make it harder to keep everything organized. Finding and removing them manually can take hours. Right? Duplicate File Finder Pro is a tool […]

Monitor Screen Calibration Guide: Everything You Should Know
Your monitor shows colors every single day. But are those colors actually correct? Most people never stop to check this. They just use the screen as it comes out of the box. This habit can lead to wrong colors in photos, videos, and work files. Colors may look too warm or too cold without you […]

How To Check Installed RAM and RAM Slots [Complete Guide]
RAM plays an important role in how smoothly a computer runs. Short for Random Access Memory, it stores the data and instructions that Windows and active applications need at any given moment. From opening multiple browser tabs to running games and productivity software, RAM helps keep everything responsive. A system with limited memory may experience […]

What is Microsoft Autopilot Everything You Need To Know
Technology has changed the way companies manage computers. Well, yes! Employees now work from offices, homes, and remote locations. Setting up devices manually for every worker takes time and effort. It can also create mistakes that slow down productivity. This is where Microsoft Autopilot becomes useful. It helps businesses prepare and deploy Windows devices with […]

Enable Automatic Device Locking Feature Windows: Complete Guide
Introduction: Your computer stores important information such as emails, documents, passwords, and personal photos. Leaving it unlocked can put that data at risk. Thankfully, Windows includes built-in features that can automatically lock your device when you are away. Setting up automatic device locking is quick and does not require any extra software. In this guide, […]

How to Update Wireless Network Driver in Windows 11 and 10
Your Wi-Fi keeps dropping. Pages load slowly. The connection feels unstable? Well, you are not alone. Most of the time, the problem is not with your internet plan. It is with your wireless network driver. A driver is a small piece of software that helps your computer talk to its hardware. When it gets outdated, […]

Common Windows 11 Problems and Solutions (2026 Version)
Windows 11 has become more polished over the years, but it is still not completely free from problems. Even after regular updates from Microsoft, many users continue to face issues like lagging performance, failed updates, audio troubles, random crashes, and network errors. Some problems appear after installing new features, while others develop gradually as the […]

Fortect Driver Updater Review: Features, Steps, Pros, and Cons.
A new PC usually feels quick and responsive. Applications open instantly, games run smoothly, and everything works as expected. As time passes, however, you may notice slower performance, system crashes, hardware glitches, or devices that stop working properly. While many people assume malware or low storage space is to blame, outdated drivers are often the […]

New Features Coming in Windows 11 This Year [2026]
Microsoft is always working to make Windows better. This year is no exception. The company has announced and rolled out several exciting updates for its users. These updates touch almost every part of the operating system. From the Start menu to system settings, changes are arriving fast. If you use Windows daily, you will want […]

