


Every computer collects junk over time. Right? Well, yes! Photos often get copied twice. Documents get saved in two folders by mistake. Old downloads pile up and never get deleted. This slowly eats up your storage space, and most people do not even notice until their drive is almost full. That is where a duplicate […]
How To Connect a Wireless Printer Easily to Windows 11/10 PC
Introduction:
Printing tasks are part of most home and office work today. Isn’t it? Well, yes! Using a wireless printer makes printing easier and faster because you don’t need cables. It allows you to print documents and images from any corner of your room as long as your device and printer are connected to the same network.
Many people find it confusing to connect a wireless printer easily to Windows. The process may seem technical, but it’s actually quite simple once you know the right steps. Whether you are setting it up for the first time or reconnecting after a reset, this guide will help you connect a wireless printer easily to a Windows system without stress.
Quickest Solution: Add Your Wireless Printer in Under 2 Minutes
Setting up a wireless printer does not have to be complicated. If your printer is already connected to Wi-Fi, Windows 11/10 can detect and add it automatically in just a few clicks.
This quick method works for most modern printers right out of the box. No software, no drivers, no hassle. Just a fast, clean setup that gets you printing within minutes.
Step 1: Open Settings, go to Bluetooth & devices, then click Printers & scanners. Click Add Device and wait for Windows to detect your printer.
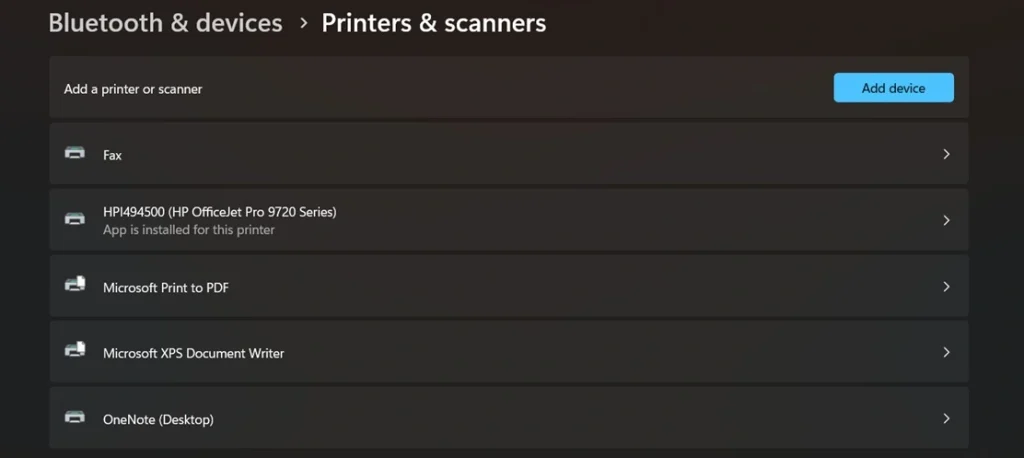
Step 2: Click your printer’s name when it appears. Windows installs the driver automatically. Your printer is ready to use.
What does this article cover?
This guide walks you through every reliable method to connect a wireless printer to Windows 11/10. Whether you are a first-time user or troubleshooting a stubborn connection, you will find a working solution here.
- Important Precautions Before You Start: Key checks to avoid setup failures before you begin.
- Method 1: Connect the Printer to Wi-Fi Network: Get your printer on the same network as your PC.
- Method 2: Add the Printer via Windows Settings: Use built-in Windows tools for a quick, driverless setup.
- Method 3: Install Manufacturer’s Printer Software: Get full features and the most reliable drivers.
- Method 4: Use the WPS Button Method: The fastest one-button connection option available.
- Helpful Tips for Beginners and Advanced Users: Fixes, shortcuts, and practical advice for every skill level.
- Conclusion and FAQs: Quick answers to the most common printer setup questions.
Before You Begin: Everything Your Setup Needs to Succeed
Skipping prep steps is the number one reason printer setup fails. Check these eight things before you start. They save time and prevent frustration.
- Same Wi-Fi network: Your printer and PC must be on the same network. A 5GHz PC paired with a 2.4GHz printer will not detect each other.
- Printer is powered on: Confirm the printer is fully on and not in sleep or power-saving mode.
- Wi-Fi is enabled on the printer: Most printers have a Wi-Fi button or wireless menu. Make sure wireless mode is active.
- Windows is up to date: Outdated Windows versions can cause driver conflicts. Run Windows Update before starting.
- Printer drivers are available: Visit your printer manufacturer’s website and download the latest driver for your model.
- Firewall is not blocking the printer: Temporarily disable third-party firewalls if your PC cannot detect the printer during setup.
- Printer is within router range: Weak signal causes dropped connections. Keep the printer reasonably close to your router.
- No pending printer errors: Check the printer’s display panel for any error messages or paper jams before you begin.
Important Precautions Before You Start
Before you begin, make sure everything is ready for a smooth connection. Taking a few simple precautions can help you avoid setup errors or failed connections.
Follow these important tips before you connect your printer:
- Check Wi-Fi Connection: Ensure your Wi-Fi network is active and stable. The printer and your PC must connect to the same network. Weak signals can interrupt setup.
- Turn On the Printer: Plug in your printer and make sure it is powered on. Wait for a few seconds to let it initialize before proceeding.
- Update Windows: Confirm your Windows 11 or Windows 10 is up to date. Updates often include new drivers that help detect wireless printers easily.
- Keep Printer Close to Router: Place your printer near your Wi-Fi router during setup. This prevents signal drops and ensures smooth configuration.
- Know Your Network Name and Password: You will need the Wi-Fi name (SSID) and password. Make sure you have them ready before you start the setup.
- Disable VPN Temporarily: A VPN connection might block local network discovery. Turn it off until you finish connecting your printer.
- Restart Devices if Needed: If your printer or PC does not detect the other, restart both. It often fixes small connection issues.
- Read the Manual Once: Skim through your printer’s quick setup guide. Each model may have a small difference in the connection steps.
How To Connect a Wireless Printer Easily to Windows 11/10 PC
There are several ways to connect a wireless printer easily to Windows systems. You can do it through Wi-Fi, Windows settings, or the printer software itself. Choose the one that fits your situation best. Each method is simple and works for both beginners and advanced users.
Method 1: Connect the Printer to Wi-Fi Network
The first and most common step is to connect your printer to the Wi-Fi network. Once it joins your home network, your Windows 11 or 10 PC can detect it easily. This process helps your devices communicate wirelessly and eliminates the need for USB cables.
When your printer is connected directly to Wi-Fi, you can print from multiple computers or even mobile devices on the same network. It’s convenient and saves time, especially in offices or households with several users.
Why this method helps:
- Works for almost all modern wireless printers.
- Allows you to print from multiple devices.
- Reduces the number of cables and clutter.
- Makes your printer available across your local network.
Steps:
Step 1: Open your printer’s control panel and find the Network or Wi-Fi Settings option. Select Wireless Setup Wizard.
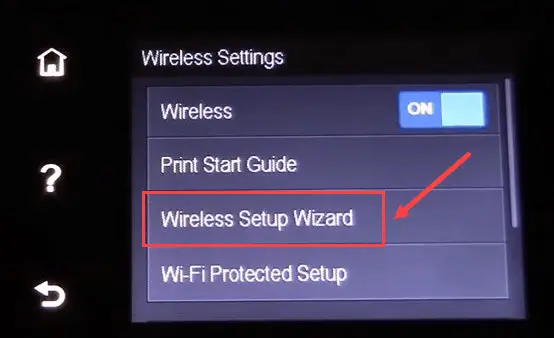
Step 2: Choose your Wi-Fi network name, enter the password, and wait until the connection completes.
Once done, your printer will show a Wi-Fi icon or a confirmation message. It is now ready to be added to your Windows PC.
Method 2: Add the Printer via Windows Settings
If your printer is already connected to Wi-Fi, you can add it through Windows Settings. This method lets your PC search for and install the correct drivers automatically. It’s one of the fastest ways to connect a wireless printer easily Windows computers.
Windows 11 and Windows 10 both have built-in features that make printer detection simple. You just need to let your system find the printer and follow the on-screen instructions.
Why this method helps:
- No manual driver installation needed.
- Fast and simple setup for home users.
- Windows installs required printer software automatically.
- Works for most popular printer brands.
Steps:
Step 1: Go to Settings > Bluetooth & Devices > Printers & Scanners.

Step 2: Click Add Device, select your wireless printer from the list, and wait while Windows installs it.
Once installation finishes, print a test page to confirm the setup is successful.
Method 3: Install Manufacturer’s Printer Software
Printer companies like HP, Canon, Epson, and Brother offer their own setup tools. These tools automatically detect the printer and help configure the wireless connection easily. Using the official software often gives better control over print quality, ink levels, and updates.
This option is useful if Windows cannot find your printer automatically. It also provides extra features like scanning, maintenance, and firmware updates.
Why this method helps:
- Provides full control over printer settings.
- Ensures the latest drivers are installed.
- Fixes issues if the printer isn’t detected by Windows.
- Works even with older or specific printer models.
Steps:
Step 1: Visit the official website of your printer’s manufacturer (like HP or Epson) and download the setup software.
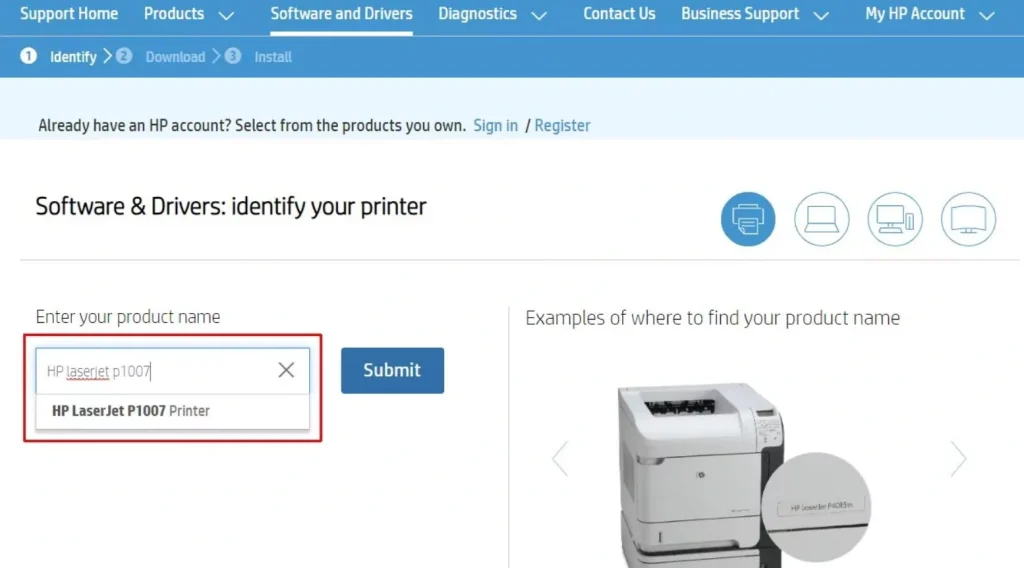
Step 2: Run the installer, choose Wireless Setup, and follow the guided instructions to complete the connection.
After the process, your printer will appear in the Printers & Scanners section of your PC.
Method 4: Use the WPS (Wi-Fi Protected Setup) Button Method
The WPS button method is one of the quickest ways to connect a wireless printer easily to Windows systems. It doesn’t require you to type your Wi-Fi password. All you need is a Wi-Fi router with a WPS button.
This method is perfect if you prefer a hands-free setup. It automatically connects your printer to the network without any manual entry.
Why this method helps:
- Quick and easy connection process.
- No need to enter Wi-Fi password.
- Great for non-technical users.
- Works with most modern routers and printers.
Steps:
Step 1: Press and hold the WPS button on your Wi-Fi router for a few seconds.
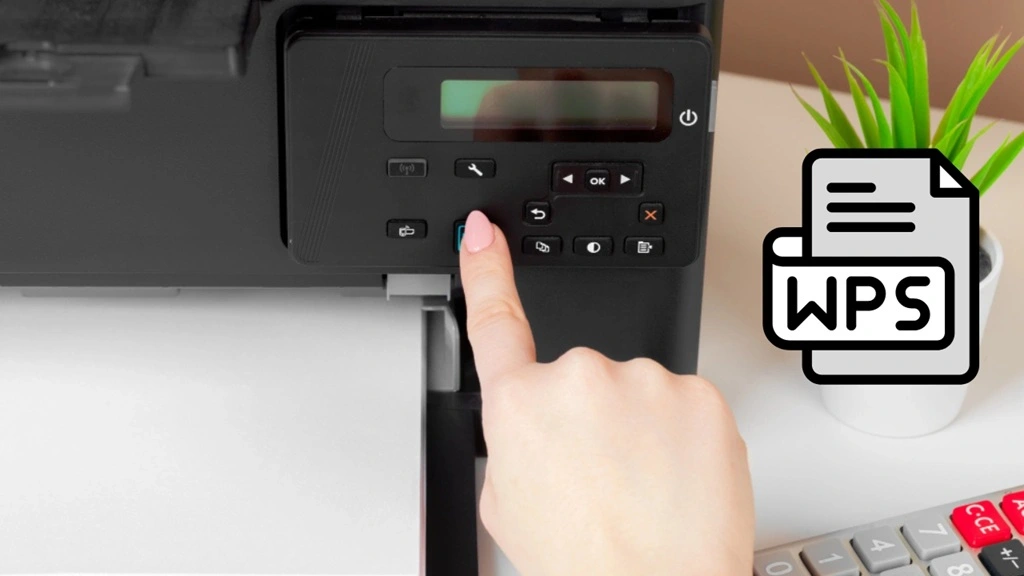
Step 2: Within two minutes, press the Wireless or WPS button on your printer.
The printer will automatically connect to the network. Wait until the Wi-Fi light becomes steady. Then, add it to your Windows PC through the Printers & Scanners settings if needed.
Helpful Tips for Beginners and Advanced Users
Once you connect your printer, maintaining it properly helps avoid connection drops and printing errors. Here are useful tips for both new and experienced users.
- Restart the Router and Printer Occasionally: It clears the cache and fixes minor connection problems.
- Assign a Static IP Address: This prevents the printer from losing connection when the router restarts or changes IP addresses.
- Use Windows Troubleshooter: The built-in troubleshooter can fix many printer issues automatically without needing extra tools.
- Install Updated Drivers:
Always keep printer drivers up to date to maintain smooth performance and compatibility. - Avoid Network Congestion:
If too many devices share the same Wi-Fi, your printer might lag. Disconnect unused devices temporarily. - Check Firewall Settings: Sometimes, security software can block printer communication. Add the printer as a trusted device.
- Use Manufacturer Apps:
Many printer brands have mobile and PC apps that simplify wireless printing and scanning. - Print a Test Page After Setup:
This confirms everything works correctly and helps identify connection problems early.
When Things Go Wrong: Common Problems and How to Fix Them
Wireless printer issues are frustrating but almost always fixable. Here are eight common problems users face and the simplest way to resolve each one.
- Printer not detected by Windows: Restart both the printer and your PC. Make sure both are on the same Wi-Fi network and try adding the printer again.
- Printer shows as offline: Right-click the printer in Settings and select See what’s printing. Uncheck Use Printer Offline if it is enabled.
- Driver installation fails: Uninstall the existing driver from Device Manager. Download a fresh copy directly from the manufacturer’s website and reinstall.
- Printer connects but does not print: Check the print queue for stuck jobs. Clear all pending jobs and send a new test print.
- Wi-Fi connection keeps dropping: Move the printer closer to the router. Assign a static IP address to the printer to prevent reconnection issues.
- WPS button method not working: Some routers disable WPS by default. Log into your router settings and confirm WPS is enabled before trying again.
- Printer detected but prints gibberish: This usually means a wrong or corrupted driver is installed. Remove the printer, reinstall the correct driver, and add it again.
- Multiple copies of the same printer appear: Delete all duplicate entries from Printers and scanners. Keep only the one showing the correct status and retest.
Conclusion
Connecting a wireless printer to a Windows 11 or Windows 10 PC might seem complicated, but with the right approach, it becomes quick and simple. Each method described above helps you connect a wireless printer easily to Windows systems without stress. Whether you use Wi-Fi setup, Windows settings, manufacturer software, or the WPS button, the process takes only a few minutes.
Remember to follow precautions before you begin and use the tips shared for better performance. Once connected, you can enjoy smooth, cable-free printing across multiple devices. A wireless printer not only saves time but also keeps your workspace neat and modern.
FAQs:
1. Why is my wireless printer not showing on Windows?
Fact: Windows might fail to detect the printer if both devices aren’t on the same Wi-Fi network.
Logic: Printers communicate through local network signals, so mismatched networks block detection.
Understanding: Your printer could be connected to a guest network or an older Wi-Fi frequency band.
Quick Tip: Reconnect both your PC and printer to the same Wi-Fi and try adding it again from Printers & Scanners.
2. Can I connect my wireless printer to more than one computer?
Fact: Yes, multiple computers can share the same wireless printer over one network.
Logic: The printer broadcasts its connection to all devices linked to the same router.
Understanding: Once added, every PC on the network can access the printer without repeating the setup.
Quick Tip: Add the printer manually on each device by searching for it in Printers & Scanners.
3. What should I do if my printer keeps disconnecting from Wi-Fi?
Fact: Frequent disconnection usually happens because of IP address changes or weak Wi-Fi signals.
Logic: When a router restarts, it may assign a new IP address, breaking the link between devices.
Understanding: The printer temporarily loses its place on the network and fails to respond.
Quick Tip: Assign a static IP to your printer and keep it close to the router for stable connectivity.
Author Bio:
Dinesh Lakhwani 

Dinesh Lakhwani, the entrepreneurial brain behind “TechCommuters,” achieved big things in the tech world. He started the company to make smart and user-friendly tech solutions. Thanks to his sharp thinking, focus on quality and the motto of never giving up, TechCommuters became a top player in the industry. His commitment to excellence has propelled the company to a leading position in the industry.
Popular Post
Recent Post

Duplicate File Finder Pro: A Complete Review, Everything You Should Know
Computers collect thousands of files over time. Well, yes! Many of them end up being duplicates created by backups, downloads, or accidental copies. These extra files take up valuable storage space and make it harder to keep everything organized. Finding and removing them manually can take hours. Right? Duplicate File Finder Pro is a tool […]

Monitor Screen Calibration Guide: Everything You Should Know
Your monitor shows colors every single day. But are those colors actually correct? Most people never stop to check this. They just use the screen as it comes out of the box. This habit can lead to wrong colors in photos, videos, and work files. Colors may look too warm or too cold without you […]

How To Check Installed RAM and RAM Slots [Complete Guide]
RAM plays an important role in how smoothly a computer runs. Short for Random Access Memory, it stores the data and instructions that Windows and active applications need at any given moment. From opening multiple browser tabs to running games and productivity software, RAM helps keep everything responsive. A system with limited memory may experience […]

What is Microsoft Autopilot Everything You Need To Know
Technology has changed the way companies manage computers. Well, yes! Employees now work from offices, homes, and remote locations. Setting up devices manually for every worker takes time and effort. It can also create mistakes that slow down productivity. This is where Microsoft Autopilot becomes useful. It helps businesses prepare and deploy Windows devices with […]

Enable Automatic Device Locking Feature Windows: Complete Guide
Introduction: Your computer stores important information such as emails, documents, passwords, and personal photos. Leaving it unlocked can put that data at risk. Thankfully, Windows includes built-in features that can automatically lock your device when you are away. Setting up automatic device locking is quick and does not require any extra software. In this guide, […]

How to Update Wireless Network Driver in Windows 11 and 10
Your Wi-Fi keeps dropping. Pages load slowly. The connection feels unstable? Well, you are not alone. Most of the time, the problem is not with your internet plan. It is with your wireless network driver. A driver is a small piece of software that helps your computer talk to its hardware. When it gets outdated, […]

Common Windows 11 Problems and Solutions (2026 Version)
Windows 11 has become more polished over the years, but it is still not completely free from problems. Even after regular updates from Microsoft, many users continue to face issues like lagging performance, failed updates, audio troubles, random crashes, and network errors. Some problems appear after installing new features, while others develop gradually as the […]

Fortect Driver Updater Review: Features, Steps, Pros, and Cons.
A new PC usually feels quick and responsive. Applications open instantly, games run smoothly, and everything works as expected. As time passes, however, you may notice slower performance, system crashes, hardware glitches, or devices that stop working properly. While many people assume malware or low storage space is to blame, outdated drivers are often the […]

New Features Coming in Windows 11 This Year [2026]
Microsoft is always working to make Windows better. This year is no exception. The company has announced and rolled out several exciting updates for its users. These updates touch almost every part of the operating system. From the Start menu to system settings, changes are arriving fast. If you use Windows daily, you will want […]

