


Slow computers are a common problem for almost every Windows user. Well, yes! Over time, your PC picks up junk files. These files sit quietly in the background. They take up space and slow things down. Programs open slower. Windows takes longer to boot. Even simple tasks like opening a folder can feel sluggish. There […]
Adjust Display Brightness Settings Easily in Windows PC
Quick Fix: Adjust Your Screen Brightness Right Now
Struggling with a screen that’s too dim to see clearly or too bright for comfort? You don’t need to dig through multiple menus to fix it. Windows gives you a fast and simple way to adjust brightness in just two steps.
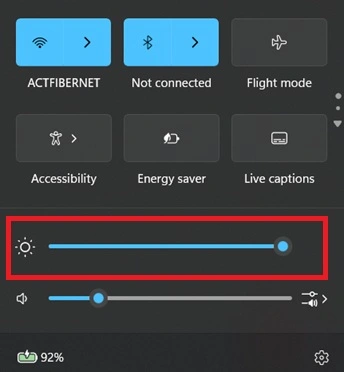
Step 1: Click the notification icon at the bottom right of your taskbar to open the Action Center. You will see a brightness slider at the bottom of the panel.
Step 2: Drag the slider left to decrease brightness or right to increase it. Your screen will adjust instantly as you move it.
What This Guide Covers?
Managing screen brightness in Windows is more than just sliding a bar up or down. The right brightness level protects your eyes, saves battery life, and improves your overall screen experience. This guide walks you through every method available so you can pick what works best for your setup.
Here is what we cover in this article:
- Precautions to take first — Important checks and safety tips to go through before you start changing any display settings on your Windows PC
- 11 ways to adjust brightness in Windows — A complete set of methods including Function Keys, Windows Settings, Action Center, Control Panel, Power Options, Keyboard Shortcuts, Graphics Card Software, Windows Mobility Center, Third-Party Apps, Registry Editor, and Command Prompt or PowerShell
- The best brightness level for your eyes — Simple guidelines to help you set a brightness level that reduces eye strain during long screen sessions
- How to auto-adjust brightness based on battery — A built-in Windows feature that automatically lowers brightness to save power when your battery is running low
- Advantages and disadvantages of adjusting brightness — A balanced look at how brightness changes affect your health, battery, and display performance
- Conclusion and FAQs — A quick summary of key takeaways, along with answers to the most commonly asked questions about Windows brightness settings
If your screen is overly bright or dim, it can strain your eyes and make tasks uncomfortable. Fortunately, Windows offers simple tools to fine-tune your display brightness. Despite how easy it is, many users aren’t aware of these quick fixes.
Windows has many built-in tools to help you. You can change brightness with just a few clicks. Some methods work better than others. Different computers may have different options. But most Windows computers support basic brightness controls.
This guide presents 11 straightforward ways to adjust your screen brightness. It also covers how to automate brightness adjustments in Windows. All methods are compatible with both Windows 10 and Windows 11, so you can choose the one that suits your device best.
Precautions To Take Before Performing These Steps
Before you start changing brightness settings, take some safety steps.
- Check your power settings – Make sure your laptop has enough battery
- Note your current brightness level – Write down what works now
- Check for Windows updates – New updates can fix brightness bugs
- Close running programs – This prevents crashes during changes
- Have your computer manual ready – Some steps may need specific info
- Test changes in good lighting – Don’t adjust in very dark or bright rooms
11 Ways To Adjust Display Brightness Settings Easily / Automatically in Windows
Windows gives you many options to control screen brightness. Some methods are quick and simple. Others offer more control and features. The best method depends on your computer type and personal needs.
Today’s computers come equipped with automatic brightness control, which adapts screen brightness according to ambient light conditions. Built-in sensors monitor the surrounding illumination and adjust the display accordingly. This not only helps conserve battery life but also reduces eye strain for a more comfortable viewing experience.
Method 1: Using Function Keys
Function keys offer the quickest method for adjusting screen brightness. On most laptops, you’ll find dedicated keys—often marked with sun icons—that make it easy to increase or decrease brightness instantly.
This approach is compatible with nearly all laptops. It’s fast, bypasses any menu navigation, and applies changes instantly. A brightness indicator appears on the screen, making adjustments visible in real time. Users generally find it simple and highly convenient.
How it helps:
- Works instantly without opening any programs
- Displays the current brightness level on-screen in real time as you make adjustments.
- Available on most laptop keyboards by default
Steps:
Step 1: Look for brightness keys on your F-row (usually F1, F2, or arrow keys with sun symbols).
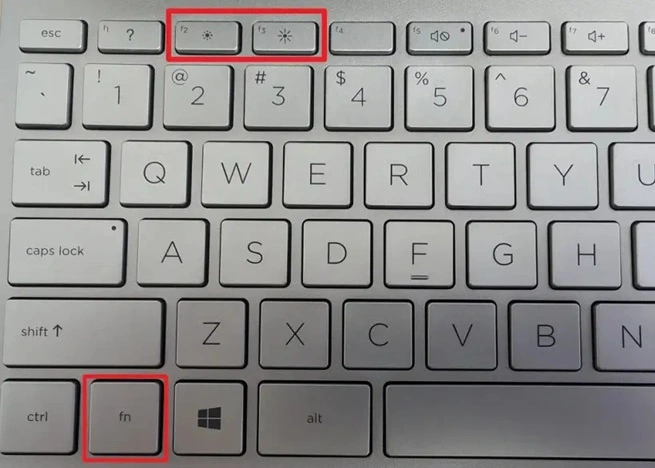
Step 2: Hold down the Fn key and tap the designated brightness key to adjust your screen’s brightness up or down.
Method 2: Windows Settings Panel
The Settings panel gives full control over brightness. You can adjust it precisely. Automatic brightness can also be enabled. It’s the main hub for display settings. All options are in one place.
You can set the brightness for different power modes. This helps save battery.
How it helps:
- Provides precise brightness control with a slider
- Works on all Windows computers, including desktops
- Offers automatic brightness options in the same location
Steps:
Step 1: Press Windows key + I, then click on “System” and select “Display”.
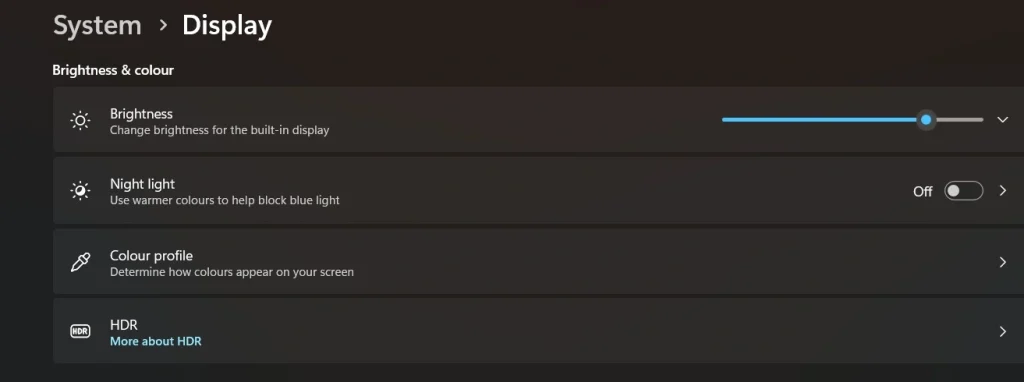
Step 2: To quickly modify your screen’s brightness in Windows, simply drag the slider located under the ‘Brightness and Color’ section.
Method 3: Action Center Quick Settings
Action Center puts brightness control at your fingertips. Click the notification icon to open it. The brightness tile is right there. This method is faster than opening the full Settings.
Quick settings save time when you need fast changes. You don’t need to navigate through menus. The brightness tile shows the current level. You can adjust it with one click. This feature works the same on all Windows versions.
How it helps:
- Accessible from any screen with one click
- Shows the current brightness percentage clearly
- No need to open multiple windows or menus
Steps:
Step 1: Click the notification icon in the bottom-right corner or press Windows + A.
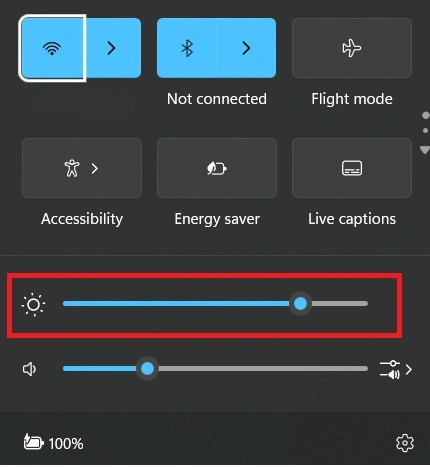
Step 2: Click on the brightness tile to cycle through brightness levels
Method 4: Control Panel Display Settings
Control Panel offers advanced brightness options. This is the old-style Windows interface. Some computers only work with this method. It gives you more technical controls than modern Settings.
How it helps:
- Compatible with older display drivers and hardware
- Provides additional advanced display configuration options
- Works when the modern Settings app has problems
Steps:
Step 1: Open Control Panel. Then, select “Power Options” from the list.
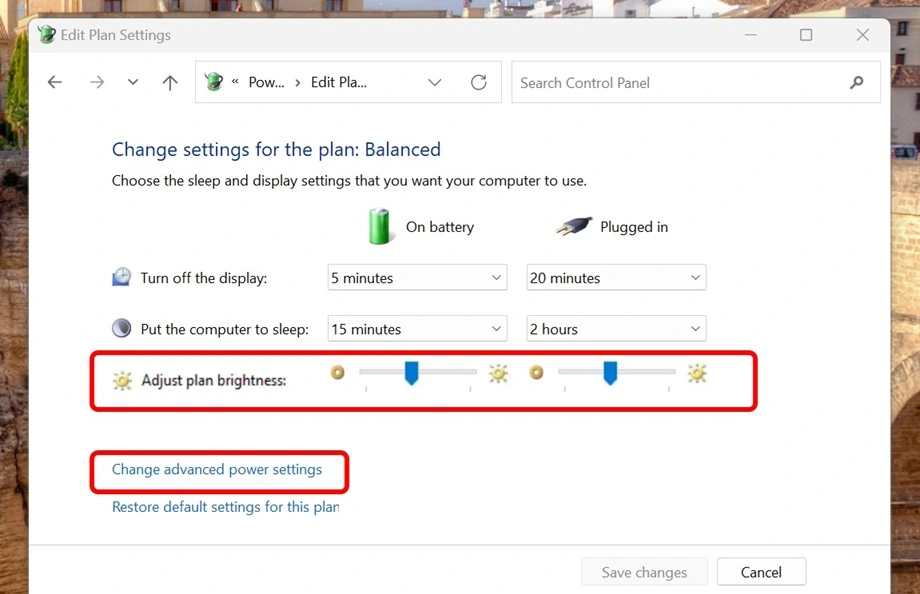
Step 2: Select “Change plan settings” and adjust the display brightness slider
Method 5: Power Options Menu
You can change screen brightness depending on the power mode using Power Options. Set different levels for battery and plugged-in use. You can set one level for battery use and another for when plugged in. This helps save battery. Each power plan remembers your settings automatically.
Power plans are smart ways to manage computer energy. Each plan can have different brightness levels. This means you can adjust display brightness automatically in Windows based on the power source. Your laptop will dim on battery to save power.
How it helps:
- Automatically adjusts brightness based on power source
- Extends battery life by dimming the screen when unplugged
- Saves custom brightness settings for each power plan
Steps:
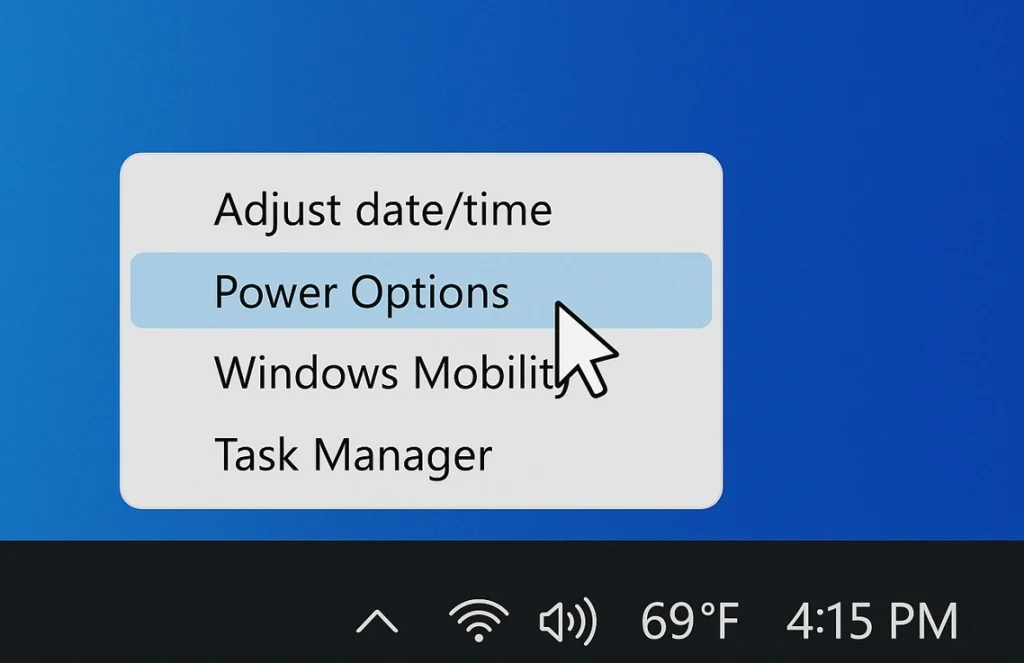
Step 1: Right-click the battery icon in the system tray and select “Power Options.”
Step 2: Click “Change plan settings” next to your current plan and adjust the brightness sliders
Method 6: Keyboard Shortcut Keys
Some Windows versions support brightness shortcuts. These work without function keys. Press the Windows key with the plus or minus keys. This method works on desktop computers, too.
Keyboard shortcuts are universal controls. They work even when other methods fail. You don’t need special laptop keys. Any keyboard can use these shortcuts. They’re helpful when function keys are broken.
How it helps:
- Works on desktop computers without special brightness keys
- Functions even when display drivers have issues
- Provides quick access using any standard keyboard
Steps:
Step 1: Press Windows key + Plus key to increase brightness.
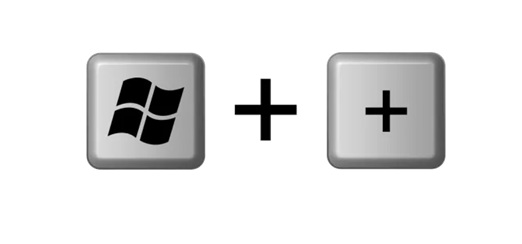
Step 2: Press Windows key + Minus key to decrease brightness
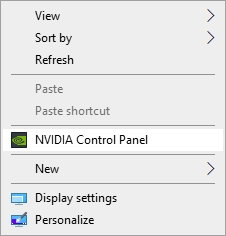
Method 7: Graphics Card Software
Your graphics card may have brightness controls. NVIDIA and AMD both offer control panels. These programs give you advanced options. They work better than Windows controls sometimes.
Graphics card software connects directly to your display hardware. This gives more precise control over brightness. Professional users often prefer these tools. They offer color correction and brightness calibration features.
How it helps:
- Provides professional-grade brightness and color controls
- Works directly with graphics hardware for better performance
- Offers advanced calibration tools for accurate displays
Steps:
Step 1: Right-click the desktop and select your graphics control panel (NVIDIA Control Panel or AMD Radeon Settings).
Step 2: Navigate to display settings and adjust brightness using the provided slider.
Method 8: Windows Mobility Center
The Mobility Center is designed for laptop users. It puts all mobile settings in one place. Brightness control is prominently featured. This tool is perfect for people who travel with laptops.
Windows created Mobility Center for portable computers. It shows battery, volume, and brightness together. You can adjust multiple settings quickly. This saves time when moving between locations with different lighting.
How it helps:
- Combines brightness with other laptop settings in one window
- Designed specifically for mobile computer usage
- Shows multiple system status indicators together
Steps:
Step 1: Press Windows key + X and select “Mobility Center” from the menu.
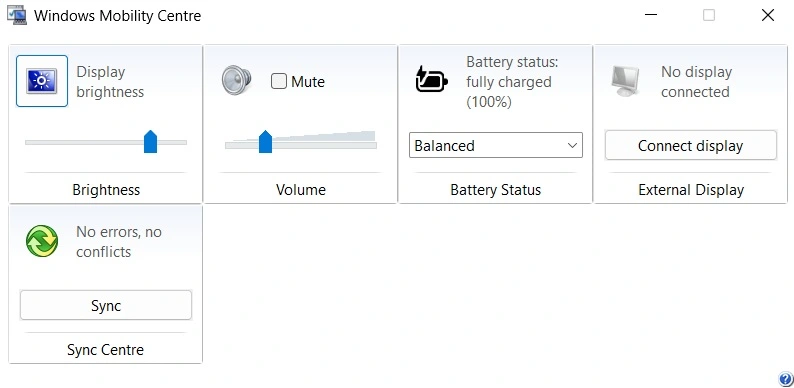
Step 2: Use the brightness slider in the “Display brightness” tile
Method 9: Third-Party Brightness Apps
Third-party apps offer extra brightness features. Some apps can make screens dimmer than Windows allows. Others add scheduling features. These apps help users with special brightness needs.
Some people need very specific brightness controls. Third-party apps fill this gap. They can schedule brightness changes throughout the day. Some apps work with multiple monitors better than Windows’ built-in tools.
How it helps:
- Extends brightness range beyond Windows default limits
- Offers scheduling and automation features not in Windows
- Provides better multi-monitor brightness management
Steps:
Step 1: Download and install a brightness control app like f.lux.
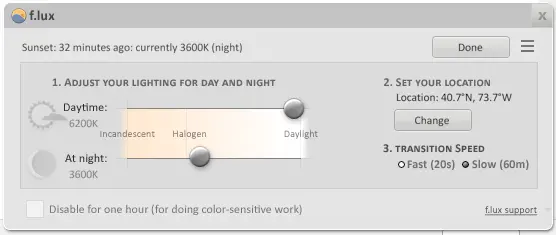
Step 2: Configure brightness settings and automation rules within the app
Method 10: Registry Editor Method
Registry Editor gives advanced users complete control. This method works when other options fail. Only experienced users should try this method. It requires careful attention to avoid problems.
Windows Registry stores all system settings. Brightness controls are stored here, too. Direct registry editing bypasses normal restrictions. This method can fix broken brightness controls. But it requires technical knowledge to use safely.
How it helps:
- Fixes brightness problems when normal methods fail
- Provides complete control over brightness behavior
- Can restore brightness controls on problematic systems
Steps:
Step 1: Press Windows + R, type “regedit” and navigate to brightness-related registry keys.
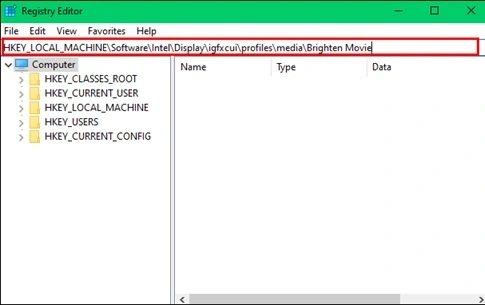
Step 2: Modify brightness values carefully and restart the computer to apply changes
Method 11: Command Prompt/PowerShell
Command-line tools offer script-based brightness control. Developers and advanced users prefer this method. You can create automated brightness scripts. This method works great for remote computer management.
Command-line brightness control is very powerful. You can write scripts to change brightness automatically. IT professionals use this for managing many computers. Scripts can adjust brightness based on time or other conditions.
How it helps:
- Enables automation and scripting of brightness changes
- Works for remote computer management and IT administration
- Provides integration with other system automation tools
Steps:
Step 1: Open Command Prompt as administrator and type brightness control commands.
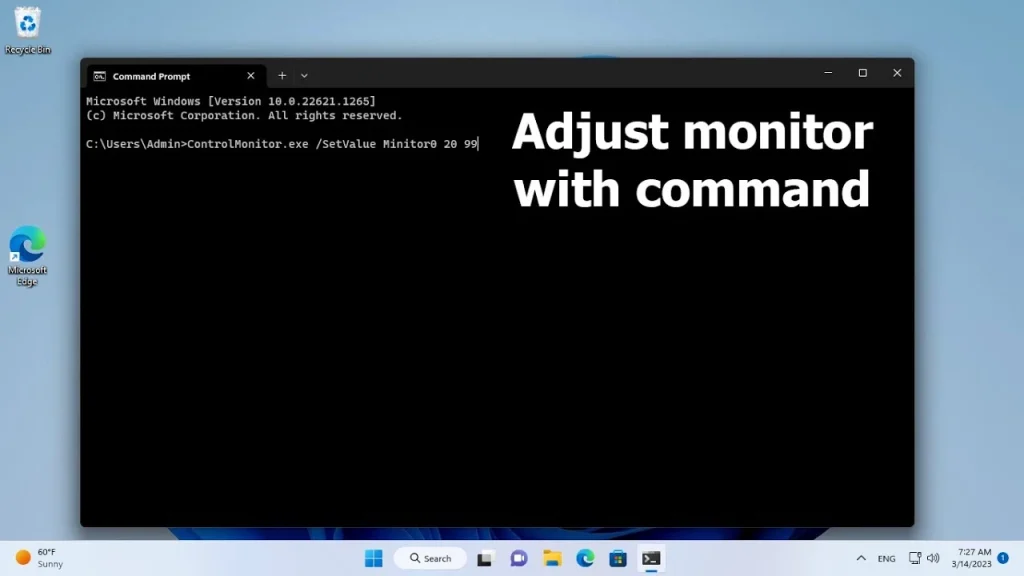
Step 2: Execute powershell scripts to adjust display brightness settings easily in Windows programmatically
Author’s Tip
The best brightness method depends on your computer type and usage. Laptop users should start with the function keys. They’re the fastest for daily use. Desktop users should use the Windows Settings panel for precise control.
Set up automatic brightness if your computer supports it. This feature adjusts brightness based on room lighting. It protects your eyes and saves battery power. The sensors work best in normal indoor lighting conditions.
Keep your display drivers updated for the best brightness control. Old drivers cause many brightness problems. Windows Update usually installs the right drivers automatically. Check manufacturer websites for the newest versions if you have issues.
Conclusion
Learning to adjust display brightness settings easily in Windows improves your computer experience. Proper brightness reduces eye strain and saves battery life. These 11 methods work on different Windows computers and situations.
Start with the simplest methods first. Function keys and the Settings panel work for most users. Try advanced methods only if simple ones don’t work. Remember to update your drivers if brightness controls aren’t working properly.
Good brightness control makes computer work more comfortable. Your eyes will feel better during long work sessions. Battery life improves when you optimize brightness settings. Take time to find the brightness level that works best for you.
FAQs
Q1: Why won’t my brightness keys work on my laptop?
Your brightness keys might not work due to missing or outdated drivers. Function key software may not be installed on your computer. Some laptops need special manufacturer software to enable brightness keys. Try updating your display drivers through Device Manager or Windows Update. Check your laptop manufacturer’s website for specific function key software. If drivers are current, try using the Windows Settings panel instead of the function keys.
Q2: How do I set automatic brightness that actually works well?
To adjust display brightness automatically in Windows effectively, make sure your device has an ambient light sensor. Go to Settings > System > Display and turn on “Change brightness automatically when lighting changes.” Place your computer where the sensor can detect room lighting properly. Avoid covering the sensor with stickers or cases. The sensor usually works best in normal indoor lighting conditions. Calibrate it by manually adjusting brightness in different lighting situations first.
Q3: Can I make my screen darker than the minimum Windows brightness setting?
Yes, you can make your screen darker using third-party software or graphics card controls. Apps like f.lux or Dimmer can reduce brightness below Windows limits. Graphics card software from NVIDIA or AMD often allows lower brightness levels. Some monitors have hardware brightness controls that go lower than software settings. Night light features in Windows can also reduce blue light and perceived brightness. These methods help people who are sensitive to bright screens.
Author Bio:
Dinesh Lakhwani 

Dinesh Lakhwani, the entrepreneurial brain behind “TechCommuters,” achieved big things in the tech world. He started the company to make smart and user-friendly tech solutions. Thanks to his sharp thinking, focus on quality and the motto of never giving up, TechCommuters became a top player in the industry. His commitment to excellence has propelled the company to a leading position in the industry.
Popular Post
Recent Post

CCleaner PC Optimizer Review: A Complete Guide for Windows Users
If your computer has started to feel slow, you are not alone. Most Windows PCs slow down over time. Junk files pile up. The registry gets messy. Too many apps open when you start your PC. All this adds up and makes even a good machine feel tired. This is where a PC cleaner tool […]

Auslogics Duplicate File Finder: Full Review and User Guide
A computer quietly gathers clutter over time. This includes duplicate photos, repeated downloads, and forgotten backups hiding in random folders. This buildup slowly eats away at storage and can make even a fast PC feel sluggish. Manually finding and deleting duplicates is tedious. It means checking every folder, comparing file names, and guessing which copies […]

CCleaner Duplicate File Finder: Key Features, Pricing, Step-by-Step Guide and More
Every computer collects junk over time. Right? Well, yes! Photos often get copied twice. Documents get saved in two folders by mistake. Old downloads pile up and never get deleted. This slowly eats up your storage space, and most people do not even notice until their drive is almost full. That is where a duplicate […]

Duplicate File Finder Pro: A Complete Review, Everything You Should Know
Computers collect thousands of files over time. Well, yes! Many of them end up being duplicates created by backups, downloads, or accidental copies. These extra files take up valuable storage space and make it harder to keep everything organized. Finding and removing them manually can take hours. Right? Duplicate File Finder Pro is a tool […]
Top 3 Duplicate File Finder for Windows 11 & Windows 10
If your PC storage keeps filling up even after you delete big files, duplicate files could be the real reason. Most of us save the same photo twice, download a document more than once, or copy a whole folder by mistake. Over months and years, these duplicate files pile up quietly. You do not even […]

Monitor Screen Calibration Guide: Everything You Should Know
Your monitor shows colors every single day. But are those colors actually correct? Most people never stop to check this. They just use the screen as it comes out of the box. This habit can lead to wrong colors in photos, videos, and work files. Colors may look too warm or too cold without you […]

How To Check Installed RAM and RAM Slots [Complete Guide]
RAM plays an important role in how smoothly a computer runs. Short for Random Access Memory, it stores the data and instructions that Windows and active applications need at any given moment. From opening multiple browser tabs to running games and productivity software, RAM helps keep everything responsive. A system with limited memory may experience […]

What is Microsoft Autopilot Everything You Need To Know
Technology has changed the way companies manage computers. Well, yes! Employees now work from offices, homes, and remote locations. Setting up devices manually for every worker takes time and effort. It can also create mistakes that slow down productivity. This is where Microsoft Autopilot becomes useful. It helps businesses prepare and deploy Windows devices with […]

Enable Automatic Device Locking Feature Windows: Complete Guide
Introduction: Your computer stores important information such as emails, documents, passwords, and personal photos. Leaving it unlocked can put that data at risk. Thankfully, Windows includes built-in features that can automatically lock your device when you are away. Setting up automatic device locking is quick and does not require any extra software. In this guide, […]

