How to Boot Windows 11 System in Safe Mode?
Introduction
Windows 11 has many strong features and tools that focus on ensuring strong OS performance. However, like others, it is not always safe from certain system issues, like bad drivers, malware problems, or bug-based errors. At this point, you can use third-party software like IObit Driver Booster to fix specific problems like defective drivers.
Yet, you should still know how to boot in Safe Mode, where the system operates with just the main fundamental apps and drivers. If the system goes through issues like sudden freeze, slow performance, or startup lag, restarting in Safe Mode allows users to find the error source while the system runs safely.
This guide highlights the different steps one can take to do this action. If that is what you want to know, read ahead.
Important Precautions Before Booting into Safe Mode
Before you switch your system into Safe Mode, take a few minutes to prepare. Safe Mode runs Windows with limited drivers and services. This helps fix problems, but it can also restrict access to certain tools and features. A little preparation keeps your data safe and avoids confusion during the process.
- Back up important files
Save your documents, photos, and work files to an external drive or cloud storage. This protects your data if anything goes wrong. - Close all running applications
Shut down open apps before restarting. This prevents file corruption and ensures a smooth transition. - Keep your device plugged in
If you are using a laptop, connect it to power. Sudden shutdowns during system changes can cause issues. - Remember your login credentials
Safe Mode may ask for your system password or PIN. Keep it ready to avoid delays. - Note recent system changes
Think about any apps or updates installed recently. This helps identify what caused the problem. - Disconnect external devices
Remove USB drives, printers, or accessories. These can sometimes interfere with Safe Mode boot. - Ensure a stable restart process
Avoid interrupting the restart. Let the system complete each step naturally. - Understand limited functionality
Internet, sound, and graphics may not work normally. This is expected in Safe Mode.
What Most Users Want to Know
1. Why should I use Safe Mode in Windows 11?
Safe Mode helps you troubleshoot system problems. It loads only basic drivers and services. This makes it easier to identify faulty apps, drivers, or settings. If your system crashes or behaves oddly, Safe Mode gives a clean environment to fix it.
2. Will Safe Mode delete my files?
No, Safe Mode does not remove your files or personal data. It only changes how Windows starts. Your documents, photos, and apps remain safe. However, it is always wise to back up data before making system changes.
3. Can I access the internet in Safe Mode?
Yes, but only if you choose Safe Mode with Networking. This option allows internet access. It is useful if you need to download drivers or search for solutions. Standard Safe Mode does not include network support.
4. How long should I stay in Safe Mode?
Stay in Safe Mode only as long as needed. Use it to fix the issue, uninstall faulty apps, or run checks. Once done, restart your system normally. Safe Mode is not meant for regular use.
Methods to Boot in Safe Mode for Windows 11
There are many security protocols available for Windows 11 systems. The Windows 11 boot into Recovery mode process includes Safe Mode as one of the best safety measures for beginner-level users and more technical experts. We created this guide with appropriate steps, detailing different approaches possible.
Method 1: Boot to Safe Mode via Start Menu
Going through the Start Menu is one of the quickest and simplest methods to activate Safe Mode on Windows 11 devices.
How to do this?
Step 1: Click on the Start menu or Windows icon available on the taskbar.
Step 2: Then, click your cursor on the Power button.
Step 3: Press down the Shift key and hold. Then, while holding the Shift key in the same position, you should press the Restart button.

Step 4: After the PC restarts, open the “Choose an option” tab and press “Troubleshoot” from the list.
Step 5: Press Advanced Settings and click on the “Startup Settings” option.
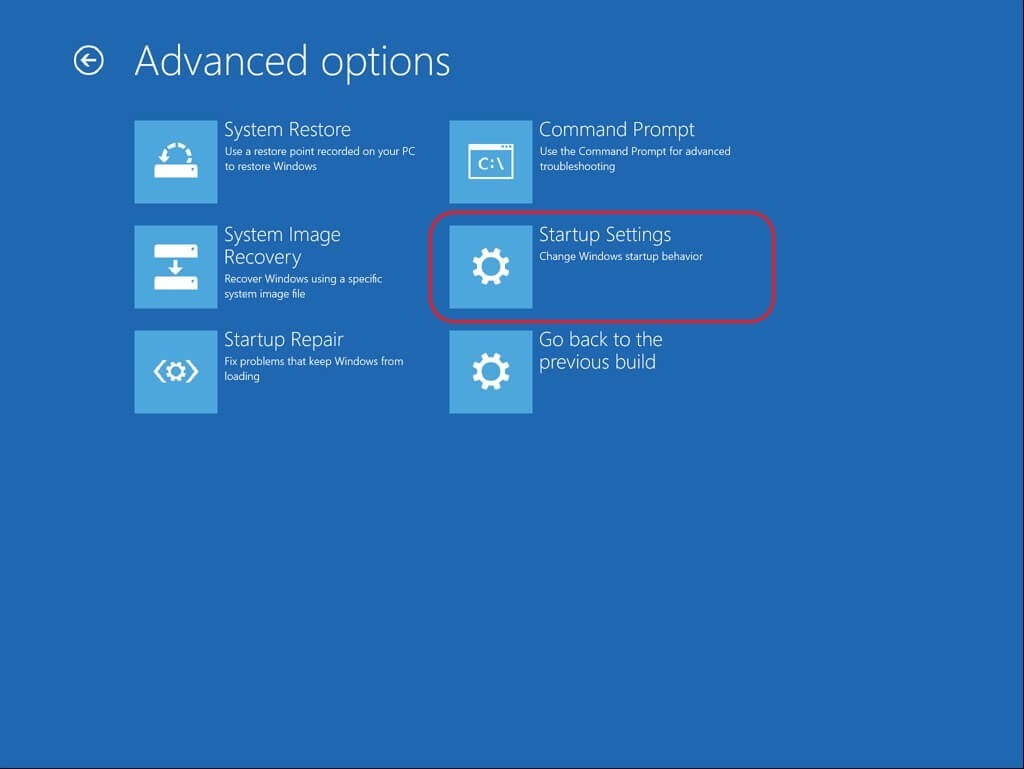
In case that is unavailable on your device settings, find the “See more recovery options” choice on the Advanced Options screen and press it.
Step 6: Press the Restart button.
Step 7: In the next window, three options will appear:
- Enable Safe Mode with Networking
- Enable Safe Mode
- Enable Safe Mode with Command Prompt

Select the Safe Mode type you want to activate on your device after the restart.
Method 2: Pressing the Shift + Restart icons
One of the easiest ways of converting a PC system into its Safe Mode form is to use Restart and Shift keys together. This is simple to carry out, even for complete beginners.
How to do this?
Step 1: Press the Windows icon on the taskbar. Then, click your cursor on the Power icon.
Step 2: Press down and hold your cursor on the Shift key. Choose the “Restart” option at the same time.
Step 3: As you hold the button down, you will see Windows 11 boot into Recovery mode.
Step 4: Open the Start menu and click on the System tab under Settings. Then, click on Recovery > Advanced Startup > Restart Now.
Step 5: The three options Safe Mode booting would appear. Choose between them and click on F6, F5, or F4 keys, depending on your specific booting needs.
Method 3: Through the Sign-in Screen
While starting the system through the Power button, users have to go to the sign-in screen. However, at this point, avoid logging in and go into the Safe Mode through specific steps.
How to do this?
Step 1: Press the Power button.
Step 2: Press + hold down the Shift key on your keyboard.
Step 3: After that, choose the “Restart” option. This would activate the Windows 11 booting process and let the OS enter WinRE mode.
Step 4: Following the Windows 11 boot into Recovery mode, access the Safe Mode.
Method 4: Use the Advanced Startup function through Windows 11
In the context of how to boot in Safe Mode, another usable method is using the Advanced Startup tool. This feature is available on Windows 11, which users can operate to configure settings or troubleshoot certain processes while the OS is still running. It is also useful for booting the operating system into the Safe recovery mode.
How to do this?
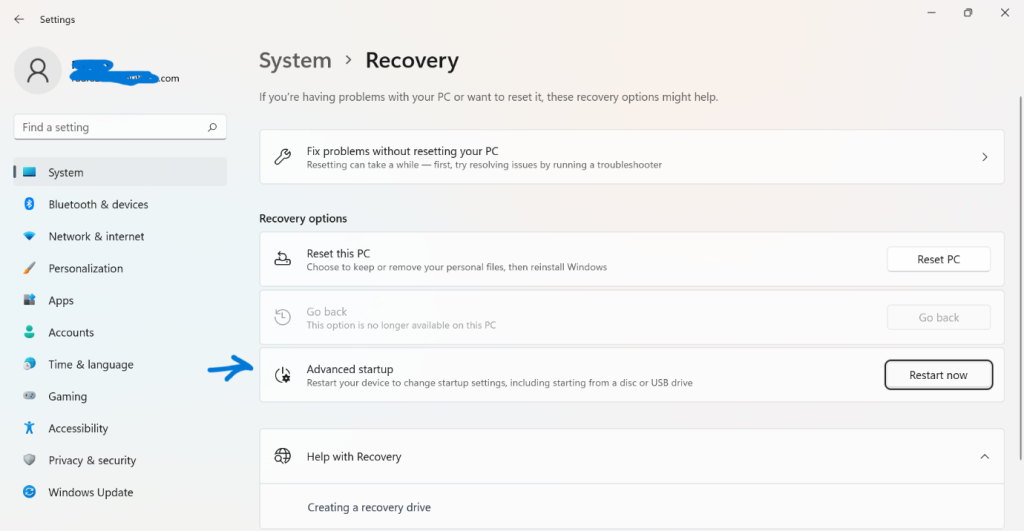
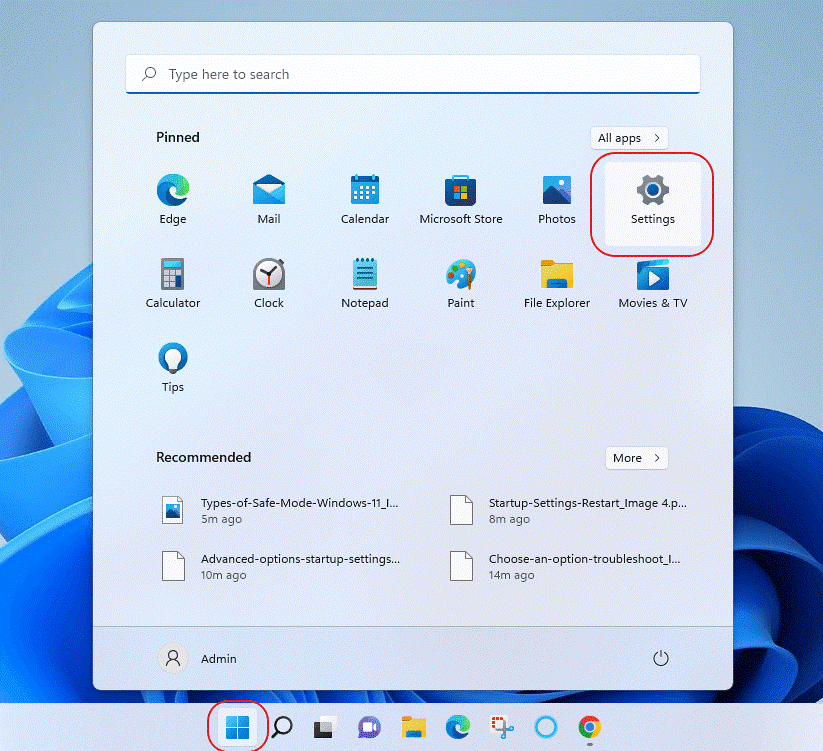
Step 1: Press the Windows and I keys together on the keyboard. Or, access the Start menu and select Settings.
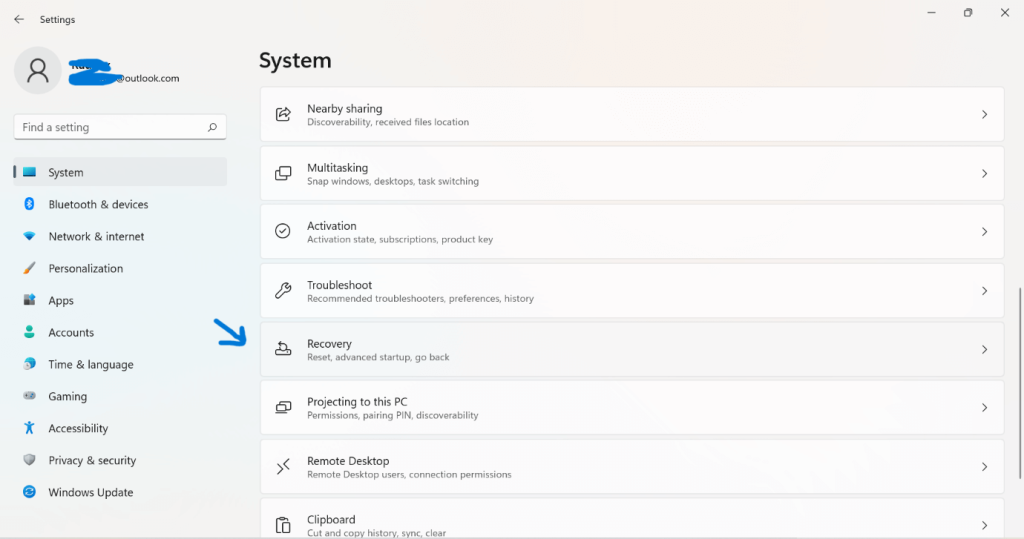
Step 2: Click on System > Recovery.
Step 3: Under the next menu, choose Advanced Startup.
Step 4: This would provide you with a warning prompt stating how the system would begin restarting instantly, and you should save all your work before rebooting.
Click on the “Restart Now” button.
Step 5: The PC would restart. After it does, choose the Troubleshoot tab. Then, click on Advanced Options > Startup Setting.
Step 6: Press Restart and let the device boot up.
Step 7: After the full booting process ends, you should choose the Safe Mode you want to use.
Method 5: Use the Recovery Drive
One of the most popular ways how to boot in Safe Mode you can use is with a USB recovery drive you prepared to restart the PC in Safe Mode. If there is none previously available, you can create a USB-based bootable recovery drive first in another system. Then, you boot Windows 11 to Safe Mode through a USB connection with the system.
How to do this?
Step 1: The PC would boot up via the USB drive.
Step 2: Make your preferred choice from the list that comes up under the “Choose your keyboard layout” screen.

Step 3: Then, the “Choose an option” section would open another window. Click on Troubleshoot.
Step 4: Follow the steps to open Startup Settings and choose your preferred type of Safe Mode option.
Method 6: Stop Normal Booting to Go into Safe Mode
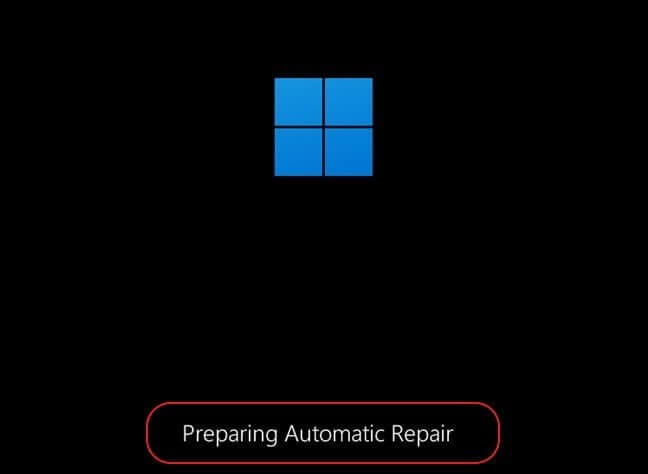
There are multiple protective measures in place for Windows 11 to perform well. One of the protocols is that the system activates its failsafe repair mode when there are many critical OS-based problems available. The system modes into this mode when users notice three booting attempts end in failure for some reason.
Thus, one must interrupt regular PC booting the same way to get into the Safe Mode.
Step 1: While you turn on the PC, press your finger down on the Power button while it starts booting up for 4-5 seconds. This will turn the device off.
Step 2: Do Step 1 twice more, and the system will go into the Automatic Repair Mode.
Step 3: The operating system would run internal diagnostics. Please wait for it to complete.
Step 4: Next, the “Automatic Repair” window would appear. Choose the Advanced Options button and click on it.
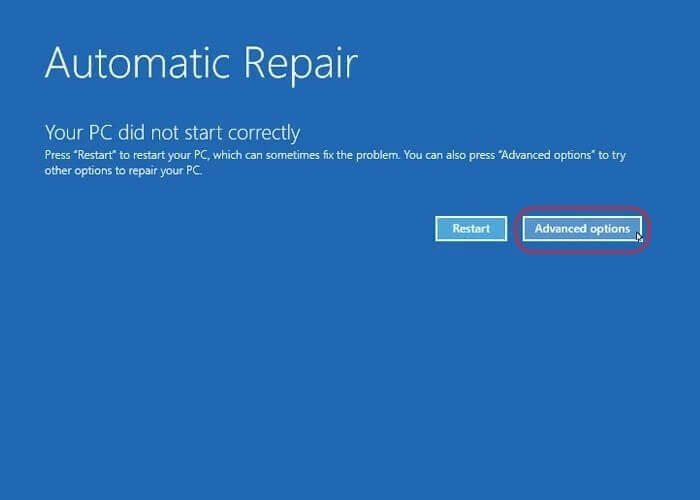
Step 5: Then, press the Troubleshoot option and click on Advanced Options under it. Choose Startup Settings next and click on it.
Step 6: Under the Startup Settings windows, press the Restart button. Select the Safe Mode-based action you want and run it.
Method 7: Use Command Prompt
You can go through the Command Prompt section and act as a PC administration to rectify specific system issues. Likewise, it is also possible to boot into Safe Mode through this route.
How to do this?
Step 1: Press the Search icon on the taskbar.
Step 2: Type the term ‘cmd’ in the text field and press Enter.
Step 3: Select the “Run as Administrator” option.
Step 4: On the windows that appear for CMD, type the next command:
shutdown.exe /r /o
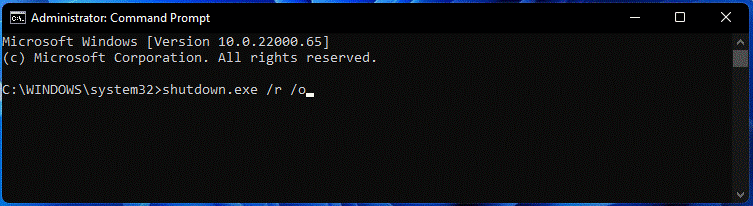
Click on Enter button on your keyboard.
Step 5: The Window 11 would boot into Recovery Mode within some time. Then, select your preferred Safe Mode action in the WinRE environment.
Method 8: Making changes in System Configuration
You can make certain changes to the system configuration through the window mentioned above. This is a suitable method if you are wondering how to boot in Safe Mode every time the system restarts. Plus, the process allows direct activation of Safe Mode without going into the Recovery environment all the time.
How to do this?
Step 1: Press the Windows and R keys on the keyboard to access the Run dialog box.
Step 2: Type the term “msconfig” and then click on the OK button.
Step 3: Press the Boot tab when the System Configuration window options. Then, press the tick box beside the “Safe Boot” option.
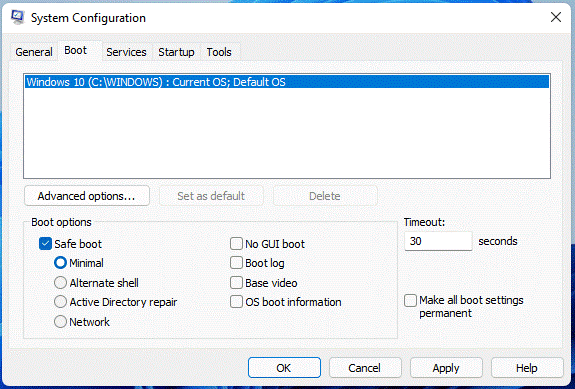
Step 4: Click on OK and then the Restart button. After that, your system would go into Safe Mode whenever you reboot.
Author’s Tip
Do not rush while working in Safe Mode. Take your time to observe how your system behaves. Small details often point to the real problem. If something works fine in Safe Mode but not in normal mode, the issue is likely caused by software or drivers.
Keep your approach simple. Start with basic fixes like uninstalling recent apps or updating drivers. Avoid making too many changes at once. This makes it easier to track what actually solved the problem.
Conclusion
Safe Mode is one of the most useful tools in Windows 11. It gives you a clean and controlled environment. This makes troubleshooting easier and more accurate. Whether the issue is caused by software, drivers, or settings, Safe Mode helps you narrow it down.
Use it wisely and only when needed. Combine it with simple steps like updates and system checks. With a calm approach, most problems can be fixed without stress. It is a reliable method that every Windows user should understand.
FAQs
1. How do I exit Safe Mode in Windows 11?
To exit Safe Mode, simply restart your computer. In most cases, the system will boot back into normal mode automatically. If it does not, you can use System Configuration settings to disable Safe Mode manually.
2. Is Safe Mode different from normal boot?
Yes, Safe Mode loads only essential system files and drivers. Normal boot loads everything, including third-party apps and services. This difference helps in identifying problems more clearly.
3. Can I install or uninstall programs in Safe Mode?
You can uninstall programs in Safe Mode, but installing new ones may not always work properly. Safe Mode limits many system functions. It is mainly meant for fixing issues, not for regular setup tasks.
Author Bio:
Dinesh Lakhwani 

Dinesh Lakhwani, the entrepreneurial brain behind “TechCommuters,” achieved big things in the tech world. He started the company to make smart and user-friendly tech solutions. Thanks to his sharp thinking, focus on quality and the motto of never giving up, TechCommuters became a top player in the industry. His commitment to excellence has propelled the company to a leading position in the industry.
Popular Post


Recent Post

What is Microsoft Autopilot Everything You Need To Know
Technology has changed the way companies manage computers. Well, yes! Employees now work from offices, homes, and remote locations. Setting up devices manually for every worker takes time and effort. It can also create mistakes that slow down productivity. This is where Microsoft Autopilot becomes useful. It helps businesses prepare and deploy Windows devices with […]

Enable Automatic Device Locking Feature Windows: Complete Guide
Introduction: Your computer stores important information such as emails, documents, passwords, and personal photos. Leaving it unlocked can put that data at risk. Thankfully, Windows includes built-in features that can automatically lock your device when you are away. Setting up automatic device locking is quick and does not require any extra software. In this guide, […]

How to Update Wireless Network Driver in Windows 11 and 10
Your Wi-Fi keeps dropping. Pages load slowly. The connection feels unstable? Well, you are not alone. Most of the time, the problem is not with your internet plan. It is with your wireless network driver. A driver is a small piece of software that helps your computer talk to its hardware. When it gets outdated, […]

Common Windows 11 Problems and Solutions (2026 Version)
Windows 11 has become more polished over the years, but it is still not completely free from problems. Even after regular updates from Microsoft, many users continue to face issues like lagging performance, failed updates, audio troubles, random crashes, and network errors. Some problems appear after installing new features, while others develop gradually as the […]

Fortect Driver Updater Review: Features, Steps, Pros, and Cons.
A new PC usually feels quick and responsive. Applications open instantly, games run smoothly, and everything works as expected. As time passes, however, you may notice slower performance, system crashes, hardware glitches, or devices that stop working properly. While many people assume malware or low storage space is to blame, outdated drivers are often the […]

New Features Coming in Windows 11 This Year [2026]
Microsoft is always working to make Windows better. This year is no exception. The company has announced and rolled out several exciting updates for its users. These updates touch almost every part of the operating system. From the Start menu to system settings, changes are arriving fast. If you use Windows daily, you will want […]

Top 14 Duplicate Photo Finder and Remover For Windows [2026]
Introduction: Photos pile up fast. Well, yes! You take ten shots of the same moment. You download the same image twice. You back up your folder and forget you already did it. Before you know it, your storage is packed with copies. A good duplicate photo finder helps you take back that space without losing […]

Advanced System Settings on Windows 11: Complete Guide
Windows 11 is a powerful operating system. It comes with many features that most users never explore. One of the most useful areas is the System Properties panel. This is where you can control how your computer performs, starts up, and handles memory. Many users only change basic settings like wallpaper or display options. But […]

21 Advanced Windows Security Settings: Latest Updates
Introduction: Your computer holds a lot of important data. From personal photos to work files, everything sits on your Windows system. That is why protecting it properly matters more than ever. Windows security settings have come a long way. Microsoft keeps adding stronger layers of protection with every update. Most users never go beyond the […]

Security Upgrades of Microsoft Windows in This Decade [Complete Guide]
Introduction Microsoft has been working hard to make Windows safer every year. Cyberattacks are growing fast. Hackers are smarter now. They target millions of Windows users every single day. That is why Microsoft has added many powerful new security upgrades of Microsoft Windows since 2020. These upgrades protect your data, your identity, and your device […]

