An Informative Guide to Utilize the Built-in Password Manager in Android
Introduction
Most people use more than one profile on different platforms, websites, and apps. For each, they use specific IDs and passwords. For the best safety, it is better to have multiple passwords for various accounts, but that can get confusing to remember for many people.
In this context, you can access the in-built Android Password Manager that is available for free to all Android users. One can conveniently store all passwords of their accounts with strong encryption protection and sign in from any location.
Reasons to Use a Password Manager
A password manager is a vital tool for online-based users to ensure strong safety and privacy for their users across multiple platforms. They are valuable to use to protect passwords for different services and apps overall. There are specific benefits of this software type.
- You can access all passwords from different accounts on one secure platform.
- The software also generates new and unique passwords.
- Flexibility with the number of passwords one can save in the storage.
- It is accessible through one master password that the user sets with their preferred email ID.
- Encryption protection for all login information.
- It is useful for storing miscellaneous data like bank account details, notes, etc.
Ways to Use The Built-in Password Manager Android Free
One can use different sequences to utilize the pre-set password manager on Android devices. It has simple usability and is free for all users, allowing all to save multiple passwords with some taps. We tested out the Password manager Android free tool for specific uses and checked the ease of the process. Here are the processes you have to follow.
Solution 1: Enable the Google Password Manager function on an Android device.
Before getting any benefits related to usability through the Android password manager settings, you should activate the built-in password manager first. There are specific steps one can handle to switch their Google-based Password Manager on.
How to do this?
Step 1: Open the Android device you are using and access the Settings tab.
Step 2: Under this section, open the Privacy tab.
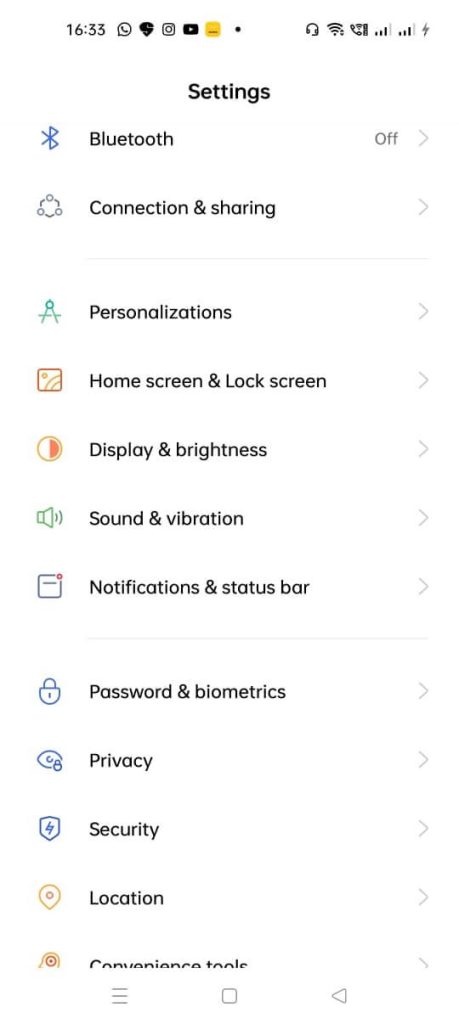
Then, click on the “Autofill services from Google” option. Alternatively, you can utilize the search bar through the menu to type the keyword Autofill and click on it.
To note, on some Android devices, the sequence of action would be Settings > Privacy > Advanced > Autofill services from Google.
So, consider your device model- the steps can differ for some users slightly.
Step 3: Switch the “Use Autofill with Google” setting on.
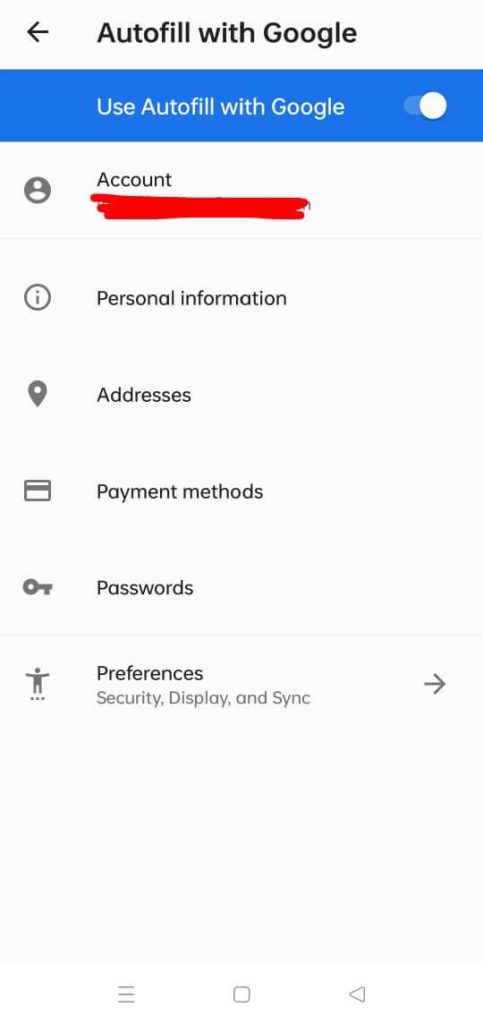
Step 4: Check that you are logged into the right account and open the Passwords section through this menu. Then, open Password Manager. On some devices, this section is available under the Privacy tab.
Step 5: Click on the Settings icon (gear-shaped button) at the upper-right side of the page.
Step 6: Then, toggle the settings for “Offer to save passwords” to the ON setting if you want the device to store all login details.
Keep in mind that this saved passwords listing is applicable when you visit sites and save the passwords through the Google Chrome browser, not other browsers. Typically, they have their own settings for Password manager Android free benefits.
Solution 2: Gain Access to Google Password Manager’s Saved Passwords
After activating the Google Password Manager account through Google, users can look for, edit, and view all saved passwords as necessary. There are steps available to access the Password Manager through the google website.
How to do this?
Step 1: Open the site link: passwords.google.com.
Step 2: Find all necessary login details for Google-based account(s) here.
Step 3: Launch the Google account. You have to add all the necessary information through your device.
Step 4: Open the Security section and click on the Password Manager button.
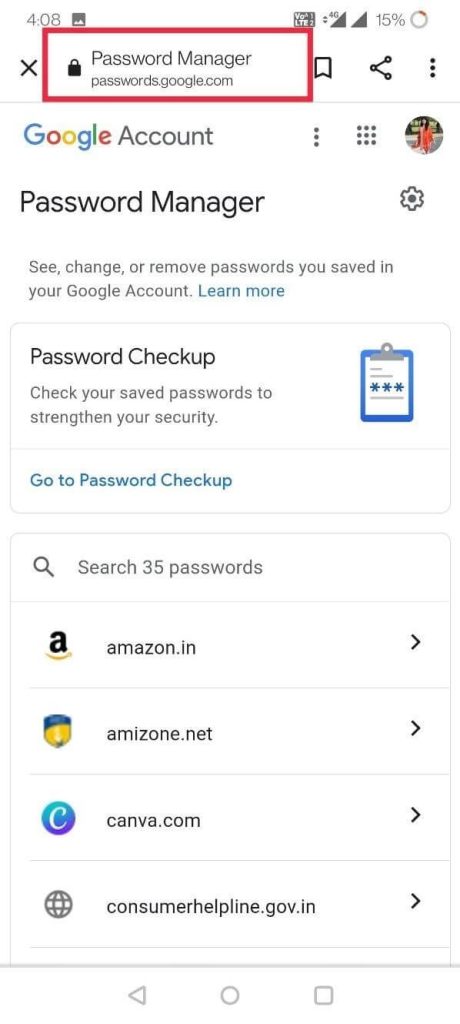
Step 5: The list of passwords will appear on the next page. Click on Password Checkup for password quality verification.

Solution 3: Manage the Auto Sign-in Settings via Google Password Manager
You access the Android password manager settings to set up automatic sign-in actions to apps and sites through the Google Password Manager. This improves the usability experience for Android users. To note, some steps of this use can differ as per the Settings navigations setup for different Android models. The sequence mentioned here is general for most Android OS devices.
How to do this?
Step 1: Get your Android device and go to Settings.
Step 2: Scroll down the menu and click on the Google tab.
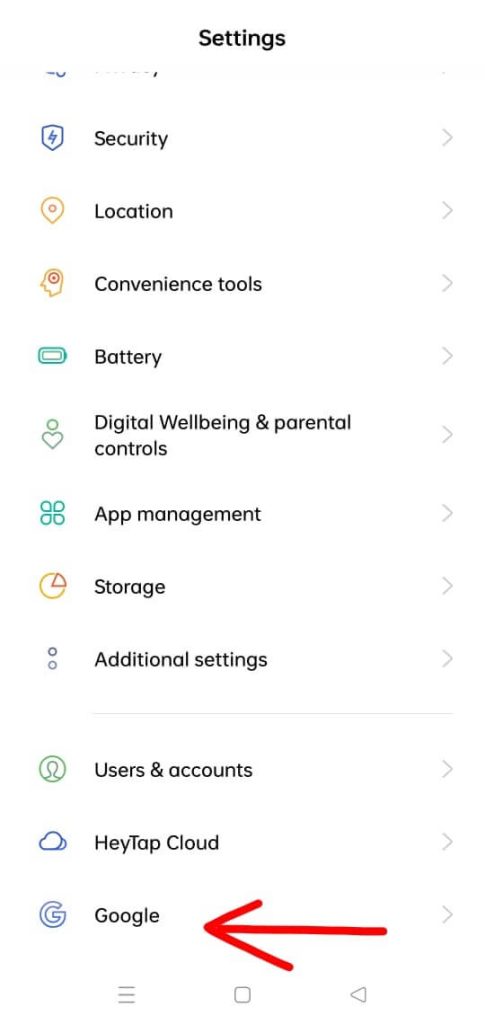
Step 3: When the next page opens, click on the “Manage your Google Account” option.
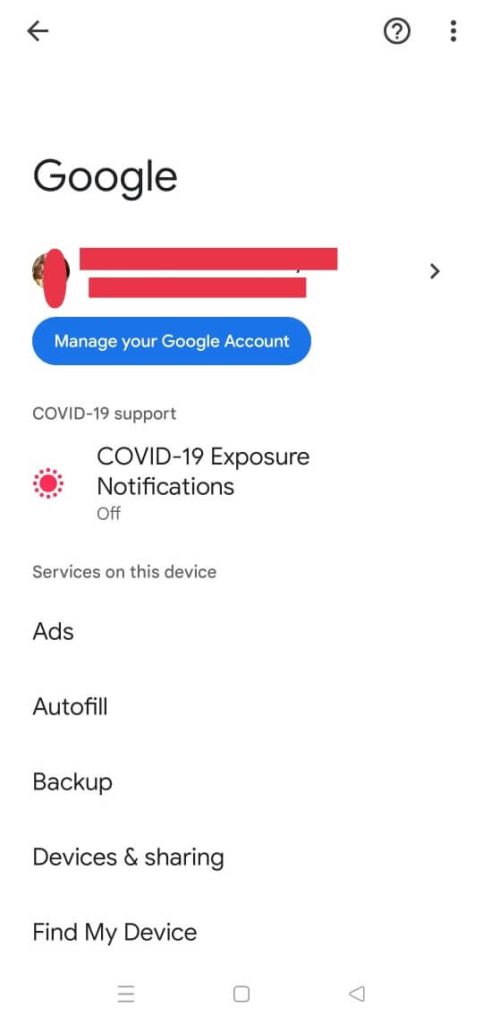
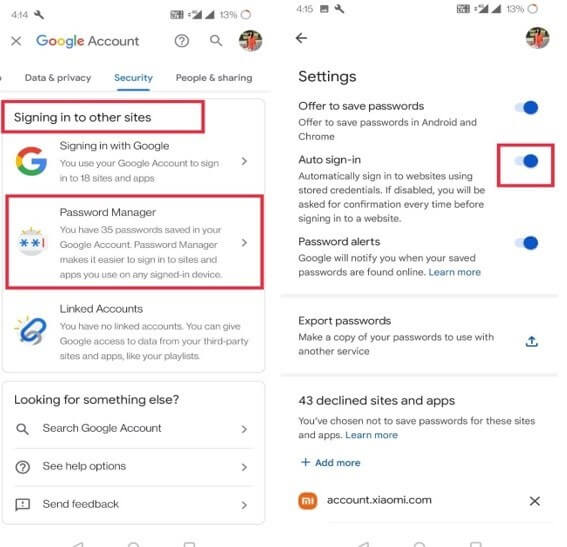
Step 4: In the next window, press on the Security tab.
Step 5: Find the “Signing into other sites” choice section. Find the Password Manager option and disable/enable the Auto sign-in settings.
Solution 4: Handle the Security Checkup for passwords
The Password Manager Android free allows users to evaluate the strength level of their passwords. For this, you should have your Google account active, like for the other processes.
How to do this?
Step 1: Open the Settings app on your Android device and click on the Privacy option.
Step 2: Then, open the Autofill Service from the Google tab. This would come up in the Advanced menu through the Privacy tab on some devices.
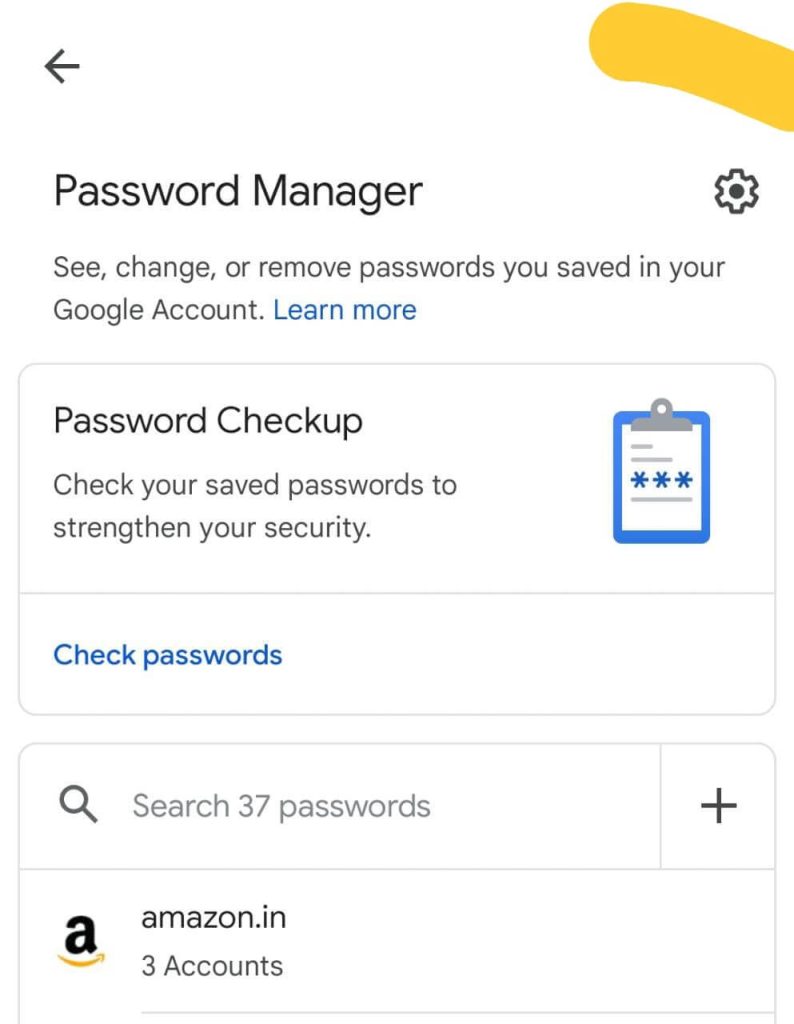
Step 3: Access the Passwords menu and choose the “Check Passwords” option under the Password Checkup section.
Solution 5: Export your password data via Google Password Manager
Users can access the Google Password manager Android free software through their device to export their data. The steps are useful for developing a specialized file for all password data that users can add to another app. Or, one can save it as an offline backup for password details.
How to do this?
Step 1: Open the Settings menu through your device and access the Privacy section.
Step 2: Click on the Autofill service from the Google option.
Step 3: Go to Passwords > Settings.
Step 4: Under the next menu, you will find the “Export passwords” button. Click on it.
Alternative: Use a Third-Party Password Manager like NordPass
While the Google Password Manager is useful for Android users, it is not the safest or most versatile option for password creation and management. Instead, you can use a high-quality, specialized password manager app like NordPass, developed under NordVPN for optimized usage. You can sync multiple devices and apps for comprehensive password storage and generate unique and secure passwords.
You can access the app or directly through the browser, regardless of device type. It includes one-click password protection in the Web Vault section. Users can also use this app offline and save more than their password information securely.
Conclusion
Overall, using, saving, and accessing multiple passwords is easier to handle using the in-built password manager in Android phones. You need to have an active Google account, save or find passwords, activate auto-signing on different websites, and even export all passwords. For additional benefits, download a more robust password manager software, like NordPass.
If you have other queries regarding this, read our other posts or leave a comment.
Popular Post
Recent Post
How to Change Mouse Scrolling Settings In Windows
A mouse is one of the most used computer tools. People use it every day. They scroll through emails. They scroll through documents. They scroll through websites and images. The movement becomes automatic. Most users do not notice it. That is why problems often go unnoticed. Scrolling problems show up slowly. At first, it feels […]
Keyboard Light Settings: Keyboard Lighting Control [Complete Guide]
Keyboards are no longer simple typing tools. Well, yes! Over time, they have evolved to include features that improve comfort, visibility, and overall experience. One of the most useful features today is keyboard lighting. It helps users work comfortably in low-light conditions. It also reduces strain when typing for long hours. Many users first notice […]
Customizing Pointer Appearance: Complete Guide
The way your mouse pointer looks on your computer may seem like a small detail. But customizing pointer appearance can make using your PC more comfortable and visually appealing. Many users do not realize that they can change the pointer size, color, and style to fit their needs. Whether you want a bigger pointer for […]
How To Choose a Computer Monitor: Monitor Buying Guide
Buying a monitor looks easy. Many people think all screens are the same. That belief causes regret later. A monitor is not just a display. It is a daily tool. You read on it. You work on it. You relax with it. Small problems become big over time. Poor brightness hurts eyes. Bad size causes […]
How To Get Help With File Explorer in Windows 11 [Complete Guide]
File Explorer is one of the most important tools in Windows 11. It is used to open folders, view files, and manage stored data. Almost every action on a Windows computer depends on it in some way. When users open documents, save downloads, or organize photos, File Explorer is always involved. Because it is used […]
How To Fix A Frozen Computer: Complete Guide [Windows 11/10]
A frozen computer is one of the most common problems Windows users face. The screen stops responding. The mouse pointer does not move. Keyboard inputs do nothing. You may hear the fan running loudly. Sometimes the system looks alive, but nothing works. This situation often happens when you are busy or working on something important. […]
How to Upgrade Computer RAM: Complete Guide
Upgrading RAM is one of the simplest ways to improve a computer. It helps the system feel faster and smoother. Apps open quicker. Browsers handle more tabs. Games and tools run with less delay. Many users search for how to upgrade computer RAM because it gives real results without high cost. You do not need […]
How To Clean Your Computer Keyboard: Complete Guide
A computer keyboard is touched more than almost any other device you own. It is used during work, study, gaming, and casual browsing. Fingers carry natural oils, sweat, and dirt. Small food crumbs fall between keys without notice. Dust settles each day slowly. Over time, this creates a hidden layer of grime. Many users do […]
Computer Mouse Buying Guide for Beginners and Advanced Users
Buying a mouse looks easy at first. Many people think all mouse work the same way. Well, that idea often leads to regret later. A mouse affects comfort, speed, and daily work. It matters for office tasks, gaming, design, and study. The right choice reduces strain and improves control. The wrong one feels annoying every […]
How To Overclock a Computer: A Complete Guide
Overclocking is the process of making your computer run faster than its factory settings. It mainly affects the processor, graphics card, and sometimes memory. Many people choose this method to improve performance without buying new hardware. It is popular among gamers, video editors, and users who run heavy software. When done properly, overclocking can give […]


