


Every computer collects junk over time. Right? Well, yes! Photos often get copied twice. Documents get saved in two folders by mistake. Old downloads pile up and never get deleted. This slowly eats up your storage space, and most people do not even notice until their drive is almost full. That is where a duplicate […]
How to Change Your DNS Server on a Mac?
The Domain Name System or DNS is vital for website accessibility across different browsers for computer systems. Many Mac users do not know of DNS server settings, but it does affect the condition since the devices hold millions of domains and connected IP addresses. Therefore, changing domain names into the corresponding IP addresses becomes easier through DNS servers.
Methods to change DNS server on Mac
There are specific steps that users must handle to change DNS server on Mac without any error. Here are the main things you should keep in mind and carry out for improving internet speed and connectivity. Follow the methods carefully for your system.
Method 1: Accessing the DNS Settings on Mac
Before changing DNS server settings on your Mac device, you should open it to see the available server settings. Following that, you can carry out the necessary steps to make setting changes.
How to do this?
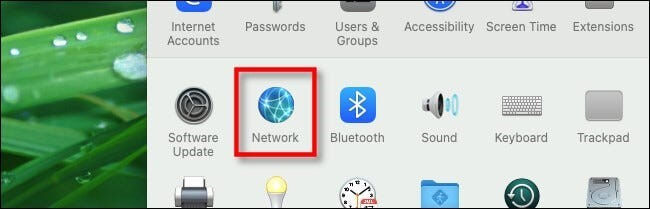
Step 1: Open the Apple home menu and then choose “System Preferences” to launch the window. Alternatively, you can click the option on the Dock.

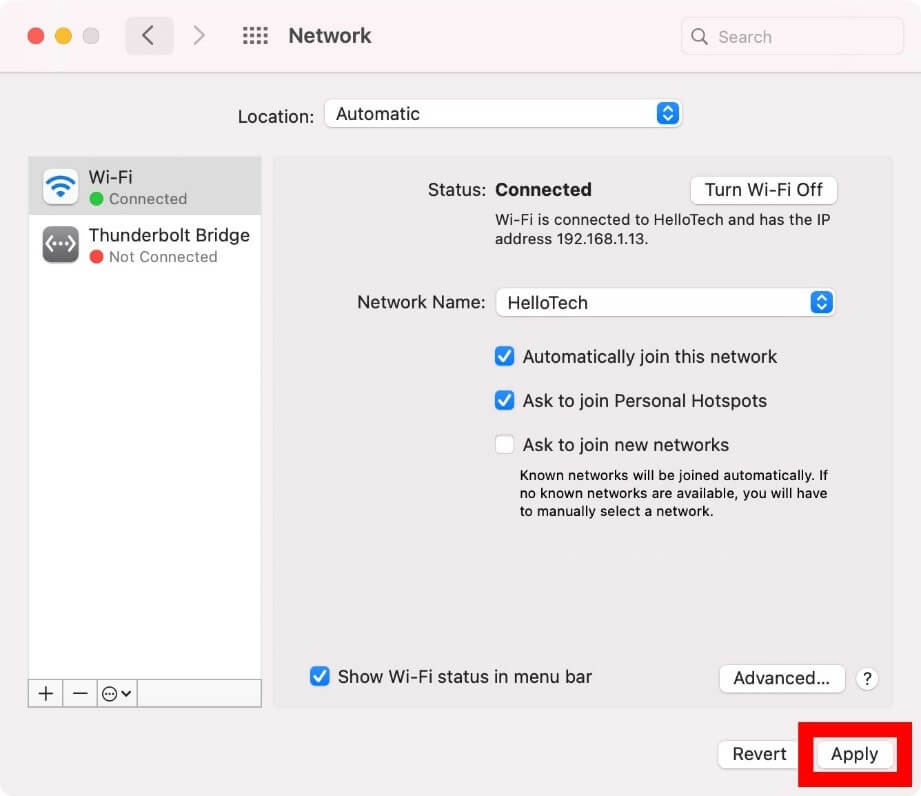
Step 2: Open the Network Preferences window through the Network option under System Preferences. It would show all active network connections.
Step 3: Choose the preferred connection type for your DNS changing steps and access the Advanced window. Typically, one connection stays active, i.e., the WiFi. A green dot would appear beside the term indicating this active status. Notably, this process is similar for whichever connection a user operates with, like Ethernet, Bluetooth, or Thunderbold Bridge.
Step 4: Open the DNS tab to show two panes. One would have the list of Search Domains, and the other would list the DNS servers.
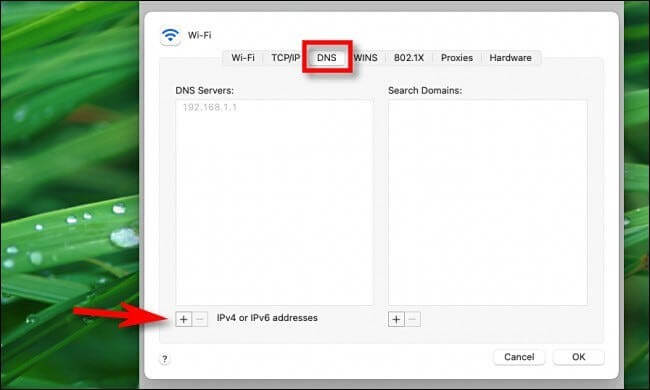
This list can appear empty, have entries in dark text, or grayed-out entries.
If it is the last type, it means that the IP addresses are running with another device, specifically the network router. You can edit the list and override it through the Network Preference window of the Mac device manually, as explained under Method 2. But this would apply to only the primary device.
Dark text entries are locally entered options, while the empty entry fields mean that DNS servers are not assigned to them.
Method 2: Change DNS Server through the System Preferences
The most straightforward method to change DNS servers while using Mac systems is to access system preferences directly. Then, follow the correct sequence to change the settings on your device.
How to do this?
Step 1: Click your cursor on top of the icon for Apple, visible on the top left-hand-side corner of the home screen.
Step 2: Then, choose the option System Preferences.
Step 3: Choose the “Network” option on the next screen.
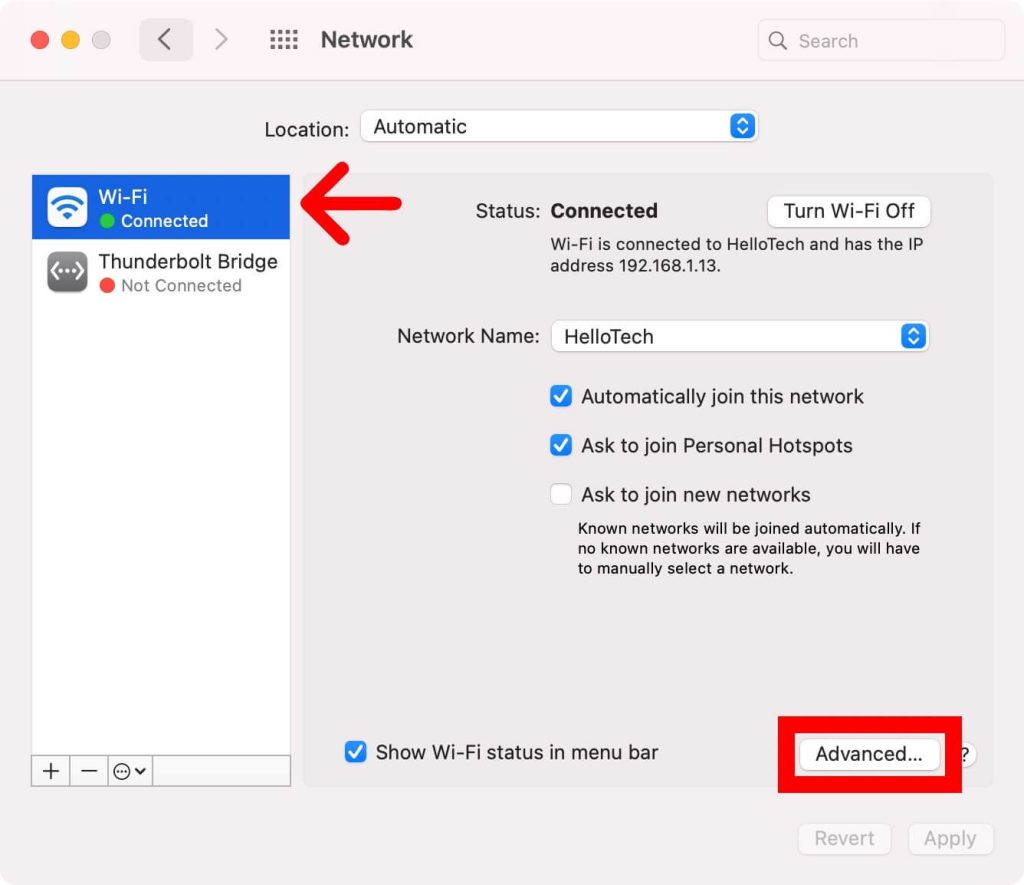
Step 4: After doing so, the system would take you to the next screen that would feature multiple available network connections. They are present on the left sidebar. Choose your preferred network connection among the green-circled choices.
Step 5: Then, select the “Advanced” option that is available on the button-right side of the dialogue box.
Step 6: Following this, you should press your cursor on the DNS tab on the upper side of your window.

Step 7: Select the plus (+) icon below the pane for the DNS Servers list. A text input field would come up in the list. You can manually add the DNS address you will use and click on “Return” after that.
For example, if you want to access the Google DNS address, all of the addresses are given before after clicking on the plus icon.
- 8.8.4.4
- 8.8.8.8
- 2001:4860:4860::8844
- 2001:4860:4860::8888
The two addresses on top are IPv4 addresses, while the third and fourth ones are IPv6 addresses.
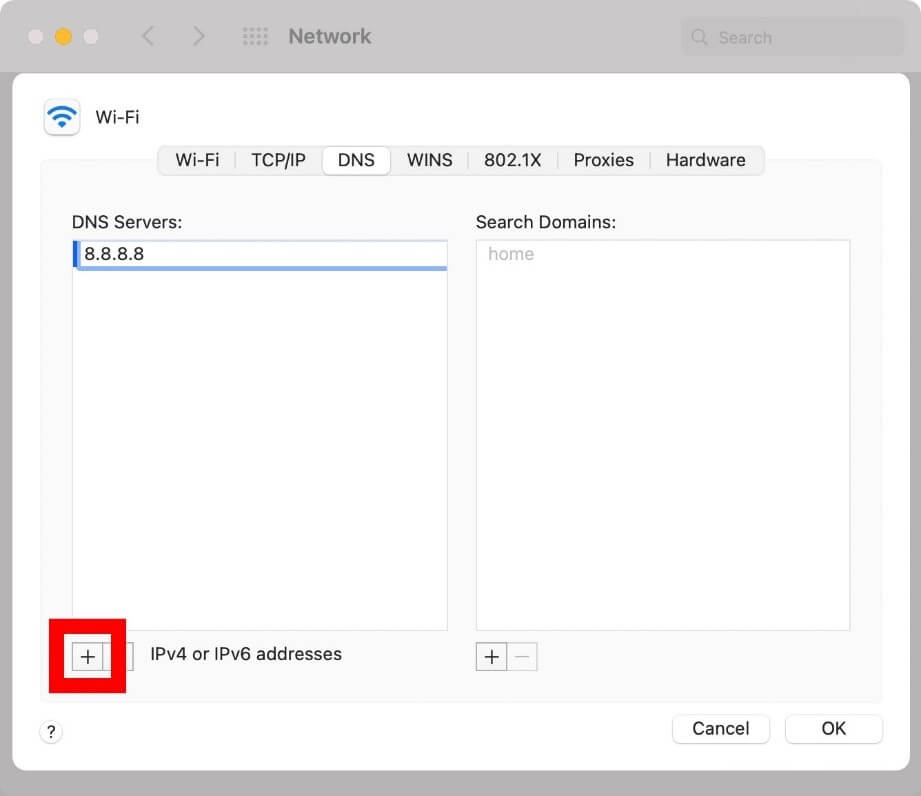
During the entry addition period, you can replace any greyed-out entries that appear to change DNS server settings. However, it is possible to delete them.
Step 8: After that, you have to add the primary and secondary DNS addresses. To resolve an URL entry when you try to change DNS server on Mac, the system would prompt about the first DNS server entry on the list. If there is zero response, it will switch to the entry after that. This continues until the system queries every server or until they receive a response.
Step 9: After this, you have to click on the “OK” button, which will take you back to the pre-opened “Network” window.
Step 10: Then, you have to select the “Apply” button. It would activate the changes you made.
What are the suitable third-party DNS Servers to use?
To change the DNS server on Mac, users can operate third-party DNS servers. The standard options include Google Public DNS, OpenDNS, and Cloudflare. They are secure, contain a comprehensive database of IP address options, and assure high privacy and speed support. All three options provide usable primary DNS addresses and secondary DNS addresses.
The DNS addresses for each are:
- Google Public DNS- 8.8.4.4 and 8.8.8.8
- OpenDNS- 208.67.220.123 and 208.67.222.123
- Cloudflare- 1.0.0.1 and 1.1.1.1
Conclusion
The methods available to change DNS server settings for Mac devices are straightforward, so follow the sequence carefully. Make sure that you have an administrator account/password and access to one or more types of DNS IP addresses. Install and use the MacPaw CleanMyMac X software for safe device cleanup additionally.
We have other such posts available. If you found this helpful, please give them a read.
Author Bio:
Dinesh Lakhwani 

Dinesh Lakhwani, the entrepreneurial brain behind “TechCommuters,” achieved big things in the tech world. He started the company to make smart and user-friendly tech solutions. Thanks to his sharp thinking, focus on quality and the motto of never giving up, TechCommuters became a top player in the industry. His commitment to excellence has propelled the company to a leading position in the industry.
Popular Post
Recent Post

Duplicate File Finder Pro: A Complete Review, Everything You Should Know
Computers collect thousands of files over time. Well, yes! Many of them end up being duplicates created by backups, downloads, or accidental copies. These extra files take up valuable storage space and make it harder to keep everything organized. Finding and removing them manually can take hours. Right? Duplicate File Finder Pro is a tool […]

Monitor Screen Calibration Guide: Everything You Should Know
Your monitor shows colors every single day. But are those colors actually correct? Most people never stop to check this. They just use the screen as it comes out of the box. This habit can lead to wrong colors in photos, videos, and work files. Colors may look too warm or too cold without you […]

How To Check Installed RAM and RAM Slots [Complete Guide]
RAM plays an important role in how smoothly a computer runs. Short for Random Access Memory, it stores the data and instructions that Windows and active applications need at any given moment. From opening multiple browser tabs to running games and productivity software, RAM helps keep everything responsive. A system with limited memory may experience […]

What is Microsoft Autopilot Everything You Need To Know
Technology has changed the way companies manage computers. Well, yes! Employees now work from offices, homes, and remote locations. Setting up devices manually for every worker takes time and effort. It can also create mistakes that slow down productivity. This is where Microsoft Autopilot becomes useful. It helps businesses prepare and deploy Windows devices with […]

Enable Automatic Device Locking Feature Windows: Complete Guide
Introduction: Your computer stores important information such as emails, documents, passwords, and personal photos. Leaving it unlocked can put that data at risk. Thankfully, Windows includes built-in features that can automatically lock your device when you are away. Setting up automatic device locking is quick and does not require any extra software. In this guide, […]

How to Update Wireless Network Driver in Windows 11 and 10
Your Wi-Fi keeps dropping. Pages load slowly. The connection feels unstable? Well, you are not alone. Most of the time, the problem is not with your internet plan. It is with your wireless network driver. A driver is a small piece of software that helps your computer talk to its hardware. When it gets outdated, […]

Common Windows 11 Problems and Solutions (2026 Version)
Windows 11 has become more polished over the years, but it is still not completely free from problems. Even after regular updates from Microsoft, many users continue to face issues like lagging performance, failed updates, audio troubles, random crashes, and network errors. Some problems appear after installing new features, while others develop gradually as the […]

Fortect Driver Updater Review: Features, Steps, Pros, and Cons.
A new PC usually feels quick and responsive. Applications open instantly, games run smoothly, and everything works as expected. As time passes, however, you may notice slower performance, system crashes, hardware glitches, or devices that stop working properly. While many people assume malware or low storage space is to blame, outdated drivers are often the […]

New Features Coming in Windows 11 This Year [2026]
Microsoft is always working to make Windows better. This year is no exception. The company has announced and rolled out several exciting updates for its users. These updates touch almost every part of the operating system. From the Start menu to system settings, changes are arriving fast. If you use Windows daily, you will want […]

