


You turn on your PC and wait. And wait. The same laptop that once opened apps in a snap now feels tired. This is not bad luck. It just happens over time. Files pile up. The registry gets messy. Old drivers stay installed long after they are useful. Junk data quietly eats up space on […]
How To Create A Bootable USB for Windows 98
Ah, the good old days, when Microsoft didn’t force updates on us every five minutes and when we were still struggling to figure out the mechanics of Minesweeper.
For these nostalgic types, there are still versions of Windows 98 floating around on the internet and, because Microsoft has stopped all active support and development of these dinosaurs, many of these versions are legally free. Still, the million question is: how exactly do you load these operating systems onto your PC or laptop?
Luckily, there’s a relatively simple answer to this question, and that’s what this guide focuses on. You’ll need to download Rufus, which essentially turns a flash drive into that Windows 98 bootable USB. We’re here to walk you through this process, though, as the idea of reloading your operating system can sometimes be a bit daunting.
Can You Create Bootable USB On Your Windows 98?
Well, creating a bootable USB on Windows 98 can be a bit challenging due to its age and limited support for modern USB devices and file systems. Here are the technical requirements and steps you’ll need to follow:
Before you proceed, please review the following prerequisites:
1. The target system should support booting from a USB drive, be it a Flash drive or a HDD.
2. Ensure that the target system is equipped with an IDE hard disk drive, as SATA drives may not be compatible. If you have a SATA hard drive installed, set the ‘Legacy/IDE’ option in the BIOS setup menu (do not use ‘AHCI’).
3. Be aware that older system BIOSes might have a 137GB hard disk limitation. Installing on a hard disk larger than 137GB or using a USB Hard Disk exceeding this capacity may cause issues. E2B (Easy2Boot) will issue a warning if this situation arises.
4. Your target system must have a minimum of 256MB of memory, as the ISO contents are copied to RAM during the process.
5. You’ll require a utility like Daemon Tools Pro or UltraISO to delete certain folders from within the Win98SE ISO. This step is crucial to avoid losing the boot sectors from the ISO.
6. Be aware that Windows 98 may lack the appropriate drivers for your audio, network, and graphics devices. You may need to obtain and install these drivers separately.
7. Obtain the Windows 98 SE ISO (installation file) by yourself. It is preferable that the ISO is bootable, but it can also be non-bootable. You can try obtaining it from sources such as here (OEM Full version is bootable) or other reputable sources.
8. In case the Win98 ISO is not bootable, you will need to acquire the optional Windows 98 SE 1.44Mb floppy .img image file.
9. If you plan to attempt this installation using a Virtual Machine (e.g., Oracle VirtualBox), ensure that it is configured for Windows 98. Allocate a small amount of memory for Display VGA memory and not more than 1GB of system memory (RAM). Also, use an IDE virtual hard disk.
Taking these requirements into account will help ensure a smooth and successful installation of Windows 98 SE.
How To Create A Bootable USB for Windows 98
This is not an overly complicated or lengthy process as Rufus does most of the work for you, but creating a Windows 98 bootable USB does need to be done correctly, so, without further ado, let’s begin.
Step 1: Insert a clean flash drive
First, you’ll need to plug in a clean flash drive and start-up Rufus. Ensure that the correct flash drive is selected under the Device tab.

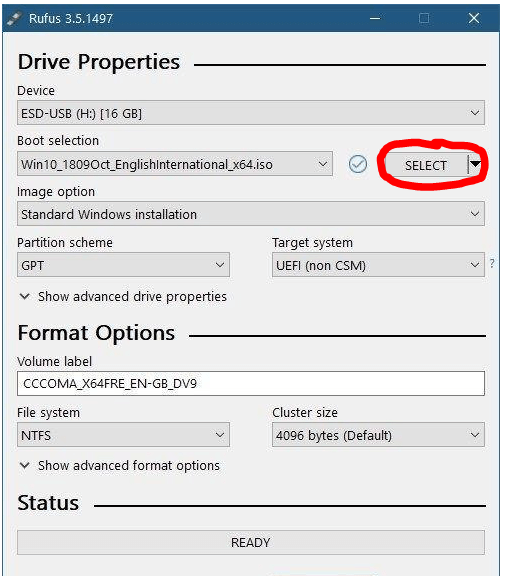
Step 2: Customize settings
Under Boot Selection, you’ll need to make sure that it’s set to Disk or ISO image and then click on Select next to it to select the Windows 98 ISO file that you downloaded.
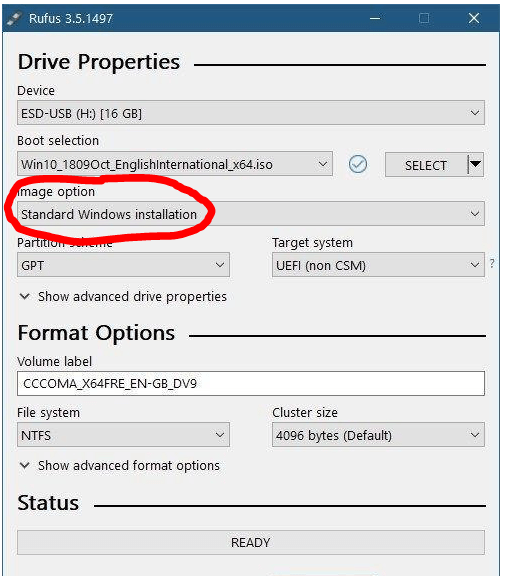
Step 3: Select partition scheme
Under Image Option, select Standard Windows Installation. Rufus will then select the best partition scheme and target system based on your machine, but you can customize these in any way you choose to if you know what you’re doing. This step is essential to create a Windows 98 bootable USB.
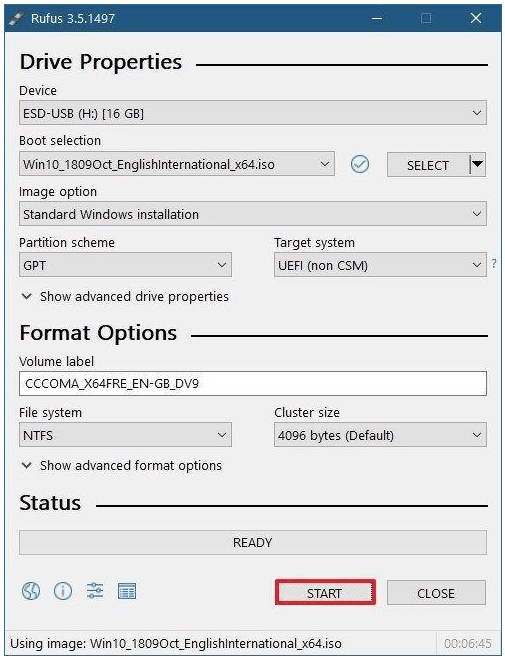
Step 4: Finalize your Windows 98 bootable USB
You can change the Volume Label to whatever you choose, or leave it as the default name and leave all of the other settings as-is. Then click on Start, and Rufus will begin to program your USB. Once it’s finished, then your bootable USB is ready to go.
Author’s Tip
Creating a bootable USB for Windows 98 needs patience. It is an old system, so it does not work like modern Windows versions. Start by using reliable tools and files. Make sure your USB drive is formatted correctly. FAT32 usually works best. Also, check your system BIOS settings. Some newer systems may not support booting Windows 98 properly. If needed, try using an older PC or enable legacy boot options.
Keep your expectations realistic. Windows 98 may not run smoothly on modern hardware. Drivers and compatibility can be a problem. It is better to use it for testing or learning, not daily use. Always keep a backup of your important data before starting. One small mistake can erase your USB or system files. Take your time and follow each step carefully.
Booting Up The Past
These were the easiest steps to create a bootable USB for Windows 98. If you have any problem regarding these steps you can ask in the comments section I will be happy to help you.
Many people in this world will say that previous versions of Windows were way better than the version that we are using today, and, in some ways, this may be true.
There was far less bloatware that we were forced to run, and we could choose when we wanted to install our updates. We had more freedom, and the programs that we worked on were much simpler and straightforward.
But as time has gone on, we’ve moved into an era that depends on technology for its survival. Once we had to leave the telephone at the end of its cord, it now travels with us as an ever-present best friend.
And where computers were a bonus to any workplace, now it’s impossible to function without them. Technology is a phenomenal thing, but sometimes it’s nice to take a trip down memory lane and remember where it all started.
FAQs
1. Can I use any USB drive to create a Windows 98 bootable USB?
You can use most USB drives, but smaller drives often work better. Windows 98 was designed for older hardware, so very large USB drives may not behave properly. It is best to use a simple USB drive with a standard format like FAT32 for better compatibility.
2. Why is my PC not booting from the USB?
This usually happens due to BIOS settings. You may need to enable USB boot or legacy mode. Some modern systems do not fully support booting older systems like Windows 98. In such cases, trying on an older computer can solve the issue.
3. Is Windows 98 still useful today?
Windows 98 is mostly used for learning, testing, or running very old software. It is not suitable for daily use because it lacks modern security and features. It can still be helpful for retro computing or specific legacy programs.
Author Bio:
Dinesh Lakhwani 

Dinesh Lakhwani, the entrepreneurial brain behind “TechCommuters,” achieved big things in the tech world. He started the company to make smart and user-friendly tech solutions. Thanks to his sharp thinking, focus on quality and the motto of never giving up, TechCommuters became a top player in the industry. His commitment to excellence has propelled the company to a leading position in the industry.
Popular Post
Recent Post
Avast Cleanup PC Cleaner and Optimizer: Everything You Need to Know
A slow computer makes it hard to focus. Programs take too long to open. Free space keeps shrinking until the disk is almost full. This happens to most PC owners at some point. Even new machines can slow down after a while. That is the exact problem cleanup tools are built to solve. They comb […]

Fortect Software Review: The Ultimate PC & Mobile Cleaning, Optimization & Security Tool
Slow computers are a common problem for almost every Windows user. Well, yes! Over time, your PC picks up junk files. These files sit quietly in the background. They take up space and slow things down. Programs open slower. Windows takes longer to boot. Even simple tasks like opening a folder can feel sluggish. There […]

CCleaner PC Optimizer Review: A Complete Guide for Windows Users
If your computer has started to feel slow, you are not alone. Most Windows PCs slow down over time. Junk files pile up. The registry gets messy. Too many apps open when you start your PC. All this adds up and makes even a good machine feel tired. This is where a PC cleaner tool […]

5 Best PC Cleaners for Windows 11 & 10 | Top PC Optimizers
Remember when your PC felt fast? Every click was quick. Every app opened in seconds. Now it feels like a different machine. Windows takes forever to boot. Programs freeze for no reason. Even opening a browser feels like a chore. You are not alone in this. Almost every PC slows down over time. Files pile […]

Auslogics Duplicate File Finder: Full Review and User Guide
A computer quietly gathers clutter over time. This includes duplicate photos, repeated downloads, and forgotten backups hiding in random folders. This buildup slowly eats away at storage and can make even a fast PC feel sluggish. Manually finding and deleting duplicates is tedious. It means checking every folder, comparing file names, and guessing which copies […]

CCleaner Duplicate File Finder: Key Features, Pricing, Step-by-Step Guide and More
Every computer collects junk over time. Right? Well, yes! Photos often get copied twice. Documents get saved in two folders by mistake. Old downloads pile up and never get deleted. This slowly eats up your storage space, and most people do not even notice until their drive is almost full. That is where a duplicate […]

Duplicate File Finder Pro: A Complete Review, Everything You Should Know
Computers collect thousands of files over time. Well, yes! Many of them end up being duplicates created by backups, downloads, or accidental copies. These extra files take up valuable storage space and make it harder to keep everything organized. Finding and removing them manually can take hours. Right? Duplicate File Finder Pro is a tool […]
Top 3 Duplicate File Finder for Windows 11 & Windows 10
If your PC storage keeps filling up even after you delete big files, duplicate files could be the real reason. Most of us save the same photo twice, download a document more than once, or copy a whole folder by mistake. Over months and years, these duplicate files pile up quietly. You do not even […]

Monitor Screen Calibration Guide: Everything You Should Know
Your monitor shows colors every single day. But are those colors actually correct? Most people never stop to check this. They just use the screen as it comes out of the box. This habit can lead to wrong colors in photos, videos, and work files. Colors may look too warm or too cold without you […]

