What Is USB Debugging Mode on Android? How to Enable It
Introduction
For activating any advanced function on Android smartphones and tablets, handling USB debugging is an important procedure. This is a necessary process that allows the Android device to access and communicate with an Android SDK via USB. Multiple complex actions like rooting the device or flashing Factory image on Nexus devices are done in this process.
While it is useful to handle USB debugging Android, the process for it can get complex for most users. However, there are specific steps one can try out to enable this function for different processes, and you can learn and practice it well for different functions. This post will give you more details on how USB debugging works on Android and how to handle it. Read ahead.
What Does USB Debugging Mean on Android?
USB debugging Android as an approach is useful for users who want to configure the internal mechanism on their smartphone by connecting to the computer via USB. Using this, users can also activate functions originally incompatible with the device.
It is important to enabling USB debugging to access the software developer kit or SDK of Android. Programmers typically use this to build new Android apps and test them for functional compatibility and ability.
After this processing, users can send advanced-level commands to smartphones with the ADB or Android Debug Bridge via the computer. Therefore, it is clear to consider this as a process that app developers and programmers typically handle. However, regular Android users can also enable the USB debugging mode on their smartphones or tablets for different functions, like:
- Using ADB to install different APK files from the PC and then send other commands via USB.
- Rooting the Android smartphones to install another operating system into the device.
- To prepare a backup copy for all the saved data.
- Operating Fastboot for bricked Android smartphone/tablet recovery.
How to Enable USB Debugging on Android?
There are different steps to handle while activating the USB Debugging function on Android devices. For this, there are differences noticeable in different Android device models in terms of the brand and version one is using. In all of them, slight variations are noticeable when it comes to the steps.
For example, some devices have About Device in place of About Phone. Or, some Android models require one to tap multiple times to access Developer options, while others have specific requirements, like users needing to tap the icon seven times.
The following is a general breakdown of how to enable USB debugging mode on Android smartphones and tablets.
How to do this?
Step 1: Go to the Settings app on your Android smartphone/tablet.
Step 2: Then, browse through the options until you see the About phone option. Tap on it to open.
Step 3: The Build Number items will appear on the next page in this section. Tap it around seven times until you see the prompt mentioning that you are operating in developer mode now.
In some devices, it is important to verify yourself by adding the lock screen password at this stage. Follow as prompted.
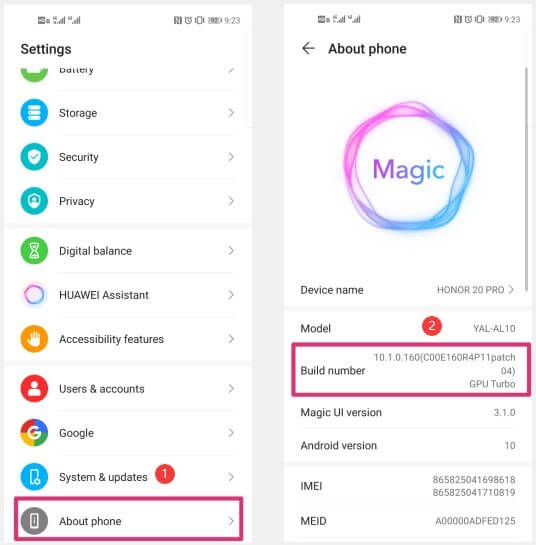
Step 4: Return to the Settings window and then click on the System & Updates option from the list.
Step 5: The “Developers options” selection will appear now in this section. This part can also be found under the About Phone section in some Android smartphones.
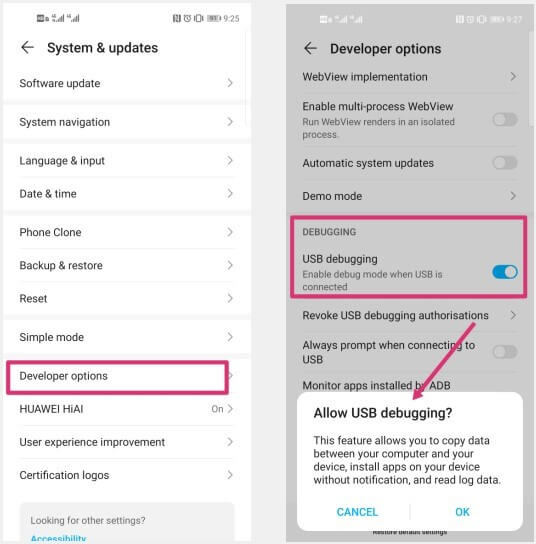
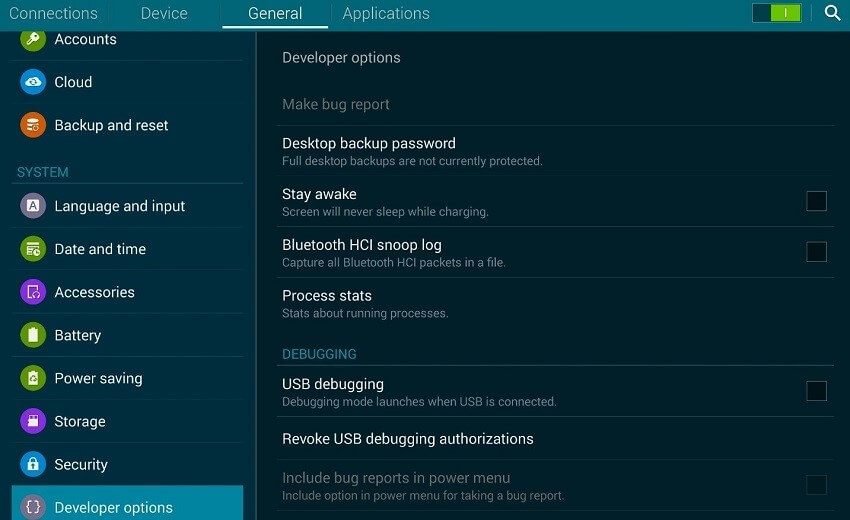
Step 6: Access the Developer Options section and find “USB Debugging” from the menu in the Debugging tab.
Step 7: Press the slider here to enable this setting.
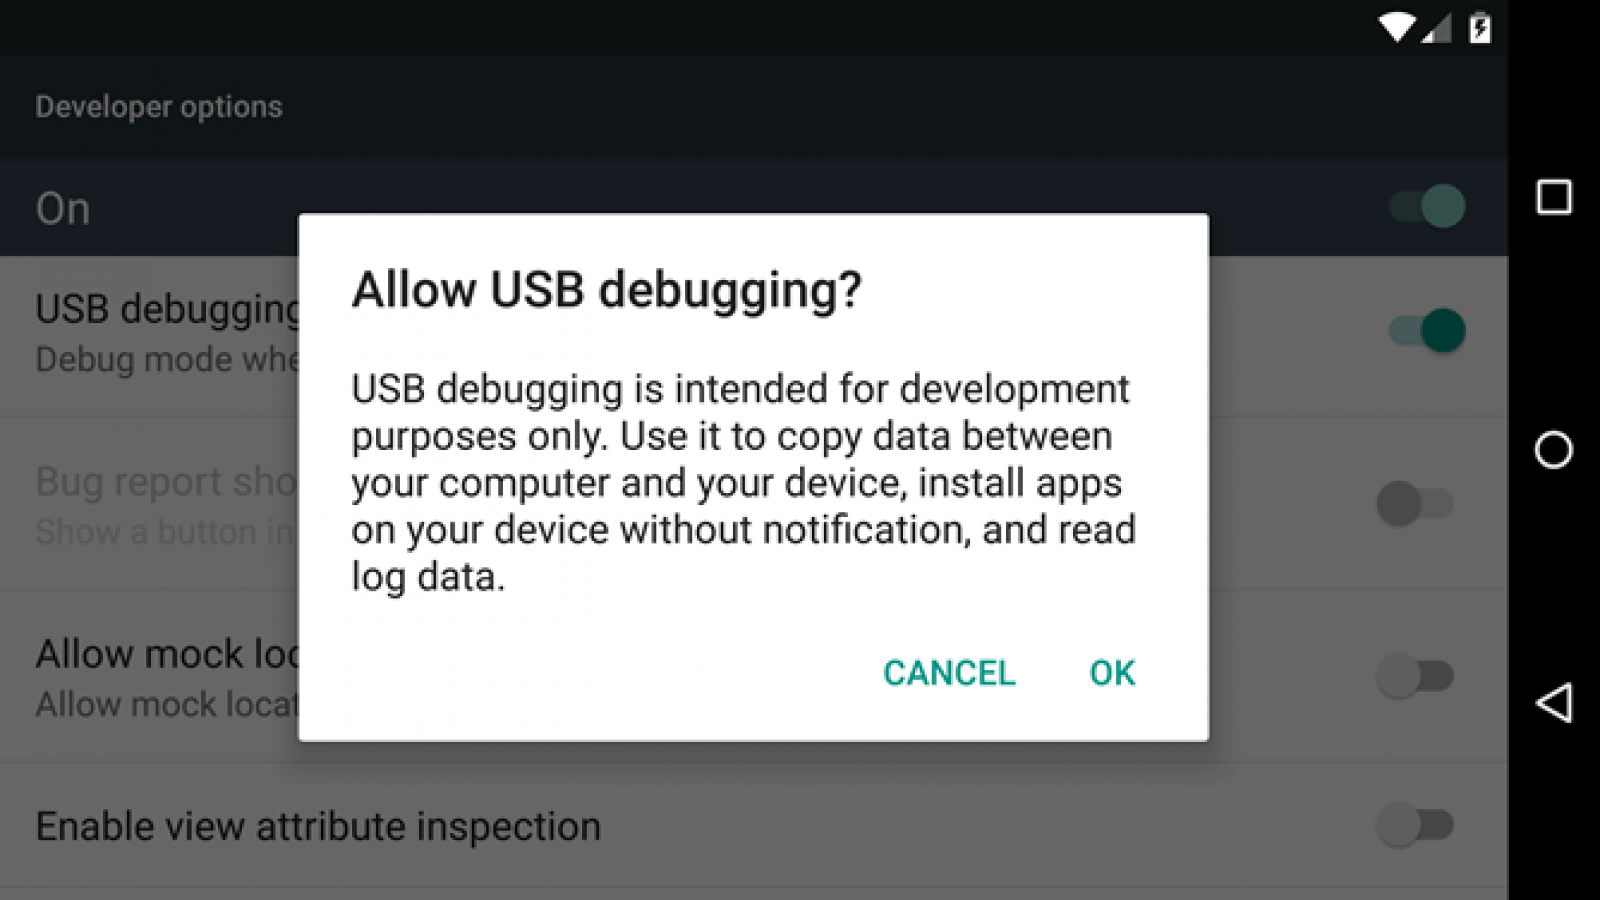
Step 8: When you see the dialog box stating the use of this feature, press the OK button for USB debugging confirmation.
Variation 1: How to enable USB Debugging in Xiaomi Redmi Smartphones?
There are different steps to handle USB debugging activation on different device models. Here are the basic steps Xiaomi users have to follow.
How to do this?
Step 1: Unlock the smartphone and access the Settings menu.
Step 2: Go to the About Device/Phone section.
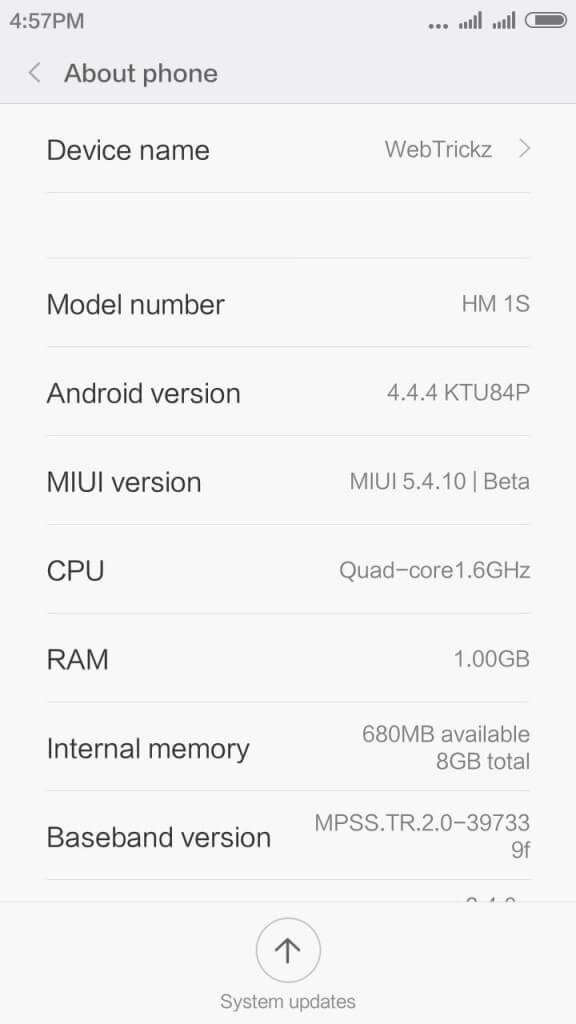
Step 3: Choose the MIUI version button multiple times. Next, you will see the prompt, “You’re now a developer!”.
Step 4: Return to the Settings menu and go to Additional Settings.
Step 5: Click on Developer Options > USB debugging. Move the slide to active status.
Variation 2: How to enable USB Debugging in Samsung Smartphones?
For another example of how the steps to enable USB debugging can be different for smartphone models, here are the steps for this on Samsung Galaxy S21/S20/S10/S9/S8 versions.
How to do this?
Step 1: Unlock the Samsung smartphone and click on Settings > About Phone.
Step 2: Tap on the Software Information section and click the build number seven times continuously. Stop when you see the prompt: Developer mode has been enabled.
Step 3: Go to the Settings menu again and find the Developer Options in this main menu.
Step 4: Access the section and activate USB Debugging. This is the same in all Samsung smartphones and tablets.
Step 5: The prompt for “Allow USB Debugging” will come up. Tap on the OK button. Then, this feature will activate in the smartphone successfully.
How to Deactivate USB Debugging on the Android Device?
After completing the functions, users can easily deactivate the USB debugging Android feature. To do so, one has to go back to the menu for Developer options and click on the USB debugging toggle switch to turn it off.
If you want to reset which PC devices can access the Android device when it is in debug mode, you can do so through the developer settings. Reach the Developers option section and browse to find “Revoke USB debugging authorization” from the drop-down menu. Then, select it.
Bonus: Use Suitable Measures to Safeguard Against USB Debugging Risks
The system is not well protected when you enable USB debugging mode on the Android smartphone or tablet device. Any external attacks like hackers and malware can enter the operating system. So, make sure to avoid using the public charging ports or the WiFi networks with public access when you are activating the debug mode.
Since the safety protocols for data security are lowered during the debugging process, cybercriminals can access the system memory and copy personal user data. Or, they can send in viruses easily into the system and cause data to wipe out. It is important to switch the debug mode off at times when you are not using the feature.
If you cannot use a private WiFi network at the time, having Avast Free Antivirus enabled will allow you to connect to unsecured public WiFi networks too.
Conclusion
While you are working on USB debugging Android, there are different points to focus on, which is a complex but necessary process. Differences are noticeable in terms of the model you are using when it comes to the steps to follow, so carefully consider that first. Then, proceed as necessary. Also, consider the security concerns associated with USB debugging and take proper precautions.
Popular Post
Recent Post
How To Transfer Photos From Android Phone To PC/Laptop [2026]
Moving photos from a phone to a computer is something most people need to do often. Phones fill up fast. Photos also matter more than apps. You may want a safe backup. You may want to edit images on a bigger screen. This guide explains how to transfer photos from Android to PC without stress. […]
Top 9 Browsers With Built-In VPN – VPN Browser
Online browsing is no longer private by default. Every website collects data in some form. This includes location details, device information, and browsing habits. Over time, this data builds a clear picture of user behavior. Many people are now uncomfortable with this level of tracking. A VPN browser helps reduce this exposure. It adds a […]
AI In Cyber Security: Who is Winning, Hackers or Security Companies
Cybersecurity once followed clear rules. Companies built firewalls. Users created passwords. Antivirus tools scanned files and removed known threats. When an attack happened, security teams studied it and added new rules. This method worked for many years. It created a sense of control and stability. That sense is gone today. Artificial intelligence has changed how […]
The Biggest AI-Run Cyber Attacks Of All Time
Artificial intelligence is now part of everyday technology. It helps people search faster. It improves medical research. It supports businesses in making better choices. But AI is not used only for good purposes. Cyber criminals have also learned how to use it. This has changed the nature of cyber attacks across the world. In the […]
Switch To a Dark Background Theme on Windows: Enable Dark Mode
People often like a screen that feels gentle on the eyes. A darker style softens bright areas and makes long computer sessions easier to handle. It also gives the desktop a cleaner and more modern feel. When you switch to a dark background theme in Windows, the colors shift to deeper shades that reduce glare […]
Complete Guide on Managing Audio Input Devices [Latest In 2026]
People use microphones for meetings, games, classes, recordings, and voice chats, so any problem with the device can interrupt their work. Even a small system error can make the voice weak or stop it fully. This is why knowing the basics of managing audio input devices is helpful for new and experienced users. Windows includes […]
Resetting Audio Settings on Windows 11: Complete Guide
Sound problems can disrupt work, study, or entertainment. Many users face issues where the audio becomes too low, too loud, unclear, or does not play at all. A common way to solve these problems is by resetting audio settings to their original state. This helps Windows rebuild its sound setup from the beginning. Windows 11 […]
Troubleshooting Headphone Detection: Headphones Not Detected/Working
A lot of users run into sound problems at some point. A common one is when the computer does not pick up the headphones. You plug them in, but the speakers keep playing. This can break your focus during work, movies, music, or calls. It also causes confusion because the reason is not always clear […]
How To Re-Pair Bluetooth Earbuds For Stereo Sound on Windows
Wireless earbuds are often paired with computers for rich stereo sound, but things don’t always go smoothly. Sometimes, the system defaults to mono audio or fails to activate the correct playback mode. This can disrupt music, calls, or gaming, making the sound feel flat and lifeless. These glitches usually stem from improper setup. Windows might […]
How To Manage Camera Permissions for App On Windows: Complete Guide [2026]
Many users run into issues when trying to join video calls or online meetings—their camera simply won’t turn on. This can happen for a few reasons: Windows might be blocking access, or the app may not have the correct permissions. These hiccups often lead to confusion and frustration. Fortunately, Windows provides straightforward tools to help […]







![Complete Guide on Managing Audio Input Devices [Latest In 2026]](https://www.techcommuters.com/wp-content/uploads/2025/12/Complete-Guide-on-Managing-Audio-Input-Devices.webp)

