How to Share Your Location in Google Maps?
Last updated on January 14th, 2025 at 10:06 am
Google Maps is a valuable feature available for people to quickly and efficiently find locations, plan routes, and avoid traffic. The application is an essential tool for tracking delivery and movement to any place via a detailed map.
However, while this application is widely used, many people do not know the real-time location sharing feature. You can even share your position in an unmarkable location on the map.
We have looked through different methods on how to share location on google maps, per OS type. Here, we present a comprehensive list of our findings. But first, remember to switch on your location GPS. Also, activate data roaming if you are in another city or town since the function would take up a lot of data.
Now, let’s get started!
Method 1: Share Google Maps Location via Android
Here are the different methods for sharing Google Maps location via Android mobile devices.
Option 1: Share Location in Google Maps Directly
You can directly share location in google maps through the app itself. The steps include the following.
Step 1: Access the Google Maps application on your Android phone. Tap on the icon for your user profile available on the top right-hand side corner of the screen.
Step 2: Choose Location Sharing. A dialog box would appear showing the process in which this function would work.
Step 3: Tap on the “Share Location” option, which would open up another panel with various options.
You would see the default setting on this screen for sharing locations for a limited period.
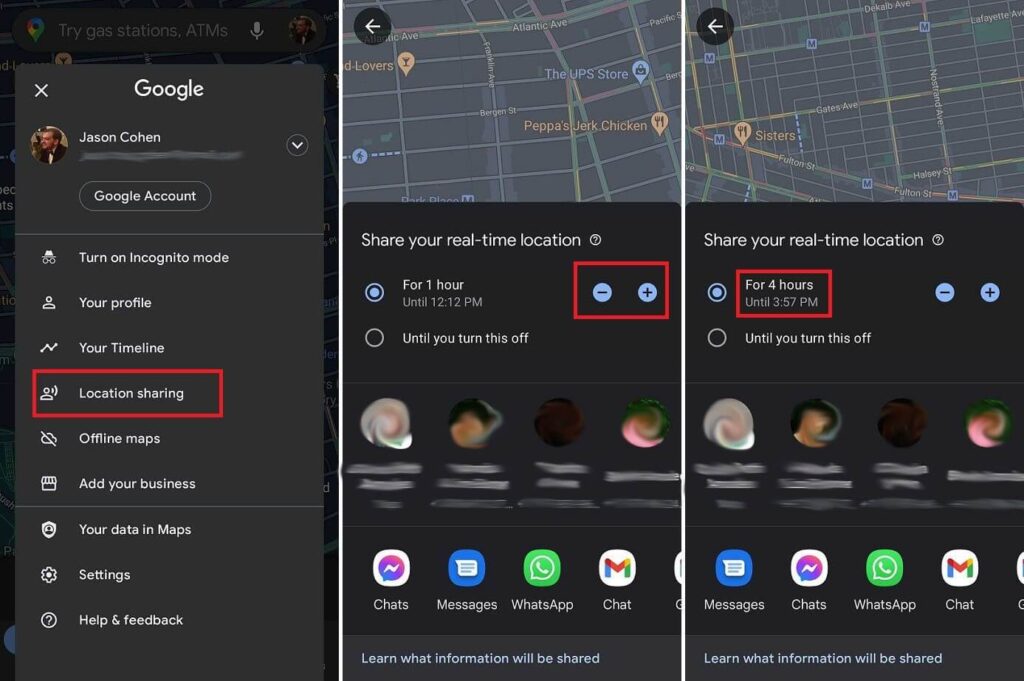
Step 4: If you do not want to give the recipient access to your location data 24×7, change the limit settings to your preferred amount of time.
There are plus (+)/minus (-) buttons on the screen. Click on them to update your time settings, from some minutes to hours.
Step 5: Choose the contact you want to send your location to from the list that appears. The main list of favorite contacts would come up here. Select from them, or click on “More” if you want to send it to someone not on your Favorites list.
Alternatively, you can share the location via different social media apps from the options, e.g., WhatsApp. This would develop a shareable link that would allow temporary access to the recipient to your location.
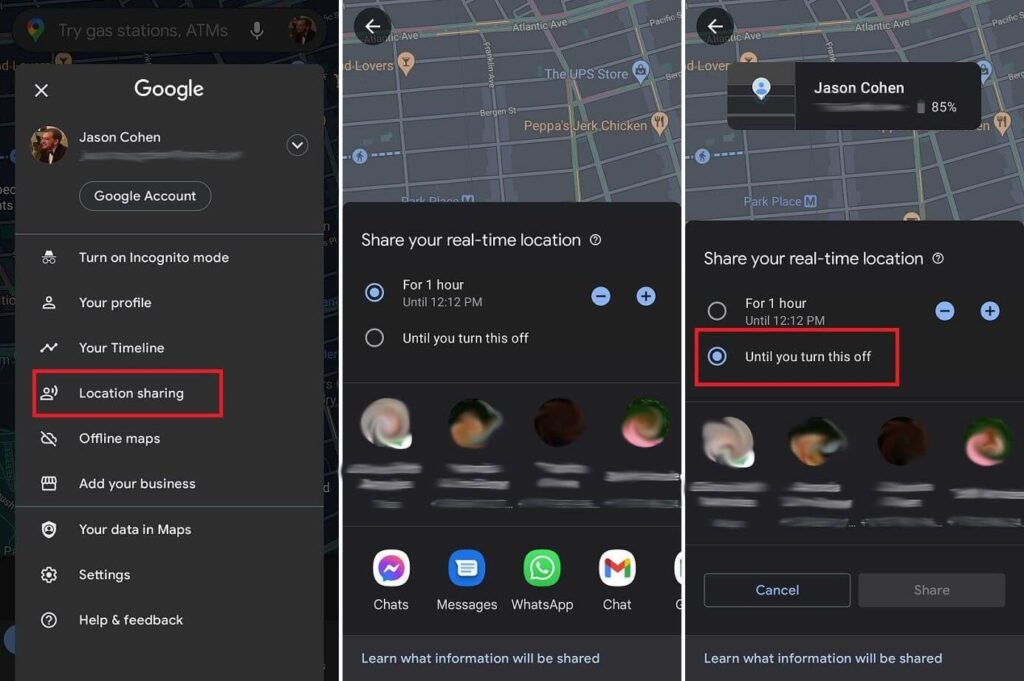
How to share location continuously?
Step 1: For continuous location sharing with family or close friends, choose Location Sharing.
Step 2: Select the “Until you turn this off” option. This would allow the location sharing until you adjust the settings later.
Here, you can choose one contact for sharing the location. However, you cannot generate any shareable link.
Step 3: After activating the share, choose the “Location Sharing” option to find the contact list. Click on “New Share” to add more recipients. Or, you can choose the icon of a person’s contact profile on your Google Maps App. Click on the plus (+) button.
How to turn off location sharing manually?
You can turn off sharing your location through the following steps.
Step 1: Choose the person’s location on your Google Maps screen.
Or, you can access the Location Sharing menu and choose their entry available at the bottom side of your screen.
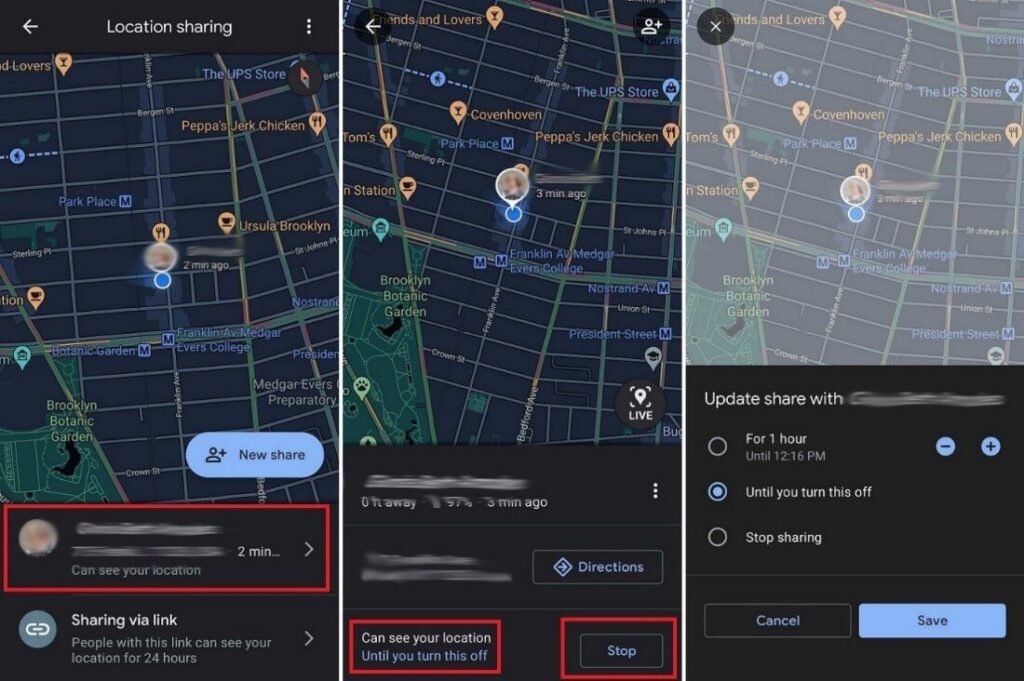
Step 2: Click on “Stop”.
Or, tap on the “Can see your location” option from beside their profile and update the amount of time you want the sharing to last.
Step 3: You can see the location links you are sharing that are active through the Location Sharing option. Click on the Sharing via Link option and select Stop. This would immediately stop the connection.
Step 4: Even if users stop sharing their location with others via step 3, the contact still appears under the Location Sharing list. Choose it and press on the three-dot icon > Remove from list.
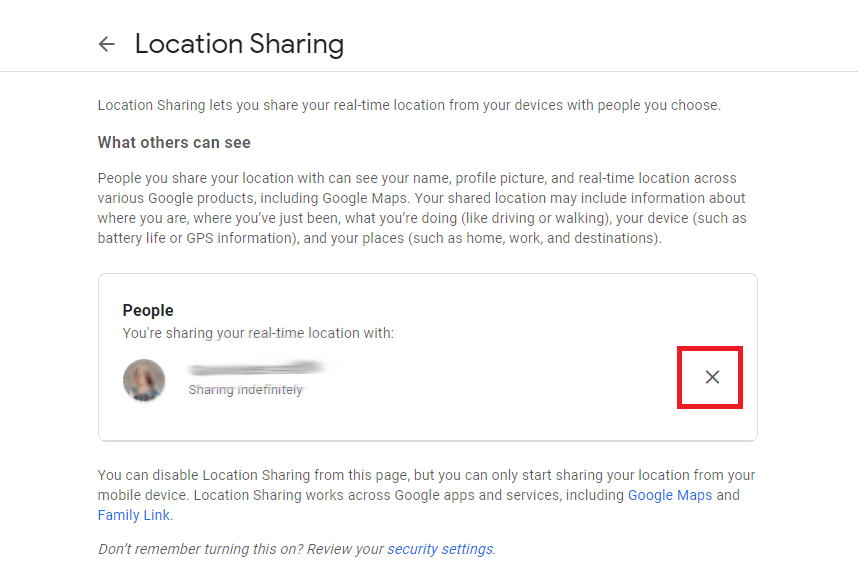
Step 5: You can access your Google Account > People & Sharing > Location Sharing > Manage Location sharing. You can view all contacts that can see your location.
Click on the (x) button beside to remove them from your list.
Option 2: Share ETA
In case you want to share the estimated time of arrival (ETA) of your journey on one trip, carry out the following steps.
Step 1: Select the Directions option on your Google Maps.
Step 2: Choose the destination on the map. Tap on Start.
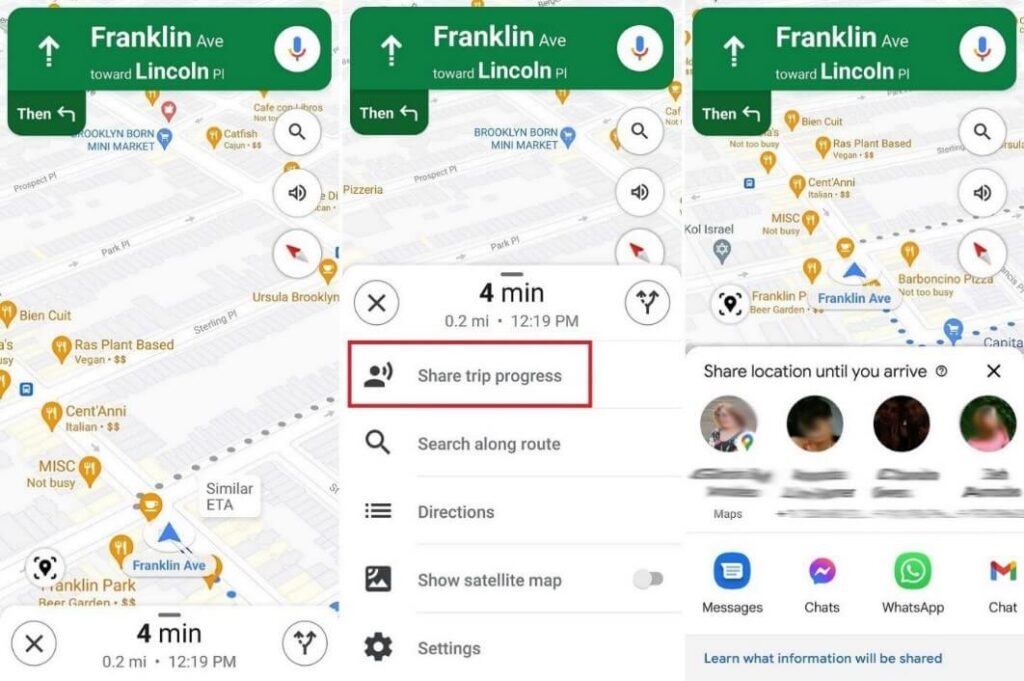
Step 3: Swipe the screen up and choose “Share Trip Progress.” Choose the contact and then click on “Share”.
Step 4: The location setting will automatically turn off when you reach the destination.
You can turn the ETA sharing manually off by choosing More > Stop Sharing.
Method 2: Share Google Maps Location via iOS
The following are the main steps to share your location on Google Maps while using iOS phones.
Step 1: Access the Google Maps app.

Step 2: Click on the location/tap and hold at any place on the screen for the marker pin to appear.
Step 3: At the lower side of your screen, tap on your address or location name.
Step 4: Then, choose the Share option.
Step 5: From the options that appear, choose the app to share your location.
Or, you can click on the “Copy” option. This would save the link to your device clipboard. Paste it in the message to your contact.
Method 3: Share Google Maps Location via Mac/PC
The following steps cover how to share location on google maps when using Mac or PC.
Step 1: Open Google Maps via Google and search/click on any location.

Step 2: At the top left-hand side corner of the screen, bedside the search bar, you would see three horizontal lines. This is the Menu- click on it.
Step 3: Click on either the “Embed map” or “Share” option.
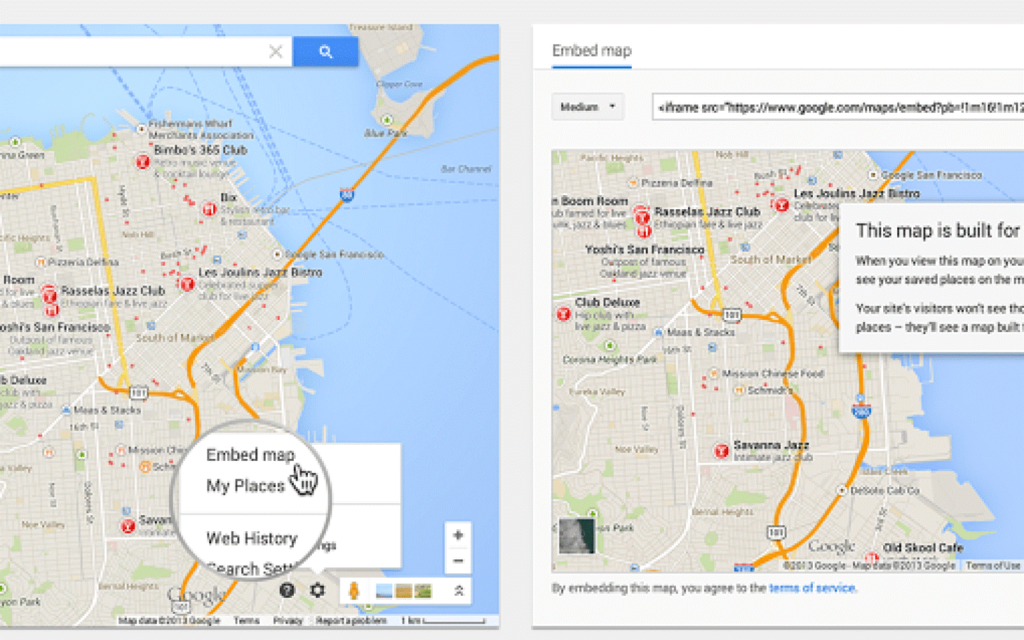
Step 4: Click on “Copy Link” to save the location link into your clipboard. Share it later via another app, message, or email by pasting.
Conclusion
Based on your device type, you can easily share your location with other people through one of these methods. You can control who you can share the data with and how long.
To better control your device and applications, you can download the Avira Free Security Software. Do regular software updates, clean your PC or mobile device, improve privacy, and conduct security scans. This would improve your device features like geolocation better.
You can go through our other write-ups for more similar software-centric information.
Author Bio:
Dinesh Lakhwani 

Dinesh Lakhwani, the entrepreneurial brain behind “TechCommuters,” achieved big things in the tech world. He started the company to make smart and user-friendly tech solutions. Thanks to his sharp thinking, focus on quality and the motto of never giving up, TechCommuters became a top player in the industry. His commitment to excellence has propelled the company to a leading position in the industry.
Popular Post


Recent Post

How To Change Default Apps For File Types In Windows
Windows is designed to make using your computer easy. One way it does this is by assigning default apps to different file types. This means when you open a file, Windows automatically opens it with a specific program. For example, photos may open with Photos, music with Groove Music, and PDFs with Edge. These default […]

How To Adjust The Mouse Pointer Speed: Complete Guide
Using a computer every day means you use the mouse a lot. The mouse pointer moves on the screen and helps you click, scroll, and select items. Many people never think about the speed of the mouse pointer. They have used the default setting for years. This can cause small problems over time. A slow […]

How to Change Mouse Scrolling Settings In Windows
A mouse is one of the most used computer tools. People use it every day. They scroll through emails. They scroll through documents. They scroll through websites and images. The movement becomes automatic. Most users do not notice it. That is why problems often go unnoticed. Scrolling problems show up slowly. At first, it feels […]

Keyboard Light Settings: Keyboard Lighting Control [Complete Guide]
Keyboards are no longer simple typing tools. Well, yes! Over time, they have evolved to include features that improve comfort, visibility, and overall experience. One of the most useful features today is keyboard lighting. It helps users work comfortably in low-light conditions. It also reduces strain when typing for long hours. Many users first notice […]

Customizing Pointer Appearance: Complete Guide
The way your mouse pointer looks on your computer may seem like a small detail. But customizing pointer appearance can make using your PC more comfortable and visually appealing. Many users do not realize that they can change the pointer size, color, and style to fit their needs. Whether you want a bigger pointer for […]

How To Choose a Computer Monitor: Monitor Buying Guide
Buying a monitor looks easy. Many people think all screens are the same. That belief causes regret later. A monitor is not just a display. It is a daily tool. You read on it. You work on it. You relax with it. Small problems become big over time. Poor brightness hurts eyes. Bad size causes […]

How To Get Help With File Explorer in Windows 11 [Complete Guide]
File Explorer is one of the most important tools in Windows 11. It is used to open folders, view files, and manage stored data. Almost every action on a Windows computer depends on it in some way. When users open documents, save downloads, or organize photos, File Explorer is always involved. Because it is used […]

How To Fix A Frozen Computer: Complete Guide [Windows 11/10]
A frozen computer is one of the most common problems Windows users face. The screen stops responding. The mouse pointer does not move. Keyboard inputs do nothing. You may hear the fan running loudly. Sometimes the system looks alive, but nothing works. This situation often happens when you are busy or working on something important. […]

How to Upgrade Computer RAM: Complete Guide
Upgrading RAM is one of the simplest ways to improve a computer. It helps the system feel faster and smoother. Apps open quicker. Browsers handle more tabs. Games and tools run with less delay. Many users search for how to upgrade computer RAM because it gives real results without high cost. You do not need […]
How To Clean Your Computer Keyboard: Complete Guide
A computer keyboard is touched more than almost any other device you own. It is used during work, study, gaming, and casual browsing. Fingers carry natural oils, sweat, and dirt. Small food crumbs fall between keys without notice. Dust settles each day slowly. Over time, this creates a hidden layer of grime. Many users do […]

