How To Set Your Time And Zone Manually Windows 11/10: Complete Guide

Windows computers usually set the time automatically. But sometimes you need to set your time and zone manually on Windows systems. This happens when automatic settings fail. It also happens when you travel to different time zones.
Manual time setting gives you full control. You can fix wrong time displays. You can also set custom time zones.
This guide shows you exactly how to do it. We cover the steps for both Windows 10 and Windows 11.
Advantages and Disadvantages: Setting up Time and Zone Manually on Windows 10/11
Manual time and zone control offers both benefits and drawbacks. Understanding these helps you make the right choice for your needs.
Advantages:
- You have full control over your system’s time.
- It works even when there’s no internet connection.
- You can fix errors caused by automatic time syncing.
- It’s great for people who travel across time zones.
- Remote workers can avoid unwanted time changes.
- Offline systems benefit from stable time settings.
- It helps prevent time drift in isolated environments.
Disadvantages:
- You must update the time manually during daylight saving changes.
- It can lead to scheduling conflicts with apps or meetings.
- Timestamps may be incorrect on files or logs.
- You’ll need to check and adjust the time regularly.
- System logs might show confusing or inconsistent entries.
- Some applications may not work properly with manual settings.
Top 7 Ways To Set Your Time and Zone Manually On Windows 11/10
Here are seven proven methods to set your time and zone manually in Windows operating systems. Each method works for different situations.
Method 1: Using Settings App (Windows 11)
The Settings app is the easiest way to set your time and zone manually in Windows 11. This modern interface is user-friendly. It works well for basic time adjustments.
Windows 11 Settings offers clear options. The interface is clean and simple. Most users prefer this method over others.
Precautions Before Performing the Steps:
- Close all running programs to avoid conflicts
- Note your current time zone before making changes
Steps:
Step 1: Press Windows key + I to open Settings. Click “Time & language”. Select “Date & time.”

Step 2: Turn off the “Set time automatically” toggle. Click “Change”. Next to “Set date and time manually” to adjust.
Method 2: Using Settings App (Windows 10)
Windows 10 Settings works similarly to Windows 11. The layout is slightly different. But the process remains straightforward and effective.
This method suits most Windows 10 users. It provides all necessary options in one place. The interface is familiar to most people.
Precautions Before Performing the Steps:
- Ensure you have administrator privileges
- Check the current system time before changes
Steps:
Step 1: Open Settings with Windows key + I. Navigate to the “Time & Language” section.
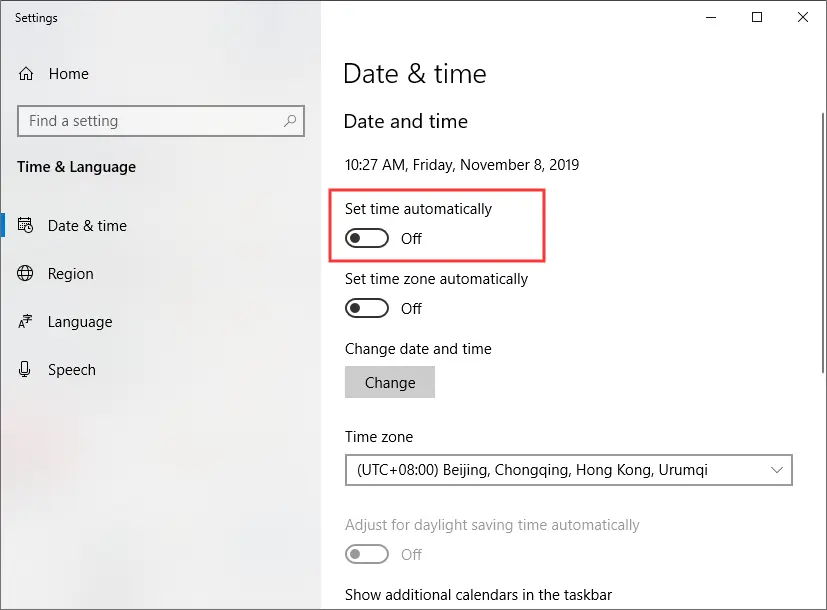
Step 2: Disable “Set time automatically.” Click “Change” under date and time to set manually.
Method 3: Using Control Panel
Control Panel offers traditional time settings. This method works on all Windows versions. Advanced users often prefer this approach.
The Control Panel method provides detailed options. It includes regional settings too. This gives you more control over formats.
Precautions Before Performing the Steps:
- Back up current time settings if needed
- Ensure no critical tasks are running
Steps:
Step 1: Type “Control Panel” in the Start menu. Go to “Clock and Region” then “Date and Time.”
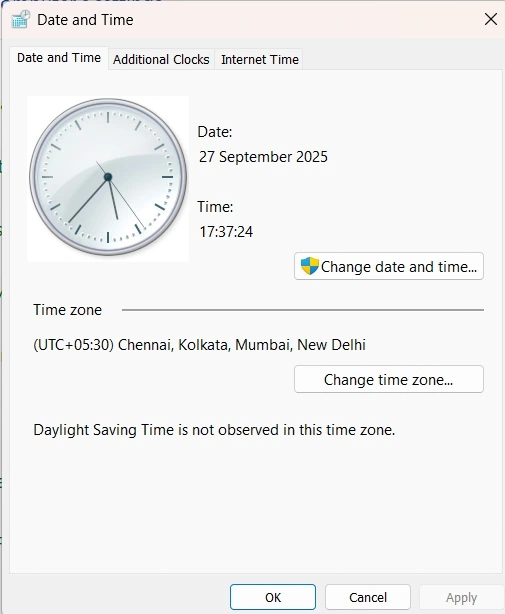
Step 2: Click the “Change date and time” button. Set your preferred time and click “OK.”
Method 4: Using Command Prompt
Command Prompt offers quick time changes. This method works for tech-savvy users. It’s faster than GUI methods for bulk changes.
Command-line control is powerful. You can script time changes. This helps system administrators manage multiple computers.
Precautions Before Performing the Steps:
- Run Command Prompt as administrator
- Double-check the time format before entering
Steps:
Step 1: Press Windows key + R, type “cmd” and press Ctrl+Shift+Enter for admin access.
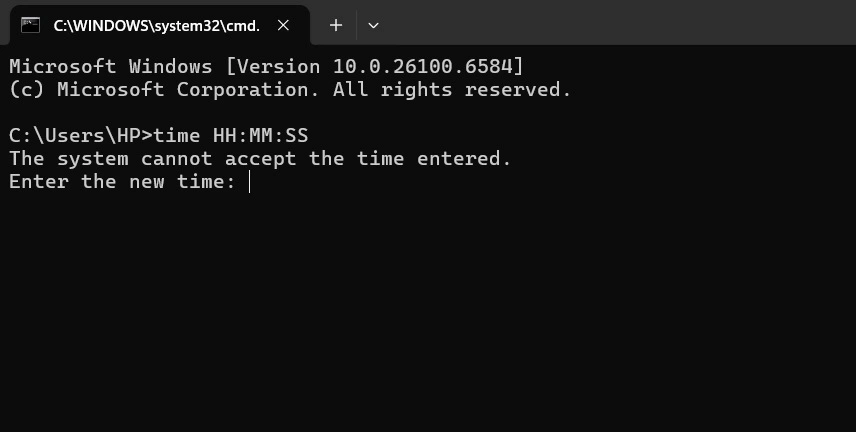
Step 2: Type “time HH:MM:SS” (replace with desired time) and press Enter to confirm.
Method 5: Using PowerShell
PowerShell provides advanced time management. This method offers more features than the Command Prompt. IT professionals use this for system automation.
PowerShell commands are more flexible. You can set complex time rules. This method suits enterprise environments well.
Precautions Before Performing the Steps:
- Open PowerShell with administrator rights
- Understand PowerShell syntax before proceeding
Steps:
Step 1: Right-click the Start button. Select “Windows PowerShell (Admin)” from the menu.
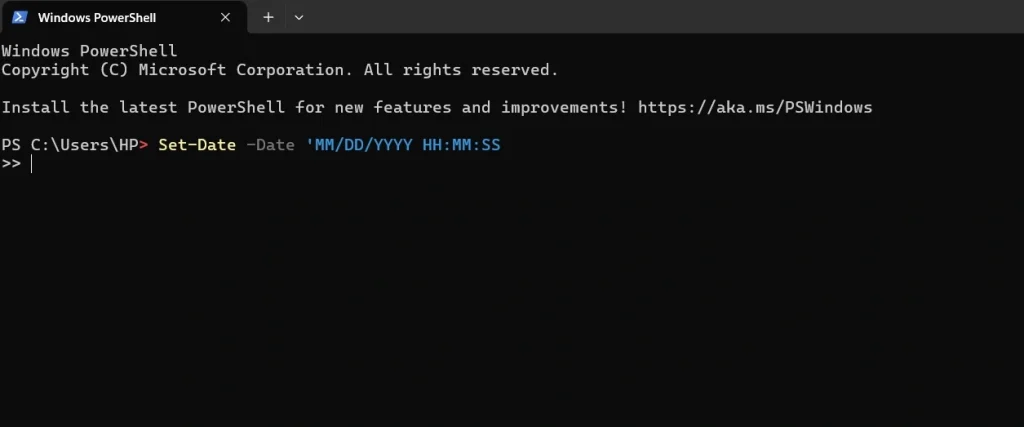
Step 2: Type “Set-Date -Date ‘MM/DD/YYYY HH:MM:SS'” with your desired date and time.
Method 6: Using Registry Editor
Registry editing provides deep system control. This method is for advanced users only. Wrong changes can damage Windows.
Registry modifications are permanent. They survive system restarts. This method fixes stubborn time issues.
Precautions Before Performing the Steps:
- Create a full system backup before editing the registry
- Only edit if you understand registry consequences
Steps:
Step 1: Press Windows key + R. Type “regedit” and press Enter to open Registry Editor.

Step 2: Navigate to HKEY_LOCAL_MACHINE\SYSTEM\CurrentControlSet\Services\W32Time\Parameters and modify time values.
Method 7: Using Group Policy Editor
Group Policy controls system-wide settings. This method works for Windows Pro versions. It’s perfect for managing multiple users.
Group Policy changes affect all users. These settings override individual preferences. Network administrators use this method often.
Precautions Before Performing the Steps:
- Only available in Windows Pro/Enterprise editions
- Changes affect all system users
Steps:
Step 1: Press Windows key + R, type “gpedit.msc” and press Enter to open the editor.
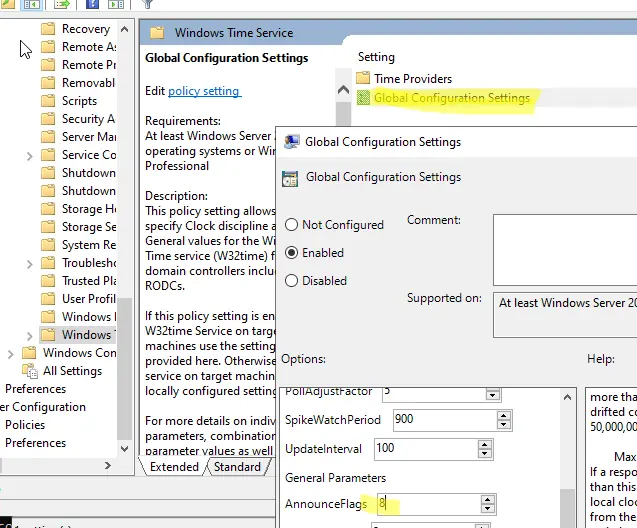
Step 2: Go to Computer Configuration > Administrative Templates > System > Windows Time Service to configure policies.
Advanced Tips By Author
These expert tips will help you master manual time settings. Follow them to avoid common issues and keep your system running smoothly.
- Disable automatic time synchronization before making manual changes. This prevents conflicts between manual and automatic settings.
- Set the time zone first. Then adjust the actual time. This ensures better accuracy and avoids mismatches.
- Use the 24-hour format in commands. It helps avoid confusion between AM and PM.
- Test time changes with non-critical applications. This lets you catch problems before they affect important tasks.
- Keep a backup of your working time settings. You can restore them quickly if something goes wrong.
- Monitor system logs after changing the time. This helps you detect any issues early.
- Use UTC time for servers. It simplifies time management and avoids timezone-related errors.
- Update the BIOS time if your system clock keeps resetting. This can fix persistent time drift problems.
Conclusion
Learning to set your time and zone manually Windows gives you complete control. These methods work for different skill levels. Choose the one that matches your comfort zone.
Manual time control solves many common problems. It helps when automatic sync fails. It also works great for offline systems. Remember to update settings when needed.
Practice these methods on a test system first. This builds your confidence safely. Soon you’ll handle any time-related issue with ease. Your Windows system will always show the correct time.
FAQs:
Q: Why won’t my Windows computer keep the correct time after manual setting?
This usually happens when automatic time sync is still enabled. Turn off automatic time synchronization first. Then set your time manually. Also, check if your CMOS battery is working properly. A dead battery causes the time to reset on every boot. Replace the battery if it’s old. Some third-party software can also interfere with time settings. Disable any time-related applications temporarily to test.
Q: Can I set different time zones for different user accounts on the same computer?
No, Windows uses a single system-wide time zone setting. All user accounts share the same time zone. However, you can use different time formats and regional settings per user. Some third-party applications let individual users see different time zones. But the core system time zone remains the same for everyone. This prevents confusion and maintains system consistency.
Q: What happens to scheduled tasks when I change the time manually?
Scheduled tasks may run at unexpected times after manual time changes. Tasks scheduled for the “past” might run immediately. Tasks scheduled for the “future” will wait until that time arrives. Windows Task Scheduler handles most changes well. But some tasks might skip or run multiple times. Check your task schedule after time changes. Restart the Task Scheduler service if needed for proper operation.
Author Bio:
Dinesh Lakhwani 

Dinesh Lakhwani, the entrepreneurial brain behind “TechCommuters,” achieved big things in the tech world. He started the company to make smart and user-friendly tech solutions. Thanks to his sharp thinking, focus on quality and the motto of never giving up, TechCommuters became a top player in the industry. His commitment to excellence has propelled the company to a leading position in the industry.
Popular Post


Recent Post

How To Check If Your PC Is Infected? [Complete Guide]
Computers now sit at the center of almost everything we do. Well, yes! From sending emails to watching videos, we depend on them without much thought. Because of this, even a small issue can disrupt daily tasks. One common problem is hidden malware. It does not always show clear signs at first. It can enter […]

Repair Apps And Programs: Repair Apps That Aren’t Working
Computers have become an essential part of everyday life, supporting work, study, communication, and entertainment. Most of these activities rely on apps and programs, so when one stops functioning, even simple tasks can be disrupted. Common problems include error messages, frozen screens, or apps that fail to open. On Windows systems, such issues often arise […]

Troubleshooting Microphone Privacy Settings: Complete Guide
Sound is a basic part of how we use computers today. People attend meetings, record audio, speak to others, and use voice tools almost every day. A working microphone makes all these tasks easy. When the microphone fails, even simple work becomes difficult. Many users first think the device is broken. In reality, the issue […]
Windows Sound Settings – Sound Control Panel: Complete Guide
Sound plays an important role in how we use a computer every day. It supports both work and leisure. You need it for meetings, videos, music, and alerts. When audio fails, even simple tasks become difficult. Many users feel stuck when sound issues appear. This usually happens because they are not familiar with Windows Sound […]

Run a Troubleshooter For PC Issues Windows: Complete Guide
A computer plays an important role in everyday life. People use it for work, study, communication, and entertainment. When a problem appears, it can interrupt everything. Even a small issue can waste time and create frustration. Many users feel unsure about how to fix such problems. They often think they need expert help. In reality, […]
![Adjusting Audio Output Settings Complete Guide [2026]](https://www.techcommuters.com/wp-content/uploads/2026/03/Adjusting-Audio-Output-Settings-Complete-Guide.webp)
Adjusting Audio Output Settings: Complete Guide [2026]
Sound is part of almost everything we do on a computer. It lets you watch videos, join calls, play music, and hear alerts. When the audio stops working the right way, it can interrupt both work and daily use. That is why adjusting audio output settings matters for every user. Many people get unsure when […]

Artificial Intelligence Explained: Concepts, Terminology, Benefits, and Future Trends
Artificial Intelligence, or AI, is basically computers doing things that usually need a human brain. We’re talking about stuff like learning from experience, figuring out problems, understanding language, and making decisions. It’s not magic, just a lot of data, pattern-spotting, and math behind the scenes. Now, AI doesn’t actually think or feel like we do. […]

Resolving Microphone Detection Problems: Latest Guide [2026]
Microphones are important tools in daily life. People use them for office meetings, online classes, interviews, gaming, customer support, and content creation. When a system fails to detect a microphone, communication stops at once. This situation can cause stress and confusion. Many users believe the microphone is damaged. In reality, most problems are simple and […]

How To Switch To A Dark Background Theme In Windows [2026]
Most people spend many hours each day in front of a computer screen. Office work, online classes, editing, browsing, and streaming all require long screen time. A bright white background may look clean at first. However, over time, it can feel sharp and tiring. The strong contrast between white backgrounds and black text may cause […]
How to Switch From Local To Microsoft Account On Windows
Many users begin with a local account when they set up a new Windows computer. A local account works only on that single device. It stores settings, files, and preferences locally. It does not connect to online Microsoft services. For basic offline use, it works well. However, as digital needs grow, many users want better […]

