How to Handle Android Studio Installation in Windows 11/10?

Last updated on September 2nd, 2023 at 4:31 am
Introduction
Windows operating systems come with many high-quality software configurations, some pre-built for Windows OS while some not. One notable software is Android Studio, which is highly related to Android app development. It comes equipped with many tools and features necessary for creating robust Android apps.
You can download and do Android Studio setup in Windows 10/11, but it can take some complex configuration steps to complete. Yet, you can do the installation if you carefully take the right steps.
What is Android Studio?
Running with IntelliJ IDEA (JetBrains), Android Studio is a notable IDE, mainly related to Android app development. It includes various features that coding experts utilize for development projects, like a blended environment, a flexible build system (Grade-centric), etc.
There is a feature-rich emulator here for coding work, NDK/C++ support, and built-in integration of the Google Cloud Platform.
System Requirements:
The following are the main system requirements you should know about before beginning the Android Studio setup in Windows.
- System compatibility- Windows 11/10/8/7
- Disk Space- Available disk space of 2-4 GB, Recommended 12 GB (at least 1.5 GB for Android Emulator/Android SDK + 500 for IDEA).
- RAM- Minimum 4 GB RAM, Recommended 8 GB RAM (Additional 1 GB RAM for Android Emulator)
- Screen Resolution- Minimum 1280 x 800
- CPU specifications- 2nd or higher Intel Core Processor, x86_64 CPU architecture, or AMD CPU + Hypervisor Support
Process of Android Studio Installation in Windows 11/10
After checking if the system requirements for the installation of Android Studio are compatible, you can begin the process. For that, there are different sequences you should learn about and follow carefully. We studied and broke down all of these methods.
Stage 1: Download/Install Java JDK
Before beginning the installation of Android Studio, you need to prepare the Java environment on your Windows 11/10 device. So, the first step involves installing and setting up Java JDK (Java Development Kit).
This is highly important as a development package that users operate to build Java-centric apps. Besides that, developers can use this package for Java-based app code testing. So, first, one should download it on their Windows 11 or 10 system.
How to do this?
Step 1: Visit the Oracle Java official website for downloads.
Step 2: Search and select the most recent Java JDK version from the given list. Under the Windows section, download its x64 MSI Installer option.

Step 3: After downloading it, access the Downloads section and open the file you received.
Step 4: Then, read through the on-screen instructions that come up and install the JDK.
Stage 2: Set up Java JDK Environment
During the Android Studio setup in the Windows process, you should kickstart the Java environment setup first after the installation of the Java JDK completes successfully. Follow the steps carefully to do this process. The Android Studio software would access the Java environment to operate securely later.
To note, there is no need to reconfigure Environmental Variables during this process if they are already done. For first-time users, doing the steps are important to decrease multiple coding errors and issues during compilation.
How to do this?
Step 1: Access the Windows search field through the given icon and type in the phrase- Edit Environment variables. Hit Enter to access this feature.
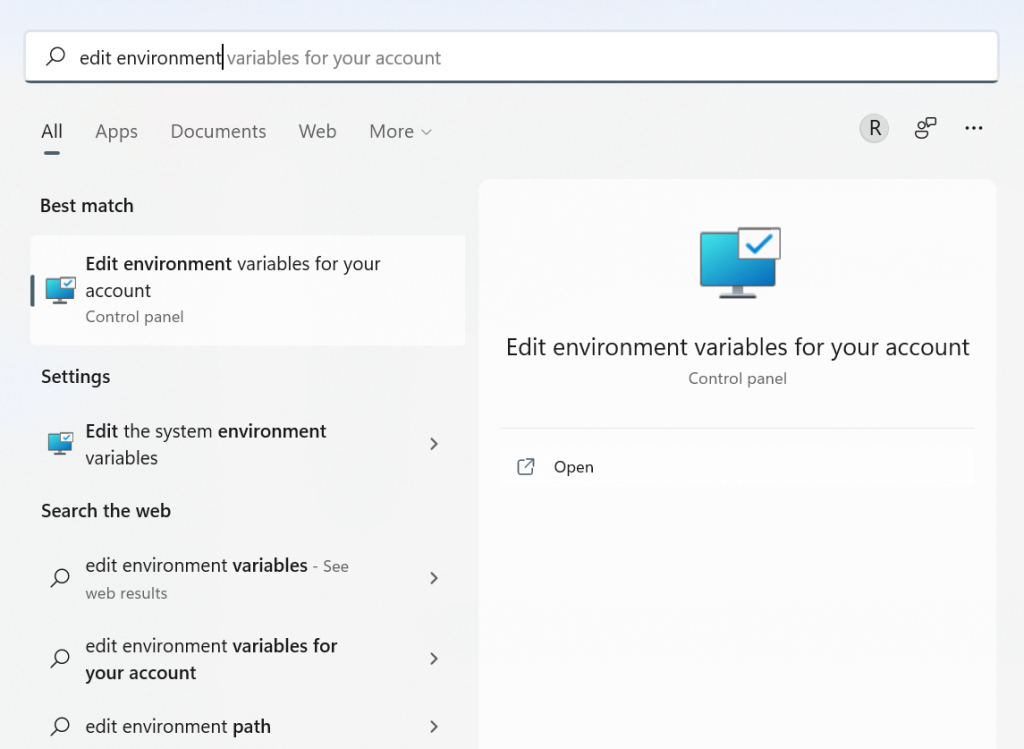
Step 2: Find and choose the Environmental Variables button. Press it.
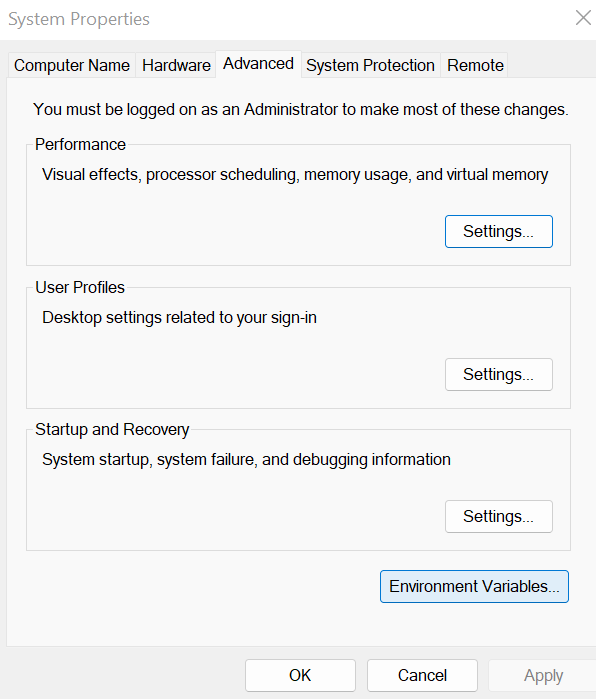
Step 3: In the next window that appears, find the “System Variables” portion in the lower part of the window. Then, click on Path > Edit > New.
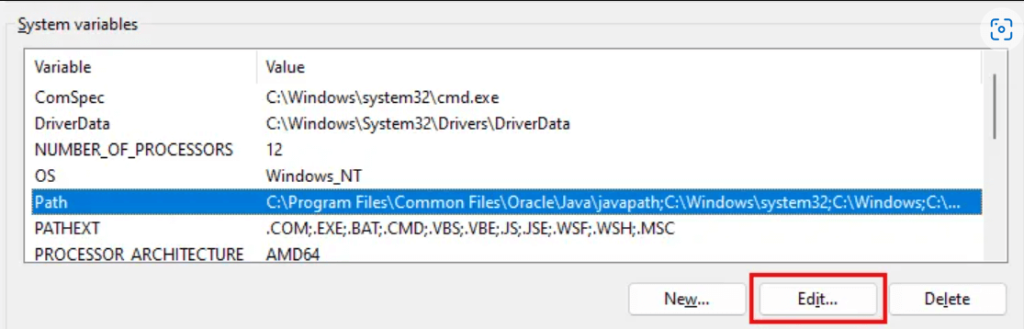
Step 4: Next, copy the folder path for the JKD binaries specifically on your device. Here is an example: C:\Program Files\Java\jdk-18.0.1.1\bin.
Step 5: Go back to the tab for Environmental Variables. Here, paste the copied path and save.
Step 6: Then, click on the User Variables section, and press the New button.
Step 7: Under the box for a variable name that appears, type in PATH_HOME. Under the box for variable value, add the path you added.
Step 8: Click on the OK button to complete the process.
Stage 3: Download and Install Android Studio
Next, you can begin the installation of Android Studio on your device. The process for this is the same for Windows 11 and 10, but there may be some variations depending on device and model differences.
How to do this?
Step 1: Download the developer’s Android Studio zip file or executable version.
Step 2: Press the Download button.
Step 3: On the next slide, click the checkbox for the “I have read and agree with the above terms and conditions” option.
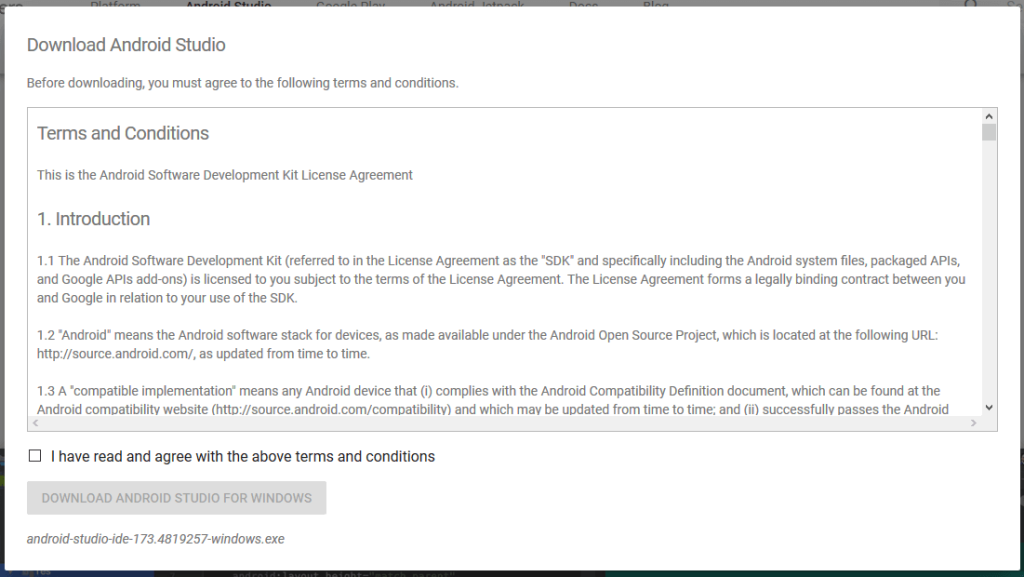
Step 4: When the next prompt box appears, click the “Save File” option. This will start the file downloading process.
Step 5: Then, access the Downloads section to access this file. Click on it to run the software and begin the installation process.
Step 6: After the installation completes, you should click the “Next” button to proceed.
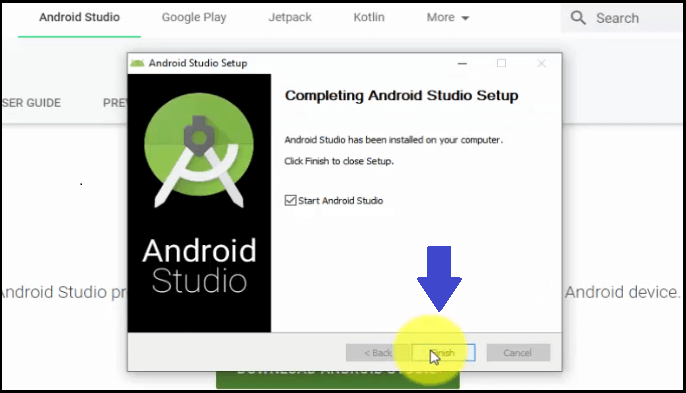
Step 7: In the following window that appears, click Finish.
Step 8: The system would then ask the user if they want to import previous Android Studio settings if they downloaded the software before. For best results, click the “Do not Import Settings” choice.
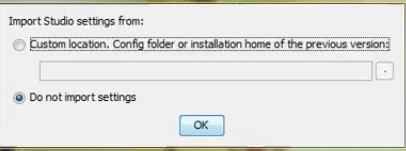
Step 9: Press OK.
Step 10: The Android Studio software would start up and then search for any present SDK Components in the system.
Step 11: After the software finds the necessary SDK components, you will get redirected toward the Welcome dialog box.
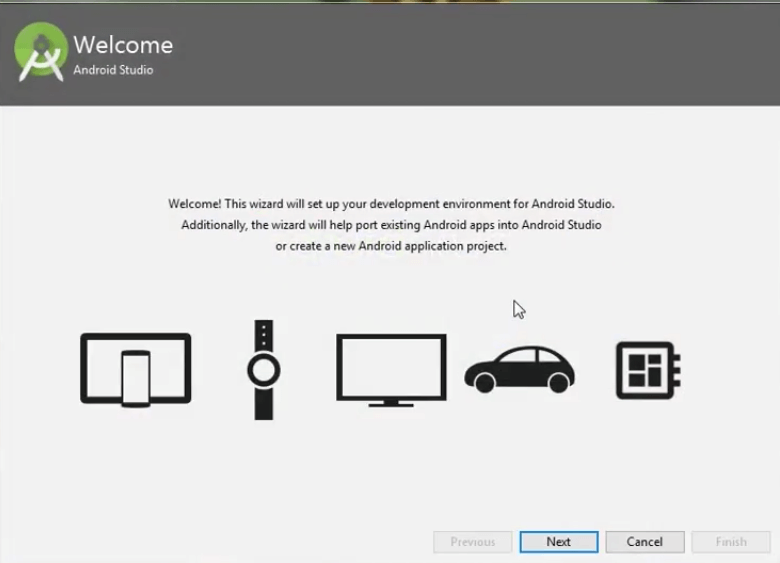
Step 12: Press the Next button.
Step 13: The Install Type window will appear. Here, select the Standard option and press Next.
Step 14: After that, you have to choose the preferred UI Theme. Two options are available- Darcula (Dark theme) and IntelliJ (Light theme).

Make your choice, and then click on the Next button.
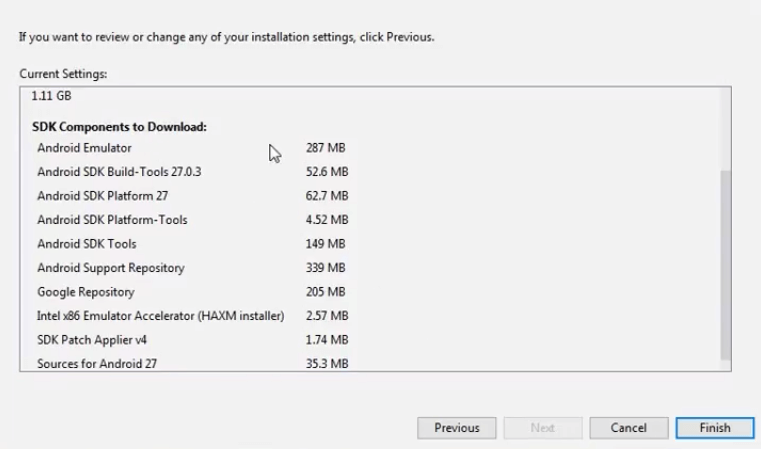
Step 15: The next window will show the available SDK Components to download. Press the Finish button to start the downloading process of each. This can take some time to complete the full process, typically around 15 to 30 minutes.
Step 16: After the configuring of Android Studio is complete; you can use it to create new apps.
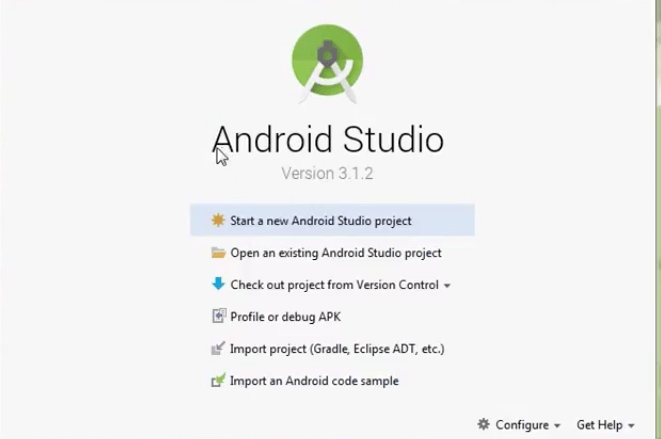
Step 17: To begin, click on the “Start a new Android Studio project” option.
Conclusion
On Windows 10 or 11, you can install Android Studio suitably for Android app development work. Before that, you have to install and set up the Java JDK in the device since that will allow the software to operate appropriately. Follow all of the steps for the Android Studio installation and setup process cautiously, and customize the app theme.
If you found this post enlightening about the topic you were searching for, there are more such guides we have published. Read through them if interested, and let us know your thoughts.
Author Bio:
Dinesh Lakhwani 

Dinesh Lakhwani, the entrepreneurial brain behind “TechCommuters,” achieved big things in the tech world. He started the company to make smart and user-friendly tech solutions. Thanks to his sharp thinking, focus on quality and the motto of never giving up, TechCommuters became a top player in the industry. His commitment to excellence has propelled the company to a leading position in the industry.
Popular Post


Recent Post

How To Get Help With File Explorer in Windows 11 [Complete Guide]
File Explorer is one of the most important tools in Windows 11. It is used to open folders, view files, and manage stored data. Almost every action on a Windows computer depends on it in some way. When users open documents, save downloads, or organize photos, File Explorer is always involved. Because it is used […]

How To Fix A Frozen Computer: Complete Guide [Windows 11/10]
A frozen computer is one of the most common problems Windows users face. The screen stops responding. The mouse pointer does not move. Keyboard inputs do nothing. You may hear the fan running loudly. Sometimes the system looks alive, but nothing works. This situation often happens when you are busy or working on something important. […]

How to Upgrade Computer RAM: Complete Guide
Upgrading RAM is one of the simplest ways to improve a computer. It helps the system feel faster and smoother. Apps open quicker. Browsers handle more tabs. Games and tools run with less delay. Many users search for how to upgrade computer RAM because it gives real results without high cost. You do not need […]

How To Clean Your Computer Keyboard: Complete Guide
A computer keyboard is touched more than almost any other device you own. It is used during work, study, gaming, and casual browsing. Fingers carry natural oils, sweat, and dirt. Small food crumbs fall between keys without notice. Dust settles each day slowly. Over time, this creates a hidden layer of grime. Many users do […]
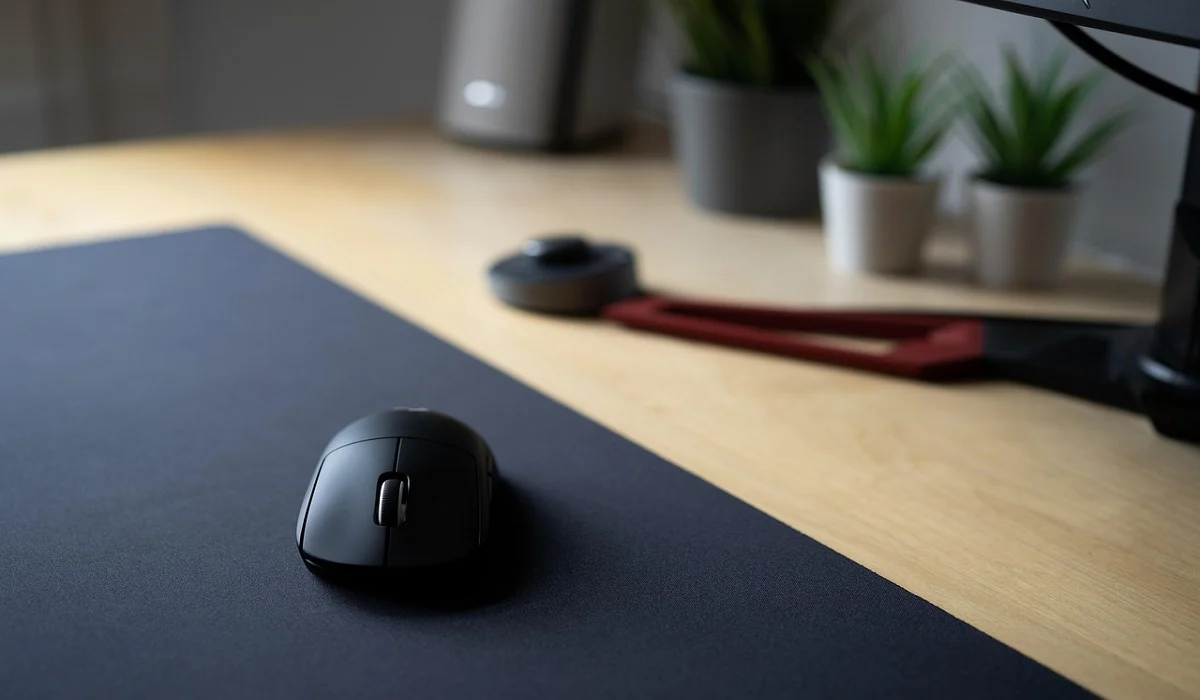
Computer Mouse Buying Guide for Beginners and Advanced Users
Buying a mouse looks easy at first. Many people think all mouse work the same way. Well, that idea often leads to regret later. A mouse affects comfort, speed, and daily work. It matters for office tasks, gaming, design, and study. The right choice reduces strain and improves control. The wrong one feels annoying every […]

How To Overclock a Computer: A Complete Guide
Overclocking is the process of making your computer run faster than its factory settings. It mainly affects the processor, graphics card, and sometimes memory. Many people choose this method to improve performance without buying new hardware. It is popular among gamers, video editors, and users who run heavy software. When done properly, overclocking can give […]

How To Find Password Saved on This Computer: Complete Guide
Many people forget their login details at some point. It happens often. We create many accounts every year. Each one needs a username and a password. Over time, it becomes hard to remember all of them. That is why computers offer ways to store login details. These saved details help users sign in faster. They […]

How To Open/Access Computer Management & Advanced Tips
Every Windows computer has many hidden tools. Most users never see them. They only use basic settings. They change wallpapers. They install apps. They adjust sound and display. That is enough for daily work. But problems still happen. The system slows down. Storage fills up. Errors appear without warning. At this stage, normal settings do […]

How To Transfer Photos From Android Phone To PC/Laptop [2026]
Moving photos from a phone to a computer is something most people need to do often. Phones fill up fast. Photos also matter more than apps. You may want a safe backup. You may want to edit images on a bigger screen. This guide explains how to transfer photos from Android to PC without stress. […]

Top 9 Browsers With Built-In VPN – VPN Browser
Online browsing is no longer private by default. Every website collects data in some form. This includes location details, device information, and browsing habits. Over time, this data builds a clear picture of user behavior. Many people are now uncomfortable with this level of tracking. A VPN browser helps reduce this exposure. It adds a […]

