How To Adjust Display Appearance Settings Easily in Windows 11/10

Your computer screen acts as the gateway to your digital life. So getting it just right is essential. When you understand how to fine-tune Windows’ display settings, your workflow improve. And so does your eye comfort.
Many users face problems like unreadable tiny text, overly dark screens, or blurry visuals. Fortunately, Windows includes easy-to-use tools to solve these common issues—no extra apps or technical know-how required.
In this guide, you’ll learn how to adjust display appearance settings easily Windows. We’ll explore brightness adjustments, text scaling, and overall display configuration.
By the end, you’ll be fully equipped to optimize your Windows display settings for a better-looking, better-performing computer.
Part 1: Why Adjust Display Appearance Settings Easily Windows?
Your Windows display settings shape every visual element on your screen—from text clarity to overall brightness. When set correctly, they can dramatically improve your daily computing experience. Smooth visuals, readable fonts, and balanced lighting don’t just look better—they reduce eye strain and boost productivity.
That’s why it’s worth paying attention to how your display is configured.
- Better eye comfort – Wrong brightness or contrast strains your eyes and causes headaches
- Improved productivity – Clear, readable text helps you work faster and make fewer mistakes
- Perfect fit for your space – Adjust settings based on room lighting and your viewing distance
- Enhanced gaming and media – Enhanced color quality and fluid display make watching content truly enjoyable.
- Reduced fatigue – Proper settings help you use your computer longer without getting tired
- Professional appearance – Well-configured displays look more polished for work presentations
- Energy savings – Optimized brightness settings can help extend laptop battery life
- Accessibility support – Larger text and high contrast help people with vision challenges
Part 2: How To Adjust Display Appearance Settings Easily in Windows?
Windows makes it simple to change how your screen looks. You can access most display settings through the Settings app or Control Panel. The changes happen right away, so you can see results instantly.
Making small adjustments to your display settings is often the most effective approach. Tweak one option at a time to see what improves your screen without creating new issues. And if something doesn’t feel right, you can always revert to the default settings.
1. Change Screen Resolution
Screen resolution affects how clear and sharp things look on your screen. Higher resolution means more detail. Lower resolution makes things look bigger but less clear. Choosing the right one helps your screen look better and feel more comfortable.
Windows often selects the best resolution for your screen on its own. But in some cases—like using older displays or doing certain types of work—you might need to change it yourself. Choosing the right resolution makes text easier to read and pictures look sharp.
How it helps:
- Makes text and images look sharper and more detailed
- Fixes blurry or fuzzy display problems that strain your eyes
- Optimizes screen space for your monitor size and capabilities
- Improves overall visual quality for work and entertainment
Step 1: Right-click on your desktop. Select “Display settings”.
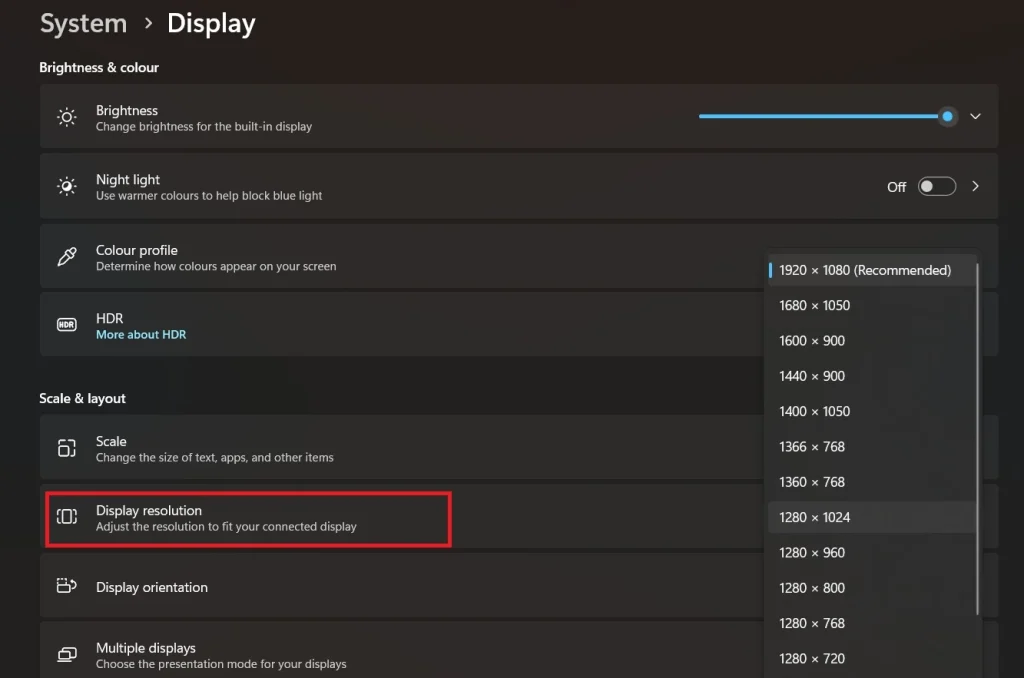
Step 2: Scroll down to find “Display resolution” and click the dropdown menu to choose your preferred resolution setting.
2. Adjust Brightness and Enable Night Light
Screen brightness affects your comfort and eye health. Too bright hurts your eyes in dark rooms. Too dim makes you strain to see things clearly. Night Light reduces blue light that can disrupt your sleep patterns.
On most laptops, you can change screen brightness using the function keys. Desktop users usually adjust brightness through Windows settings. At night, the Night Light feature adds warmer tones to your display, which can help your body get ready for sleep naturally.
How it helps:
- Reduces eye strain and prevents headaches from improper lighting
- Saves battery life on laptops when you lower brightness appropriately
- Improves sleep quality by filtering harmful blue light in evening hours
- Adapts display to different lighting conditions throughout the day
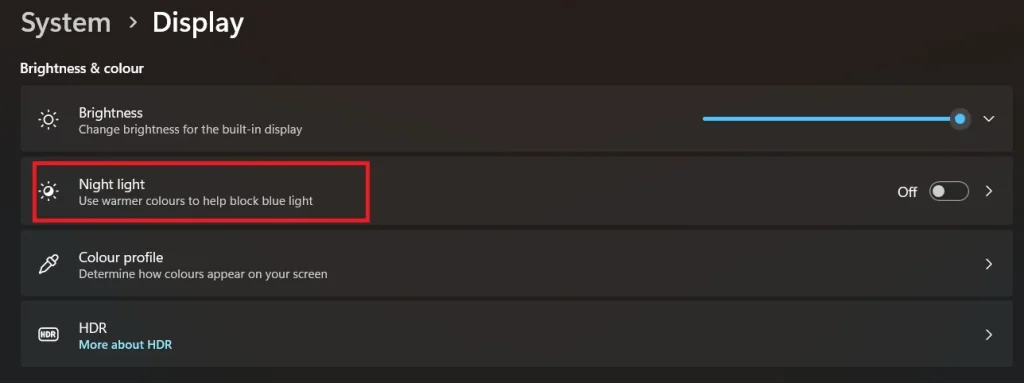
Step 1: Go to Settings > System > Display and use the brightness slider to adjust screen brightness to your comfort level.

Step 2: Toggle on “Night light” and click “Night light settings” to schedule automatic blue light reduction for evening hours.
3. Scale Text and Apps
Text scaling makes words and buttons bigger without changing screen resolution. This helps when text looks too small to read comfortably. Scaling keeps everything sharp while making it easier to see.
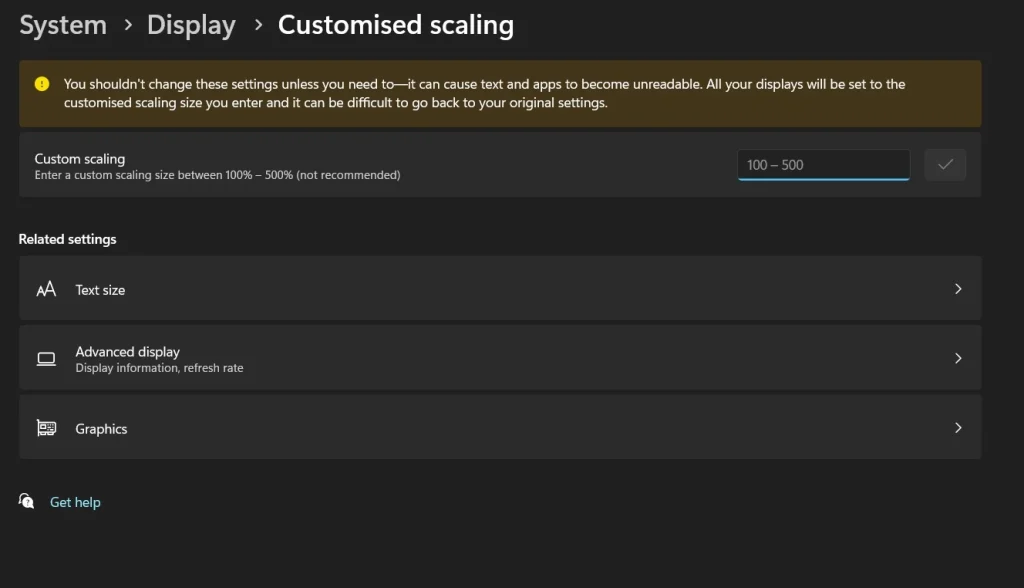
Windows offers preset scaling options like 100%, 125%, and 150%. You can also set custom scaling percentages. Higher scaling makes everything larger. Lower scaling fits more content on screen but makes things smaller.
How it helps:
- Makes text easier to read without making display quality worse
- Helps people with vision problems use computers more comfortably
- Adjusts interface size for different monitor sizes and viewing distances
- Keeps all programs looking consistent at the new size
Step 1: Open Settings > System > Display. Locate the “Scale and layout” section on the main display page.
Step 2: Click the dropdown under “Change the size of text, apps, and other items” and select your preferred scaling percentage.
4. Change Display Orientation
Display orientation controls whether your screen shows content normally or rotated. Most people use landscape mode. But portrait mode works well for reading documents or coding. Some users accidentally rotate their screen and need to fix it.
Rotation works best with monitors that physically rotate too. Software rotation on fixed monitors can feel awkward. Some graphics cards have hotkeys that accidentally trigger rotation. Knowing how to fix this saves frustration.
How it helps:
- Fixes accidentally rotated screens that make computer use difficult
- Optimizes display for specific tasks like document editing or programming
- Makes better use of screen space for tall content like web pages
- Accommodates different monitor mounting positions and setups
Step 1: Access Settings > System > Display. Scroll to find the “Display orientation” dropdown menu.
Step 2: Choose between “Landscape,” “Portrait,” “Landscape (flipped),” or “Portrait (flipped)” depending on how your screen is positioned and what works best for your task.
5. Configure Multiple Displays
Multiple monitors boost productivity by giving you more screen space. Windows can extend your desktop across monitors or mirror the same content. Each monitor can have different settings for brightness and resolution.
Setting up multiple displays takes some planning. You need to choose which monitor is primary. You also decide how to arrange them virtually. This affects how your mouse moves between screens. Getting it right makes multitasking much easier.
How it helps:
- Increases workspace for better multitasking and productivity gains
- Allows different applications to run on separate screens simultaneously
- Enables presentations while keeping notes private on your main screen
- Provides backup display option if one monitor has problems
Step 1: Connect your second monitor and go to Settings > System > Display to see all connected displays.
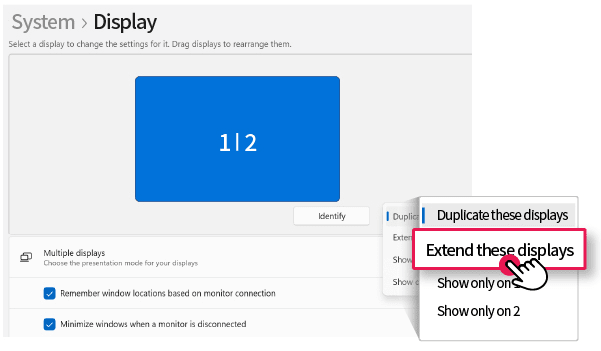
Step 2: Choose “Extend these displays” to use both screens, then drag the display rectangles to match your physical monitor arrangement.
Part 3: Pro Tips To Adjust Display Appearance Settings Easily Windows
Advanced users can get even more from their Windows display stories. These tips help you fine-tune settings for the best possible experience. Some require digging deeper into Windows options.
- Use keyboard shortcuts – Windows key + P quickly switches between display modes for presentations
- Update graphics drivers – Latest drivers fix display bugs and add new features for better performance
- Try custom refresh rates – Higher refresh rates make scrolling and gaming smoother on supported monitors
- Calibrate your colors – Windows has built-in color calibration tools for accurate photo and video work
- Set different wallpapers – Each monitor in multi-display setups can have its own background image
- Use display profiles – Save different setting combinations for work, gaming, and media consumption
- Enable GPU scaling – Graphics card scaling sometimes works better than Windows scaling for games
- Check cable quality – Poor cables cause display problems that settings can’t fix.
Part 4: Advanced Display Customization Options
Windows offers many hidden features that help you adjust display appearance settings easily Windows doesn’t show by default. These advanced options give you precise control over how your screen looks and behaves. Power users love these tweaks for specialized workflows.
Registry tweaks and third-party tools unlock even more customization. But be careful with advanced changes. Always backup your system before making major modifications. Some changes require technical knowledge and can cause problems if done wrong.
Advanced Customization Features:
- Custom resolution creation – Add non-standard resolutions through graphics driver software for unique setups
- Per-application DPI settings – Force specific scaling for individual programs that don’t handle system scaling well
- Color temperature scheduling – Set precise color warmth changes throughout the day beyond basic Night Light
- Refresh rate optimization – Match refresh rates to your monitor’s capabilities for smoother motion
- HDR and wide color gamut – Enable advanced color features on compatible monitors for better media experience
- Multi-monitor bezel correction – Adjust for physical gaps between monitors in multi-display setups
- Display rotation hotkeys – Create custom keyboard shortcuts for quick orientation changes
- Power management tuning – Set different display sleep times for AC power versus battery usage
Authors’ Tip
Don’t change too many display settings at once. Make one adjustment and use your computer normally for a day or two. This helps you understand how each change affects your daily work. If something feels wrong, you’ll know exactly what to undo.
Keep a note of your original settings before making changes. Take a screenshot of your current display settings page. This makes it easy to go back if new settings don’t work out. Some changes work great for one task but poorly for others. Having a backup plan saves time and frustration when experimenting with display configurations.
Conclusion
Learning to adjust display appearance settings easily Windows provides transforms your computer experience. Your eyes will thank you for proper brightness and scaling. Your productivity will improve with clear, comfortable displays. These skills help whether you use one monitor or several.
Remember that perfect settings vary by person and situation. What works in a bright office might not work at home in the evening. Don’t be afraid to adjust settings as your needs change. Windows makes it easy to experiment and find what works best.
Start with the basics like brightness and text scaling. Then explore advanced options like multiple displays and color calibration. With practice, you’ll become confident at making your Windows display look exactly how you want it. Your computer will become a more comfortable and efficient tool for everything you do.
FAQs:
Q: Why does my text look blurry after changing display settings?
Blurry text usually happens when scaling settings don’t match your monitor’s native resolution. Try setting scaling to 100% and adjusting resolution instead. Also check that you’re using the recommended resolution for your monitor. Some older programs don’t handle scaling well and may need compatibility settings adjusted.
Q: Can I have different brightness levels for multiple monitors?
Yes, Windows allows individual brightness control for each connected monitor. Go to Display settings and select each monitor separately to adjust its brightness. External monitors might need manual brightness adjustment using their physical buttons. Some third-party tools offer more advanced multi-monitor brightness control options.
Q: How do I fix a rotated screen that happened by accident?
The fastest fix is pressing Ctrl + Alt + Up Arrow to return to normal orientation. If that doesn’t work, go to Display settings and change orientation back to Landscape. Some graphics drivers have different hotkeys, so check your graphics control panel if the standard method doesn’t work.
Author Bio:
Dinesh Lakhwani 

Dinesh Lakhwani, the entrepreneurial brain behind “TechCommuters,” achieved big things in the tech world. He started the company to make smart and user-friendly tech solutions. Thanks to his sharp thinking, focus on quality and the motto of never giving up, TechCommuters became a top player in the industry. His commitment to excellence has propelled the company to a leading position in the industry.
Popular Post


Recent Post

Customizing Pointer Appearance: Complete Guide
The way your mouse pointer looks on your computer may seem like a small detail. But customizing pointer appearance can make using your PC more comfortable and visually appealing. Many users do not realize that they can change the pointer size, color, and style to fit their needs. Whether you want a bigger pointer for […]

How To Choose a Computer Monitor: Monitor Buying Guide
Buying a monitor looks easy. Many people think all screens are the same. That belief causes regret later. A monitor is not just a display. It is a daily tool. You read on it. You work on it. You relax with it. Small problems become big over time. Poor brightness hurts eyes. Bad size causes […]

How To Get Help With File Explorer in Windows 11 [Complete Guide]
File Explorer is one of the most important tools in Windows 11. It is used to open folders, view files, and manage stored data. Almost every action on a Windows computer depends on it in some way. When users open documents, save downloads, or organize photos, File Explorer is always involved. Because it is used […]

How To Fix A Frozen Computer: Complete Guide [Windows 11/10]
A frozen computer is one of the most common problems Windows users face. The screen stops responding. The mouse pointer does not move. Keyboard inputs do nothing. You may hear the fan running loudly. Sometimes the system looks alive, but nothing works. This situation often happens when you are busy or working on something important. […]

How to Upgrade Computer RAM: Complete Guide
Upgrading RAM is one of the simplest ways to improve a computer. It helps the system feel faster and smoother. Apps open quicker. Browsers handle more tabs. Games and tools run with less delay. Many users search for how to upgrade computer RAM because it gives real results without high cost. You do not need […]
How To Clean Your Computer Keyboard: Complete Guide
A computer keyboard is touched more than almost any other device you own. It is used during work, study, gaming, and casual browsing. Fingers carry natural oils, sweat, and dirt. Small food crumbs fall between keys without notice. Dust settles each day slowly. Over time, this creates a hidden layer of grime. Many users do […]
Computer Mouse Buying Guide for Beginners and Advanced Users
Buying a mouse looks easy at first. Many people think all mouse work the same way. Well, that idea often leads to regret later. A mouse affects comfort, speed, and daily work. It matters for office tasks, gaming, design, and study. The right choice reduces strain and improves control. The wrong one feels annoying every […]
How To Overclock a Computer: A Complete Guide
Overclocking is the process of making your computer run faster than its factory settings. It mainly affects the processor, graphics card, and sometimes memory. Many people choose this method to improve performance without buying new hardware. It is popular among gamers, video editors, and users who run heavy software. When done properly, overclocking can give […]
How To Find Password Saved on This Computer: Complete Guide
Many people forget their login details at some point. It happens often. We create many accounts every year. Each one needs a username and a password. Over time, it becomes hard to remember all of them. That is why computers offer ways to store login details. These saved details help users sign in faster. They […]
How To Open/Access Computer Management & Advanced Tips
Every Windows computer has many hidden tools. Most users never see them. They only use basic settings. They change wallpapers. They install apps. They adjust sound and display. That is enough for daily work. But problems still happen. The system slows down. Storage fills up. Errors appear without warning. At this stage, normal settings do […]

