FoneDog iOS Data Recovery Review: Bring Back Your Lost iPhone Files
Last updated on August 10th, 2025 at 5:13 am
Being a smartphone by simply touching the screen you can accidentally delete files and there is no way to stop it. But if you have a good data recovery backup tool then things can change. FoneDog iOS Data Recovery application helps recover lost data from iOS devices.
In this post we will discuss, FoneDog iOS Data Recovery tool and why is it recommended.
Why do we lose data?
To resolve a problem we need to understand both the problem and the reason behind it. Here, we’d discuss the reasons for data loss.
- Accidentally deleting data – This one is the most common for all.
- Forgot password – Failing to recall unlock code can result in data loss.
- Water Damage – If your smart device falls into the water all the data is gone.
- Latest iOS Update -If you end up installing a buggy update you an up making your device unusable.
- System Error – Sometimes while downloading data or installing updates if the connection drop you might lose data.
- Factory Reset – to resolve unresolved issues you might factory reset data and erase all the files on it.
Now that we know, the causes let’s learn how FoneDog iOS can help and get back deleted data.
Also Read: Best Data Recovery Software for Windows
How will the FoneDog iOS Data Recovery tool help?
As an outline FoneDog iOS Data Recovery helps recover deleted files or lost data from iOS devices that support iOS 13 and higher. Using this tool, you can recover most of the files. The tool offers three ways using which you can recover data.
Highlights
- Recover any type of lost data be it photos, videos, WhatsApp data or anything
- Easy to use tool
- Recover data directly from iPhone devices without backup
- 30-day money-back guarantee
Benefits
- Retrieve data using any of three effective methods
- Select files you wish to recover
- Perform deep scan to recover as much data as you can
Pros and Cons
| Pros | Cons |
| Easy to use and powerful tool | A bit expensive. However, it offers discount, that you need to confirm with FoneDog support. |
| Compatible with the latest iOS | It may take a bit longer to scan, if you choose Deep scan. |
| One-time purchase | |
| Preview before recovering data | |
| Free trial version | |
| 30- day money-back guarantee |
How to use FoneDog iOS to recover data from iOS devices?
FoneDog iOS Data Recovery tool offers three data recovery methods. Using any of them as per your convenience you can recover data.
Method 1: Recover Data From iPhone That Does Not Have Backup
FoneDog iOS Data Recovery tool is safe to use, using it you can restore data without worrying about overwriting data on your iPhone device. You can recover all data from iTunes and iCloud backup files. To start using this powerful tool all you need is to download and install the tool. Once installed you can use different steps explained below to recover deleted data.
Steps to recover data from an iPhone without backup:
- Open FoneDog iOS Data Recovery tool and connect your device to the computer.
- Now, from the left pane select Recover from iOS Device.
3. Once the device is connected you will see the name on your screen. To start the scan and look for deleted data Click Start Scan. FoneDog iOS Data Recovery tool will now scan your device for deleted files. Depending on the size of the disk and amount of deleted data FoneDog iOS Data Recovery tool will take time.
4. Once the scanning is done, you will see a list of files. Select the ones that you want to recover and click Recover.
That’s it using these 4 simple steps and FoneDog iOS Data Recovery Tool you can recover deleted data from any iPhone without backup.
Method 2: Restore data from iTunes Backup files
Note: If you wish to restore the backup in the future, disable the automatic backup feature before connecting your device to the computer.
1. Open FoneDog iOS Data Recovery tool.
2. Click Recover from iTunes Backup Files option > select the device that you wish to scan and click Scan. The program will now check the selected device for iTunes backup files.
3. Once the scanning is done; select the file you wish to restore. Preview the contents and select the files you wish to recover.
4. Now go ahead and click Recover.
Also Read: Best Data Recovery Software for Mac
Method 3: Recovering data using iCloud Backup Files
1. Launch FoneDog iOS Data Recovery tool on your Windows or Mac machine.
2. Now click the third option that reads Recover from iCloud Backup File present in the left pane.
3. Log in to your iCloud account using which you backed up data on iPhone and other iOS devices. Now, select the backup file you would want to restore from the list. You can sort the backup by the date this will make selecting the file easy.
4. Click Scan Downloaded.
5. Once the backup file is downloaded, the FoneDog iOS Data Recovery tool will list down all the files that the FoneDog iOS Data Recovery tool was able to scan. You can choose multiple files or just one. Upon selecting the files click Next.
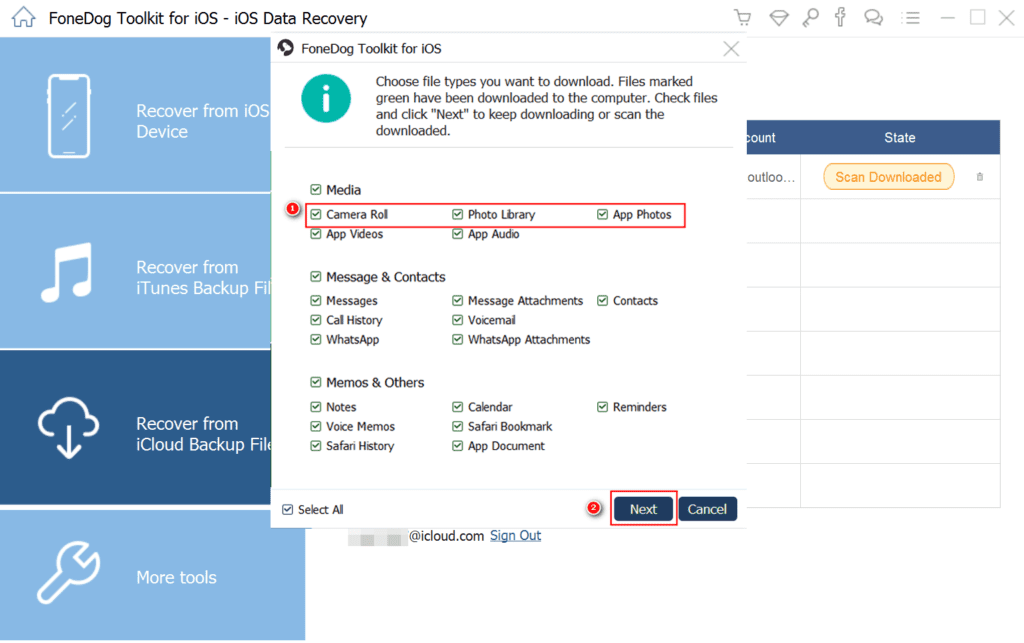
6. Preview scanned files and once you are sure that this the file to be restored select it can click Recover.
Using these simple steps, you can recover deleted files from your iPhone.
Verdict
Undoubtedly, FoneDog iOS Data Recovery tool is an excellent tool to restore lost or deleted files. Using any of the three methods provided by the tool you can retrieve data from any of the iOS devices. Most importantly this tool scans your system for all types of deleted files.
Therefore, if you suffer from data loss due to any reason you can trust FoneDog iOS Data Recovery tool. You can use any of the three methods to recover data. What do you think about the tool? Do share your feedback.
Author Bio:
Dinesh Lakhwani 

Dinesh Lakhwani, the entrepreneurial brain behind “TechCommuters,” achieved big things in the tech world. He started the company to make smart and user-friendly tech solutions. Thanks to his sharp thinking, focus on quality and the motto of never giving up, TechCommuters became a top player in the industry. His commitment to excellence has propelled the company to a leading position in the industry.
Popular Post


Recent Post

How to Switch Windows 10 to a Local Account: Complete Guide
Windows 10 allows users to sign in with either a Microsoft account or a local account. When you set up a new computer, the system often suggests using a Microsoft account. This account connects your device to Microsoft services such as Outlook, OneDrive, and the Microsoft Store. It also syncs settings, themes, and passwords across […]

How To Change Default Apps For File Types In Windows
Windows is designed to make using your computer easy. One way it does this is by assigning default apps to different file types. This means when you open a file, Windows automatically opens it with a specific program. For example, photos may open with Photos, music with Groove Music, and PDFs with Edge. These default […]

How To Adjust The Mouse Pointer Speed: Complete Guide
Using a computer every day means you use the mouse a lot. The mouse pointer moves on the screen and helps you click, scroll, and select items. Many people never think about the speed of the mouse pointer. They have used the default setting for years. This can cause small problems over time. A slow […]

How to Change Mouse Scrolling Settings In Windows
A mouse is one of the most used computer tools. People use it every day. They scroll through emails. They scroll through documents. They scroll through websites and images. The movement becomes automatic. Most users do not notice it. That is why problems often go unnoticed. Scrolling problems show up slowly. At first, it feels […]

Keyboard Light Settings: Keyboard Lighting Control [Complete Guide]
Keyboards are no longer simple typing tools. Well, yes! Over time, they have evolved to include features that improve comfort, visibility, and overall experience. One of the most useful features today is keyboard lighting. It helps users work comfortably in low-light conditions. It also reduces strain when typing for long hours. Many users first notice […]

Customizing Pointer Appearance: Complete Guide
The way your mouse pointer looks on your computer may seem like a small detail. But customizing pointer appearance can make using your PC more comfortable and visually appealing. Many users do not realize that they can change the pointer size, color, and style to fit their needs. Whether you want a bigger pointer for […]

How To Choose a Computer Monitor: Monitor Buying Guide
Buying a monitor looks easy. Many people think all screens are the same. That belief causes regret later. A monitor is not just a display. It is a daily tool. You read on it. You work on it. You relax with it. Small problems become big over time. Poor brightness hurts eyes. Bad size causes […]

How To Get Help With File Explorer in Windows 11 [Complete Guide]
File Explorer is one of the most important tools in Windows 11. It is used to open folders, view files, and manage stored data. Almost every action on a Windows computer depends on it in some way. When users open documents, save downloads, or organize photos, File Explorer is always involved. Because it is used […]

How To Fix A Frozen Computer: Complete Guide [Windows 11/10]
A frozen computer is one of the most common problems Windows users face. The screen stops responding. The mouse pointer does not move. Keyboard inputs do nothing. You may hear the fan running loudly. Sometimes the system looks alive, but nothing works. This situation often happens when you are busy or working on something important. […]

How to Upgrade Computer RAM: Complete Guide
Upgrading RAM is one of the simplest ways to improve a computer. It helps the system feel faster and smoother. Apps open quicker. Browsers handle more tabs. Games and tools run with less delay. Many users search for how to upgrade computer RAM because it gives real results without high cost. You do not need […]

