FoneDog iOS Data Recovery Review: Bring Back Your Lost iPhone Files
Being a smartphone by simply touching the screen you can accidentally delete files and there is no way to stop it. But if you have a good data recovery backup tool then things can change. FoneDog iOS Data Recovery application helps recover lost data from iOS devices.
In this post we will discuss, FoneDog iOS Data Recovery tool and why is it recommended.
Why do we lose data?
To resolve a problem we need to understand both the problem and the reason behind it. Here, we’d discuss the reasons for data loss.
- Accidentally deleting data – This one is the most common for all.
- Forgot password – Failing to recall unlock code can result in data loss.
- Water Damage – If your smart device falls into the water all the data is gone.
- Latest iOS Update -If you end up installing a buggy update you an up making your device unusable.
- System Error – Sometimes while downloading data or installing updates if the connection drop you might lose data.
- Factory Reset – to resolve unresolved issues you might factory reset data and erase all the files on it.
Now that we know, the causes let’s learn how FoneDog iOS can help and get back deleted data.
Also Read: Best Data Recovery Software for Windows
How will the FoneDog iOS Data Recovery tool help?
As an outline FoneDog iOS Data Recovery helps recover deleted files or lost data from iOS devices that support iOS 13 and higher. Using this tool, you can recover most of the files. The tool offers three ways using which you can recover data.
Highlights
- Recover any type of lost data be it photos, videos, WhatsApp data or anything
- Easy to use tool
- Recover data directly from iPhone devices without backup
- 30-day money-back guarantee
Benefits
- Retrieve data using any of three effective methods
- Select files you wish to recover
- Perform deep scan to recover as much data as you can
Pros and Cons
| Pros | Cons |
| Easy to use and powerful tool | A bit expensive. However, it offers discount, that you need to confirm with FoneDog support. |
| Compatible with the latest iOS | It may take a bit longer to scan, if you choose Deep scan. |
| One-time purchase | |
| Preview before recovering data | |
| Free trial version | |
| 30- day money-back guarantee |
How to use FoneDog iOS to recover data from iOS devices?
FoneDog iOS Data Recovery tool offers three data recovery methods. Using any of them as per your convenience you can recover data.
Method 1: Recover Data From iPhone That Does Not Have Backup
FoneDog iOS Data Recovery tool is safe to use, using it you can restore data without worrying about overwriting data on your iPhone device. You can recover all data from iTunes and iCloud backup files. To start using this powerful tool all you need is to download and install the tool. Once installed you can use different steps explained below to recover deleted data.
Steps to recover data from an iPhone without backup:
- Open FoneDog iOS Data Recovery tool and connect your device to the computer.
- Now, from the left pane select Recover from iOS Device.
3. Once the device is connected you will see the name on your screen. To start the scan and look for deleted data Click Start Scan. FoneDog iOS Data Recovery tool will now scan your device for deleted files. Depending on the size of the disk and amount of deleted data FoneDog iOS Data Recovery tool will take time.
4. Once the scanning is done, you will see a list of files. Select the ones that you want to recover and click Recover.
That’s it using these 4 simple steps and FoneDog iOS Data Recovery Tool you can recover deleted data from any iPhone without backup.
Method 2: Restore data from iTunes Backup files
Note: If you wish to restore the backup in the future, disable the automatic backup feature before connecting your device to the computer.
1. Open FoneDog iOS Data Recovery tool.
2. Click Recover from iTunes Backup Files option > select the device that you wish to scan and click Scan. The program will now check the selected device for iTunes backup files.
3. Once the scanning is done; select the file you wish to restore. Preview the contents and select the files you wish to recover.
4. Now go ahead and click Recover.
Also Read: Best Data Recovery Software for Mac
Method 3: Recovering data using iCloud Backup Files
1. Launch FoneDog iOS Data Recovery tool on your Windows or Mac machine.
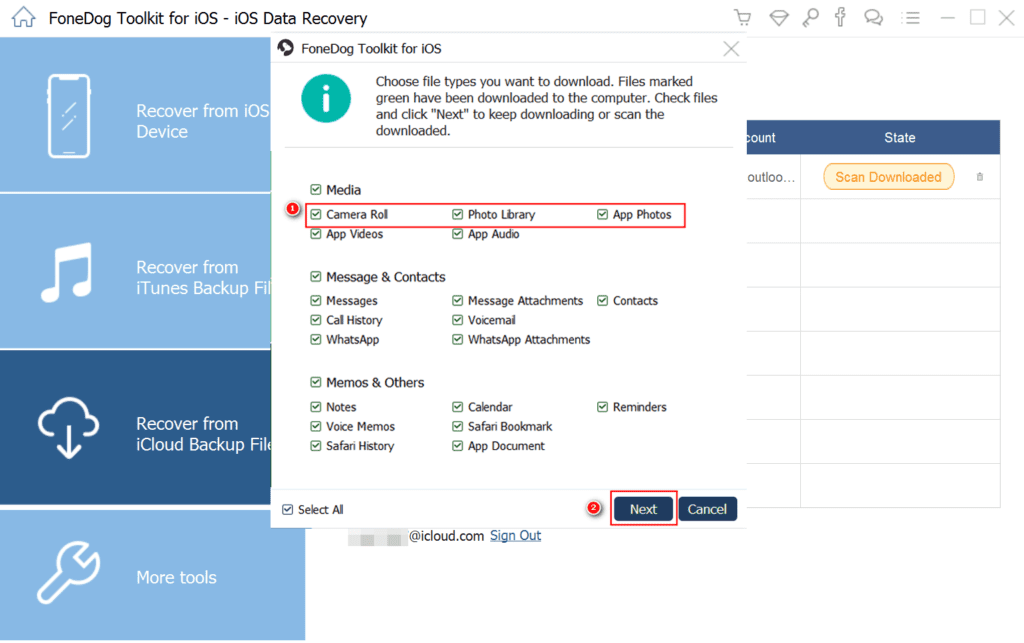
2. Now click the third option that reads Recover from iCloud Backup File present in the left pane.
3. Log in to your iCloud account using which you backed up data on iPhone and other iOS devices. Now, select the backup file you would want to restore from the list. You can sort the backup by the date this will make selecting the file easy.
4. Click Scan Downloaded.
5. Once the backup file is downloaded, the FoneDog iOS Data Recovery tool will list down all the files that the FoneDog iOS Data Recovery tool was able to scan. You can choose multiple files or just one. Upon selecting the files click Next.

6. Preview scanned files and once you are sure that this the file to be restored select it can click Recover.
Using these simple steps, you can recover deleted files from your iPhone.
Verdict
Undoubtedly, FoneDog iOS Data Recovery tool is an excellent tool to restore lost or deleted files. Using any of the three methods provided by the tool you can retrieve data from any of the iOS devices. Most importantly this tool scans your system for all types of deleted files.
Therefore, if you suffer from data loss due to any reason you can trust FoneDog iOS Data Recovery tool. You can use any of the three methods to recover data. What do you think about the tool? Do share your feedback.
Popular Post
Recent Post
How To Open/Access Computer Management & Advanced Tips
Every Windows computer has many hidden tools. Most users never see them. They only use basic settings. They change wallpapers. They install apps. They adjust sound and display. That is enough for daily work. But problems still happen. The system slows down. Storage fills up. Errors appear without warning. At this stage, normal settings do […]
How To Transfer Photos From Android Phone To PC/Laptop [2026]
Moving photos from a phone to a computer is something most people need to do often. Phones fill up fast. Photos also matter more than apps. You may want a safe backup. You may want to edit images on a bigger screen. This guide explains how to transfer photos from Android to PC without stress. […]
Top 9 Browsers With Built-In VPN – VPN Browser
Online browsing is no longer private by default. Every website collects data in some form. This includes location details, device information, and browsing habits. Over time, this data builds a clear picture of user behavior. Many people are now uncomfortable with this level of tracking. A VPN browser helps reduce this exposure. It adds a […]
AI In Cyber Security: Who is Winning, Hackers or Security Companies
Cybersecurity once followed clear rules. Companies built firewalls. Users created passwords. Antivirus tools scanned files and removed known threats. When an attack happened, security teams studied it and added new rules. This method worked for many years. It created a sense of control and stability. That sense is gone today. Artificial intelligence has changed how […]
The Biggest AI-Run Cyber Attacks Of All Time
Artificial intelligence is now part of everyday technology. It helps people search faster. It improves medical research. It supports businesses in making better choices. But AI is not used only for good purposes. Cyber criminals have also learned how to use it. This has changed the nature of cyber attacks across the world. In the […]
Switch To a Dark Background Theme on Windows: Enable Dark Mode
People often like a screen that feels gentle on the eyes. A darker style softens bright areas and makes long computer sessions easier to handle. It also gives the desktop a cleaner and more modern feel. When you switch to a dark background theme in Windows, the colors shift to deeper shades that reduce glare […]
Complete Guide on Managing Audio Input Devices [Latest In 2026]
People use microphones for meetings, games, classes, recordings, and voice chats, so any problem with the device can interrupt their work. Even a small system error can make the voice weak or stop it fully. This is why knowing the basics of managing audio input devices is helpful for new and experienced users. Windows includes […]
Resetting Audio Settings on Windows 11: Complete Guide
Sound problems can disrupt work, study, or entertainment. Many users face issues where the audio becomes too low, too loud, unclear, or does not play at all. A common way to solve these problems is by resetting audio settings to their original state. This helps Windows rebuild its sound setup from the beginning. Windows 11 […]
Troubleshooting Headphone Detection: Headphones Not Detected/Working
A lot of users run into sound problems at some point. A common one is when the computer does not pick up the headphones. You plug them in, but the speakers keep playing. This can break your focus during work, movies, music, or calls. It also causes confusion because the reason is not always clear […]
How To Re-Pair Bluetooth Earbuds For Stereo Sound on Windows
Wireless earbuds are often paired with computers for rich stereo sound, but things don’t always go smoothly. Sometimes, the system defaults to mono audio or fails to activate the correct playback mode. This can disrupt music, calls, or gaming, making the sound feel flat and lifeless. These glitches usually stem from improper setup. Windows might […]


![Complete Guide on Managing Audio Input Devices [Latest In 2026]](https://www.techcommuters.com/wp-content/uploads/2025/12/Complete-Guide-on-Managing-Audio-Input-Devices.webp)


