


You turn on your PC and wait. And wait. The same laptop that once opened apps in a snap now feels tired. This is not bad luck. It just happens over time. Files pile up. The registry gets messy. Old drivers stay installed long after they are useful. Junk data quietly eats up space on […]
Help With Color Management In Windows: Complete Guide
Color often decides how we experience a picture, a video, a website, or even a simple chart. Many users feel confused when colors look different on each screen. A monitor may show a softer shade while a laptop shows a sharper one. This creates doubt and slows down work. It can also lead to mistakes in design and editing.
Windows includes reliable tools to control these changes. These tools work with profiles, device settings, and display rules. When used in the right way, they bring stable results. Anyone can use them. You do not need special training. You only need patience and a basic plan.
This guide offers clear steps for users who need help with color management in Windows and want to reduce errors.
Part 1: What Is Color Management in Windows?
Color management in Windows is a built-in system that keeps colors steady across different devices. It uses color profiles to tell your computer how each screen or printer behaves. Once the profiles are set, the system compares them and makes adjustments. This helps you get a more even output, even if devices use different parts or different technology.
This system is useful for work that needs accuracy. Editing images, preparing presentations, or designing logos all benefit from it. When colors shift, your final results may not match your intent. With proper settings, you can avoid this risk. Many users look for help with color management in Windows because they want results that stay the same each time they open a file.
Part 2: Safety Steps Before Changing Settings: Precautions Before You Begin
Before you change color settings, you must prepare your device. Quick changes can sometimes cause uneven behavior. A simple step like checking cables can prevent problems later. These small steps help your display work at its best. Many users end up searching for help with color management in Windows only because they skipped basic preparation.
Make sure your display is clean. Make sure your drivers are ready. Make sure your lighting is steady. When these parts are in order, you can set profiles with more confidence.
Key points to follow
- Check display cables
A loose cable can make colors look washed out. Make sure the cable fits well on both ends. - Update graphics drivers
Old drivers can cause color errors. Install updates from the official source to avoid those mistakes. - Reset display settings
If you changed many settings in the past, reset them to the default. This gives you a clean start. - Keep steady room lighting
Strong or changing light can fool your eyes. Try to work under one steady light source. - Clean the screen surface
Dust and fingerprints can create patches. Clean the screen gently with a dry cloth. - Check power settings
Some power-saving modes lower the brightness. Make sure your device is not dimming the screen. - Use one display profile at a time
Too many profiles confuse the system. Keep only the profiles you need. - Avoid third-party color tools during setup
They may override Windows tools. Turn them off until you finish your setup.
Part 3: FLUQS
1. Why do two screens never look the same?
Each screen is built with different parts. Some use a stronger backlight. Some use softer panels. This changes the way colors appear. A profile helps reduce these changes, but the two screens will never match perfectly. They will only look closer to each other.
2. Why does my print look darker than my monitor?
A print uses ink on paper. A monitor uses light. Paper absorbs color. Light pushes color forward. This creates natural differences. With the right profile for your printer and your paper type, you can reduce this gap and get a more balanced result.
3. Why do games look too bright or too saturated?
Games often use their own display rules. They may boost color to make scenes look dramatic. Some games also use HDR. You must adjust the game settings after you finish setting your Windows profile. This will give you a more even and steady look.
4. Why do my photos change color in different apps?
Not all apps read color profiles. Some show the raw file without correction. This makes the photo look dull or washed out. Use apps that support profiles when you need the correct color. This will keep your work steady across your project.
Part 4: How To Help With Color Management In Windows?
Color control in Windows becomes easier when you follow a planned set of methods. A method helps you focus on one task at a time. It keeps the setup steady and reduces mistakes. When you move through each method in order, your display reacts in a more predictable way.
Each method below targets one part of the system. You can use them one by one or return to a method later if things drift. This slow, steady approach works well for beginners and for users who want stable color without advanced tools.
Method 1: Set the Right Color Profile
This method helps the system understand how your display behaves. A profile tells Windows how your screen shows color. Without a correct profile, your shades may look dull or too strong.
- It gives Windows the correct base rules for your display.
- It reduces sudden shifts in shades or tones.
- It helps photos, videos, and documents look closer to real color.
- It prevents guesswork when you compare work across two screens.
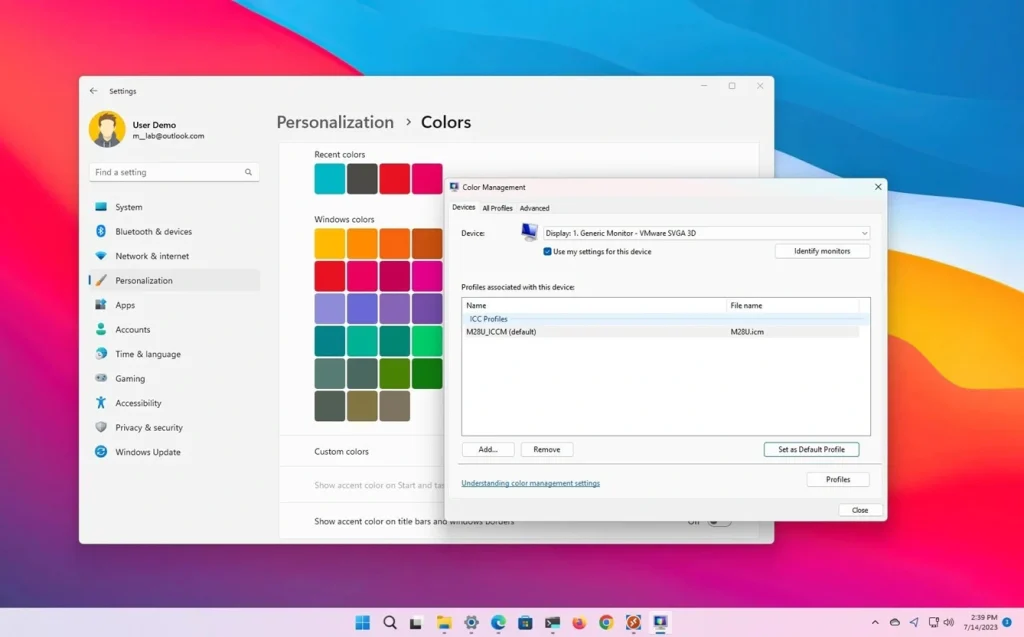
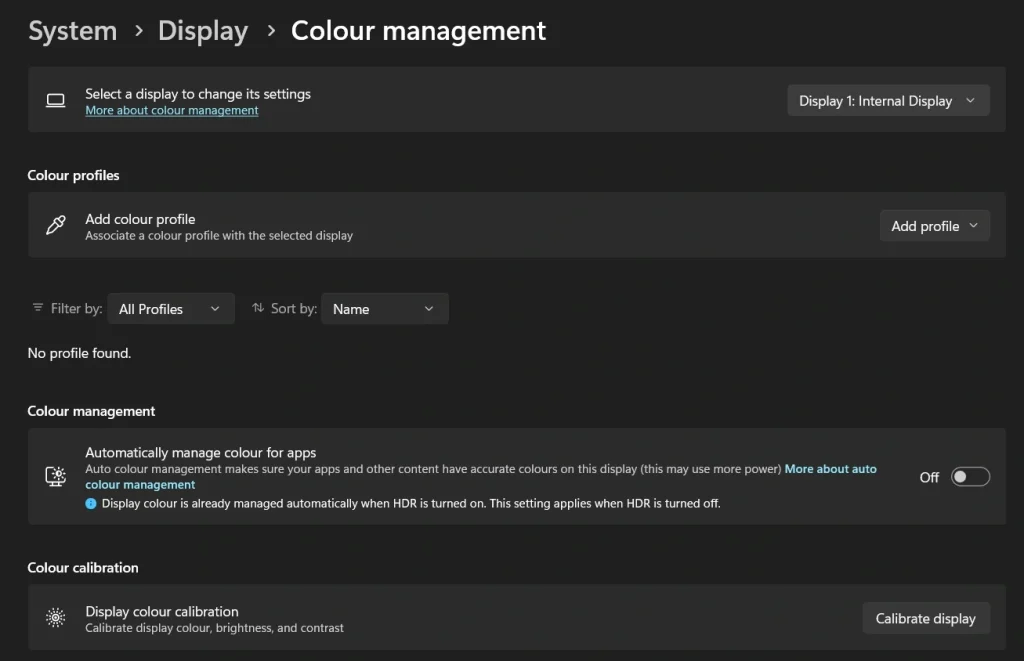
Step 1: Open the Color Management panel
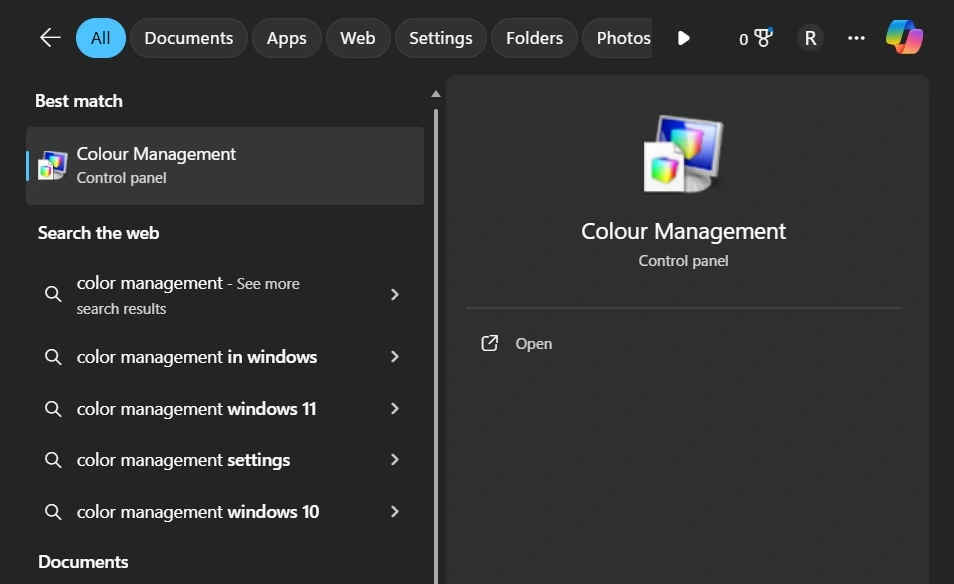
Open the Start menu. Type Color Management. Select your display and allow Windows to use custom device settings.
Step 2: Assign a profile
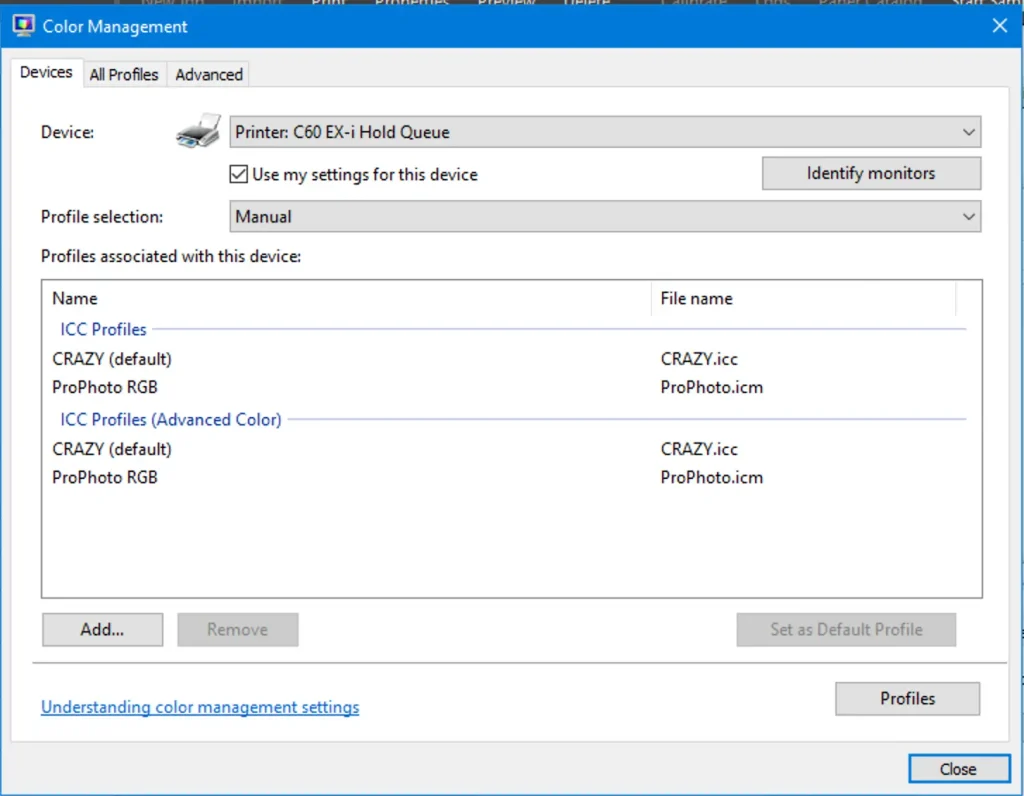
Click Add. Pick the correct profile. Set it as the default. Test with familiar images to see if tones improved.
Method 2: Use Display Calibration
This method fine-tunes basic display controls. Calibration helps you fix shadows, highlights, and mid-tones. It creates a cleaner balance across your screen.
- It fixes brightness and contrast issues that a profile cannot solve.
- It improves mid-tone balance, which affects skin tones and shadows.
- It makes the screen easier to read in long work sessions.
- It creates a steadier display for editing and daily tasks.
Step 1: Start the calibration tool
Open Settings. Go to System. Select Display. Click on “Color Profile”. Search for the calibration tool. Follow the steps for gamma, brightness, and contrast.
Step 2: Apply and review
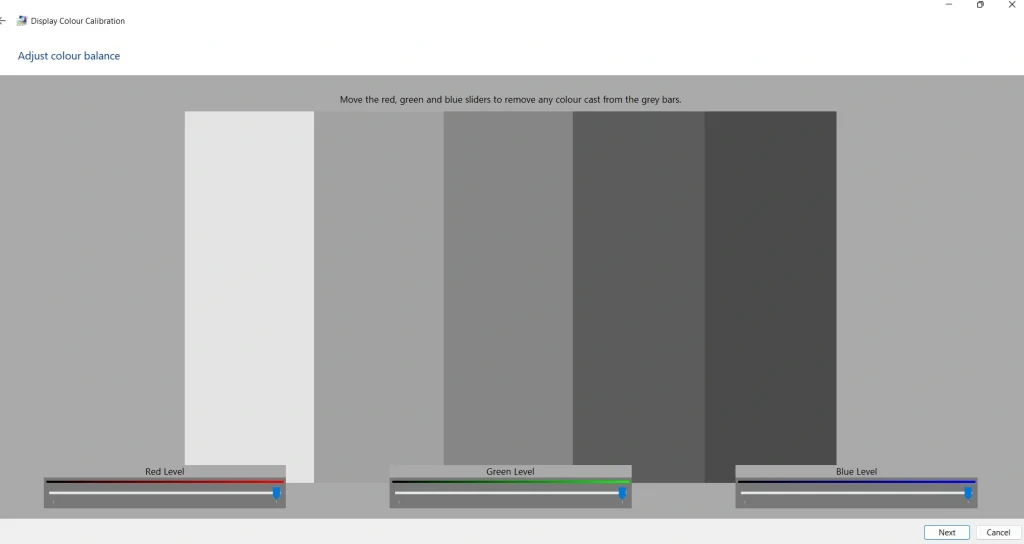
Save the calibration. Open your test images. Check if dark areas show detail and if bright areas look clear.
Method 3: Set HDR and SDR Rules
This method is useful when your screen supports HDR. HDR can change color strength. Some users see spikes in brightness because HDR is not set correctly.
- It stops HDR from washing out normal content.
- It keeps movies bright without harming everyday shades.
- It makes mixed content look steady on screens that support HDR.
- It prevents sharp color spikes that occur when HDR is not set well.
Step 1: Review HDR settings
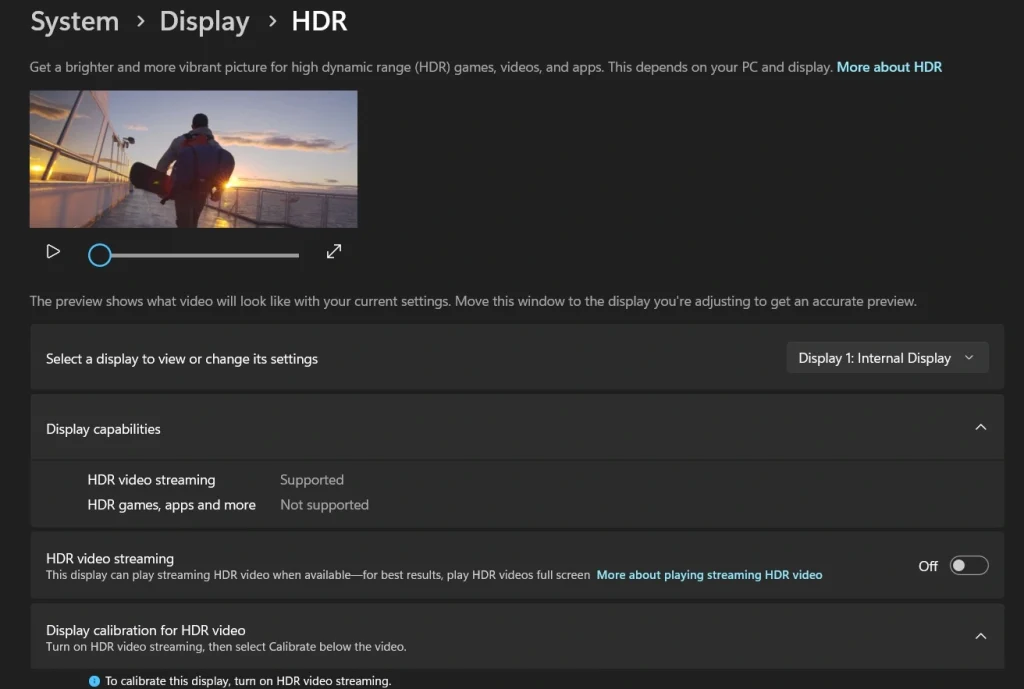
Go to Settings. Open Display. Turn HDR on only if your monitor handles it well. A weak panel can show sharp color jumps.
Step 2: Balance SDR content
Use the SDR brightness slider to keep normal content stable. This helps photos and websites look natural even when HDR is active.
Method 4: Use Advanced Panel Options
This method is for users who want more control over how Windows handles profiles. The advanced panel controls default behavior and system-wide rules.
- It gives more control when simple methods are not enough.
- It helps fix system-wide errors that affect all apps.
- It lets you choose a stable base profile for long-term use.
- It prevents Windows from switching rules without your notice.
Step 1: Open the Advanced tab
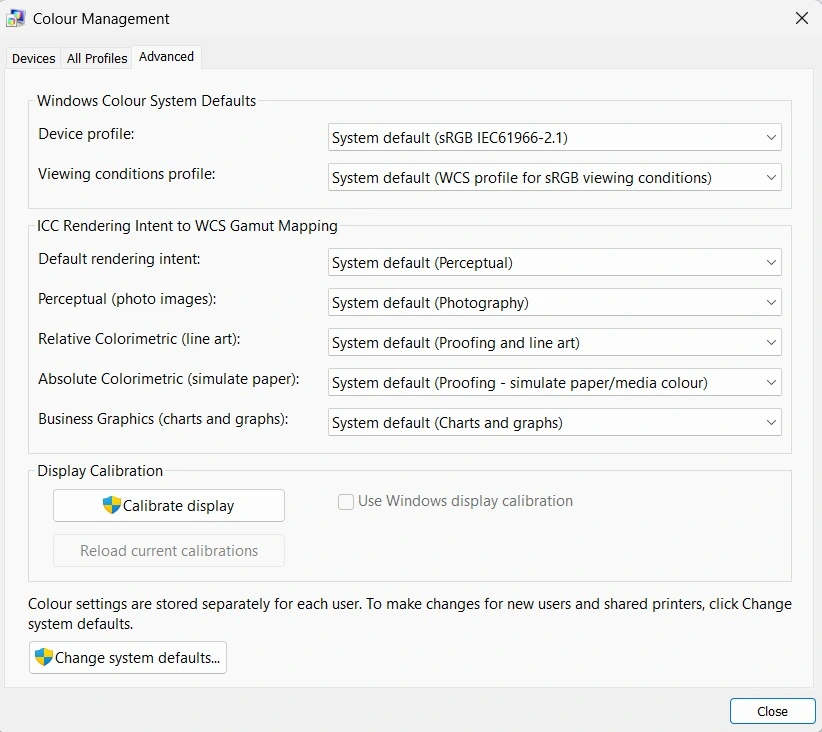
Open the Color Management panel. Go to the Advanced tab. Review the system defaults and active profile options.
Step 2: Set defaults carefully
Choose one stable profile as your default. Leave it unchanged for a while. This prevents sudden color shifts during daily work.
Author’s Tip
Once you set a profile, live with it for a while. Your eyes need time to adjust. Do not change settings again too soon. Quick changes will confuse you more and make the process look harder than it is.
Keep a folder of test images on your device. Include photos with skin tones, landscapes, shadows, and bright objects. Open them after each change. These images will help you judge accuracy. You will know right away if the color shift is subtle or strong because you have seen these images many times.
Part 5: Advanced Tips: Power Moves for Better Color Control
Advanced color control is useful when your work needs sharp results. This may include editing raw photos, preparing brand kits, or formatting visual guides. In these cases, basic settings may not be enough. You may need to control gamma, white point, and uniformity.
These tips require a bit of patience. None of them is complex, but each one needs steady testing. Work with one tip at a time. Do not mix too many changes during one session. That makes it easier to track mistakes.
Useful advanced steps
- Calibrate with hardware tools
A calibration tool measures your screen. This gives a more exact profile. - Set custom gamma
Gamma affects mid-tones. Adjusting it can fix displays that look faded. - Pick a steady white point
A stable white point helps remove color cast. Choose a point that matches your room lighting. - Disable auto brightness
Auto brightness shifts colors as it reacts to light. Turn it off during work. - Fine-tune contrast
A small change in contrast can help you see darker tones more clearly. - Test using color charts
These charts show a wide range of shades. They help you spot errors faster. - Keep a backup of your best profile
A backup saves time if you need to reset settings. - Create different profiles for different tasks
Use one profile for design. Use another for movies. Switch only when needed.
Conclusion
Color control is not a hard job once you understand the basic steps. Windows gives you reliable tools that are built into the system. You do not need special software to get good results. A careful setup can fix the most common issues.
You only need to follow a steady plan. Prepare your device. Set the profile. Test the results. Repeat if needed. With practice, your colors will stay close to what you want. This guide will help you stay organized and clear.
FAQs:
How often should I recalibrate my display?
Recalibrate your display every few months to maintain accuracy. If you work with photos or color‑critical projects daily, consider checking calibration more frequently to ensure consistent results.
Can I use the same profile for two different monitors?
No. Each monitor has unique characteristics, so you’ll need to create a separate profile for each device to achieve reliable color accuracy.
Why do videos look different from photos after setup?
Videos often appear different because they use motion, compression, and sometimes player‑specific color settings. After completing your Windows setup, review your video player’s color options to ensure consistency.
Author Bio:
Dinesh Lakhwani 

Dinesh Lakhwani, the entrepreneurial brain behind “TechCommuters,” achieved big things in the tech world. He started the company to make smart and user-friendly tech solutions. Thanks to his sharp thinking, focus on quality and the motto of never giving up, TechCommuters became a top player in the industry. His commitment to excellence has propelled the company to a leading position in the industry.
Popular Post
Recent Post
Avast Cleanup PC Cleaner and Optimizer: Everything You Need to Know
A slow computer makes it hard to focus. Programs take too long to open. Free space keeps shrinking until the disk is almost full. This happens to most PC owners at some point. Even new machines can slow down after a while. That is the exact problem cleanup tools are built to solve. They comb […]

Fortect Software Review: The Ultimate PC & Mobile Cleaning, Optimization & Security Tool
Slow computers are a common problem for almost every Windows user. Well, yes! Over time, your PC picks up junk files. These files sit quietly in the background. They take up space and slow things down. Programs open slower. Windows takes longer to boot. Even simple tasks like opening a folder can feel sluggish. There […]

CCleaner PC Optimizer Review: A Complete Guide for Windows Users
If your computer has started to feel slow, you are not alone. Most Windows PCs slow down over time. Junk files pile up. The registry gets messy. Too many apps open when you start your PC. All this adds up and makes even a good machine feel tired. This is where a PC cleaner tool […]

5 Best PC Cleaners for Windows 11 & 10 | Top PC Optimizers
Remember when your PC felt fast? Every click was quick. Every app opened in seconds. Now it feels like a different machine. Windows takes forever to boot. Programs freeze for no reason. Even opening a browser feels like a chore. You are not alone in this. Almost every PC slows down over time. Files pile […]

Auslogics Duplicate File Finder: Full Review and User Guide
A computer quietly gathers clutter over time. This includes duplicate photos, repeated downloads, and forgotten backups hiding in random folders. This buildup slowly eats away at storage and can make even a fast PC feel sluggish. Manually finding and deleting duplicates is tedious. It means checking every folder, comparing file names, and guessing which copies […]

CCleaner Duplicate File Finder: Key Features, Pricing, Step-by-Step Guide and More
Every computer collects junk over time. Right? Well, yes! Photos often get copied twice. Documents get saved in two folders by mistake. Old downloads pile up and never get deleted. This slowly eats up your storage space, and most people do not even notice until their drive is almost full. That is where a duplicate […]

Duplicate File Finder Pro: A Complete Review, Everything You Should Know
Computers collect thousands of files over time. Well, yes! Many of them end up being duplicates created by backups, downloads, or accidental copies. These extra files take up valuable storage space and make it harder to keep everything organized. Finding and removing them manually can take hours. Right? Duplicate File Finder Pro is a tool […]
Top 3 Duplicate File Finder for Windows 11 & Windows 10
If your PC storage keeps filling up even after you delete big files, duplicate files could be the real reason. Most of us save the same photo twice, download a document more than once, or copy a whole folder by mistake. Over months and years, these duplicate files pile up quietly. You do not even […]

Monitor Screen Calibration Guide: Everything You Should Know
Your monitor shows colors every single day. But are those colors actually correct? Most people never stop to check this. They just use the screen as it comes out of the box. This habit can lead to wrong colors in photos, videos, and work files. Colors may look too warm or too cold without you […]

