









It can be frustrating when a Word document suddenly disappears. You may have spent hours writing a report, assignment, or letter. Then your computer crashes, the power cuts out, or Word closes before you save the file. In that moment, it may seem like all your work is gone. This happens more often than most […]
How To Run a Troubleshooter For PC Issues on Windows [Windows 11/10]
Dealing with computer issues can be a real hassle. Slow performance, system crashes, and unexpected error messages often get in the way. Fortunately, Windows includes built-in tools designed to diagnose and resolve these problems efficiently.
Learning to run a troubleshooter for PC issues on Windows can save you time and money. You don’t need to call tech support for every small problem.
Windows troubleshooters can fix many common issues automatically.
Part 1: What is a Windows Troubleshooter?
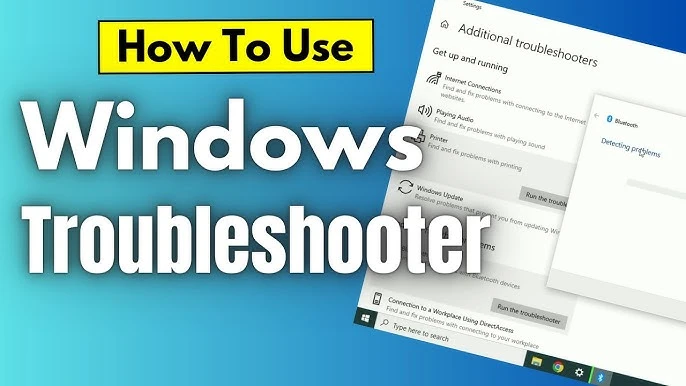
A Windows troubleshooter is a built-in utility. It is designed to identify and resolve common PC issues. It runs a system scan to detect problems—like network failures, audio glitches, or update errors—and then attempts to fix them automatically. You can think of it as your computer’s built-in technician. A technician who runs quietly in the background to keep things running smoothly.
These tools come pre-installed with Windows 11 and Windows 10. Microsoft created them to help users. They solve common PC problems. They run tests on your system. Each part is checked for issues. When problems are found, they apply known fixes. The process is automatic. You don’t need to do much. It’s quick and simple. Just follow the steps and let it work.
Part 2: Why Use a Windows Troubleshooter? How Does It Help?
Windows troubleshooters offer many benefits for PC users. They provide quick solutions without technical knowledge. Here are the main reasons to use them:
- Saves time – Fixes issues in minutes. No need to spend hours searching online or adjusting settings manually. It handles the technical work so you don’t have to.
- Free solution – No payment required. Avoid expensive tech support or repair shops. You get reliable fixes without spending a single rupee.
- Easy to use – Simple layout and clear steps. No technical knowledge needed. Just follow the prompts and let it do the rest.
- Automatic detection – Scans your system for hidden problems. Finds issues you might miss, like background errors or misconfigured settings.
- Safe repairs – Uses trusted Microsoft fixes. No risk to your files or system. Every solution is tested and secure.
- Multiple problem types – Handles network, audio, display, and performance issues. From slow Wi-Fi to sound failures, it covers the most common problems.
- Step-by-step guidance – Shows what it’s checking and fixing. You stay informed at every stage. No guesswork or confusion.
- Detailed reports – Explains what went wrong and how it was fixed. Gives you a clear summary with recommendations to avoid future issues.
Part 3: Advantages/Disadvantages of Using Windows Troubleshooter
Every tool has pros and cons. Understanding both sides helps you use troubleshooters effectively.
Advantages:
- Quick problem detection and resolution – Finds and fixes issues fast. No long waits or complicated steps.
- No technical skills required – No tech skills needed. Just follow the on-screen instructions.
- Completely free to use – No cost at any stage. No subscriptions, fees, or hidden charges.
- Safe and reliable fixes – Uses trusted solutions. Keeps your system stable and secure.
- Works offline without internet – Runs without a connection. Perfect for fixing problems when you’re offline.
- Covers most common PC issues – Handles network, audio, display, and performance problems. Solves everyday tech headaches.
- Provides clear explanations – Tells you what went wrong and how it was fixed. No jargon, just plain language.
Disadvantages:
- Cannot fix complex hardware problems – Doesn’t handle issues with physical components like faulty motherboards or damaged ports.
- Limited to known Microsoft solutions – Only applies fixes that are officially supported. It won’t offer custom or third-party solutions.
- May not work for newer issues – Might not recognize problems introduced by recent updates or new hardware.
- Sometimes gives generic advice – In some cases, suggestions may be broad or not tailored to your exact setup.
- Cannot repair physical damage – Won’t help with broken screens, cracked cases, or other physical defects.
- May miss rare or unique problems – Uncommon errors or system-specific bugs might go undetected.
Part 4: Precautions to Take When Using Windows Troubleshooter for Fixing Issues
Taking precautions protects your data and system. Always prepare before running any diagnostic tools. Follow these safety steps:
- Create a backup – Save your important files before making any system changes. It’s a simple step that keeps your data safe if something unexpected happens. Backing up ensures you won’t lose documents, photos, or settings during repairs or updates.
- Close running programs – Stop other apps to avoid conflicts during troubleshooting. It helps the tool work more efficiently.
- Check system updates – Install the latest Windows updates first. Some issues may already be fixed by newer patches.
- Note current settings – Write down your current configurations. You may need to restore them later if changes don’t work.
- Run as administrator – Use admin rights for full access. This ensures the troubleshooter can make necessary system changes.
- Avoid interrupting – Let the troubleshooter complete its full scan. Interrupting may prevent it from finding or fixing problems.
- Review suggested changes – Read what the tool wants to change before accepting. Make sure you understand what will be modified.
- Test after fixes – Verify that problems are actually solved before finishing. Try using the affected features to confirm everything works.
Part 5: How to Run a Troubleshooter for PC Issues on Windows 11/10?
Running troubleshooters is simple once you know where to find them. Windows provides several ways to access these helpful tools.
For Windows 11:
Method 1: Through Settings
The Settings app is the modern way to access troubleshooters. It works best for Windows 11 users. The interface is clean and simple. Menus are easy to navigate. You don’t need technical skills. Just follow the steps and run the tool. It’s quick and beginner-friendly.
This approach gives you access to all available troubleshooters in one place. The Settings app organizes tools by category. You can see which troubleshooters are available for your specific problems.
- Click the Start button. Select “Settings” (gear icon). Choose “System” from the left menu. Click “Troubleshoot”.
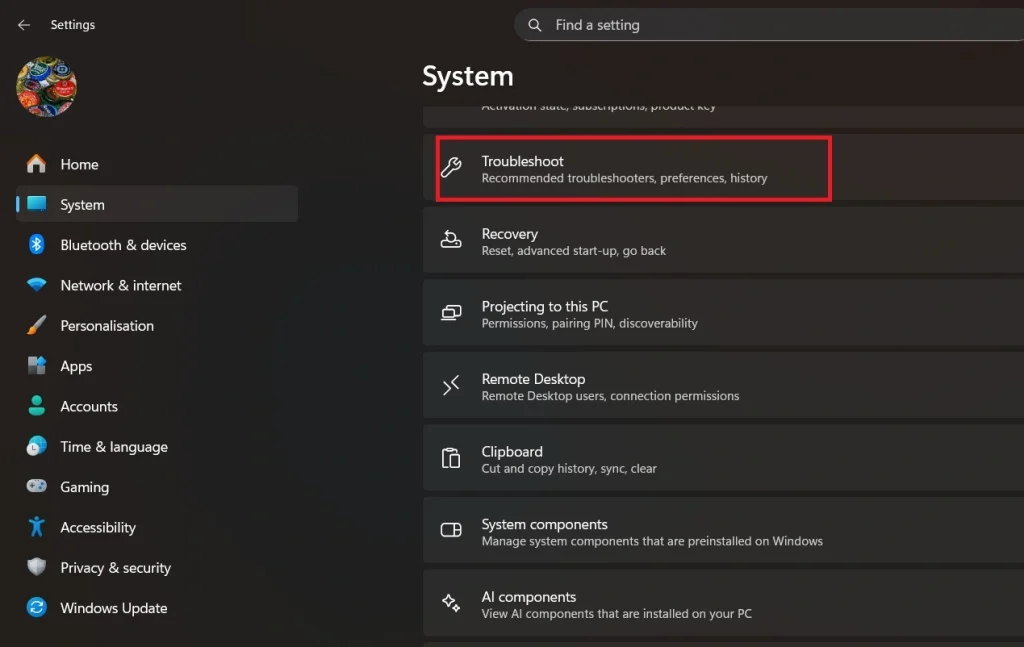
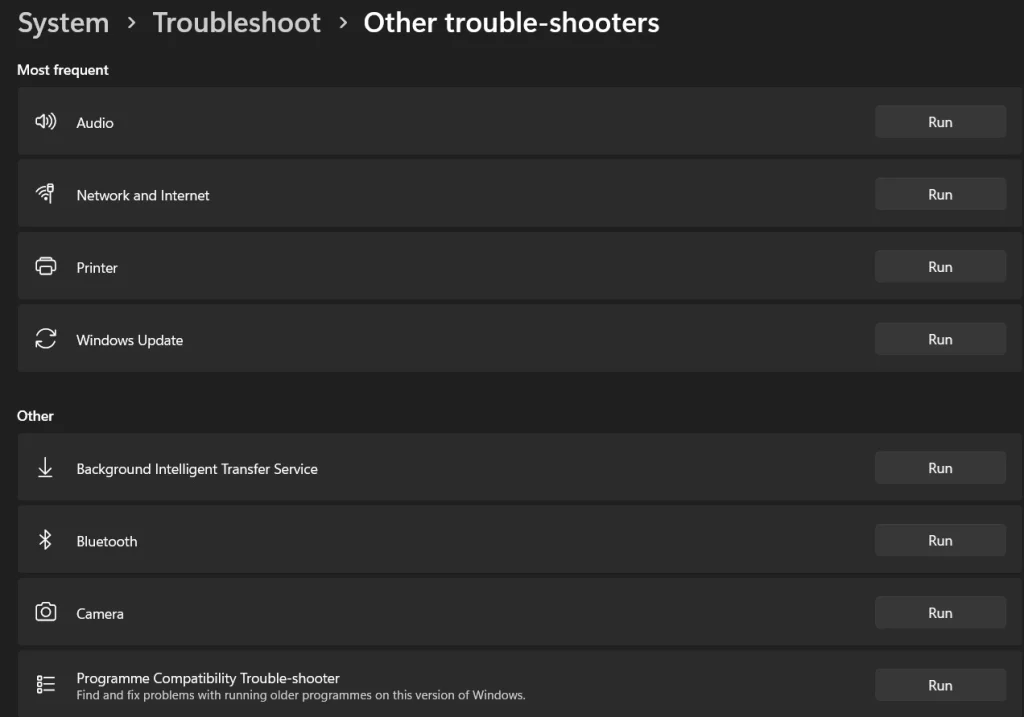
- Select “Other troubleshooters”.
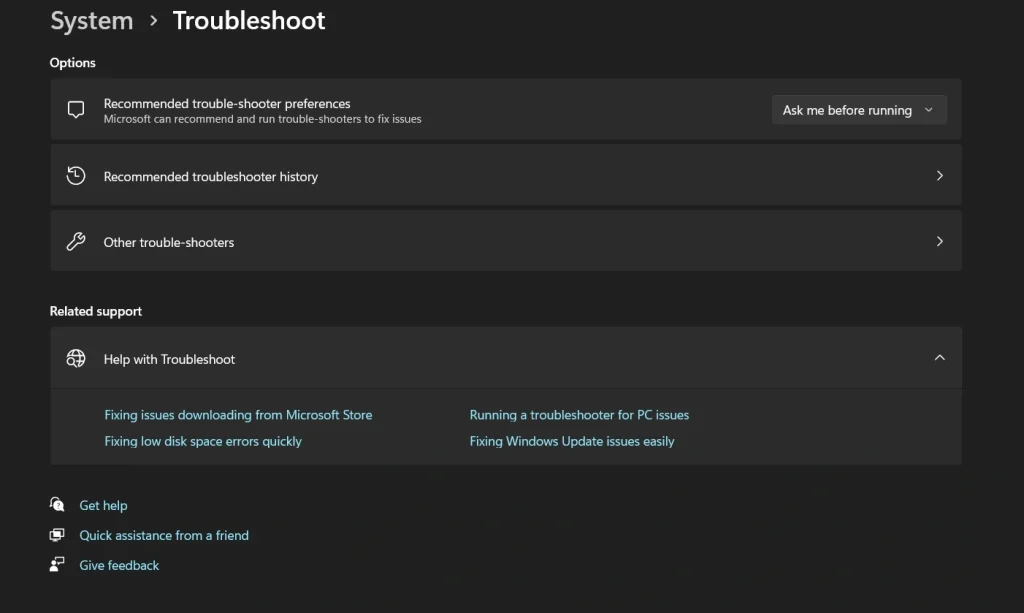
- Find the issue type you need. Click “Run” next to the appropriate troubleshooter.
Method 2: Through Control Panel
Control Panel offers the classic Windows troubleshooting experience. This method works well for advanced users. It provides more detailed options and legacy troubleshooters.
Some older troubleshooters only appear in Control Panel. This method also works if the Settings app has problems. Power users often prefer this traditional approach.
- Press Windows key + R. Type “control” and press Enter. Click “Troubleshooting”.
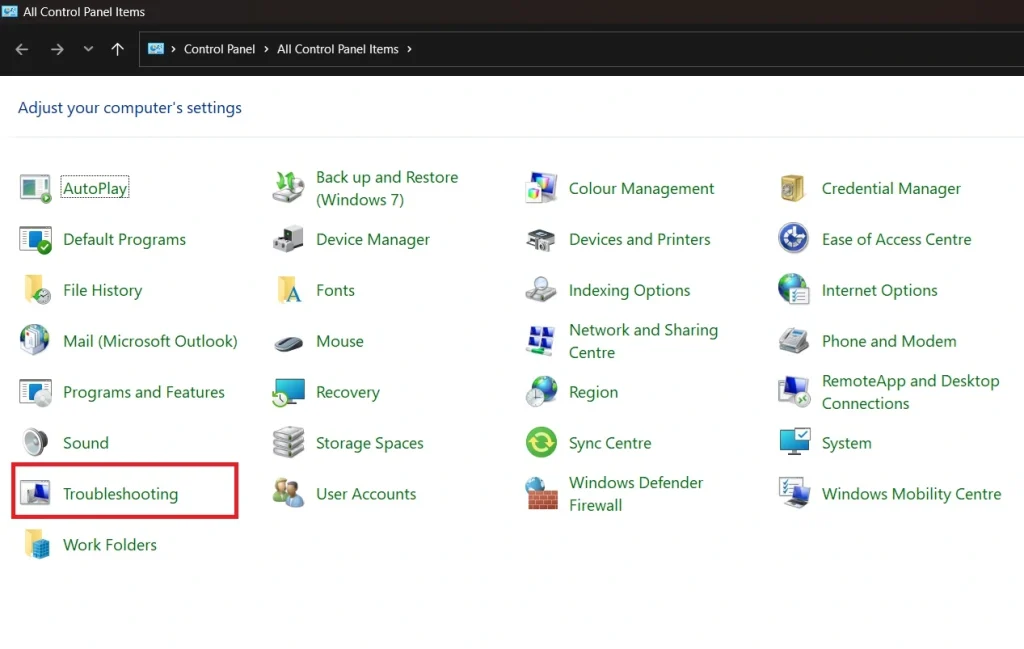
- Choose your problem category. Follow the on-screen instructions.
Method 3: Quick Access
Quick access saves time when you need troubleshooters fast. This method uses the Windows search feature. It’s perfect for users who know exactly what they need.
Search helps you jump directly to specific troubleshooters. You skip multiple menu clicks. This approach works even if you don’t remember the exact location of tools.
- Right-click the Start button. Select “Settings”. Use the search box to type “troubleshoot”.
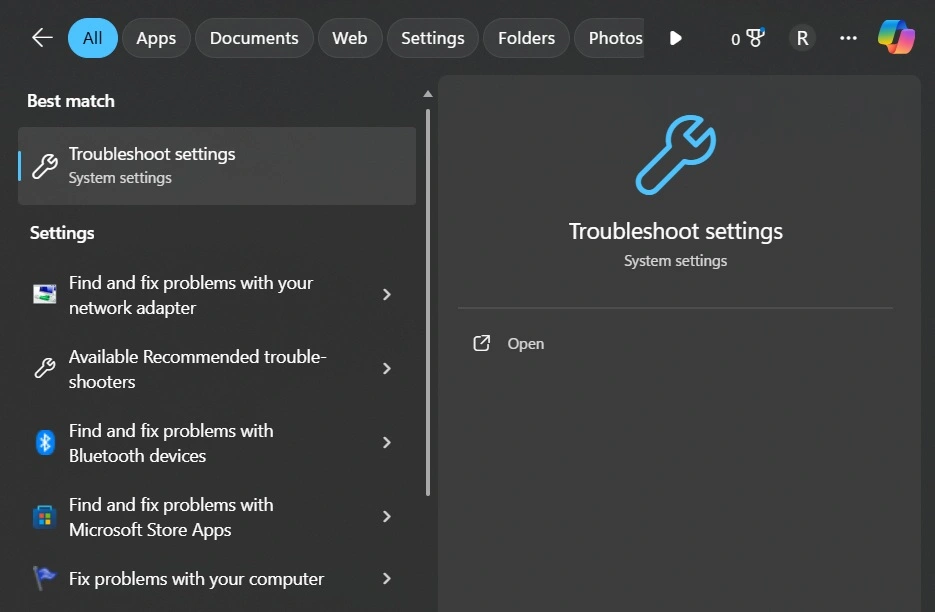
- Click on the relevant result.
For Windows 10:
The Settings app in Windows 10 keeps all troubleshooters organized. This method is user-friendly and modern. It works great for beginners who want simple navigation.
The Settings app shows troubleshooter status clearly. You can see which tools ran recently. The interface explains what each troubleshooter does before you run it.
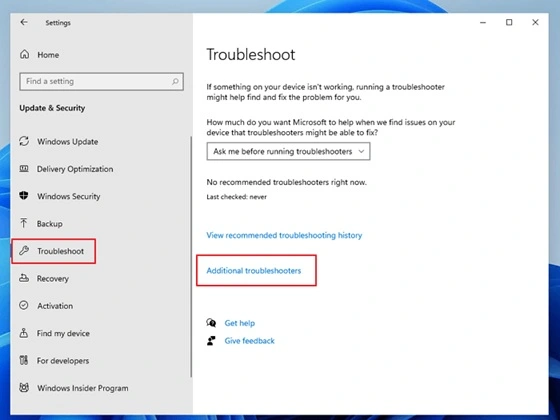
- Press Windows key + I. Click “Update & Security”. Select “Troubleshoot” from the left panel. Choose “Additional troubleshooters”.
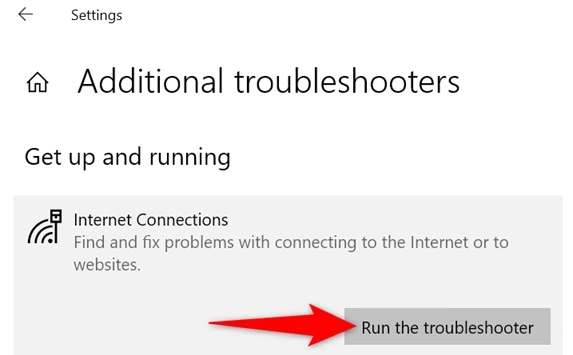
- Pick the troubleshooter you need. Click “Run the troubleshooter.”
Common Troubleshooters Available for Windows 11/10:
- Internet Connections – Fixes network and WiFi problems. Helps restore access when you’re unable to connect or facing slow speeds.
- Audio – Resolves sound and speaker issues. Repairs problems with playback, volume, or missing audio devices.
- Windows Update – Fixes update download problems. Helps when updates fail to install or get stuck.
- Printer – Solves printing and scanner issues. Restores communication between your PC and connected devices.
- Bluetooth – Repairs wireless device connections. Fixes pairing failures and missing Bluetooth options.
- Power – Optimizes battery and sleep settings. Adjusts configurations to improve battery life and prevent sleep-related issues.
- Hardware – Detects device driver problems. Identifies missing, outdated, or malfunctioning drivers.
- Apps – Fixes Microsoft Store and app issues. Helps when apps won’t open, crash, or fail to install.
When you run a troubleshooter for PC issues Windows, it will scan your system. The tool shows a progress bar. It lists what it’s checking. If problems are found, it offers to fix them automatically. Always read the suggested fixes before applying them.
Author’s Tip
Start with the most obvious troubleshooter first. If you have sound problems, try the Audio troubleshooter. For internet issues, use the Network troubleshooter. This saves time and gets better results.
Don’t run multiple troubleshooters at once. Let each one finish completely. Running several tools together can cause conflicts. This might create new problems instead of fixing old ones.
Keep your Windows system updated. New troubleshooters come with updates. They fix more recent problems. Updated troubleshooters work better than old versions. Check for updates monthly to get the latest fixes.
Conclusion
Windows troubleshooters are powerful tools for fixing PC problems. They offer quick, free solutions for common issues. Learning to run a troubleshooter for PC issues Windows makes you more independent with computer problems.
These tools aren’t perfect, but they solve most everyday problems. Try them before calling tech support or paying for repairs. With practice, you’ll fix PC issues faster and easier than ever before.
FAQs:
Q: How long does it take to run a troubleshooter for PC issues on Windows?
Most troubleshooters finish within 2-5 minutes. Complex problems might take longer. The tool shows progress, so you know how much time is left. Simple network fixes happen quickly, while hardware scans take more time.
Q: Can troubleshooters make my PC problems worse?
Windows troubleshooters are very safe. They use tested Microsoft fixes. The tools create restore points before major changes. If something goes wrong, you can undo the changes. Always backup important files first as an extra precaution.
Q: What should I do if the troubleshooter doesn’t fix my problem?
Try a different troubleshooter if available. Check Windows Update for newer fixes. Search online for your specific error message. Contact Microsoft support or a local technician for complex hardware problems that troubleshooters cannot resolve.
Author Bio:
Dinesh Lakhwani 

Dinesh Lakhwani, the entrepreneurial brain behind “TechCommuters,” achieved big things in the tech world. He started the company to make smart and user-friendly tech solutions. Thanks to his sharp thinking, focus on quality and the motto of never giving up, TechCommuters became a top player in the industry. His commitment to excellence has propelled the company to a leading position in the industry.
Popular Post
Recent Post

What Is A Zero-Day Attack And How Can You Defend Against One?
Picture this. A hacker finds a secret crack in your favorite app. You don’t know it’s there. The company that built the app doesn’t know either. But the hacker does. And they use it right away, before anyone can stop them. This is the heart of a zero-day attack. It strikes when a flaw is […]

Iolo System Mechanic PC Cleanup Software: Hands-On Performance Review
PCs feel fast on the first day. Every click is quick. Apps open right away. With time, things slow down. Programs take longer to load. Files open slowly. Fans get loud even during light use. This happens to almost every computer, no matter how careful you are. The reason is clear. Junk files build up […]

Advanced SystemCare PC Cleanup Tool: A Detailed Review
You turn on your PC and wait. And wait. The same laptop that once opened apps in a snap now feels tired. This is not bad luck. It just happens over time. Files pile up. The registry gets messy. Old drivers stay installed long after they are useful. Junk data quietly eats up space on […]
Avast Cleanup PC Cleaner and Optimizer: Everything You Need to Know
A slow computer makes it hard to focus. Programs take too long to open. Free space keeps shrinking until the disk is almost full. This happens to most PC owners at some point. Even new machines can slow down after a while. That is the exact problem cleanup tools are built to solve. They comb […]

Fortect Software Review: The Ultimate PC & Mobile Cleaning, Optimization & Security Tool
Slow computers are a common problem for almost every Windows user. Well, yes! Over time, your PC picks up junk files. These files sit quietly in the background. They take up space and slow things down. Programs open slower. Windows takes longer to boot. Even simple tasks like opening a folder can feel sluggish. There […]

CCleaner PC Optimizer Review: A Complete Guide for Windows Users
If your computer has started to feel slow, you are not alone. Most Windows PCs slow down over time. Junk files pile up. The registry gets messy. Too many apps open when you start your PC. All this adds up and makes even a good machine feel tired. This is where a PC cleaner tool […]

5 Best PC Cleaners for Windows 11 & 10 | Top PC Optimizers
Remember when your PC felt fast? Every click was quick. Every app opened in seconds. Now it feels like a different machine. Windows takes forever to boot. Programs freeze for no reason. Even opening a browser feels like a chore. You are not alone in this. Almost every PC slows down over time. Files pile […]

Auslogics Duplicate File Finder: Full Review and User Guide
A computer quietly gathers clutter over time. This includes duplicate photos, repeated downloads, and forgotten backups hiding in random folders. This buildup slowly eats away at storage and can make even a fast PC feel sluggish. Manually finding and deleting duplicates is tedious. It means checking every folder, comparing file names, and guessing which copies […]

CCleaner Duplicate File Finder: Key Features, Pricing, Step-by-Step Guide and More
Every computer collects junk over time. Right? Well, yes! Photos often get copied twice. Documents get saved in two folders by mistake. Old downloads pile up and never get deleted. This slowly eats up your storage space, and most people do not even notice until their drive is almost full. That is where a duplicate […]

