


If your computer has started to feel slow, you are not alone. Most Windows PCs slow down over time. Junk files pile up. The registry gets messy. Too many apps open when you start your PC. All this adds up and makes even a good machine feel tired. This is where a PC cleaner tool […]
How To Manage & Free Up Disk Space On Windows 11
Introduction:
Low disk space on Windows 11 is a frequent issue that can lead to slow performance, program crashes, and failure to save files. Fortunately, understanding how to manage your storage can quickly resolve these problems and keep your system running smoothly.
A lot of people aren’t aware that Windows 11 includes built-in features to help free up disk space. Instead, they assume purchasing a new hard drive is the only solution, which isn’t the case. With the right tools already in the system, you can clear out clutter and reclaim space without spending a rupee.
This guide shows simple ways to manage disk space on Windows 11. We’ll cover basic cleanup methods. We’ll also share advanced tips.
Fastest Way: To Save Your Time
If your Windows 11 PC is running low on disk space, you do not always need to go through every method in this guide. One built-in tool can scan your drive and remove junk files in just a couple of minutes, giving you back several gigabytes without touching any personal files.
Storage Sense is the quickest and safest place to start. It automatically detects temporary files, old downloads, and system clutter that Windows no longer needs. Running it once can make a noticeable difference before you try anything else.
Step 1: Go to Settings, click System, then select Storage. Click Temporary files to see a breakdown of what Windows considers safe to delete.
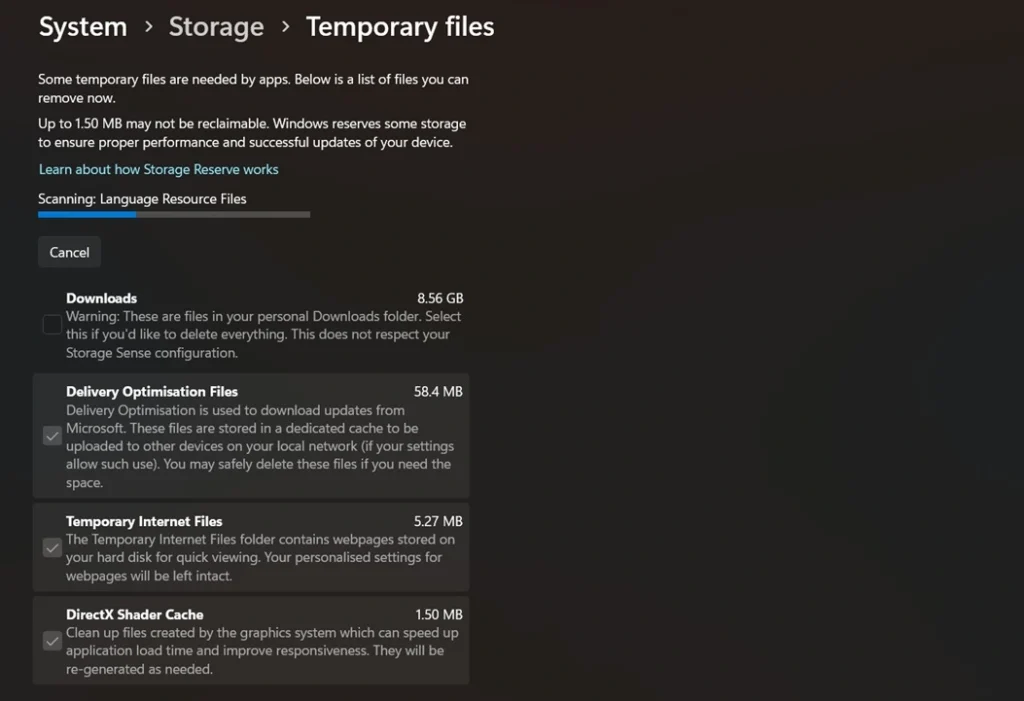
Step 2: Check the categories you want to clear, such as Temporary files, Recycle Bin, and Delivery Optimization Files. Click Remove files, and Windows handles the rest.
Why Free Up Disk Space on Windows 11?
When your hard drive fills up, Windows 11 struggles to work properly. This creates many problems that slow down your daily tasks.
Here’s why:
- Faster boot times – Windows 11 starts quicker with more free space
- Better program performance – Apps run smoother when disk space is available
- Prevents system crashes – Low disk space causes Windows 11 to freeze or crash
- Enables system updates – Windows 11 needs space to download and install updates
- Improves file saving – Documents and files save faster with adequate space
- Reduces system errors – Many Windows 11 errors happen due to low disk space
- Better virtual memory – Windows 11 uses disk space for temporary memory
- Prevents data loss – Full drives can corrupt files and lose important data
Questions Most People Actually Have About This
How much disk space does Windows 11 require to run properly?
Windows 11 requires a minimum of 64 GB of storage to install, but that alone is not enough for comfortable daily use. Once system updates, drivers, and basic apps are factored in, your drive fills up quickly. Microsoft recommends having at least 20 to 30 GB of free space at all times for smooth performance. When free space drops below 10 percent of your total drive capacity, Windows starts to slow down noticeably. Tasks like installing updates, creating restore points, and running virtual memory all depend on available disk space.
Is it safe to delete temporary files on Windows 11?
Yes, deleting temporary files is completely safe in most cases. These files are created by Windows and applications during normal use and are not needed once their task is complete. They include update leftovers, cached installers, error logs, and thumbnail data. Windows itself marks these files as safe to remove, which is why tools like Disk Cleanup and Storage Sense target them first. The only exception is if an app is currently running and actively using a temp file, but Windows will skip those files automatically during cleanup.
Why does my disk space keep filling up even after I delete files?
Several background processes refill disk space without you noticing. Windows Update downloads and stores installation packages even after updates are applied. System Restore creates new restore points regularly. Your browser stores cache data from every website you visit. Apps like Spotify, Adobe, and Teams store local copies of files, thumbnails, and logs over time. If you use the Recycle Bin without emptying it, deleted files still occupy space. Addressing these sources one by one, rather than just deleting personal files, is what actually keeps your drive clear long-term.
What is the difference between Disk Cleanup and Storage Sense in Windows 11?
Disk Cleanup is an older, manual tool that has been part of Windows for decades. You run it yourself, choose what to delete, and it clears those items immediately. Storage Sense is the modern replacement built into Windows 11 Settings. It can run automatically on a schedule, monitor your Downloads folder, and manage locally available cloud files. Storage Sense is better for ongoing maintenance, while Disk Cleanup is useful for a one-time deep clean, especially when you need to remove system files or old Windows installation data. Both tools are safe and effective when used correctly.
Set Yourself Up for Success: Precautions to Take Before Freeing Up Disk Space
Clearing disk space is generally safe, but a few careless decisions can lead to data loss or system issues. Taking these precautions before you start protects your files and keeps Windows running smoothly throughout the process.
- Back up important files first: Copy critical documents, photos, and project files to an external drive or cloud storage before deleting anything. Accidental deletions are hard to reverse once the Recycle Bin is emptied.
- Create a system restore point: Go to Control Panel, search for Recovery, and create a restore point. This gives you a safety net if something goes wrong during cleanup.
- Do not delete files you do not recognize: Unknown files in system folders like Windows, System32, or ProgramData may look like junk, but are often essential. Leave them alone unless you are certain of their purpose.
- Check the Recycle Bin before emptying it: Scan through the Recycle Bin once before permanently deleting its contents. It is easy to accidentally send needed files there without realizing it.
- Close all running applications: Open apps may lock certain temp files or write new data during cleanup. Closing them ensures the cleanup tool can access and remove everything it needs to.
- Avoid interrupting the cleanup process: Do not shut down or restart your PC while a cleanup or uninstall is in progress. Interrupting the process can leave partial files behind or cause app errors.
- Verify cloud sync before deleting local files: If you use OneDrive or Google Drive, confirm your files are fully synced to the cloud before removing local copies. Deleting an unsynced file removes it permanently.
- Keep at least 10 to 15 percent of drive space free: Do not aim to use every last gigabyte. Windows needs breathing room for updates, virtual memory, and restore points. Staying above 15 percent free space keeps performance stable.
How to Free Up Disk Space on Windows 11?
Clearing out disk space in Windows 11 is all about using the right built-in tools for the job. The operating system offers a variety of options, each designed to tackle specific kinds of junk, like temporary files, system logs, or old Windows updates. With these tools at your fingertips, managing storage becomes a lot more efficient and hassle-free.
The key to success is using multiple methods together. This approach helps you free up disk space on Windows 11 more effectively. Let’s explore the best ways to manage disk space on Windows 11.
Method 1: Use the Disk Cleanup Tool
Disk Cleanup is Windows 11’s basic space management tool. It finds temporary files on your computer. These files are safe to remove. The tool has helped users for many years.
The tool scans your entire system first. It looks for files you don’t need. Then it shows you how much space each file type uses.
How Disk Cleanup helps:
- Removes temporary Internet files
- Clears system cache files
- Deletes old Windows update files
- Removes recycle bin contents
- Clears thumbnail cache
Steps to use Disk Cleanup:
- Press Windows key + R. Type “cleanmgr” and press Enter. Select your main drive (usually C:). Wait for the scan to complete. Check boxes for files you want to delete.

- Click “Clean up system files” for more options. Click “OK” to start the cleanup
Method 2: Use Storage Sense
Storage Sense is an automatic cleanup tool built into Windows 11 that quietly runs in the background as you use your PC. There’s no need to launch it manually—it takes care of freeing up disk space on its own, making storage management effortless.
Storage Sense takes care of file cleanup automatically. It prioritizes temporary files, then clears out old downloads you might’ve overlooked. You can customize how often it runs—daily, weekly, or monthly—to keep your system tidy without lifting a finger.
How Storage Sense helps:
- Automatically deletes temporary files
- Removes old files from the Downloads folder
- Clears the recycle bin contents
- Manages OneDrive files
- Frees up space while you work
Steps to enable Storage Sense:
- Open Settings (Windows key + I). Go to System > Storage. Click “Storage Sense”. Turn on “Storage Sense”. Click “Configure Storage Sense.”

- Set how often it runs. Choose what files to delete automatically
Method 3: Uninstall Unused Programs
Unnecessary programs can take up a surprising amount of disk space. Windows 11 often comes with pre-installed apps, and over time, more software gets added and then neglected. In reality, most users don’t need or use every program on their system.
Some programs use huge amounts of space. Games often take 50GB or more. Media software can use 10-20GB each. Check your program list every month. Remove programs you haven’t used in 6 months.
How uninstalling programs helps:
- Frees up large amounts of space quickly
- Removes associated temporary files
- Reduces startup time
- Improves system performance
- Eliminates security risks from old software
Steps to uninstall programs:
- Open Settings (Windows key + I). Go to Apps > Installed apps. Look through your program list. Click the three dots next to unused programs. Select “Uninstall.”

- Follow the removal prompts. Restart if prompted
Method 4: Clear Browser Cache and Data
Web browsers store lots of temporary data on your computer. This includes images from websites you visited. It also includes scripts and cookies. All browsers do this automatically.
As you browse the web, browsers like Chrome, Edge, and Firefox accumulate cached data—which can quietly expand into several gigabytes over time. Since most users rarely think to clear it, this digital clutter continues to pile up month after month, eating away at valuable storage space.
How clearing browser data helps:
- Removes temporary Internet files
- Deletes stored images and scripts
- Clears download history
- Removes old cookies
- Frees up space from multiple browsers
Steps to clear browser cache:
- Open your web browser. Press Ctrl + Shift + Delete. Select “All time” for time range. Check “Cached images and files”. Check “Cookies and other site data”.

- Click “Clear data“. Repeat for other browsers
Method 5: Delete Large Files and Folders
Large files often hide in places you forget about. Old videos take up the most space. Software installers stay in Downloads forever. Backup files from years ago still sit on your drive.
To track down large files eating up space, open File Explorer and sort your files by size. This brings the biggest offenders right to the top. Focus on files over 100MB that you no longer need—like outdated software installers, old videos, or duplicate photos—and clear them out to reclaim valuable storage.
How deleting large files helps:
- Quickly frees up significant space
- Removes forgotten downloads
- Clears old backup files
- Eliminates duplicate media files
- Makes room for important data
Steps to find and delete large files:
- Open File Explorer. Go to This PC > Local Disk (C:). Click View > Details.

- Click the “Size” column to sort by size. Look for files larger than 100MB. Right-click on unwanted large files. Select “Delete” or move to external storage
Method 6: Use Disk Cleanup Advanced Options
Advanced Disk Cleanup targets system files that regular cleanup can’t touch. These include old Windows installations after updates. They also include system restore points from months ago. This method can free up huge amounts of space.
System files are protected from normal deletion. Advanced options let you access them safely. Windows 11 updates often leave behind old system files. These can use 10-20GB of space. The advanced cleanup removes them properly.
How advanced cleanup helps:
- Removes old Windows installation files
- Clears system restore points
- Deletes Windows update backup files
- Removes driver backup files
- Frees up several gigabytes of space
Steps for advanced cleanup:
- Press Windows key + R. Type “cleanmgr” and press Enter. Select your main drive. Click “Clean up system files”. Wait for the advanced scan.

- Check “Windows Upgrade Log files”. Click “OK” to start the cleanup.
Method 7: Move Files to External Storage
External storage is perfect for files you rarely need. Old photos from years ago don’t need to stay on your main drive. Large video files can live on external drives. This frees up space without deleting anything important.
You have many external storage options today. USB drives, external hard drives, and cloud storage all work well. You keep your files completely safe. You can still access them when needed. Your main drive gets more room for daily programs.
How external storage helps:
- Keeps files safe while freeing space
- No risk of losing important data
- Easy to access files when needed
- Works for any file type or size
- Creates more room for daily use
Steps to move files to external storage:
- Connect an external drive or set up cloud storage. Open File Explorer. Navigate to folders with large files. Select files you rarely use.

- Right-click and choose “Cut”. Navigate to external storage. Right-click and choose “Paste.”
Method 8: Compress Files and Folders Using Windows Built-In Tool
Windows 11 includes a built-in NTFS compression feature that reduces the size of files and folders without deleting them. It works silently in the background and is especially effective for folders containing documents, text files, logs, and archives that are accessed infrequently.
This method is ideal when you need to recover space but cannot afford to delete or move files. It is not recommended for folders containing media files like videos or images, since those formats are already compressed and the tool will have little to no effect on them.
How it helps:
- Reduces file size by 20 to 60 percent for text-heavy files and documents.
- Files remain accessible and usable without any extra steps to decompress.
- Works on individual files, folders, or entire drives through File Explorer.
- Useful for archiving old project folders you still want to keep on your PC.
- No third-party software is required since it is built directly into Windows 11.
Step 1: Right-click the file or folder you want to compress in File Explorer. Select Properties, click the Advanced button, and check Compress contents to save disk space. Click OK and then Apply.
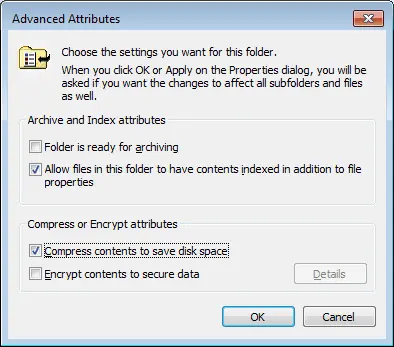
Step 2: Windows will ask if you want to apply the change to the selected folder only or to all subfolders and files within it. Choose Apply changes to this folder, subfolders, and files for maximum space savings, then click OK.
Method 9: Disable or Limit Hibernation to Recover Hidden Space
Hibernation saves your PC’s current state to a file called hiberfil.sys so you can resume exactly where you left off after a full shutdown. The problem is that this file is automatically sized at 75 to 100 percent of your total RAM. On a PC with 16 GB of RAM, that is up to 16 GB of disk space used by a single hidden file.
If you use Sleep mode instead of Hibernate, or if you shut your PC down fully each time, you are paying a large disk space cost for a feature you may not even be using. Disabling or reducing hibernation is one of the fastest ways to recover several gigabytes instantly without touching any personal files.
How it helps:
- Instantly frees up gigabytes equal to 75 to 100 percent of your installed RAM.
- The hiberfil.sys file is completely removed from your drive when hibernation is disabled.
- No personal files, documents, or applications are affected in any way.
- You can still use Sleep mode normally after disabling Hibernate.
- Re-enabling hibernation later is just as simple if you change your mind.
Step 1: Click the Start menu, type cmd, right-click Command Prompt, and select Run as administrator.
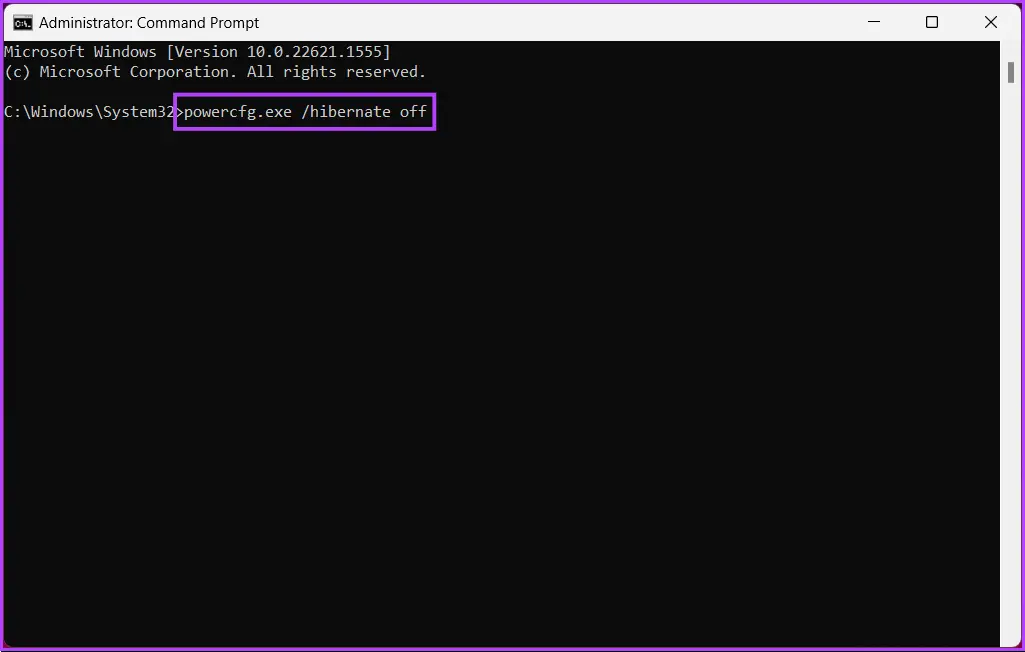
Step 2: Type the command powercfg /hibernate off and press Enter. Windows immediately deletes the hiberfil.sys file and reclaim the space. No restart is needed.
Stop Before You Delete: Things You Should Never Do While Freeing Up Disk Space
Freeing up disk space is straightforward when done carefully, but several common mistakes can damage your system or cause permanent data loss. Knowing what to avoid is just as important as knowing what to delete.
- Do not delete files from the Windows or System32 folder: These folders contain core operating system files. Removing anything from them can cause apps to crash or prevent Windows from booting correctly.
- Do not use unknown third-party cleaners from unverified sources: Many free disk cleaner tools bundled with other software contain adware or malware. Stick to trusted tools or Windows built-in options unless the software comes from a well-known developer.
- Do not clear the Recycle Bin without reviewing its contents: Once you empty the Recycle Bin, recovery becomes difficult and often requires paid third-party software. Always glance through it first.
- Do not remove restore points unless drive space is critically low: System restore points are your safety net when updates or software installations go wrong. Deleting all of them leaves you with no way to roll back Windows if something breaks.
- Do not delete program folders manually from the C drive: Dragging an app folder to the Recycle Bin does not uninstall the program. It leaves behind registry entries and shared files, often causing errors. Always use Settings or the Control Panel to uninstall apps properly.
- Do not compress your Windows installation folder: Applying NTFS compression to the Windows folder itself can cause serious performance issues and boot errors. Only compress personal files and non-system folders.
- Do not move the paging file or virtual memory to an external drive: Virtual memory needs fast, reliable access. Moving it off the main drive causes severe slowdowns and system instability under load.
- Do not skip the backup step when freeing up large amounts of space: If you are planning to delete several gigabytes at once, a quick backup to an external drive or cloud storage takes only minutes and protects you from an irreversible mistake.
Pro Tips to Free Up Disk Space on Windows 11
Advanced users can apply extra techniques to manage disk space on Windows 11. These pro tips go beyond basic cleanup methods. They help you squeeze out every bit of available space.
Here are expert tips to free up disk space on Windows 11:
- Enable NTFS compression – Compresses files automatically to save 20-30% space
- Use symbolic links – Link folders to external drives without moving them completely
- Clean Windows logs regularly – System logs can grow to several gigabytes over time
- Disable hibernation – Removes hiberfil.sys which can be 4-8GB in size
- Reduce virtual memory – Lower page file size if you have plenty of RAM
- Clear Windows Defender scan history – Old scan logs take up unnecessary space
- Remove language packs – Delete unused language files that came with Windows 11
- Clean registry regularly – Use built-in tools to remove invalid registry entries
Author’s Tip
After helping thousands of users manage disk space on Windows 11, I’ve learned some key lessons. The biggest mistake people make is waiting too long. Don’t wait until your disk is 90% full. Start cleanup when you hit 70% capacity.
Set up Storage Sense to run automatically. This prevents space problems before they start. Also, check your Downloads folder monthly. This folder fills up fast with forgotten files. Many users find 10-20GB of space just by cleaning Downloads.
Create a monthly cleanup routine. Spend 15 minutes checking disk space. Run Disk Cleanup and review installed programs. This small effort prevents big problems later. Your Windows 11 system will thank you with better performance and fewer crashes.
Conclusion
Learning how to manage disk space on Windows 11 is essential for every user. These methods help keep your system running smoothly. Regular maintenance prevents most space-related problems.
Start with the simple methods like Disk Cleanup and Storage Sense. These tools handle most cleanup tasks automatically. Then move to advanced techniques like uninstalling programs and moving large files. The combination of these methods keeps your Windows 11 system healthy.
Remember that managing disk space on Windows 11 is an ongoing task. Set up automatic tools where possible. Check your space monthly. With these habits, you’ll never run into serious disk space problems again. Your computer will run faster and more reliably for years to come.
FAQs
Q: How much free disk space does Windows 11 need to run properly?
Windows 11 needs at least 15-20% of your total disk space to remain free. For a 500GB drive, keep 75-100GB free. This space allows Windows 11 to create temporary files, download updates, and manage virtual memory. Less than 15% free space causes performance problems and system errors.
Q: Will deleting system files harm my Windows 11 computer?
Using built-in Windows 11 cleanup tools is safe for system files. Tools like Disk Cleanup and Storage Sense only remove files that Windows 11 can recreate. Never manually delete files from Windows, System32, or Program Files folders. Always use official Microsoft tools to manage disk space on Windows 11.
Q: How often should I clean up disk space on Windows 11?
Clean up disk space on Windows 11 at least once per month. Enable Storage Sense to run automatically weekly. Check your Downloads folder and installed programs monthly. Run full Disk Cleanup quarterly. Heavy users should clean more often. Regular maintenance prevents serious space problems and keeps Windows 11 running smoothly.
Author Bio:
Dinesh Lakhwani 

Dinesh Lakhwani, the entrepreneurial brain behind “TechCommuters,” achieved big things in the tech world. He started the company to make smart and user-friendly tech solutions. Thanks to his sharp thinking, focus on quality and the motto of never giving up, TechCommuters became a top player in the industry. His commitment to excellence has propelled the company to a leading position in the industry.
Popular Post
Recent Post

Auslogics Duplicate File Finder: Full Review and User Guide
A computer quietly gathers clutter over time. This includes duplicate photos, repeated downloads, and forgotten backups hiding in random folders. This buildup slowly eats away at storage and can make even a fast PC feel sluggish. Manually finding and deleting duplicates is tedious. It means checking every folder, comparing file names, and guessing which copies […]

CCleaner Duplicate File Finder: Key Features, Pricing, Step-by-Step Guide and More
Every computer collects junk over time. Right? Well, yes! Photos often get copied twice. Documents get saved in two folders by mistake. Old downloads pile up and never get deleted. This slowly eats up your storage space, and most people do not even notice until their drive is almost full. That is where a duplicate […]

Duplicate File Finder Pro: A Complete Review, Everything You Should Know
Computers collect thousands of files over time. Well, yes! Many of them end up being duplicates created by backups, downloads, or accidental copies. These extra files take up valuable storage space and make it harder to keep everything organized. Finding and removing them manually can take hours. Right? Duplicate File Finder Pro is a tool […]

Monitor Screen Calibration Guide: Everything You Should Know
Your monitor shows colors every single day. But are those colors actually correct? Most people never stop to check this. They just use the screen as it comes out of the box. This habit can lead to wrong colors in photos, videos, and work files. Colors may look too warm or too cold without you […]

How To Check Installed RAM and RAM Slots [Complete Guide]
RAM plays an important role in how smoothly a computer runs. Short for Random Access Memory, it stores the data and instructions that Windows and active applications need at any given moment. From opening multiple browser tabs to running games and productivity software, RAM helps keep everything responsive. A system with limited memory may experience […]

What is Microsoft Autopilot Everything You Need To Know
Technology has changed the way companies manage computers. Well, yes! Employees now work from offices, homes, and remote locations. Setting up devices manually for every worker takes time and effort. It can also create mistakes that slow down productivity. This is where Microsoft Autopilot becomes useful. It helps businesses prepare and deploy Windows devices with […]

Enable Automatic Device Locking Feature Windows: Complete Guide
Introduction: Your computer stores important information such as emails, documents, passwords, and personal photos. Leaving it unlocked can put that data at risk. Thankfully, Windows includes built-in features that can automatically lock your device when you are away. Setting up automatic device locking is quick and does not require any extra software. In this guide, […]

How to Update Wireless Network Driver in Windows 11 and 10
Your Wi-Fi keeps dropping. Pages load slowly. The connection feels unstable? Well, you are not alone. Most of the time, the problem is not with your internet plan. It is with your wireless network driver. A driver is a small piece of software that helps your computer talk to its hardware. When it gets outdated, […]

Common Windows 11 Problems and Solutions (2026 Version)
Windows 11 has become more polished over the years, but it is still not completely free from problems. Even after regular updates from Microsoft, many users continue to face issues like lagging performance, failed updates, audio troubles, random crashes, and network errors. Some problems appear after installing new features, while others develop gradually as the […]

