How to Activate Windows Security on Your Device: Windows 11, 10
Introduction:
Windows Security is an essential safeguard built into your device, offering protection against viruses, malware, and other threats. By enabling Windows Security on Windows 11 or 10, you ensure robust security without any additional cost. This free security feature is included with every Windows computer.
Many users struggle with properly activating Windows Security on their Windows 11 or 10 devices, missing out on crucial protection features. Without the correct setup, their computers remain vulnerable—hackers can steal sensitive data, viruses can corrupt files, and personal information is at risk.
Learning to activate Windows Security on your device Windows 11, 10 is simple. This guide shows you every step. You’ll learn the benefits of using Windows Security. We’ll cover important safety tips too. By the end, your computer will have strong protection. Your data will stay safe from online threats.
Key Points Covered in This Guide:
This guide walks you through the practical side of turning on and managing security protection on your Windows system. It focuses on simple methods, common issues, and what to expect once the feature is active.
- How to enable Windows Security on your device
- Different ways to access security settings in Windows 11 and Windows 10
- Key features that help protect your system from threats
- Common problems users face during activation
- Extra methods to activate security when the usual options do not work
What is “Windows Security”?
Windows Security is a built-in protection system in Windows 10 and Windows 11. It comes pre-installed on your device. It includes tools like antivirus, firewall, device security, and account protection. You do not need extra software for basic safety.
It works as a central place for all security settings. You can check for viruses and manage protection from one screen. Everything is simple and easy to find. This helps users control security without confusion.
It runs quietly in the background. It checks for threats and keeps updating itself. You do not need to manage it all the time. It keeps your system protected with minimal effort.
Benefits of Activating Windows Security On Windows
When you activate Windows Security on your Windows 11, 10 device, you unlock many powerful features. These tools work together to keep your computer safe. They run in the background without slowing down your system. Here are the main benefits you get:
- Real-time virus protection – Scans files as you open them and blocks dangerous software before it can harm your computer
- Firewall protection – Controls which programs can access the internet and blocks hackers from getting into your system
- Browser safety – Warns you about dangerous websites and stops malicious downloads from infecting your device
- Ransomware protection – Prevents criminals from locking your files and demanding money to unlock them
- Device performance monitoring – Checks your computer’s health and alerts you to problems that could slow it down
- Parental controls – Helps parents manage what their children can see and do online safely
- Secure boot protection – Stops malware from loading when your computer starts up
- Regular security updates – Downloads the latest protection features automatically to keep you safe from new threats
Disadvantages: Drawbacks You Should Know
While Windows Security is reliable for everyday use, it is not perfect. There are a few limitations that users may notice, especially in more advanced situations.
- Limited advanced features
It lacks some high-end tools found in premium antivirus software, such as detailed network monitoring. - Occasional false alerts
Safe files or apps may sometimes be flagged as threats, which can interrupt normal work. - Performance impact on low-end systems
On older devices, background scans can slow things down slightly. - Basic ransomware protection
Protection is available, but it may not be as strong as dedicated security tools. - Dependency on updates
If Windows updates are disabled, security definitions may become outdated. - Less customization
Advanced users may find fewer control options compared to third-party solutions. - Conflicts with other antivirus software
Running multiple security tools can cause system issues or disable features. - Internet reliance for full protection
Some features work best when the system is connected online.
Common Errors You Might Face
While activating or using Windows Security, users often run into small but frustrating issues. Most of these have simple fixes once you understand the cause.
- “Windows Security not opening.”
The app fails to launch due to corrupted system files or disabled services. - Real-time protection turned off automatically
This can happen if another antivirus program is installed. - “This setting is managed by your administrator.”
Appears when group policies restrict changes, even on personal devices. - Security service is not running
Essential background services may be stopped or disabled. - Virus definitions are not updating
This usually occurs due to network issues or paused updates. - Blank or broken interface
The app opens but shows no content, often due to app glitches. - Firewall not turning on
Conflicts or misconfigured settings may block activation. - Frequent security notifications
Repeated alerts can appear if something is partially configured or failing.
Precautions To Take: When You Activate Windows Security On Your Device Windows 11, 10
Before you activate Windows Security on your device Windows 11, 10, you need to prepare properly. Taking the right steps prevents problems later. These precautions ensure a smooth setup and better protection. Follow these important safety measures:
- Remove old antivirus software – Uninstall any third-party antivirus programs to prevent conflicts and system slowdowns
- Update Windows first – Install all available Windows updates before activation to ensure compatibility and optimal performance
- Back up important files – Create copies of your valuable data in case something goes wrong during setup
- Check system requirements – Make sure your computer meets the minimum specifications for Windows Security features
- Close running programs – Shut down unnecessary applications to free up system resources during activation
- Connect to stable internet – Ensure you have a reliable internet connection for downloading security definitions and updates
- Create a restore point – Set up a system restore point so you can undo changes if problems occur
- Disable conflicting software – Turn off any security tools or system optimizers that might interfere with Windows Security activation
How to Activate Windows Security on Your Device Windows 11, 10
There are four main ways to activate Windows Security on your device in Windows 11, 10. Each method works well for different users. All methods lead to the same strong protection.
Method 1: Using Windows Settings (Easiest Way)
The Windows Settings method is perfect for beginners who want to activate Windows Security on your device Windows 11, 10. This approach uses the modern Settings app that Microsoft designed to be user-friendly. You don’t need technical knowledge or experience with complicated menus. Everything appears in simple, clear language with helpful descriptions.
This method works great because it shows you exactly what each security feature does. The Settings app explains each option in plain English. You can see which protections are active and which need attention. New users feel confident using this method because it guides them through every step safely.
For Windows 11:
Step 1: Press Windows key + I keys. This will open Settings. Click on “Privacy & security”. Click “Windows Security” from the options. This opens the security center directly.

Step 2: Click the “Open Windows Security” button. The main dashboard will now appear on the screen.

Step 3: Select “Virus & threat protection,” then enable both “Real-time protection” and “Cloud-delivered protection” to enhance security.

Step 4: Click “Firewall & network protection.” Make sure all three network profiles show “On” status.
For Windows 10:
Step 1: Press the Windows key + I to open Settings. Navigate to “Update & Security” from the main menu, then select “Windows Security” from the left panel. Click the “Open Windows Security” button to access security settings.

Step 2: Use the same steps as Windows 11 to activate all protection features.
Method 2: Using Start Menu Search
The Start Menu search method offers the fastest way to activate Windows Security on your device Windows 11, 10. This approach saves time because you skip multiple menu clicks. You type once and reach your destination immediately. Busy users love this method because it gets them to security settings in seconds.
This method helps when you need quick access to Windows Security features. You don’t need to remember where settings live in different menus. The search function finds everything instantly. This approach works the same way on both Windows 10 and 11, making it reliable across different systems.
Step 1: Click the Start button. Type “Windows Security” in the search box.

Step 2: Select the “Windows Security” app from the search results to open the security dashboard instantly. On the main page, click “Virus & threat protection,” then enable “Real-time protection” using the toggle switch.
Method 3: Using Control Panel (Traditional Method)
The Control Panel method appeals to users who prefer classic Windows interfaces. Many people learned Windows through the Control Panel over the years. This familiar approach feels comfortable for those who don’t like modern app designs. You get the same powerful results with traditional menu layouts that haven’t changed much.
This method helps users who find the Settings app confusing or too simplified. Control Panel shows more detailed options in organized categories. IT professionals often prefer this approach because it matches their training. The method works reliably across all Windows versions, making it a dependable choice for activating Windows Security on your device, Windows 11, 10.
Step 1: Press Windows key + R to open the Run dialog. Type “control” and press Enter to open Control Panel.

Step 2: Click “Security and Maintenance” from the main Control Panel view.

Step 3: Click “Change Security and Maintenance settings” on the left panel.

Step 5: Expand the “Security” section. Make sure “Virus protection” and “Firewall” both show “On.”

Step 6: If either shows “Off,” click the corresponding option to activate Windows Security features.
Method 4: Using Command Prompt (Advanced Users)
The Command Prompt method gives advanced users precise control when they activate Windows Security on your device Windows 11, 10. This approach works through text commands instead of clicking buttons. Power users and IT professionals prefer this method because it’s fast and scriptable. You can automate the activation process or run it on multiple computers at once.
This method helps when graphical interfaces don’t work properly or load slowly. Command Prompt always responds quickly, even on older computers. You can verify settings immediately and troubleshoot problems easily. This approach also works remotely, letting IT staff activate security on computers they can’t physically access.
Step 1: Press Windows key + X. Select “Windows PowerShell (Admin)” or “Command Prompt (Admin).” Type this command and press Enter: powershell Set-MpPreference -DisableRealtimeMonitoring $false
Step 2: Type this command to enable firewall: netsh advfirewall set allprofiles state on

Step 2: Type this to check status: Get-MpPreference | Select-Object DisableRealtimeMonitoring. If the result shows “False,” real-time protection is active. Close the command window.
Step 3: Open the Windows Security app to verify all settings are activated correctly.
Method 5: Using Windows Services
Sometimes, Windows Security does not turn on because its background services are stopped. These services handle core functions like threat detection and system monitoring. If they are not running, the security system cannot work properly, even if the settings look correct.
This method focuses on restarting and enabling those essential services. It is a direct way to fix issues where Windows Security appears disabled or unresponsive without any clear reason.
Step 1: Press Windows + R, type services.msc, and press Enter.
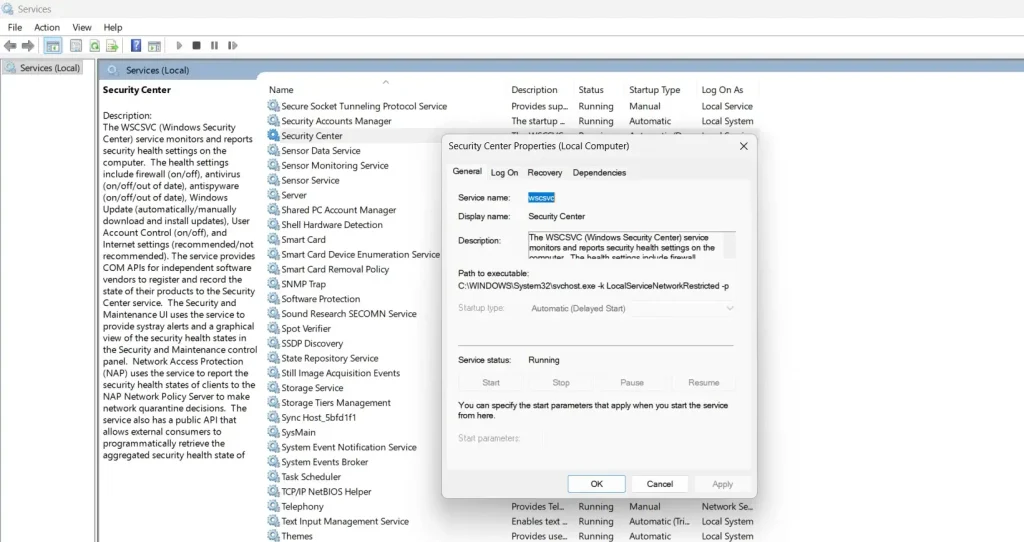
Step 2: Locate Security Center. Right-click and select Start (also set Startup type to Automatic)
Method 6: Using Group Policy Editor (For Pro Versions)
In some cases, Windows Security is disabled through system policies. This is more common in work devices, but it can also happen on personal systems due to certain changes or software. When this happens, normal settings will not allow you to turn protection back on.
Using the Group Policy Editor lets you check if any restrictions are blocking Windows Security. Once you remove those restrictions, the system should allow you to enable protection again.
Step 1: Press Windows + R, type gpedit.msc, and press Enter.
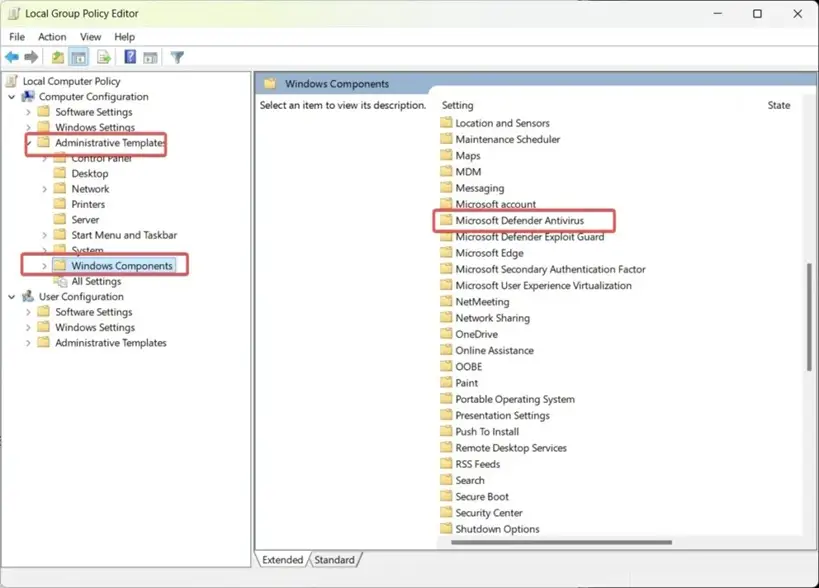
Step 2: Go to Administrative Templates > Windows Components > Microsoft Defender Antivirus, then set the policy to Not Configured
Author’s Tip
When you activate Windows Security on your device Windows 11, 10, don’t just set it and forget it. Check your security status weekly. Look for any red warnings or alerts. Update your security definitions regularly. This keeps your protection current against new threats.
Many users make the mistake of turning off Windows Security features. They think these tools slow down their computer. In reality, modern Windows Security uses very few system resources. It runs efficiently in the background. Keep all protection features enabled for maximum safety.
Remember to scan your computer monthly with Windows Security. Schedule full system scans during times when you don’t use your device. This deep cleaning finds hidden threats that real-time protection might miss. Regular scans keep your system running smoothly and safely.
Conclusion
Learning to activate Windows Security on your device Windows 11, 10 protects your digital life. This free, built-in protection rivals expensive third-party antivirus software. It provides comprehensive security without slowing down your computer. Your personal data, photos, and documents stay safe from cyber threats.
Don’t wait until hackers attack your system. Activate Windows Security on your device Windows 11, 10, today. Follow the simple steps in this guide. Check your security settings regularly. Keep your system updated. With proper protection, you can browse the internet, download files, and use your computer with confidence.
FAQs
Q: Does activating Windows Security slow down my computer?
Modern Windows Security is designed to use minimal system resources. It runs efficiently in the background without affecting your computer’s performance. The protection benefits far outweigh any minor resource usage. Most users notice no speed difference after activation.
Q: Can I use Windows Security with another antivirus program?
Running multiple antivirus programs simultaneously can cause conflicts and system problems. Windows Security automatically disables itself when it detects third-party antivirus software. Choose one primary security solution to avoid compatibility issues and ensure optimal protection.
Q: How often should I run manual scans after activation?
While Windows Security provides real-time protection, running manual full system scans monthly is recommended. Schedule these scans during off-hours when you’re not using your computer. This ensures comprehensive detection of any threats that might have bypassed real-time scanning.
Author Bio:
Dinesh Lakhwani 

Dinesh Lakhwani, the entrepreneurial brain behind “TechCommuters,” achieved big things in the tech world. He started the company to make smart and user-friendly tech solutions. Thanks to his sharp thinking, focus on quality and the motto of never giving up, TechCommuters became a top player in the industry. His commitment to excellence has propelled the company to a leading position in the industry.
Popular Post


Recent Post

What is Microsoft Autopilot Everything You Need To Know
Technology has changed the way companies manage computers. Well, yes! Employees now work from offices, homes, and remote locations. Setting up devices manually for every worker takes time and effort. It can also create mistakes that slow down productivity. This is where Microsoft Autopilot becomes useful. It helps businesses prepare and deploy Windows devices with […]

Enable Automatic Device Locking Feature Windows: Complete Guide
Introduction: Your computer stores important information such as emails, documents, passwords, and personal photos. Leaving it unlocked can put that data at risk. Thankfully, Windows includes built-in features that can automatically lock your device when you are away. Setting up automatic device locking is quick and does not require any extra software. In this guide, […]

How to Update Wireless Network Driver in Windows 11 and 10
Your Wi-Fi keeps dropping. Pages load slowly. The connection feels unstable? Well, you are not alone. Most of the time, the problem is not with your internet plan. It is with your wireless network driver. A driver is a small piece of software that helps your computer talk to its hardware. When it gets outdated, […]

Common Windows 11 Problems and Solutions (2026 Version)
Windows 11 has become more polished over the years, but it is still not completely free from problems. Even after regular updates from Microsoft, many users continue to face issues like lagging performance, failed updates, audio troubles, random crashes, and network errors. Some problems appear after installing new features, while others develop gradually as the […]

Fortect Driver Updater Review: Features, Steps, Pros, and Cons.
A new PC usually feels quick and responsive. Applications open instantly, games run smoothly, and everything works as expected. As time passes, however, you may notice slower performance, system crashes, hardware glitches, or devices that stop working properly. While many people assume malware or low storage space is to blame, outdated drivers are often the […]

New Features Coming in Windows 11 This Year [2026]
Microsoft is always working to make Windows better. This year is no exception. The company has announced and rolled out several exciting updates for its users. These updates touch almost every part of the operating system. From the Start menu to system settings, changes are arriving fast. If you use Windows daily, you will want […]

Top 14 Duplicate Photo Finder and Remover For Windows [2026]
Introduction: Photos pile up fast. Well, yes! You take ten shots of the same moment. You download the same image twice. You back up your folder and forget you already did it. Before you know it, your storage is packed with copies. A good duplicate photo finder helps you take back that space without losing […]

Advanced System Settings on Windows 11: Complete Guide
Windows 11 is a powerful operating system. It comes with many features that most users never explore. One of the most useful areas is the System Properties panel. This is where you can control how your computer performs, starts up, and handles memory. Many users only change basic settings like wallpaper or display options. But […]

21 Advanced Windows Security Settings: Latest Updates
Introduction: Your computer holds a lot of important data. From personal photos to work files, everything sits on your Windows system. That is why protecting it properly matters more than ever. Windows security settings have come a long way. Microsoft keeps adding stronger layers of protection with every update. Most users never go beyond the […]

Security Upgrades of Microsoft Windows in This Decade [Complete Guide]
Introduction Microsoft has been working hard to make Windows safer every year. Cyberattacks are growing fast. Hackers are smarter now. They target millions of Windows users every single day. That is why Microsoft has added many powerful new security upgrades of Microsoft Windows since 2020. These upgrades protect your data, your identity, and your device […]

