


You turn on your PC and wait. And wait. The same laptop that once opened apps in a snap now feels tired. This is not bad luck. It just happens over time. Files pile up. The registry gets messy. Old drivers stay installed long after they are useful. Junk data quietly eats up space on […]
How to Transfer iPhone Photos to Your Mac (8 Easy Solutions)
Have you clicked a stellar image with your iPhone and now want to upload it on your website or edit it?
Then, you can easily transfer your iPhone photos to your Mac to edit them with robust MacOS editing tools and further upload them on the web. Transferring photos from iPhone to Mac can save storage space on your iPhone and allows you to safely backup your special images.
Since iPhone and Mac are both Apple products; thus, there are many ways available to transfer photos from iPhone to Mac. Let’s scroll down to check out 8 easy solutions to transfer photos from iPhone to Mac.
Solution 1. AirDrop Photos
AirDrop is Apple’s data transfer technology that allows users to share data across multiple Apple devices ranging within 30 feet. To AirDrop photos, first, turn on the WiFi network and Bluetooth on both your iPhone and Mac. After that, follow these steps:
Step 1. Open the Photos app on your iPhone and select the photo or photos you want to transfer to Mac.
Step 2. Tap on the Share icon from the bottom and select AirDrop from the popup menu.
Step 3. Choose your Mac’s name.
Step 4. Wait for a few minutes until the iPhone shows a successful transfer message.

Solution 2. Through Photos App
The Photos app is a centralized location in both Mac and iPhone to store photos and videos. Thus, you can easily transfer photos between both Apple devices using this app as:
Step 1. Connect the iPhone to your Mac using a USB cable and launch the Photos app.
Step 2. The Photos app on Mac can Import all the photos and videos from your iPhone Photos app. Select the iPhone name from the Photos sidebar if the Import screen doesn’t automatically appear on Mac.

Step 3. Unlock your iPhone and tap on the Trust when a Trust This Computer message displays.
Step 4. Select Import Selected to transfer chosen photos to Mac or simply click on Import All New Photos to transfer the entire camera roll.
Solution 3. The Files App
The Files app is a default Apple program that helps users to manage files on iPhone and share across Dropbox, Google Drive, etc. This tool can also manage photos and send them to Mac. Here’s how you can use this utility app to transfer photos from iPhone to Mac:
Step 1. Launch the Files app on your iPhone.
Step 2. Tap the ellipsis icon on the upper right corner or on the Browse if you are on any other screen.
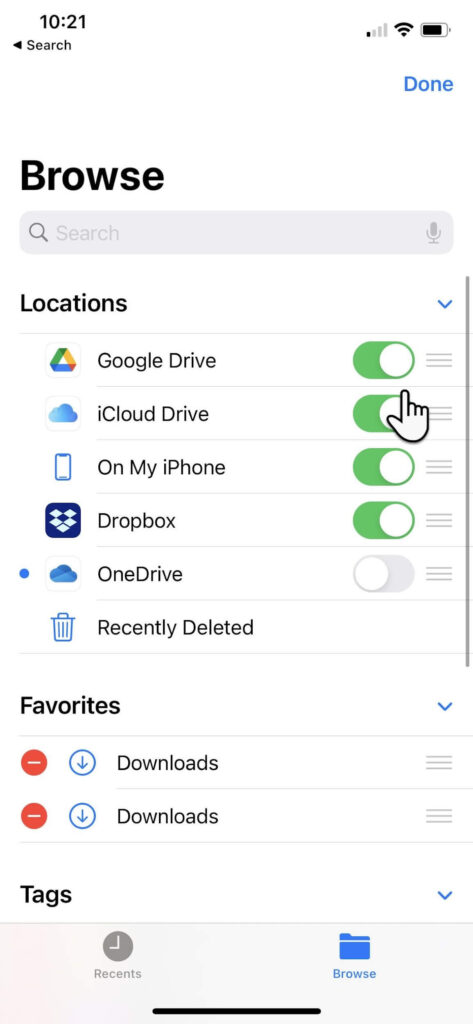
Step 3. Tap Edit and under the Location, turn on the toggle next to iCloud Drive or other third-party cloud services. Tap Done.
Step 4. Go to the Photos app on iPhone, select the photo to transfer, and tap on the Share icon.
Step 5. Select Save to Files and choose iCloud Drive or any other storage services. Tap Done.
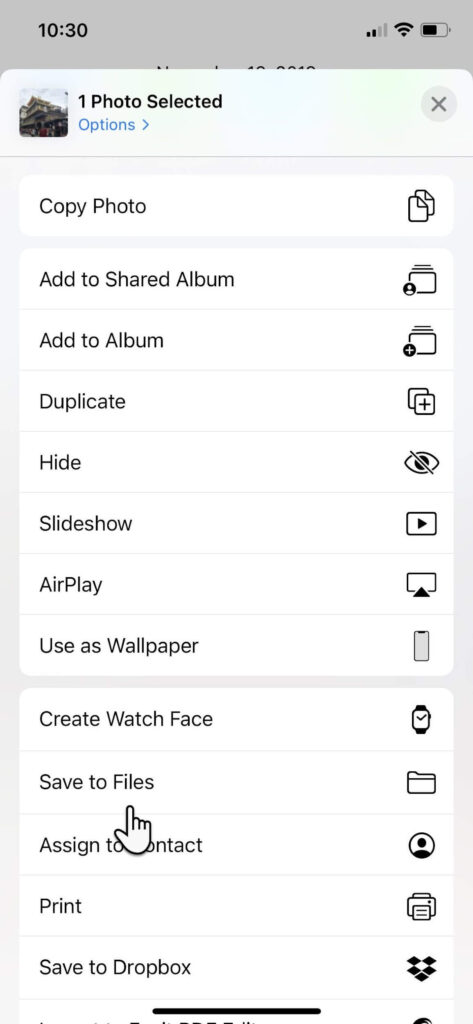
Step 6. Open iCloud Drive on your Mac, and the selected photo will be now available there.
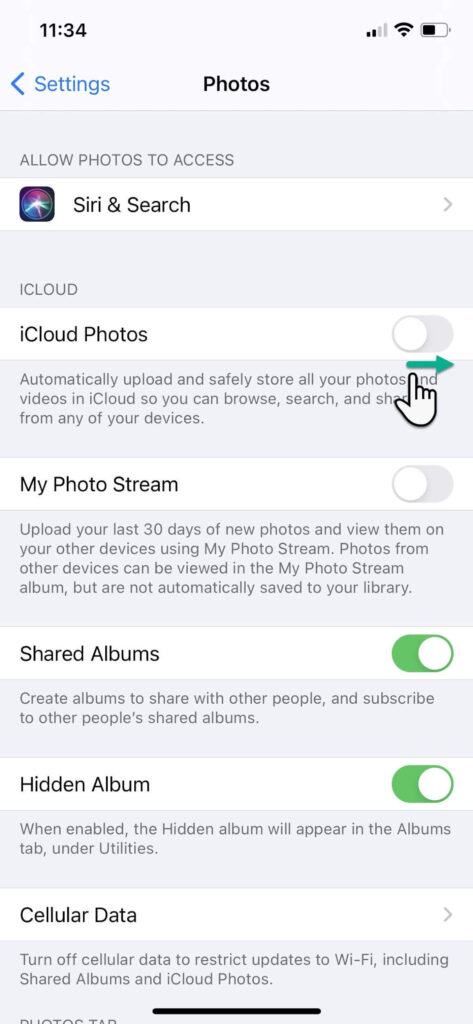
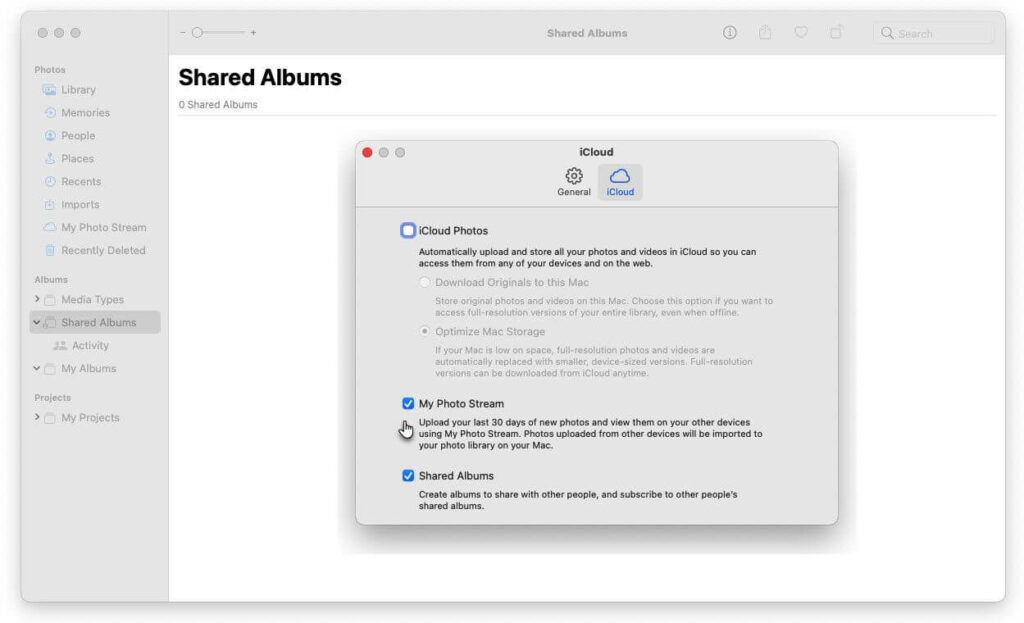
Solution 4. iCloud Photos
Once you sync iCloud with Photos, you can access all Photos app content across all your devices. However, the only problem is that iCloud offers 5 GB of free space, which will exhaust pretty quickly. Thus, you have to buy extra space on iCloud to enjoy the auto photo library sync feature.
Before that, make sure that iCloud Photos is enabled on your iPhone and Mac:
Go to Settings on your iPhone > Photos > Switch toggle to green next to iCloud Photos.
Open the Photos app on Mac > Photos > Preferences > iCloud > Checkbox next to iCloud Photos.
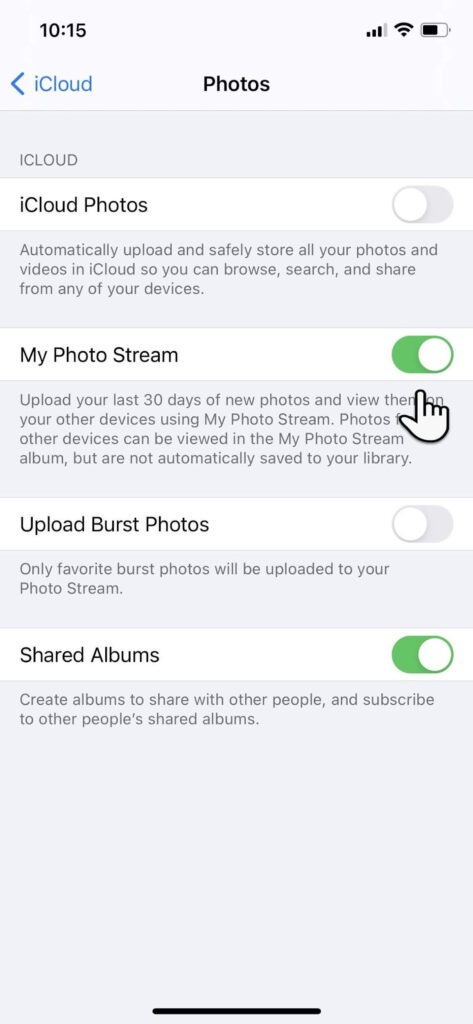
Solution 5. Use iCloud Photos Stream
One second, we have already discussed this solution. No, we have talked about iCloud Photos, not iCloud Photos Stream. But what’s the difference?
The iCloud Photos allows you to store all photos and videos on the cloud. But iCloud Photos Stream only uploads your new photos (no Live Photos or videos). It will only keep 30 days old photos on the cloud. This is a great feature to save space on iCloud.
To enable this feature on iPhone, go to Settings > iCloud > Photos > My Photo Streams.
On Mac, open the Photos app > Photos > Preferences > iCloud > My Photo Streams.
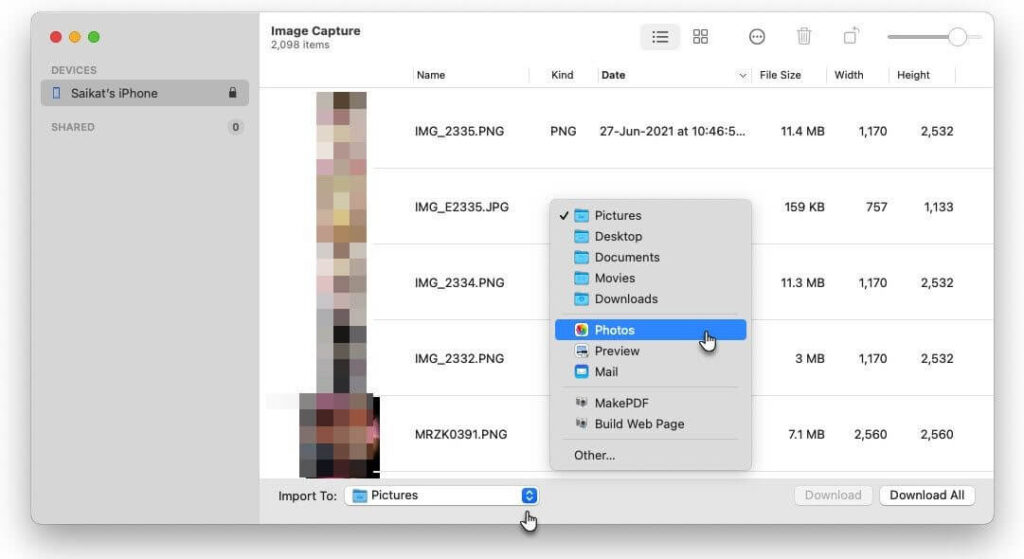
Solution 6. Image Capture
Image Capture is a default Mac utility app to import photos from digital cameras and scanners. But it can transfer photos from other devices too, including iPhone, as follows:
Step 1. Connect the iPhone to your Mac using the USB cable.
Step 2. Launch the Image Capture app on Mac and select your iPhone name from the Devices or Shared list.
Step 3. Select the images you want to transfer to Mac.
Step 4. Choose the Import To from the bottom of the window and select the location to save photos. You can also save photos as web pages or PDF.
Solution 7. Use Finder
If you use macOS Catalina (10.15) or later, you can easily transfer photos from iPhone to Mac via Finder. To do so:
Step 1. Connect the iPhone to your Mac using a USB cable.
Step 2. Open the Finder window on Mac and select your iPhone under the Devices.
Step 3. Click Photos from the top of your screen and check the “Sync Photos” box.
Step 4. Select all photos and albums or just a few photos, click Apply to complete the transfer.
Solution 8. Third-party Program
If you want a better solution than the iCloud and Photos app to transfer photos from iPhone to Mac, you can use a third-party tool called AnyTrans. It is a backup and media downloader that can seamlessly transfer content between iPhone and Mac. To use this app:
Step 1. Download AnyTrans on both your devices and connect them to the same network.
Step 2. Connect the iPhone to your Mac using a cable.
Step 3. Allows AnyTrans to access your photos and navigate to Device Manager > Export iPhone content to your Mac.
That’s it! Now, you are ready to transfer photos from iPhone to Mac. You can use any method at your convenience to migrate photos. If you get stuck somewhere, jot down below to us. We will shortly help you out.
To read more articles on Mac usability, you can go to other articles on this blog site or follow us on social media networks.
Author Bio:
Dinesh Lakhwani 

Dinesh Lakhwani, the entrepreneurial brain behind “TechCommuters,” achieved big things in the tech world. He started the company to make smart and user-friendly tech solutions. Thanks to his sharp thinking, focus on quality and the motto of never giving up, TechCommuters became a top player in the industry. His commitment to excellence has propelled the company to a leading position in the industry.
Popular Post
Recent Post

Avast Cleanup PC Cleaner and Optimizer: Everything You Need to Know
A slow computer makes it hard to focus. Programs take too long to open. Free space keeps shrinking until the disk is almost full. This happens to most PC owners at some point. Even new machines can slow down after a while. That is the exact problem cleanup tools are built to solve. They comb […]

Fortect Software Review: The Ultimate PC & Mobile Cleaning, Optimization & Security Tool
Slow computers are a common problem for almost every Windows user. Well, yes! Over time, your PC picks up junk files. These files sit quietly in the background. They take up space and slow things down. Programs open slower. Windows takes longer to boot. Even simple tasks like opening a folder can feel sluggish. There […]

CCleaner PC Optimizer Review: A Complete Guide for Windows Users
If your computer has started to feel slow, you are not alone. Most Windows PCs slow down over time. Junk files pile up. The registry gets messy. Too many apps open when you start your PC. All this adds up and makes even a good machine feel tired. This is where a PC cleaner tool […]

5 Best PC Cleaners for Windows 11 & 10 | Top PC Optimizers
Remember when your PC felt fast? Every click was quick. Every app opened in seconds. Now it feels like a different machine. Windows takes forever to boot. Programs freeze for no reason. Even opening a browser feels like a chore. You are not alone in this. Almost every PC slows down over time. Files pile […]

Auslogics Duplicate File Finder: Full Review and User Guide
A computer quietly gathers clutter over time. This includes duplicate photos, repeated downloads, and forgotten backups hiding in random folders. This buildup slowly eats away at storage and can make even a fast PC feel sluggish. Manually finding and deleting duplicates is tedious. It means checking every folder, comparing file names, and guessing which copies […]

CCleaner Duplicate File Finder: Key Features, Pricing, Step-by-Step Guide and More
Every computer collects junk over time. Right? Well, yes! Photos often get copied twice. Documents get saved in two folders by mistake. Old downloads pile up and never get deleted. This slowly eats up your storage space, and most people do not even notice until their drive is almost full. That is where a duplicate […]

Duplicate File Finder Pro: A Complete Review, Everything You Should Know
Computers collect thousands of files over time. Well, yes! Many of them end up being duplicates created by backups, downloads, or accidental copies. These extra files take up valuable storage space and make it harder to keep everything organized. Finding and removing them manually can take hours. Right? Duplicate File Finder Pro is a tool […]
Top 3 Duplicate File Finder for Windows 11 & Windows 10
If your PC storage keeps filling up even after you delete big files, duplicate files could be the real reason. Most of us save the same photo twice, download a document more than once, or copy a whole folder by mistake. Over months and years, these duplicate files pile up quietly. You do not even […]

Monitor Screen Calibration Guide: Everything You Should Know
Your monitor shows colors every single day. But are those colors actually correct? Most people never stop to check this. They just use the screen as it comes out of the box. This habit can lead to wrong colors in photos, videos, and work files. Colors may look too warm or too cold without you […]

