Rename Your Device For Better Security Windows [Windows 11 & 10]

While it may seem minor, your device’s name plays a surprisingly important role in protecting your online privacy. When you rename your device for better security Windows, you take a smart first step. This simple change helps protect you from hackers and other threats.
Most people never change their device name. They keep the default name that Windows gives them. This is a mistake. Default names tell hackers what type of computer you have. They also show your username or real name. This gives bad people too much information about you and your system.
Changing your device name is easy and free. It takes just a few minutes. But the benefits last forever. In this guide, you will learn why this matters.
We will cover both Windows 11 and Windows 10. Plus, we will share other security tips to keep you safe.
Part 1: How Renaming The Device Will Improve The Security
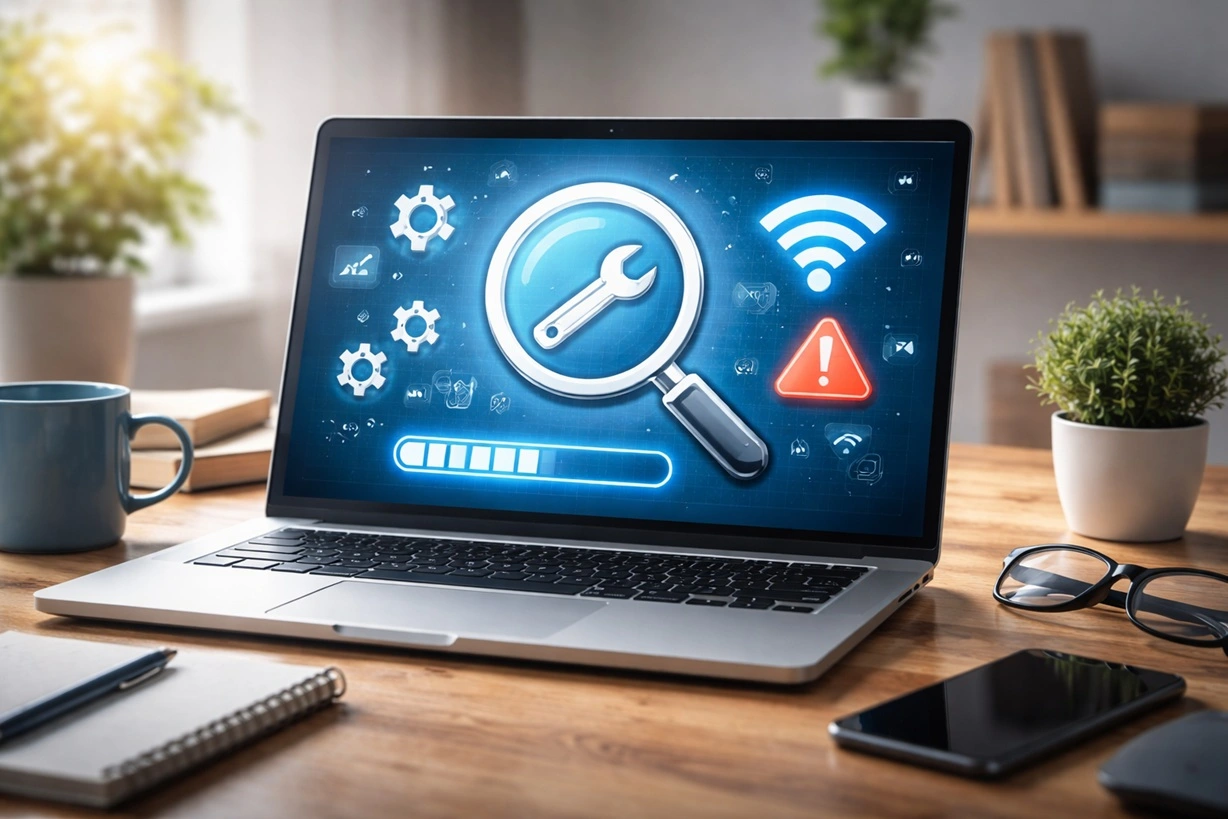
Device names play a bigger role in security than most people think. Your computer broadcasts its name to networks and other devices. This happens when you connect to Wi-Fi, share files, or use network features. Hackers can see this information and use it against you.
When you rename your device for better security in Windows, you make it harder for attackers to target you. A good device name hides what type of computer you have. It also hides personal information about you. This simple change adds a layer of protection to your digital life.
Here are the main ways renaming your device improves security:
- Hides your computer model and brand – Default names often include “Dell,” “HP,” or “Lenovo.” This tells hackers exactly what hardware you have.
- Removes personal information – Many default names include your real name or username. This gives away your identity.
- Makes network scanning harder – Hackers scan networks for easy targets. Generic names make your device less obvious.
- Reduces targeted attacks – Without knowing your device type, hackers cannot use specific exploits for your system.
- Protects against social engineering – Your device name can reveal details that scammers use to trick you.
- Improves Wi-Fi security – Other users on public networks cannot easily identify your device.
- Helps with privacy – A neutral name keeps your personal details hidden from others.
- Makes you a smaller target – Hackers often look for devices with obvious names first.
Part 2: How to Rename Your Device For Better Security Windows [Windows 11 & 10]
Now you know why renaming matters. Let’s learn how to do it. We will show you three different methods. Choose the one that feels easiest for you.
Renaming your computer on Windows 10 or 11 is simple, with only slight differences in where the settings are located. If you make a mistake—no worries! You can always change the name again. Just be sure to restart your device once you’re done to apply the changes.
For Windows 11 (Detailed Steps):
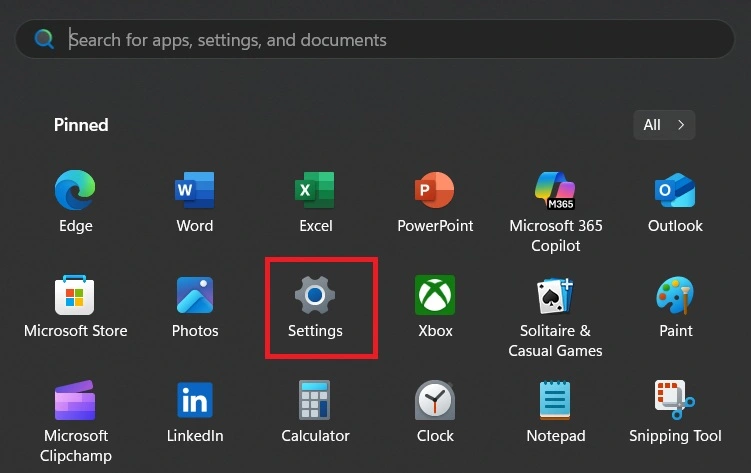
Step 1: On Taskbar, click Windows icon. A menu will pop up. Look for “Settings” in this menu. Click on “Settings.”
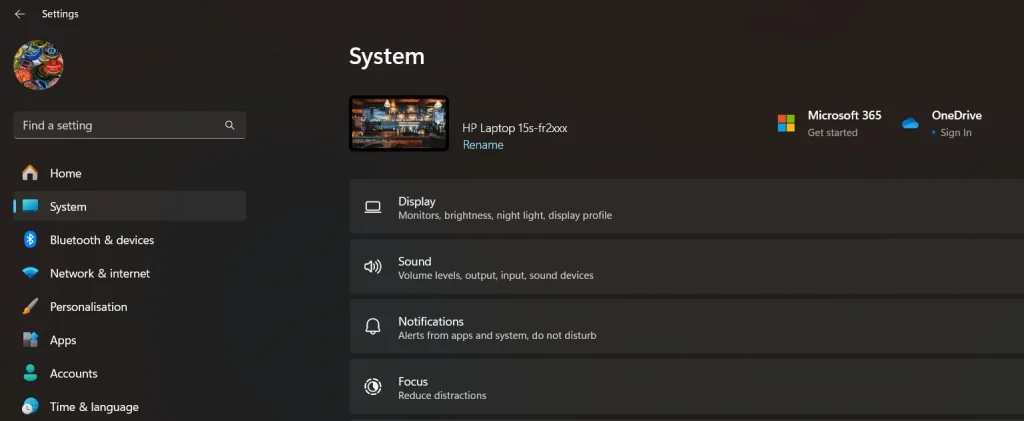
Step 2: The Settings app will open. Find “System” at the top of this list. Click on “System.” This opens the System settings page.
Step 3: You are now on the System page. Look at the left sidebar again. Scroll down to find more options. At the very bottom, you will see “About.” Click on “About.” This page shows information about your computer.
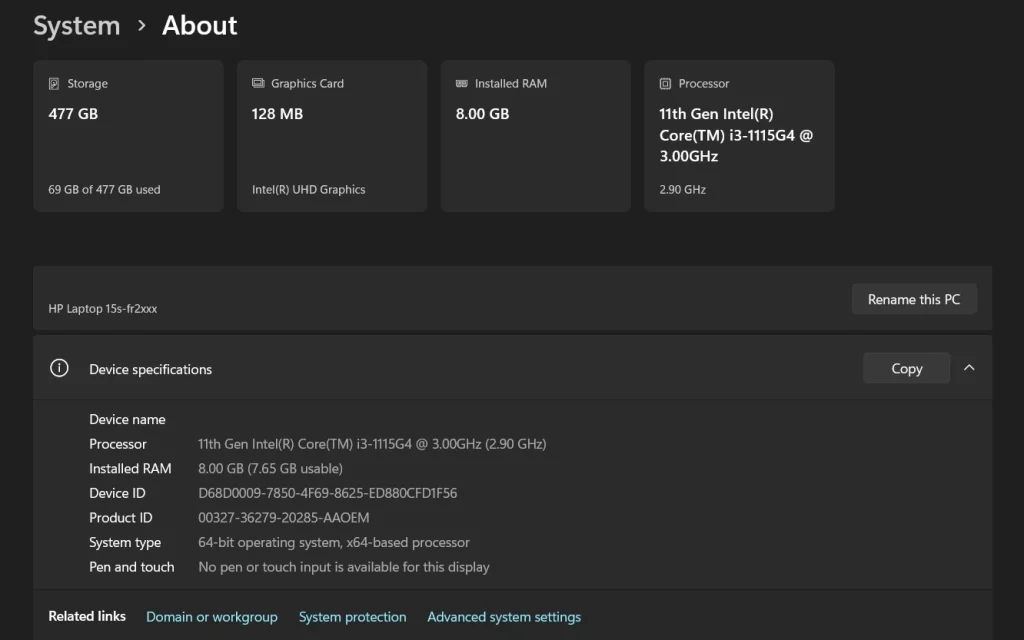
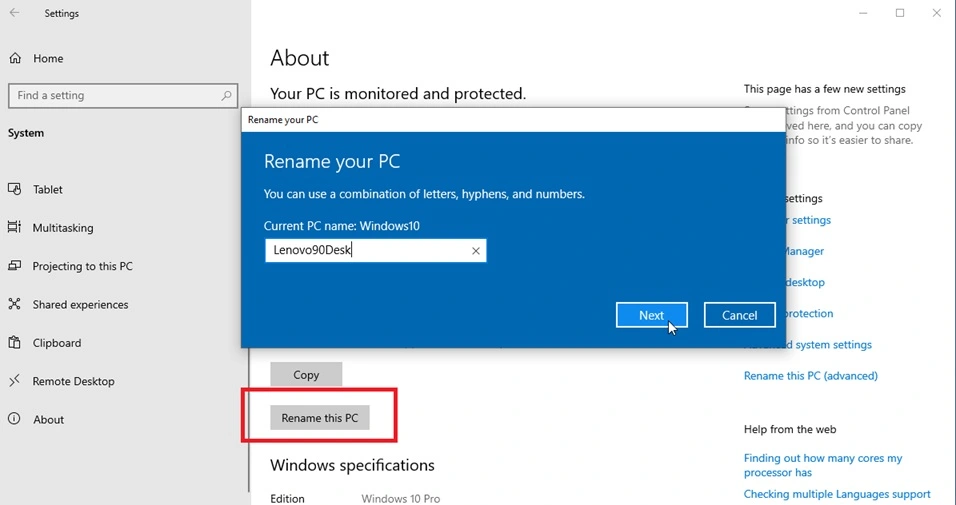
Step 4: Look for a section called “Device specifications.” This section is in the middle of the page. Under this heading, you will see your current PC name. Right beside the PC name, you’ll find a button labeled “Rename this PC.” Simply click on it to proceed.
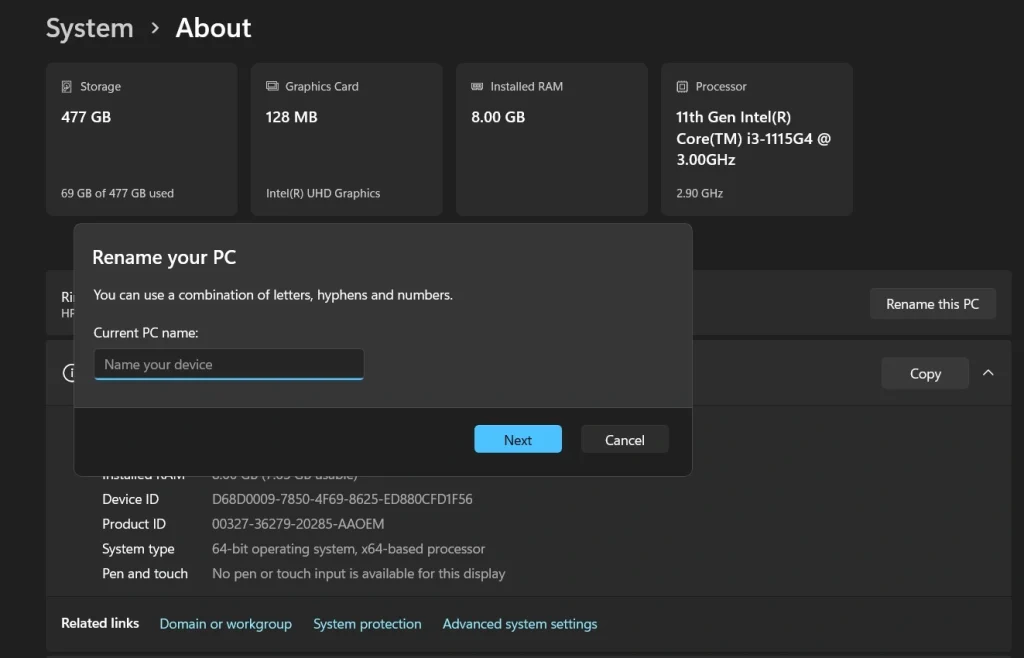
Step 5: A small window will appear. This window asks for a new computer name. Click in the text box. Delete the old name completely. Type your new device name. Use only letters from A to Z. Use numbers from 0 to 9. You can also use hyphens (-). Do not use spaces. Do not use symbols like @ or #. Keep the name short. Use 15 characters or fewer.

Step 6: Look at your new name. Make sure it looks correct. Click the “Next” button when ready. Windows will ask about restarting. After renaming your computer, you’ll have two options: restart now or restart later. If you want the changes to take effect immediately, click Restart now—but make sure to save any open work first. Your device will reboot and apply the new name.
The new name will be active after a restart.
For Windows 10 (Detailed Steps):
Step 1: Click the Start button and choose “Settings.”Click “System” from the options.
Step 2: Click “About” in the left menu. In the “Device specifications” section, click on Rename this PC. Enter your desired device name, making sure it follows Windows 11’s naming conventions. Select Next, and when prompted, restart your computer to finalize the changes.
Alternative Method Using Run Dialog (Both Versions):
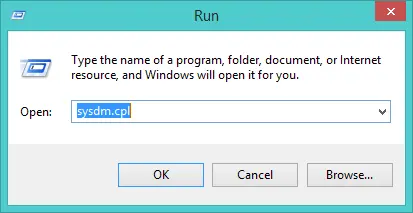
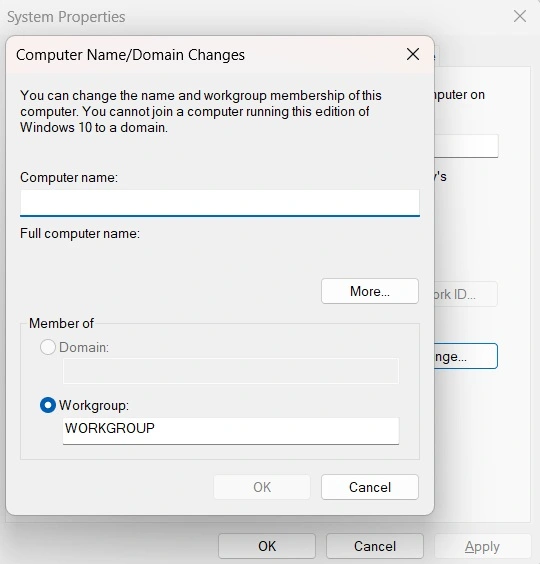
Step 1: Press Windows + R. Type sysdm.cpl and hit Enter.
Step 2: In the window that opens, switch to the Computer Name tab and click Change….
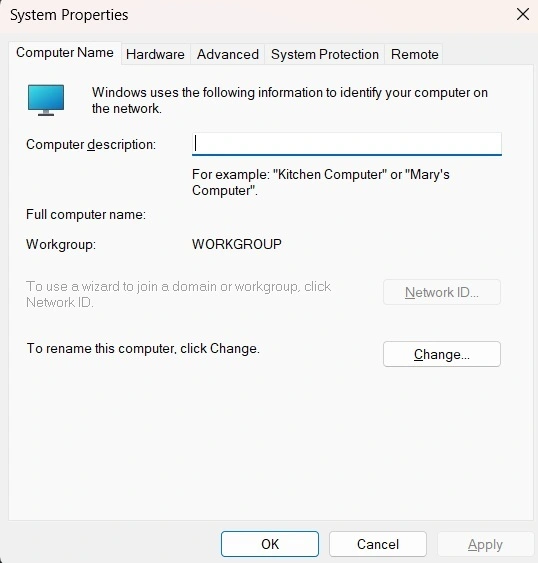
Step 3: Remove the previous name and enter your new one. Use only letters, numbers, and hyphens. No spaces or special symbols. Keep it under 15 characters. Click OK and Yes when asked for permission. If prompted, click OK again. Click Restart Now when asked.
Verification Steps:
Step 1: Your computer has finished restarting. Now you need to check if the name change worked. Open the Settings app again. Use the same method you used before. Right-click the Start button for Windows 11. Click the Start button for Windows 10. Find and click “Settings.”
Step 2: Go to the System section. Click on “System” from the main Settings page. Then click on “About” from the left menu. This takes you to the same page where you changed the name.
Step 3: Look at the “Device specifications” section. Find the line that shows your computer name. Check if it displays your new device name. If you see the new name, the change was successful. If you still see the old name, the change did not work. You may need to try the process again.
Author’s Tip
Choose your new device name carefully. The best names are short, simple, and tell nothing about you or your computer. Avoid using your real name, birth year, or device model. Good examples include “WorkStation1,” “HomePC,” or “Desktop-A.” These names are boring on purpose. They do not give hackers any useful information.
Also, avoid common names that many people use. Names like “MyComputer” or “PC” are too obvious. Think of something unique but neutral. You can use a random word generator if you need ideas. Just make sure the name has no connection to you personally. Remember, the goal is to blend in and stay invisible to potential threats.
Part 3: Other Security Tips
Beyond renaming your device, there are many other ways to stay safe online. These tips work together to create strong protection. When you rename your device for better security on Windows, and follow these other steps, you build a solid defense against cyber threats.
Here are important security measures to consider:
- Use strong, unique passwords – Create different passwords for each account. Use a password manager to keep track of them all.
- Enable two-factor authentication – Add an extra layer of security to your important accounts like email and banking.
- Keep Windows updated – Install security updates as soon as they are available. Turn on automatic updates if possible.
- Use antivirus software – Install trusted antivirus protection and keep it running at all times.
- Be careful with downloads – Only download software from official websites. Avoid clicking suspicious links or email attachments.
- Secure your Wi-Fi network – Use WPA3 encryption and change the default router password. Hide your network name if possible.
- Regular backups – Back up important files to an external drive or cloud service. This protects you if ransomware strikes.
- Limit user privileges – Do not use administrator accounts for daily tasks. Create a standard user account for regular use.
Part 4: Common Mistakes to Avoid
Many people make simple mistakes when trying to rename your device for better security in Windows. These errors can actually make you less safe. The biggest mistake is choosing a name that reveals too much information. Never use your full name, address, or phone number in your device name.
Another common error is using names that are too obvious. Names like “Gaming-PC” or “Work-Laptop” tell hackers what your computer is used for. This information helps them plan attacks. Stick to neutral names that could apply to any computer.
Some people also forget to restart their computer after changing the name. The new name only takes effect after a reboot. Without restarting, you are still using the old, less secure name. Always complete the process by restarting when prompted.
Part 5: Advanced Security Considerations
For extra protection, consider these advanced steps. First, disable network discovery when possible. This prevents other devices from seeing your computer on the network. You can find this setting in the Network and Sharing Center.
Second, change your device name regularly. Some security experts suggest changing it every few months. This makes it even harder for persistent attackers to track your device. Set a reminder to update your device name as part of regular maintenance.
Third, use different names for different networks. If you travel with a laptop, consider changing the name when you connect to new networks. This adds another layer of anonymity. Just remember to change it back if needed for work or home networks.
Conclusion
Rename your device for better security Windows is a simple but powerful step. It costs nothing and takes just minutes to complete. Yet it provides real protection against common cyber threats. This small change makes you a harder target for hackers and protects your privacy.
Security is not about one big solution. It is about many small steps working together. Renaming your device is just the beginning. Combine it with other security practices for the best protection. Stay alert, keep learning, and update your defenses regularly. Your digital safety depends on the choices you make today.
FAQs
Q: Will renaming my device cause any problems with software or networks?
A: No, renaming your device should not cause problems with most software or networks. Some programs that rely on the computer name might need to be reconfigured. Network shares and remote access tools may also need updates. But these issues are rare and easy to fix. The security benefits far outweigh these small inconveniences.
Q: How often should I rename my device for security?
A: Most experts suggest changing your device name every 3-6 months for maximum security. However, even changing it once provides significant benefits. If you travel frequently or use public networks often, consider changing it more regularly. For home users on secure networks, changing it once or twice a year is usually enough.
Q: Can I use special characters or spaces in my device name?
A: Windows device names have specific rules. You can use letters, numbers, and hyphens only. Spaces and special characters like @, #, or % are not allowed. The name must be 15 characters or fewer. Keep it simple and avoid anything that might cause compatibility issues with networks or software.
Author Bio:
Dinesh Lakhwani 

Dinesh Lakhwani, the entrepreneurial brain behind “TechCommuters,” achieved big things in the tech world. He started the company to make smart and user-friendly tech solutions. Thanks to his sharp thinking, focus on quality and the motto of never giving up, TechCommuters became a top player in the industry. His commitment to excellence has propelled the company to a leading position in the industry.
Popular Post


Recent Post

How To Check If Your PC Is Infected? [Complete Guide]
Computers now sit at the center of almost everything we do. Well, yes! From sending emails to watching videos, we depend on them without much thought. Because of this, even a small issue can disrupt daily tasks. One common problem is hidden malware. It does not always show clear signs at first. It can enter […]
Repair Apps And Programs: Repair Apps That Aren’t Working
Computers have become an essential part of everyday life, supporting work, study, communication, and entertainment. Most of these activities rely on apps and programs, so when one stops functioning, even simple tasks can be disrupted. Common problems include error messages, frozen screens, or apps that fail to open. On Windows systems, such issues often arise […]
Troubleshooting Microphone Privacy Settings: Complete Guide
Sound is a basic part of how we use computers today. People attend meetings, record audio, speak to others, and use voice tools almost every day. A working microphone makes all these tasks easy. When the microphone fails, even simple work becomes difficult. Many users first think the device is broken. In reality, the issue […]
Windows Sound Settings – Sound Control Panel: Complete Guide
Sound plays an important role in how we use a computer every day. It supports both work and leisure. You need it for meetings, videos, music, and alerts. When audio fails, even simple tasks become difficult. Many users feel stuck when sound issues appear. This usually happens because they are not familiar with Windows Sound […]
Run a Troubleshooter For PC Issues Windows: Complete Guide
A computer plays an important role in everyday life. People use it for work, study, communication, and entertainment. When a problem appears, it can interrupt everything. Even a small issue can waste time and create frustration. Many users feel unsure about how to fix such problems. They often think they need expert help. In reality, […]
![Adjusting Audio Output Settings Complete Guide [2026]](https://www.techcommuters.com/wp-content/uploads/2026/03/Adjusting-Audio-Output-Settings-Complete-Guide.webp)
Adjusting Audio Output Settings: Complete Guide [2026]
Sound is part of almost everything we do on a computer. It lets you watch videos, join calls, play music, and hear alerts. When the audio stops working the right way, it can interrupt both work and daily use. That is why adjusting audio output settings matters for every user. Many people get unsure when […]

Artificial Intelligence Explained: Concepts, Terminology, Benefits, and Future Trends
Artificial Intelligence, or AI, is basically computers doing things that usually need a human brain. We’re talking about stuff like learning from experience, figuring out problems, understanding language, and making decisions. It’s not magic, just a lot of data, pattern-spotting, and math behind the scenes. Now, AI doesn’t actually think or feel like we do. […]

Resolving Microphone Detection Problems: Latest Guide [2026]
Microphones are important tools in daily life. People use them for office meetings, online classes, interviews, gaming, customer support, and content creation. When a system fails to detect a microphone, communication stops at once. This situation can cause stress and confusion. Many users believe the microphone is damaged. In reality, most problems are simple and […]
How To Switch To A Dark Background Theme In Windows [2026]
Most people spend many hours each day in front of a computer screen. Office work, online classes, editing, browsing, and streaming all require long screen time. A bright white background may look clean at first. However, over time, it can feel sharp and tiring. The strong contrast between white backgrounds and black text may cause […]
How to Switch From Local To Microsoft Account On Windows
Many users begin with a local account when they set up a new Windows computer. A local account works only on that single device. It stores settings, files, and preferences locally. It does not connect to online Microsoft services. For basic offline use, it works well. However, as digital needs grow, many users want better […]

